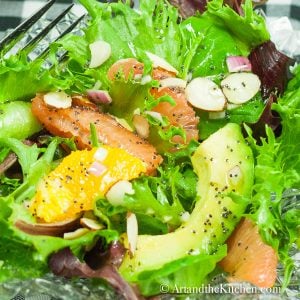
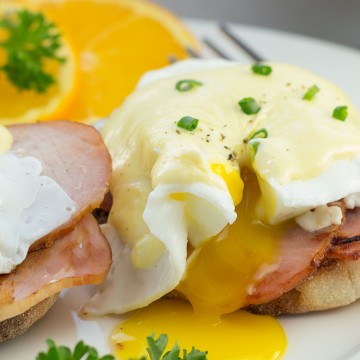
Search Results for: label/egg dishes


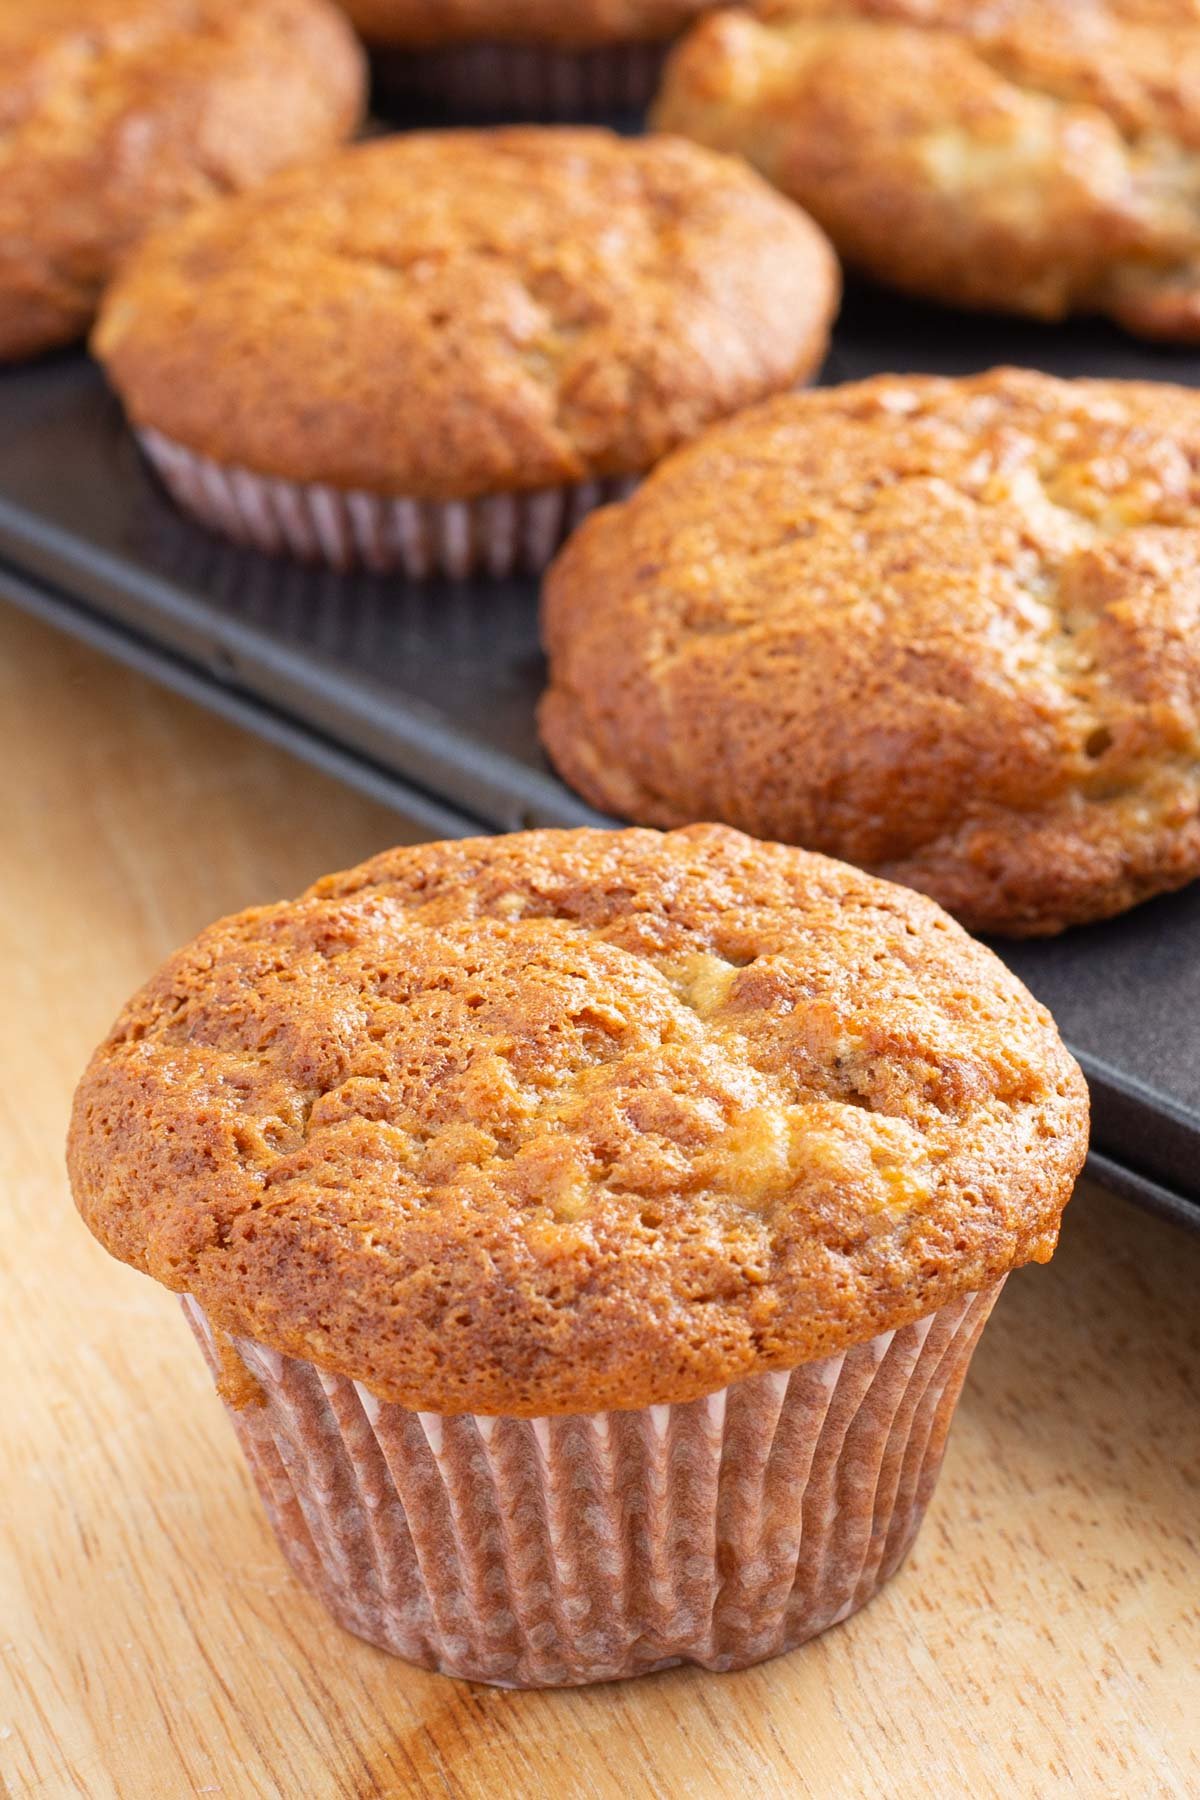
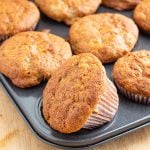
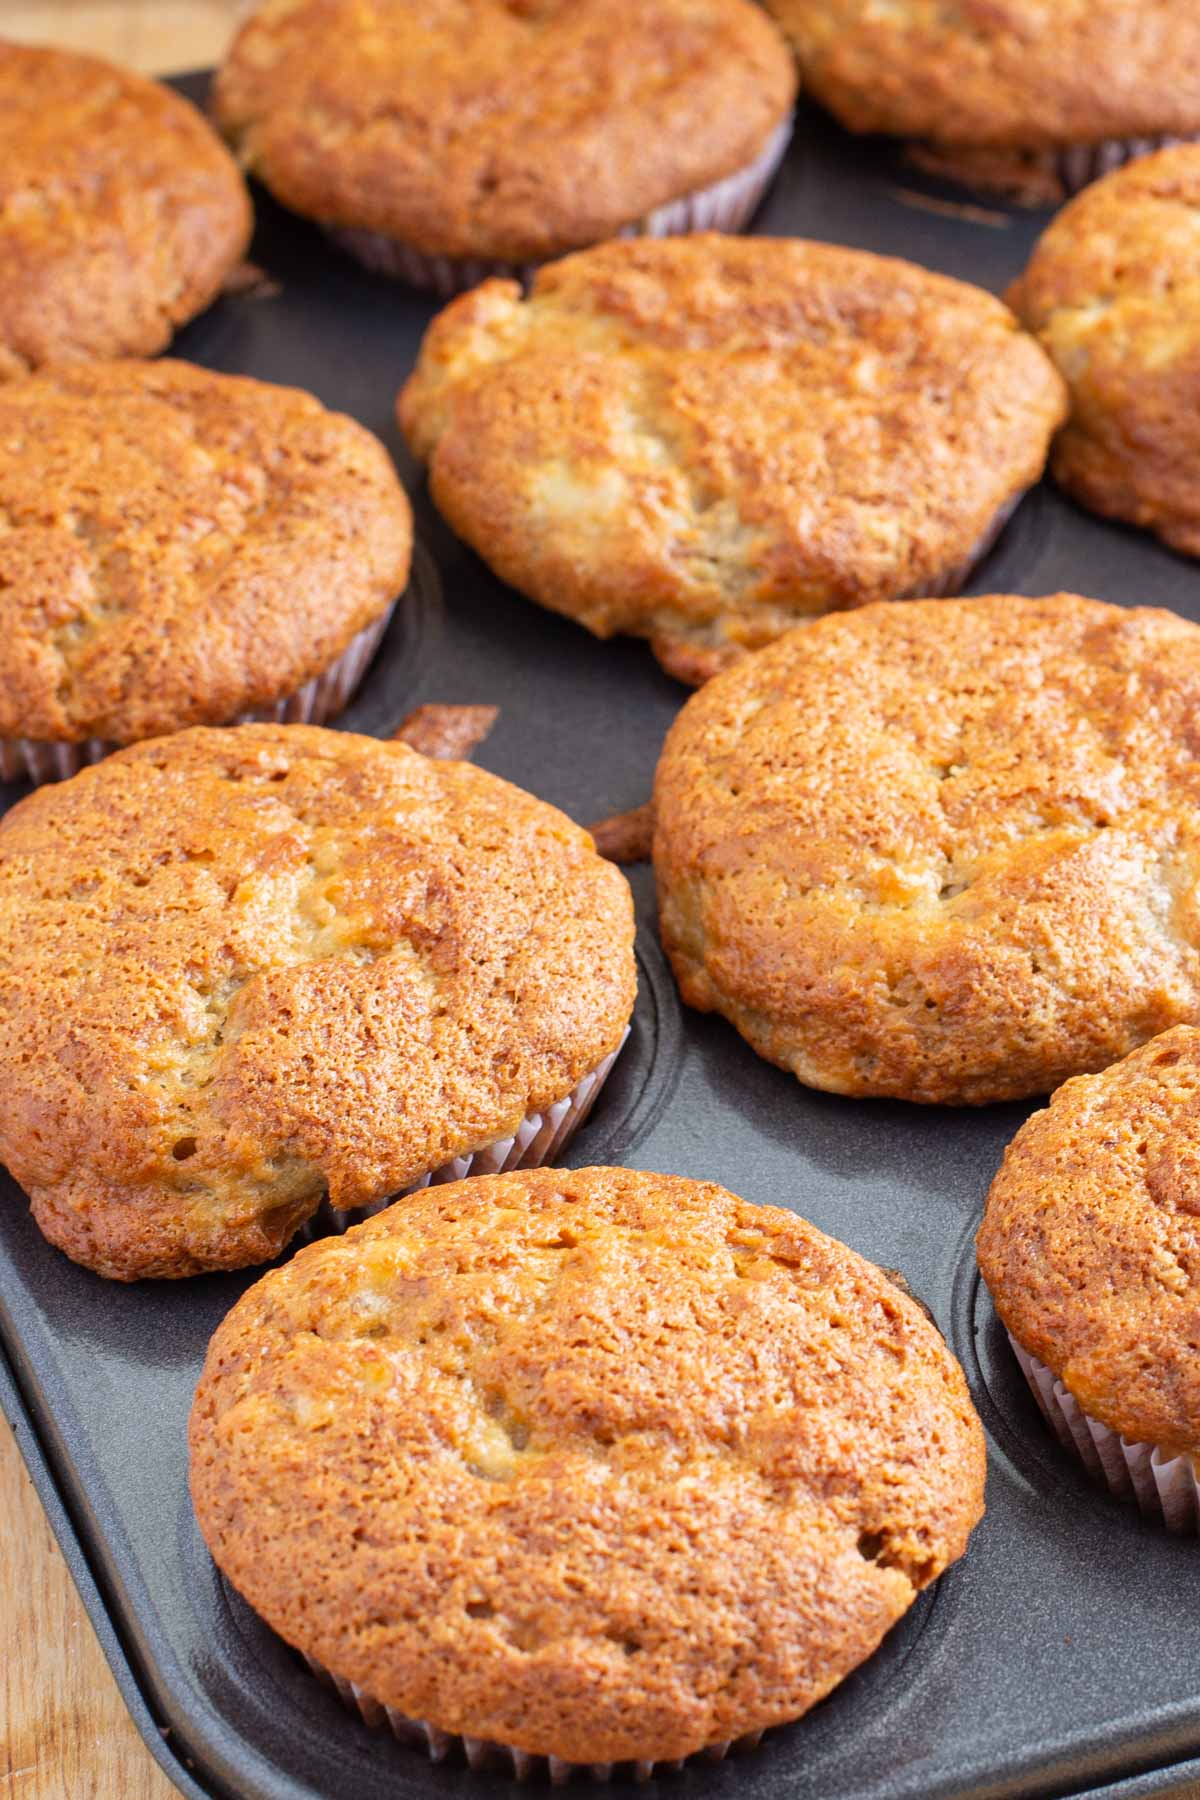
Best Banana Muffins
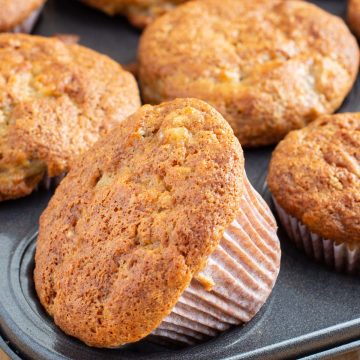
A light and moist recipe for Banana Muffins. One of my best recipes for using up overripe bananas.
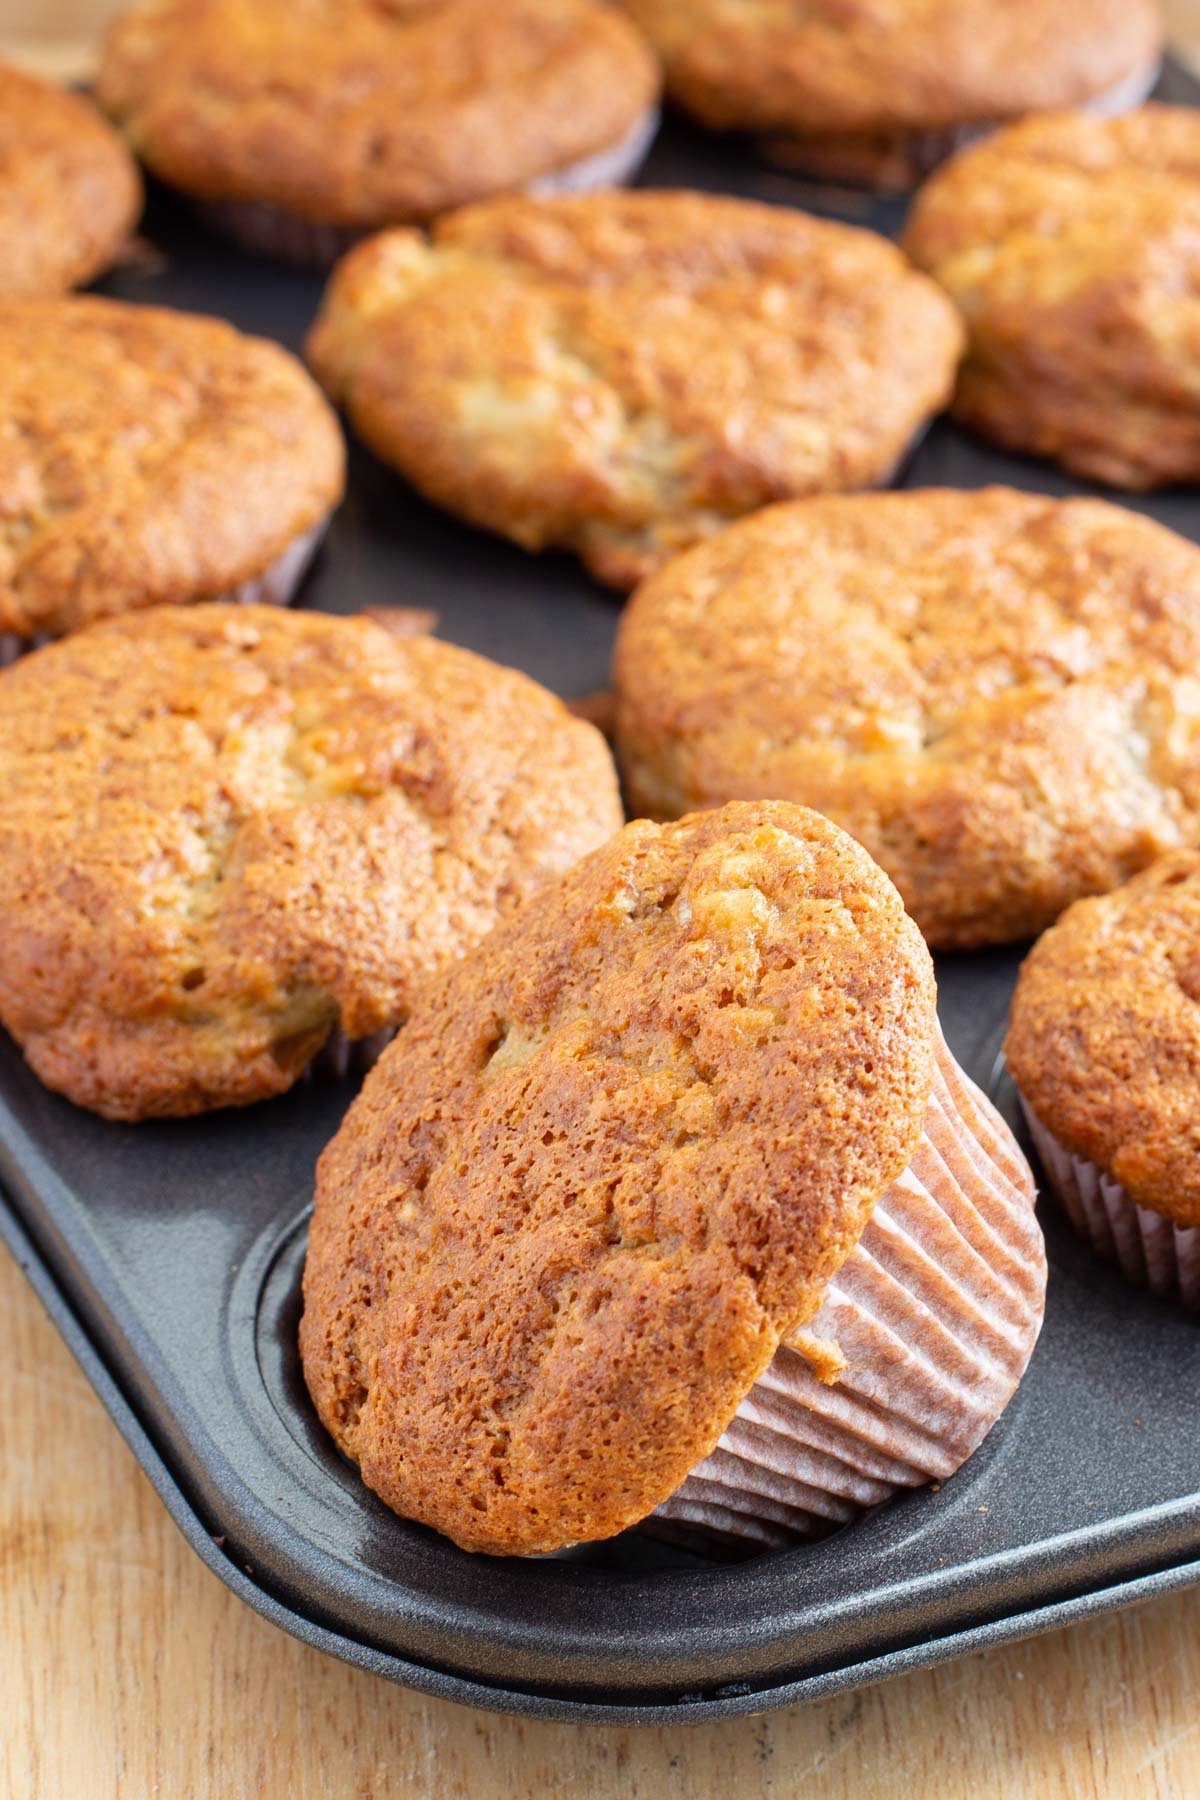
Best Banana Muffins bake up with crispy muffin tops and a soft, moist center. This banana muffin recipe is so easy to make and ready in only 30 minutes! You will want to buy extra bananas just to have some that become overripe to make these muffins as well as my Best Ever Banana Bread or Banana Cake with Cream Cheese Frosting.
Tips for making these muffins
Mash the bananas slightly when measuring. Two cups of mashed bananas are about 4 medium-sized bananas.
Whisk the dry ingredients together to ensure they are fully incorporated.
Do not over-bake the muffins or they become dry. Test for doneness by inserting a toothpick into the center. The toothpick should come out clean with no wet batter on it.
Can you make mini muffins with this recipe?
For sure, this recipe will make about 36 mini banana muffins.
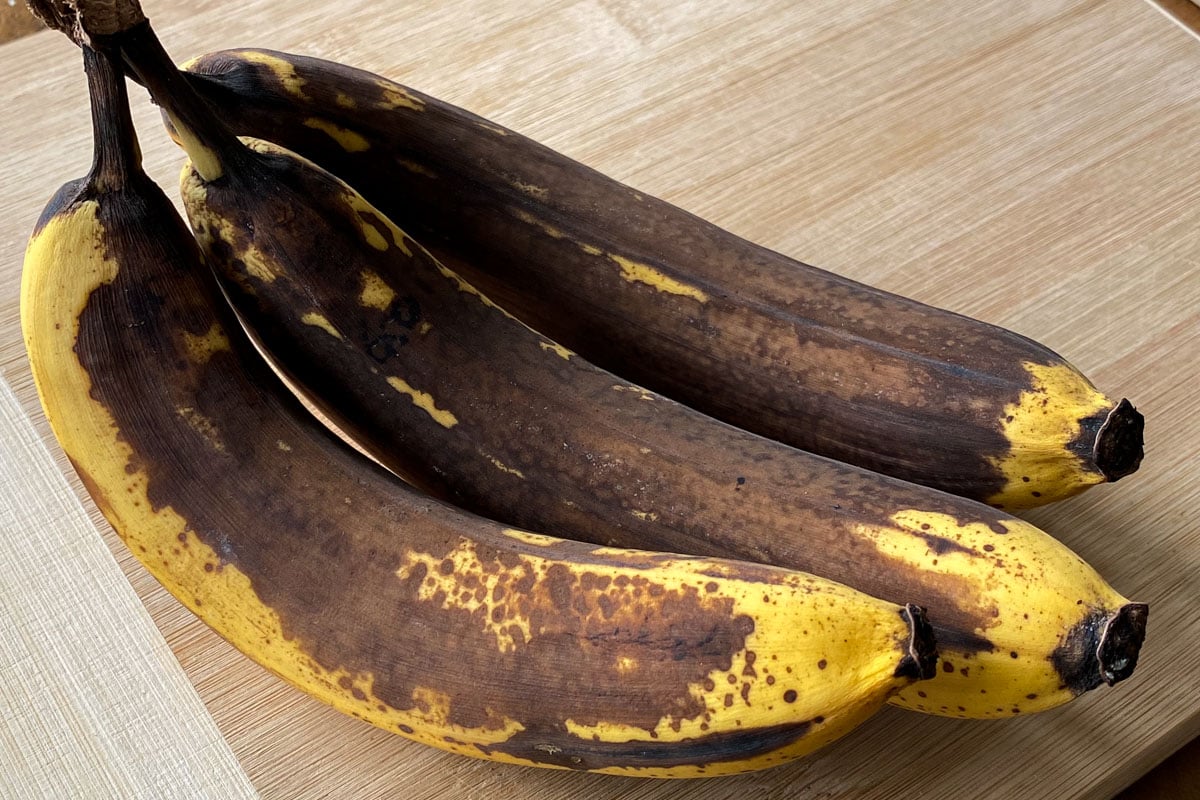
Best Bananas to use for baking
Overripe bananas are the key to great flavor for baking. The banana peel should be dark brown, almost black with patches of yellow. Overripe bananas become naturally sweeter and enhance the flavor of any banana recipe.
Can you use frozen bananas?
Yes, thaw completely to room temperature. Strain the extra liquid out and discard it.
If you have overripe bananas and can't use them right away, put them in a freezer bag and freeze for later use. I freeze mine with the peels on for 3-6 months.
Additional ingredients you can add to banana muffins.
Chocolate chips
Chopped nuts like walnuts or pecans.
Teaspoon of cinnamon
This post was originally published March 6, 2016. Occasionally I update with fresh tips, content, and photos. Current update January 14, 2023.
Best Banana Muffins
Best Banana Muffins bake up with crispy muffin tops and a soft, moist center.
Servings: 12
Calories: 215kcal
Ingredients
- 1 ½ cups flour
- ½ teaspoon salt
- 2 teaspoons baking powder
- 1 teaspoon baking soda
- 4 overripe bananas 2 cups mashed
- ½ cup sugar
- 1 egg
- ½ cup oil
- 1 teaspoon pure vanilla extract
- ⅛ cup milk
Instructions
- Preheat the oven to 350º F.
- Place paper cupcake liners into muffin pan.
- Whisk together the flour, salt, baking powder and baking soda.
- In a large bowl, beat together the bananas, sugar, egg, oil and vanilla extract.
- Blend in the flour mixture, and mix on low speed just until combined with the wet ingredients.
- Stir the milk into the banana mixture. Blend just until combined. Do not over-mix.
- Divide equally into muffin cups.
- Bake 350º F for 30 minutes or until toothpick comes out clean when inserted into the center of the muffin.
- Allow to cool and bit, then transfer to cool completely on wire rack.
Nutrition
Calories: 215kcal | Carbohydrates: 30g | Protein: 3g | Fat: 10g | Saturated Fat: 1g | Polyunsaturated Fat: 3g | Monounsaturated Fat: 6g | Trans Fat: 0.04g | Cholesterol: 14mg | Sodium: 196mg | Potassium: 234mg | Fiber: 1g | Sugar: 13g | Vitamin A: 49IU | Vitamin C: 3mg | Calcium: 39mg | Iron: 1mg
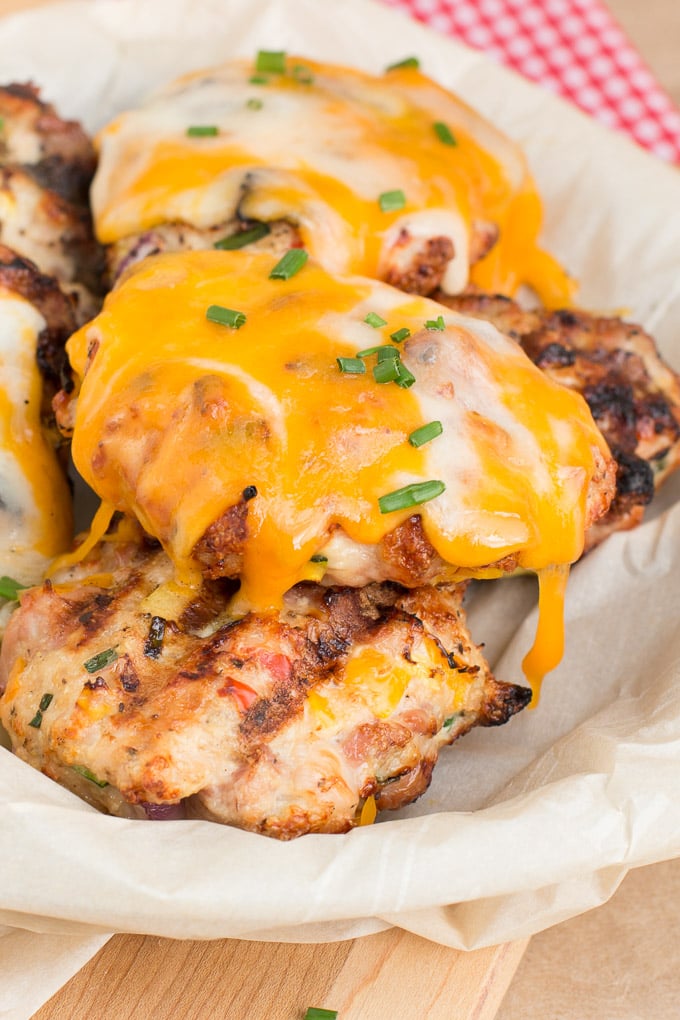
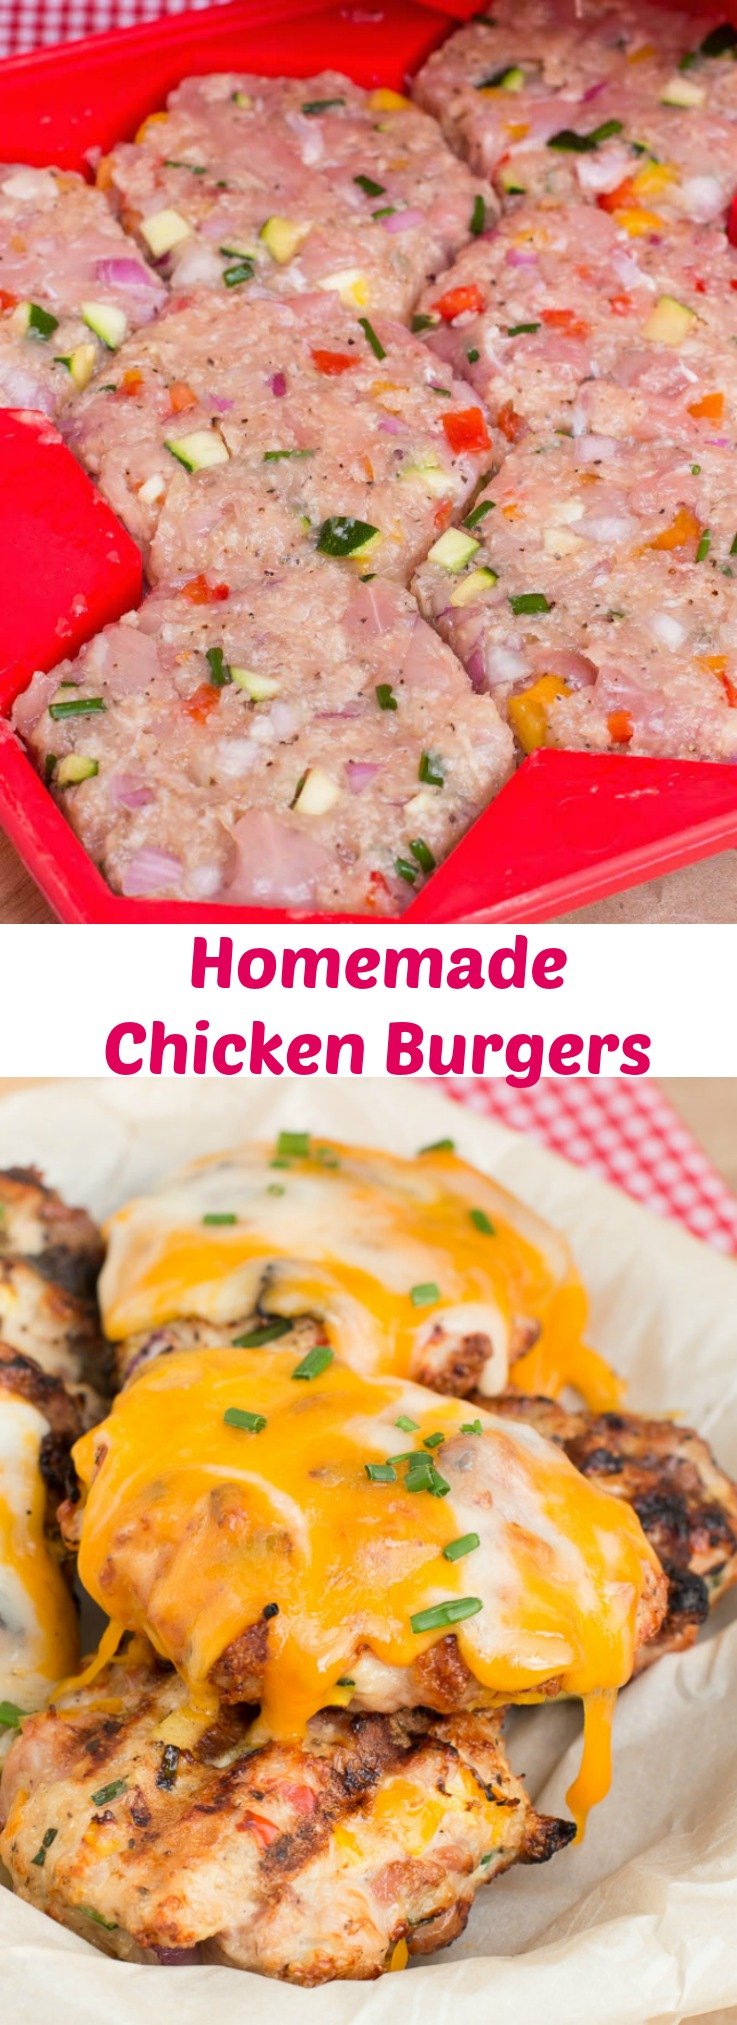
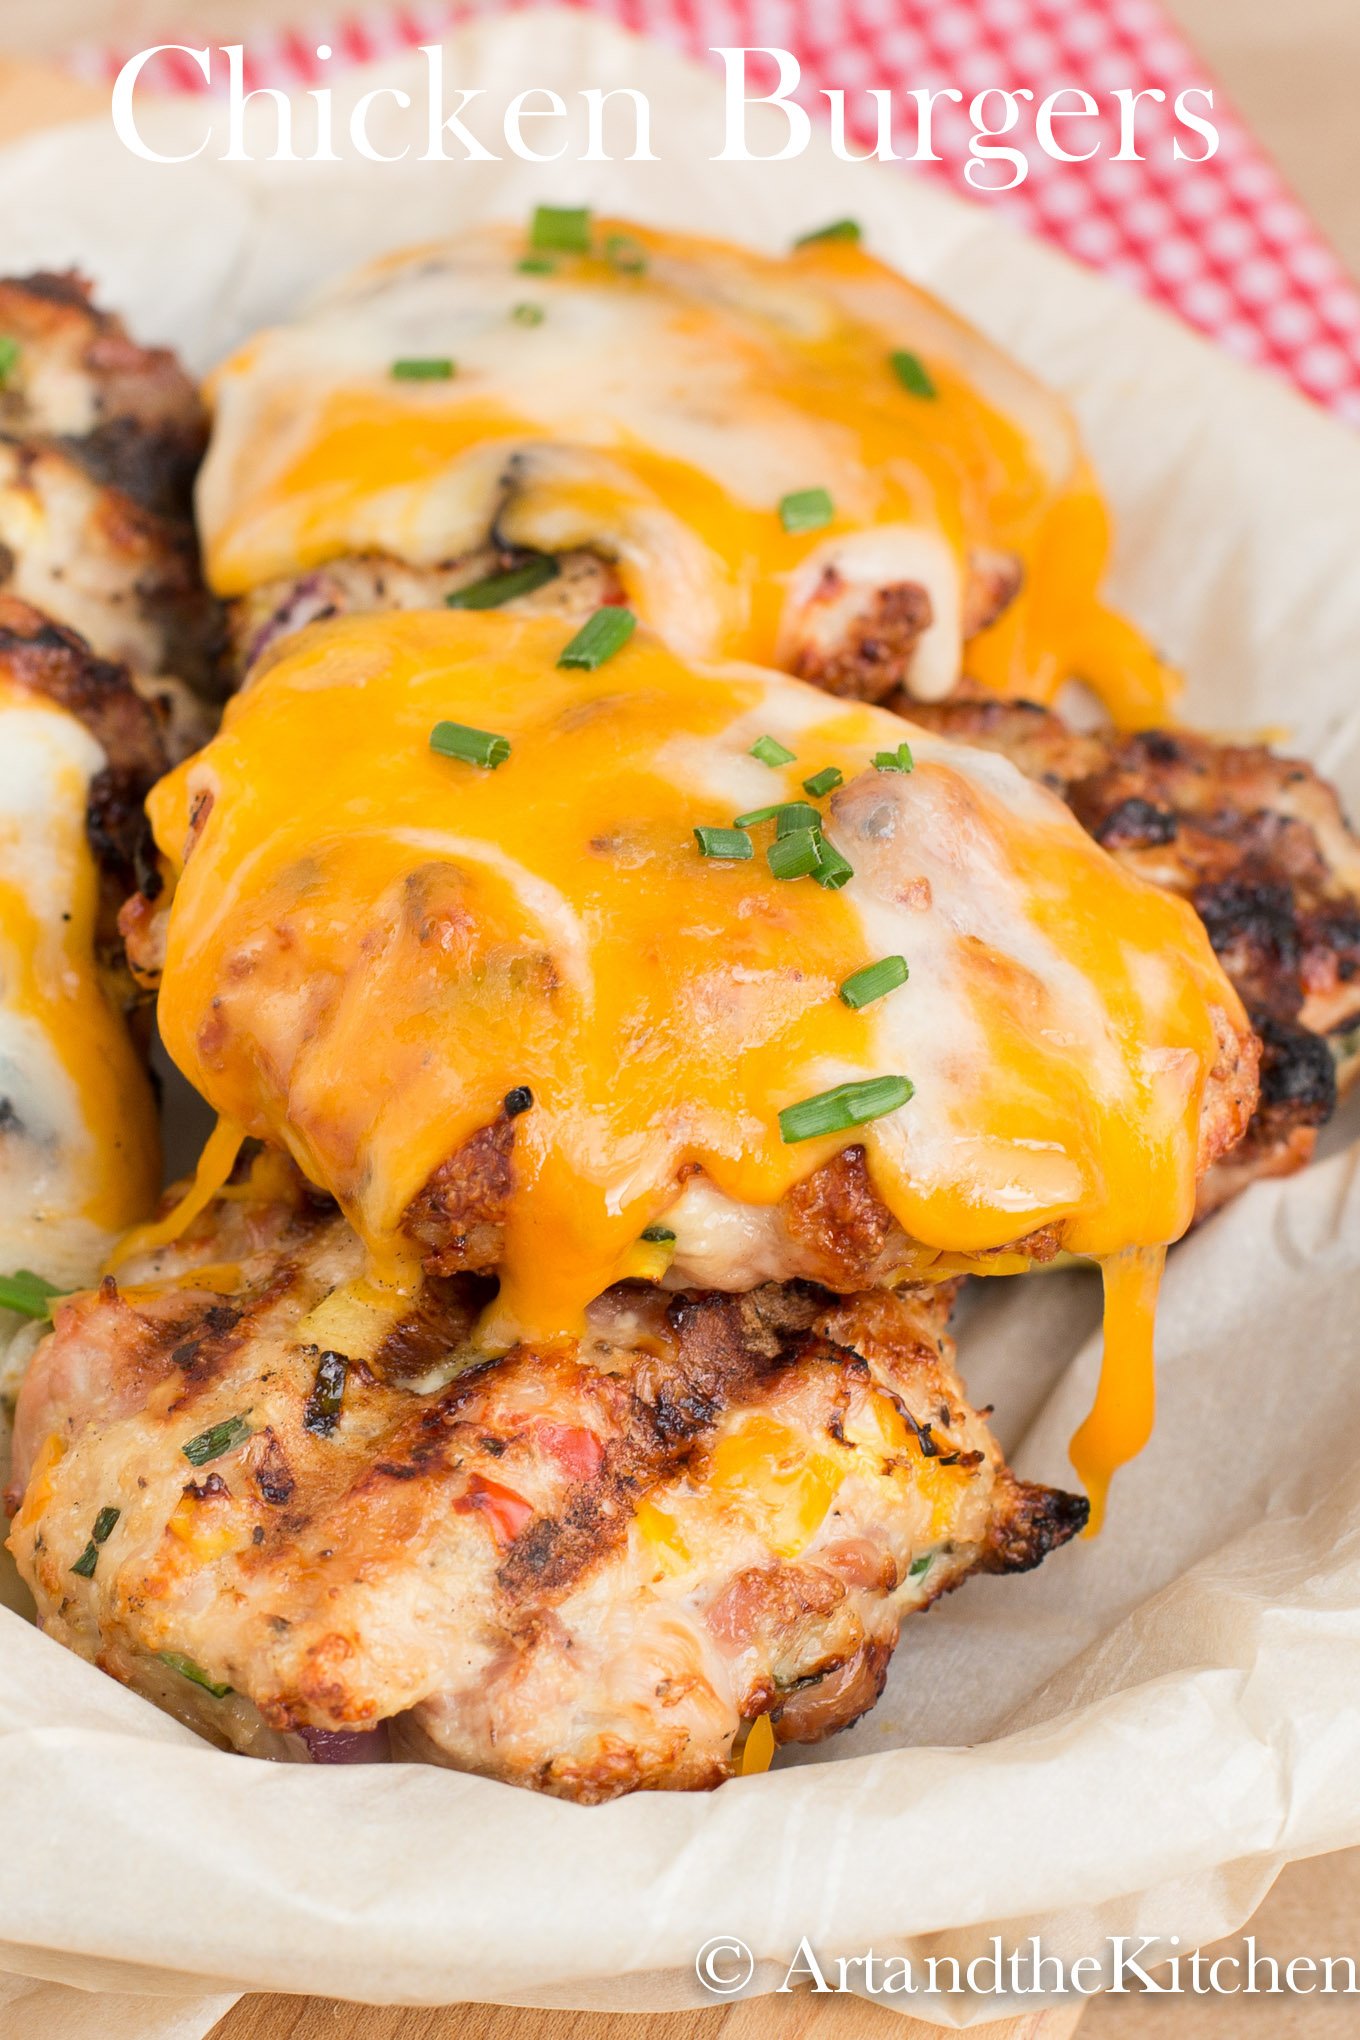
Homemade Chicken Burgers
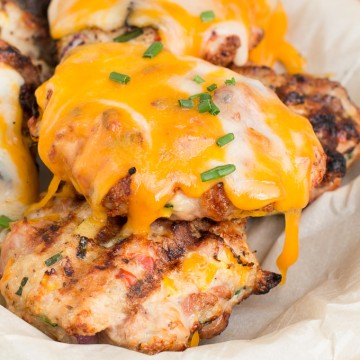
Homemade Chicken burgers are a great alternative to beef. These chicken burgers are lean, tender and moist. Perfect for the grill, pan fried or baked in the oven.
This recipe is from my husband's cousin Kim. We enjoyed some great grilled chicken burgers when we visited a while ago in Winnipeg. We don't get together that often, but when we do all the secret childhood/teenage stories come out and we laugh until our bellies hurt.
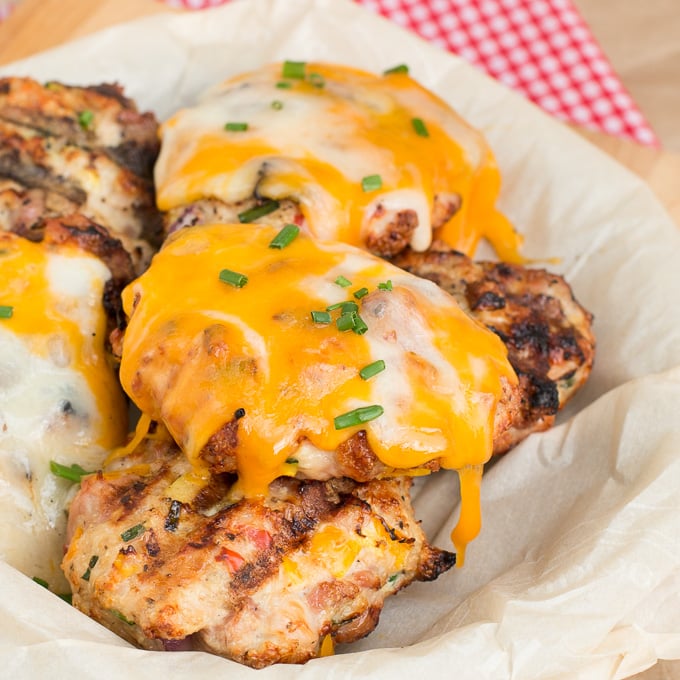
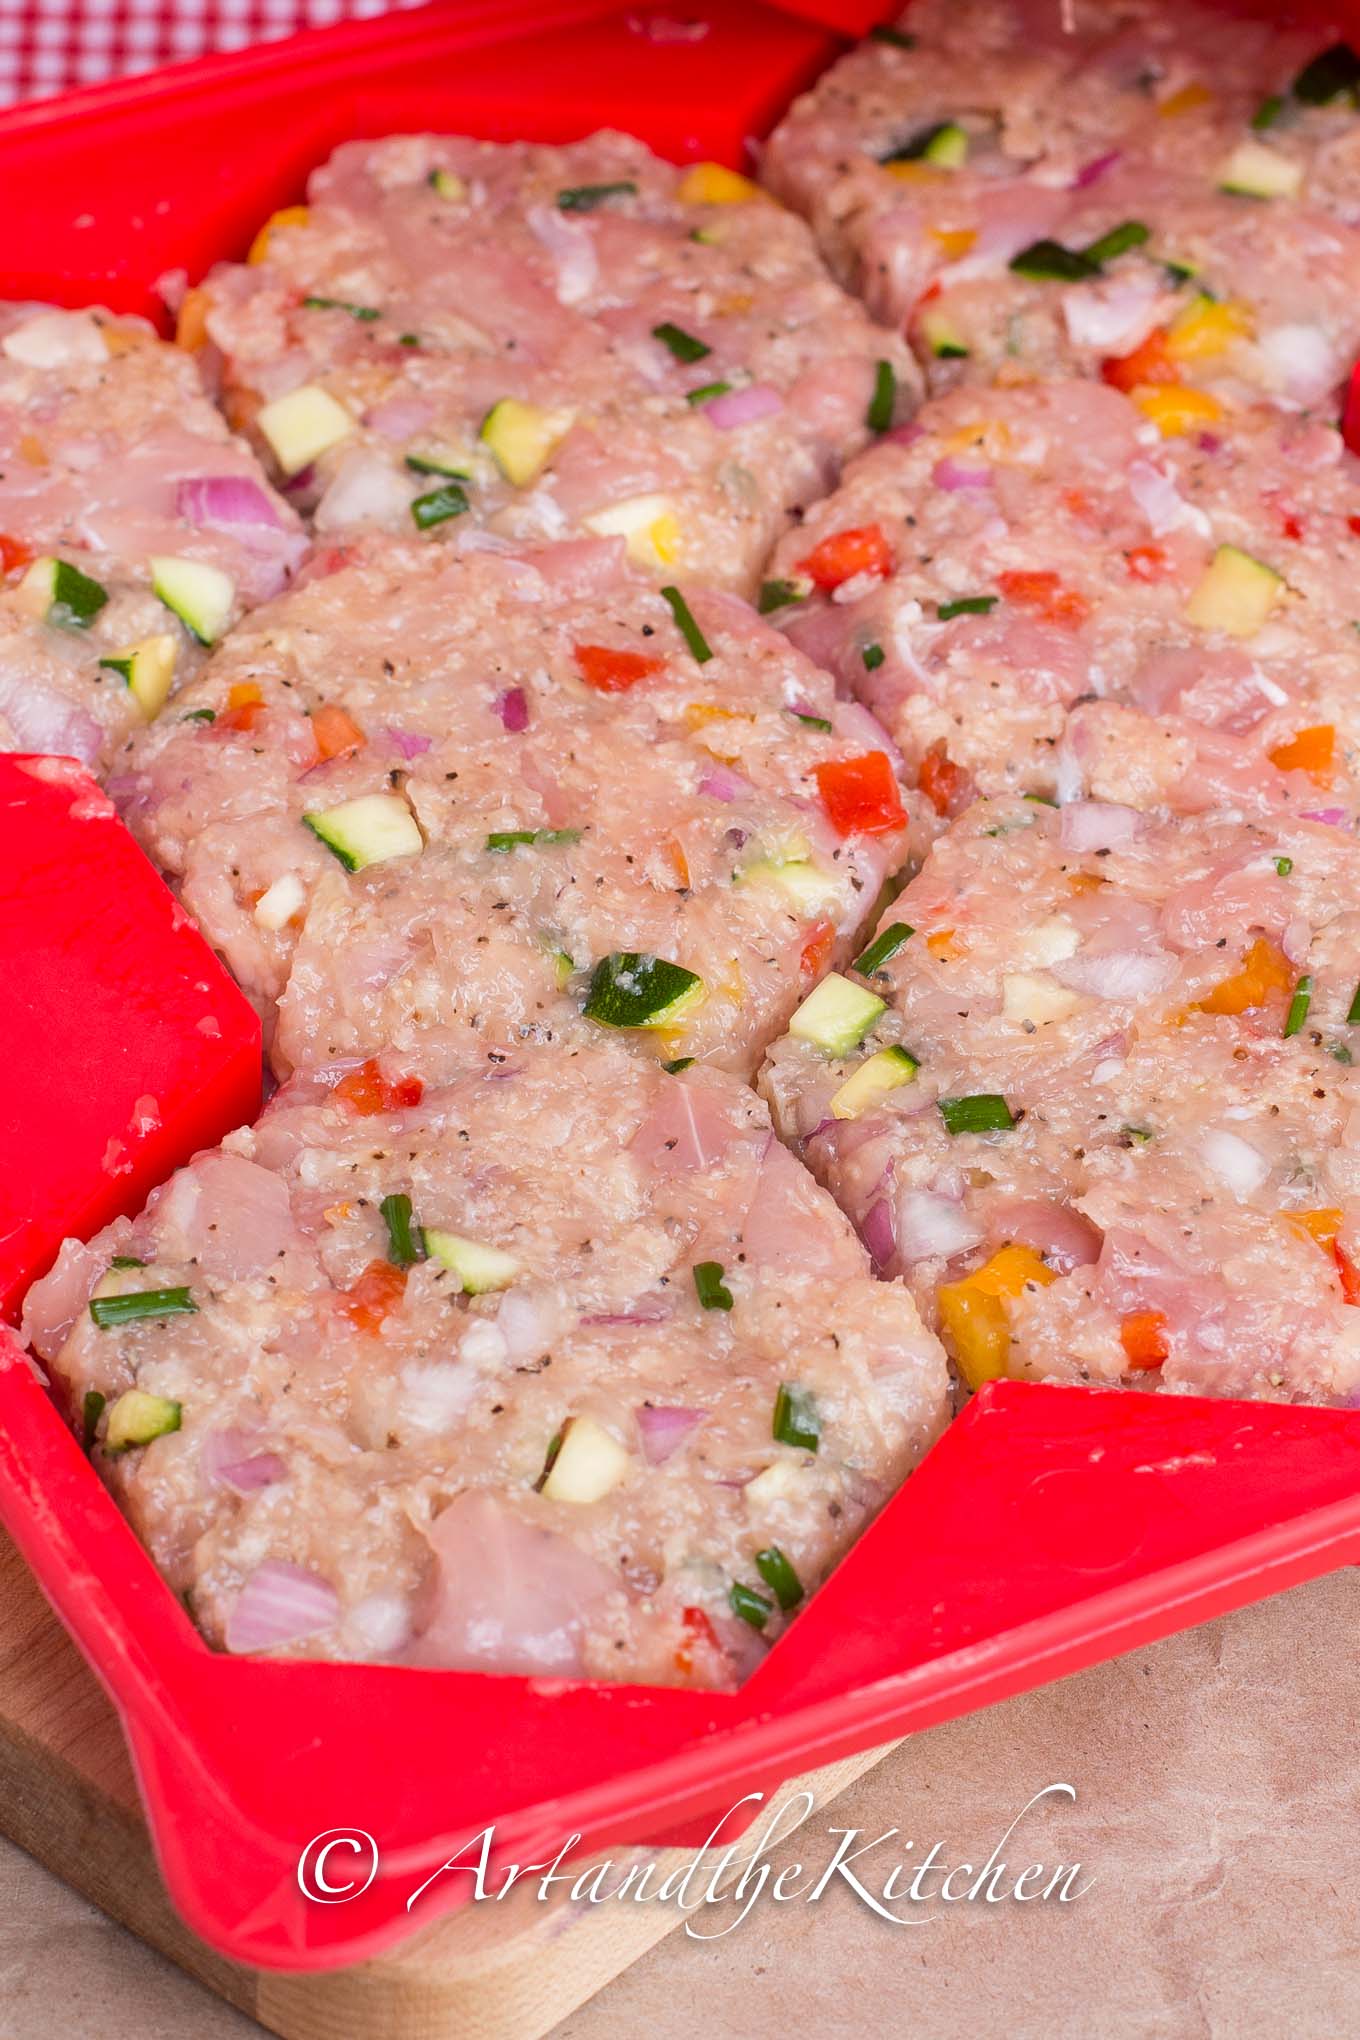
I added a few things to Kim's original recipe. In addition to using ground chicken I added small cut up chunks of chicken, this gave the burgers a great texture. For this recipe I used dark chicken meat, but chicken breasts will also work but may be slightly drier. These grilled up nicely on the BBQ, just be sure to spray the grill with cooking spray so the burgers don't stick. Keep it lean, or serve up with some melted cheese and top with your favourite burger toppings such as tomatoes, lettuce, peppers, pickles etc.

I like to make burgers ahead of time and store in my convenient Shape+Store Burger Master to form perfect burger shapes. These burgers also freeze very well so double the batch and keep some on hand in the freezer.

Homemade Chicken Burgers
These chicken burgers are lean, tender and moist. Perfect for the grill, pan fried or baked in the oven.
Servings: 8
Calories: 142kcal
Ingredients
- 1 lb ground chicken
- ½ lb chicken chopped into small pieces raw, white or dark pieces
- ½ cup red onion diced
- ½ cup zucchini diced
- ½ cup mix of red yellow and orange bell peppers
- 2 tablespoon fresh chopped chives
- 1 teaspoon kosher salt
- 1 teaspoon fresh ground pepper
- ½ cup panko bread crumbs
- 1 egg whisk slightly with fork
Instructions
- In large bowl combine together ground chicken and chopped chicken.
- Add red onion, zucchini, peppers and chives.
- Add panko breadcrumbs, salt and pepper.
- Add egg and combine together. Do not overwork mixture.
- Form into patties.
- Oil grill with cooking spray or oil to prevent burgers from sticking.
- Grill medium heat approximately 6- 7 minutes per side or until internal temperature 170º
Nutrition
Calories: 142kcal | Carbohydrates: 5g | Protein: 14g | Fat: 7g | Saturated Fat: 2g | Cholesterol: 79mg | Sodium: 371mg | Potassium: 391mg | Fiber: 1g | Sugar: 1g | Vitamin A: 390IU | Vitamin C: 14.7mg | Calcium: 17mg | Iron: 1mg
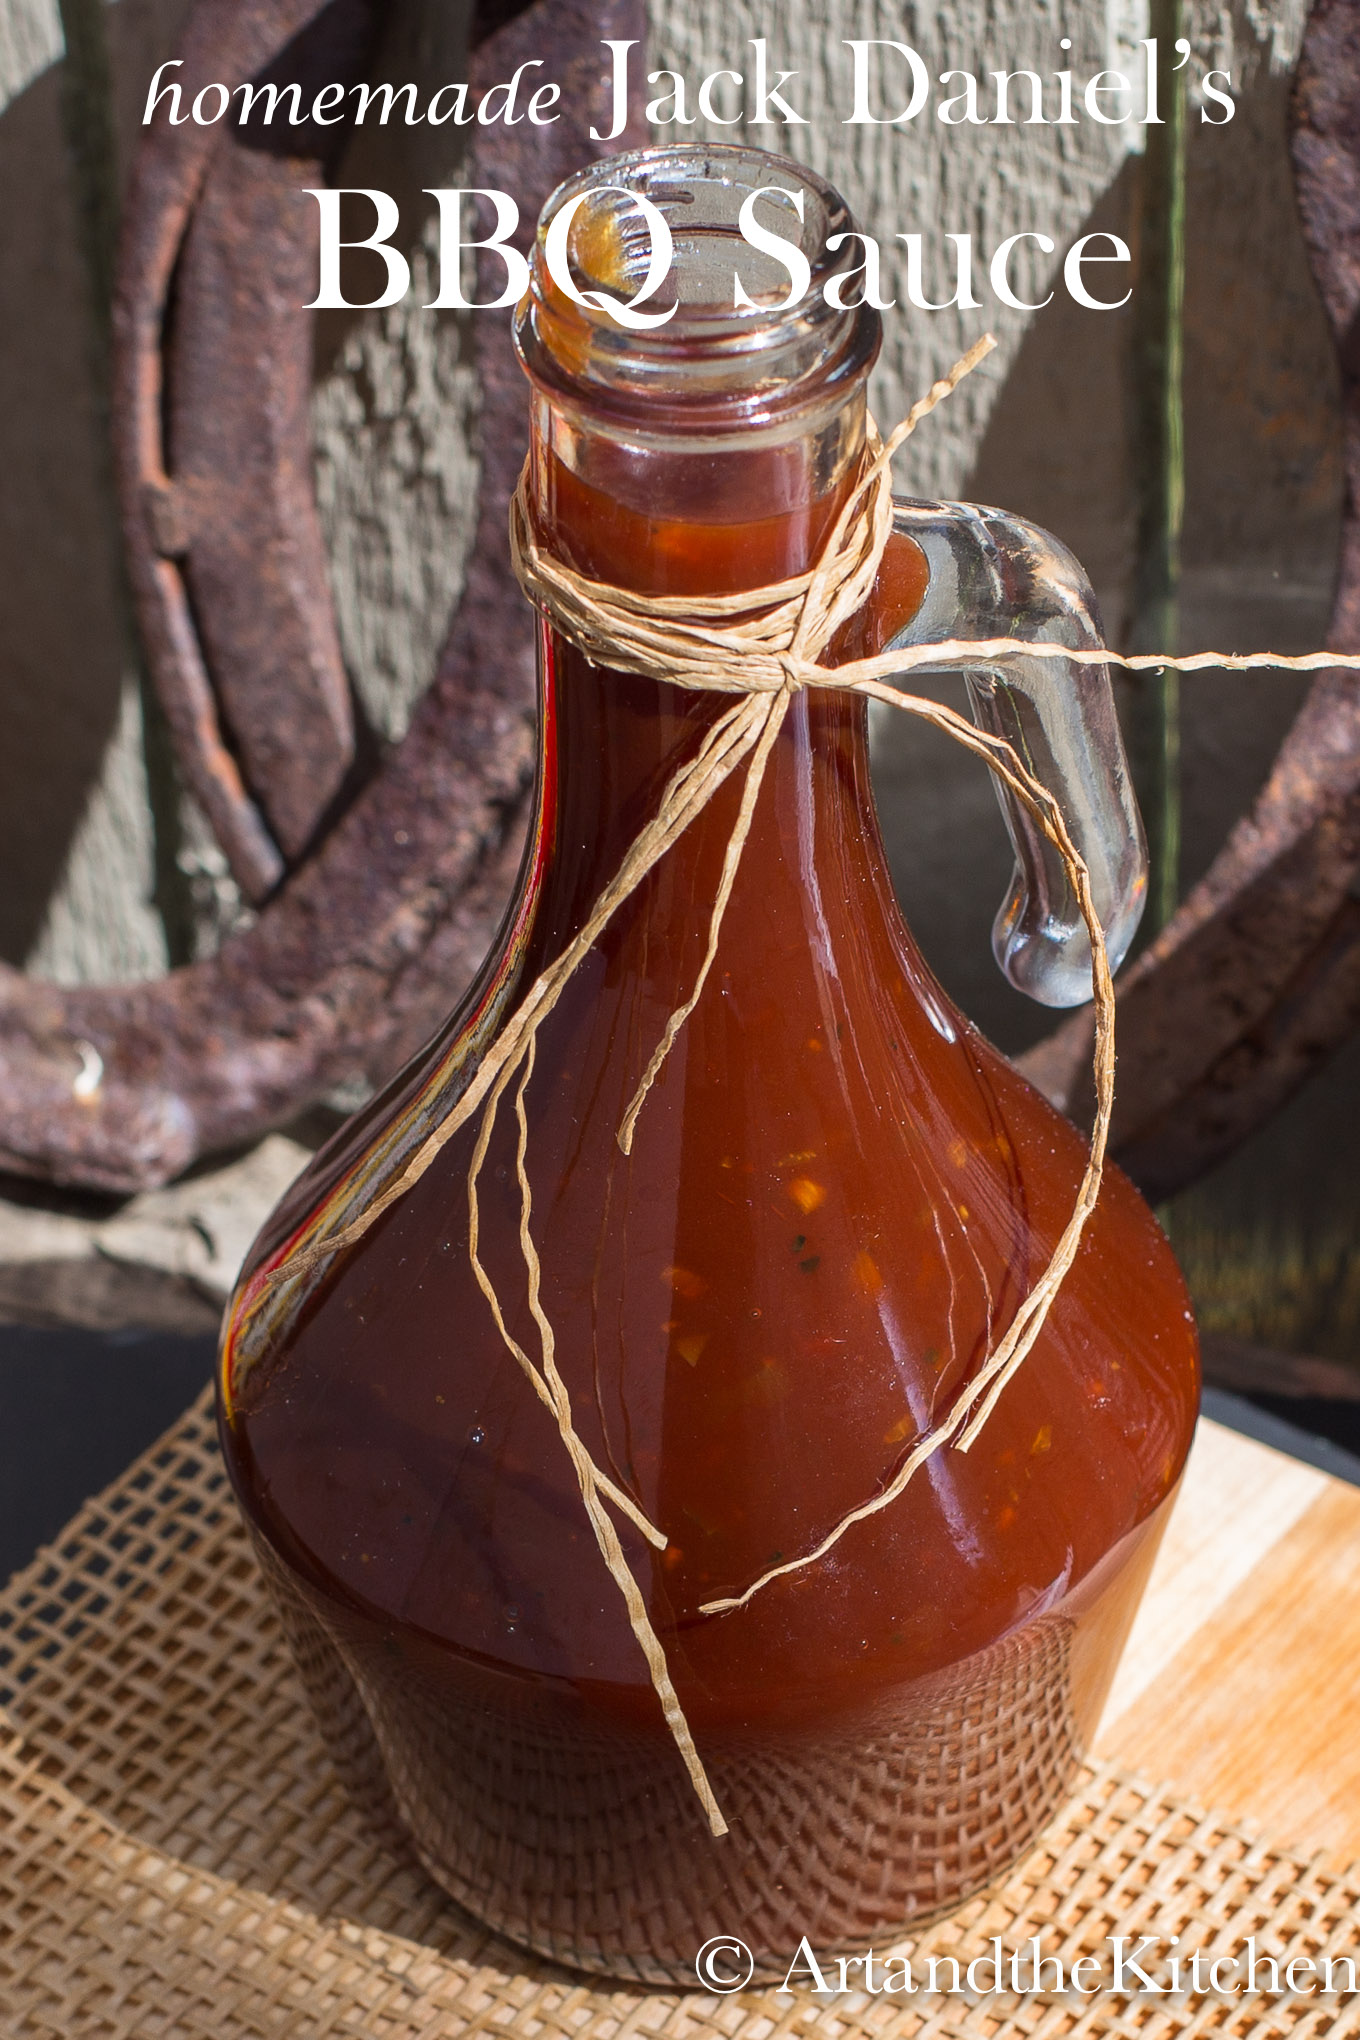
My Homemade Jack Daniel's BBQ Sauce tastes great on these chicken burgers!
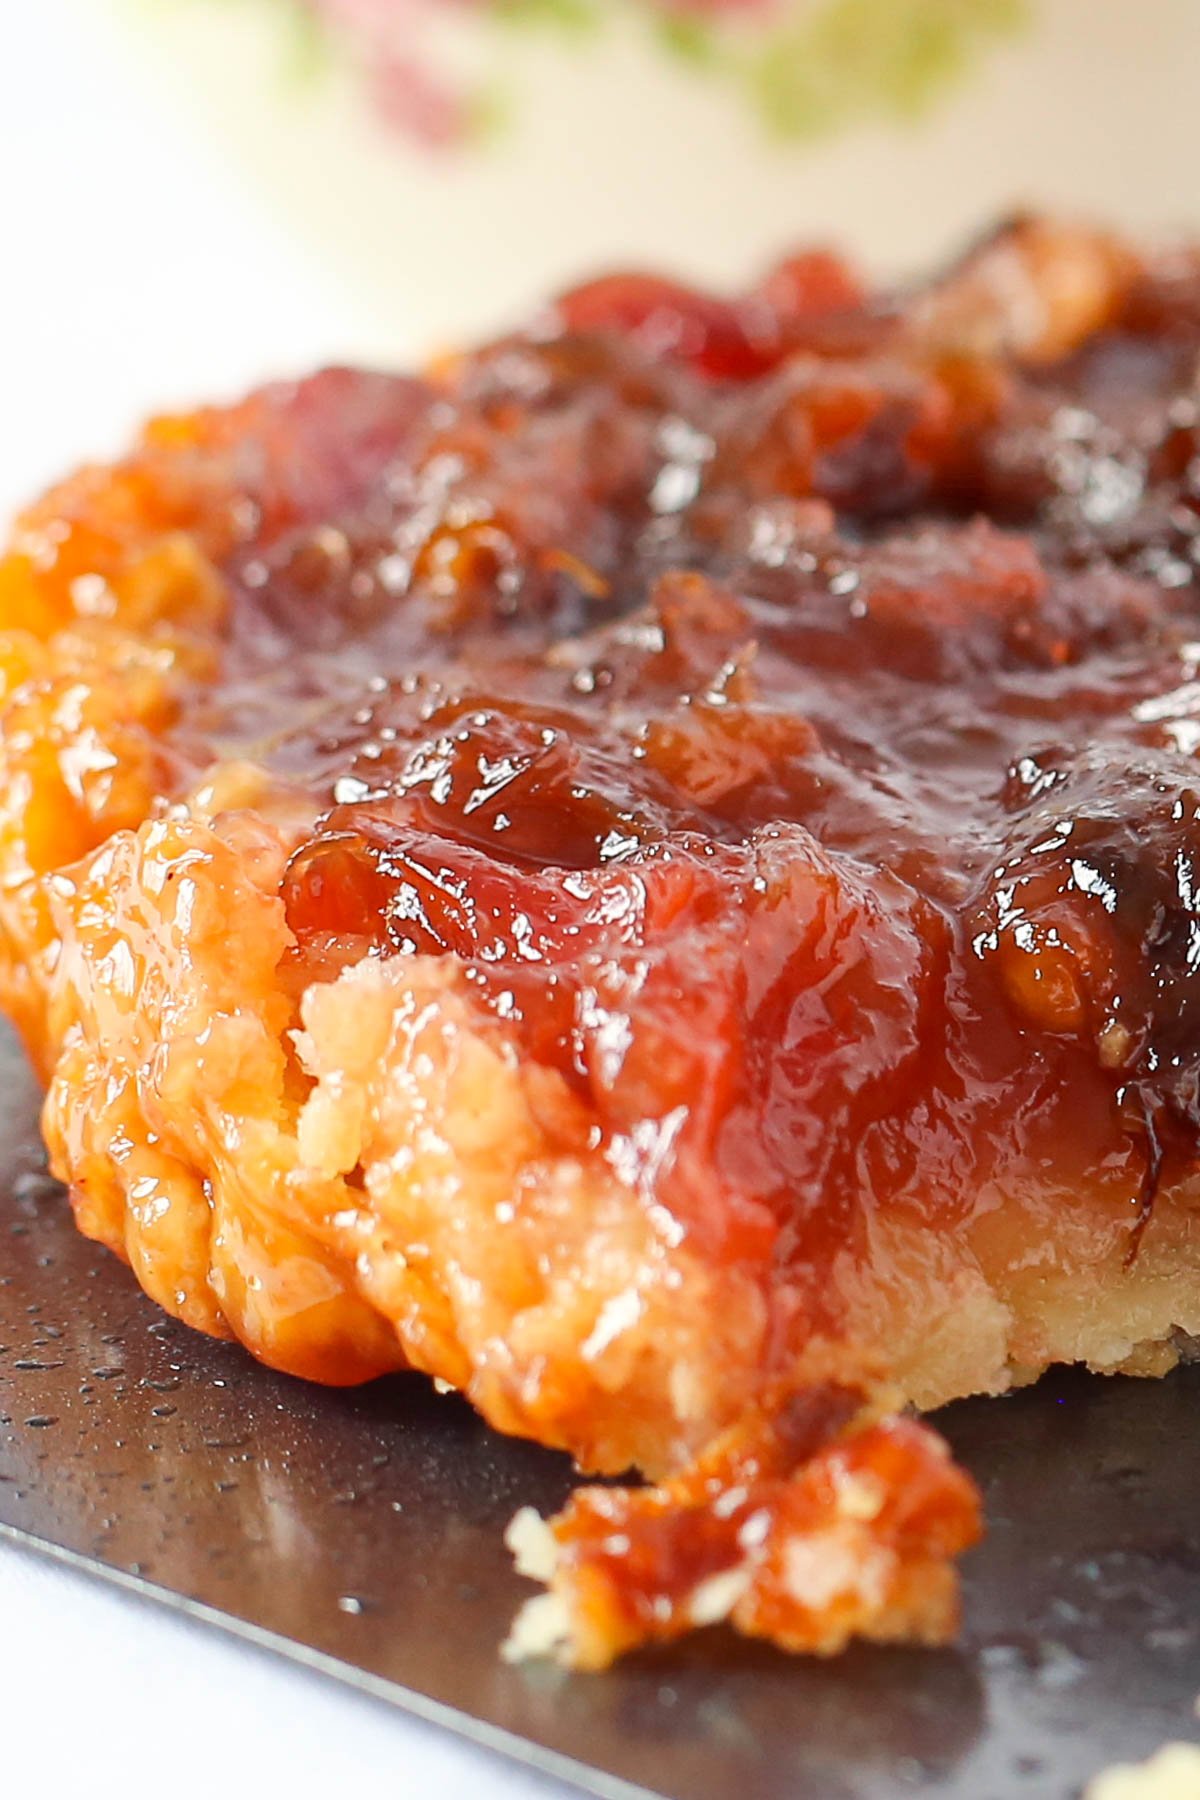
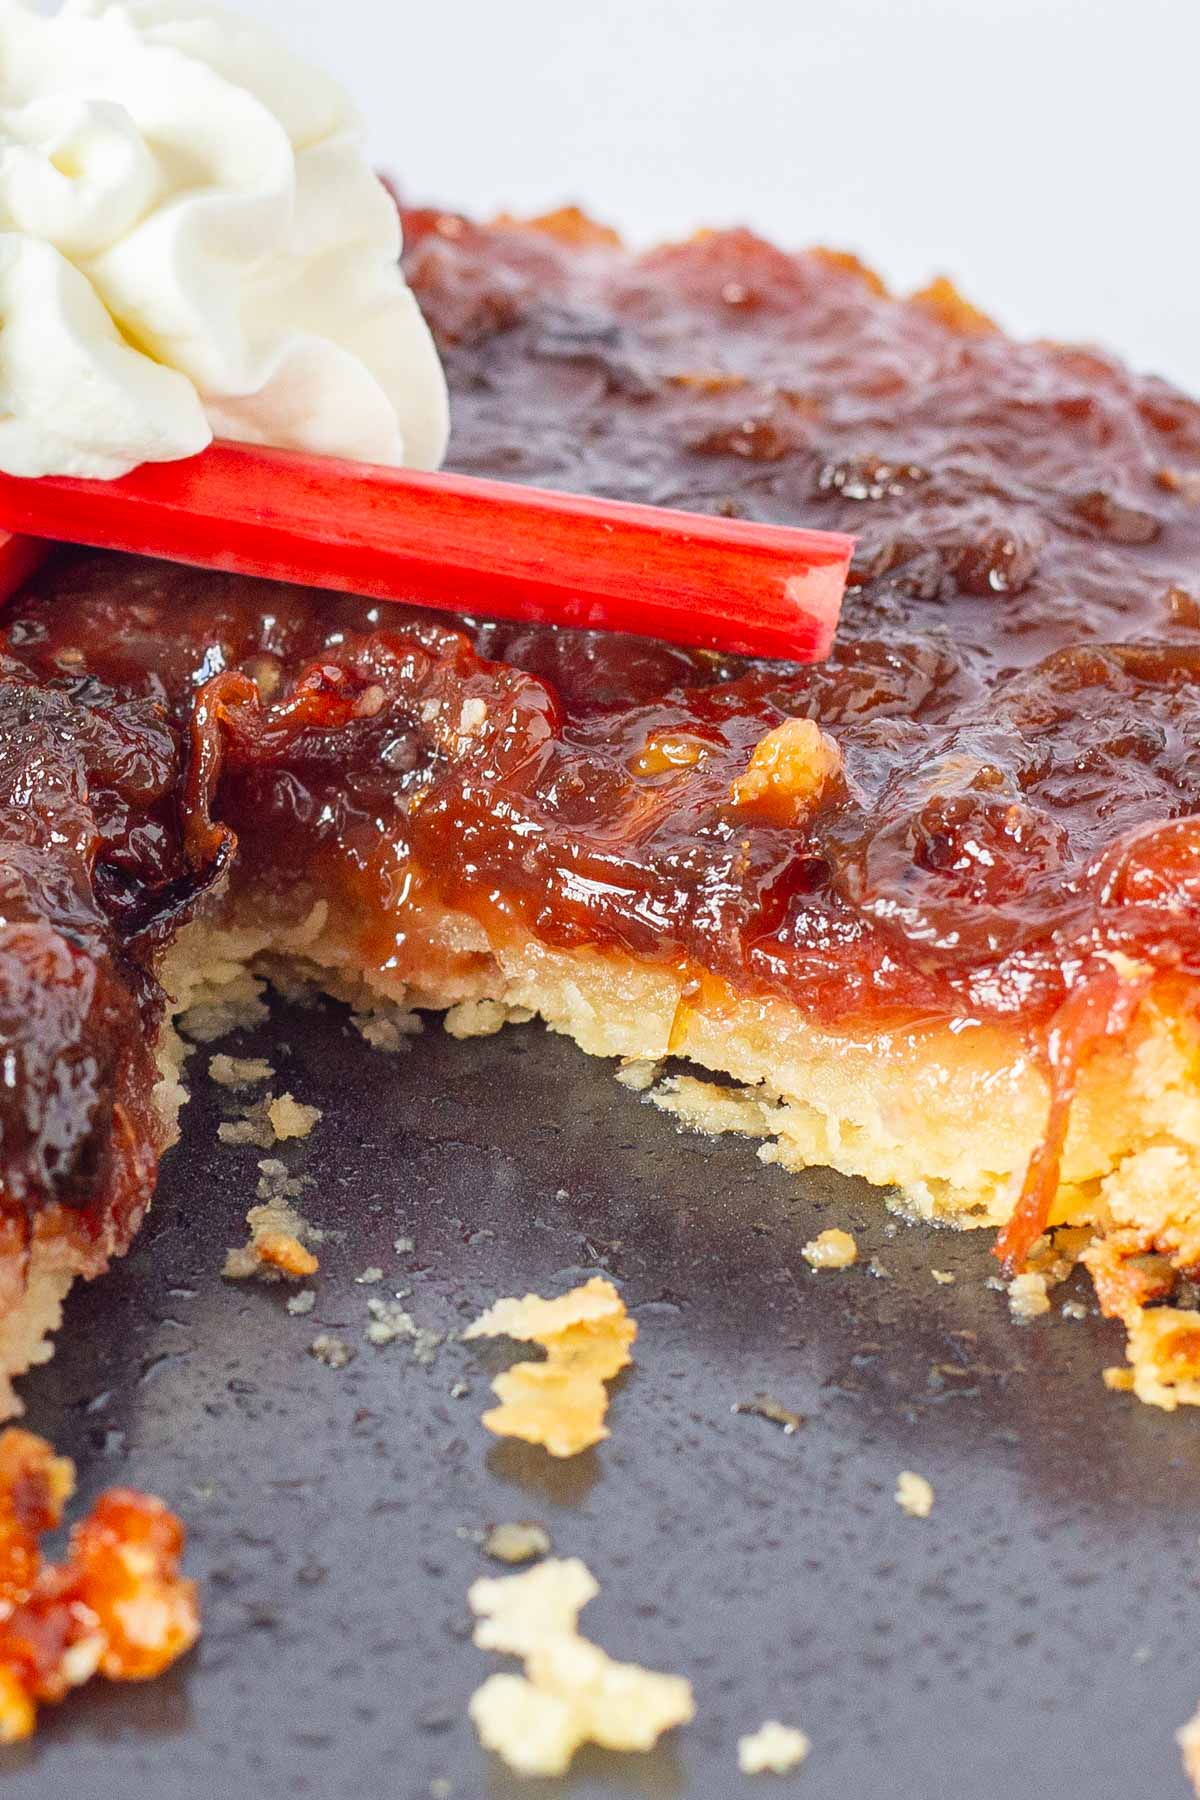
Rhubarb Tarte Tatin
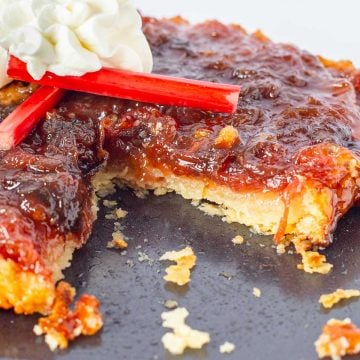
Rhubarb Tarte Tatin is a recipe uses garden fresh rhubarb. It features caramelized rhubarb baked in a buttery pastry crust.
What is Tarte Tatin?
Tarte Tatin is a French dessert that consists of fruit that has been caramelized with butter and sugar, then topped with pastry dough and baked in a skillet. After it has finished baking, you invert the skillet to serve.
Valerie Lugonja from A Canadian Foodie invited me to participate in The Canadian Food Experience Project and I decide to make a rhubarb recipe. Her topic was sharing a recipe for "An Authentic Food Memory". Be sure to check out all the amazing recipes from some of the best Food Bloggers in Canada!
My fondest memories relating to food take me back to my childhood and spending precious time at the farm in Saskatchewan with my Grandparents. Everything was homegrown from the bread to the butter. They raised their own chickens for eggs, cows for milk, cream and butter, and grew an enormous garden. If we ever needed a snack in the afternoon, we simply went to the raspberry patch, picked a bowl full. Gramma would pour a little fresh cream on and sprinkle with sugar. Rhubarb was also a tasty treat for us. It was the only candy we got, a small bowl of sugar for dipping a fresh stem of rhubarb. I can't help but smile as I write this remembering those carefree days, life was so simple, yet so joyous!
The recipe I am sharing is a French dessert with a great Canadian fruit - RHUBARB!
I love rhubarb and have a huge plant growing in my garden. It is great for making jams, sauces and sweet desserts like my Strawberry Rhubarb Pie.

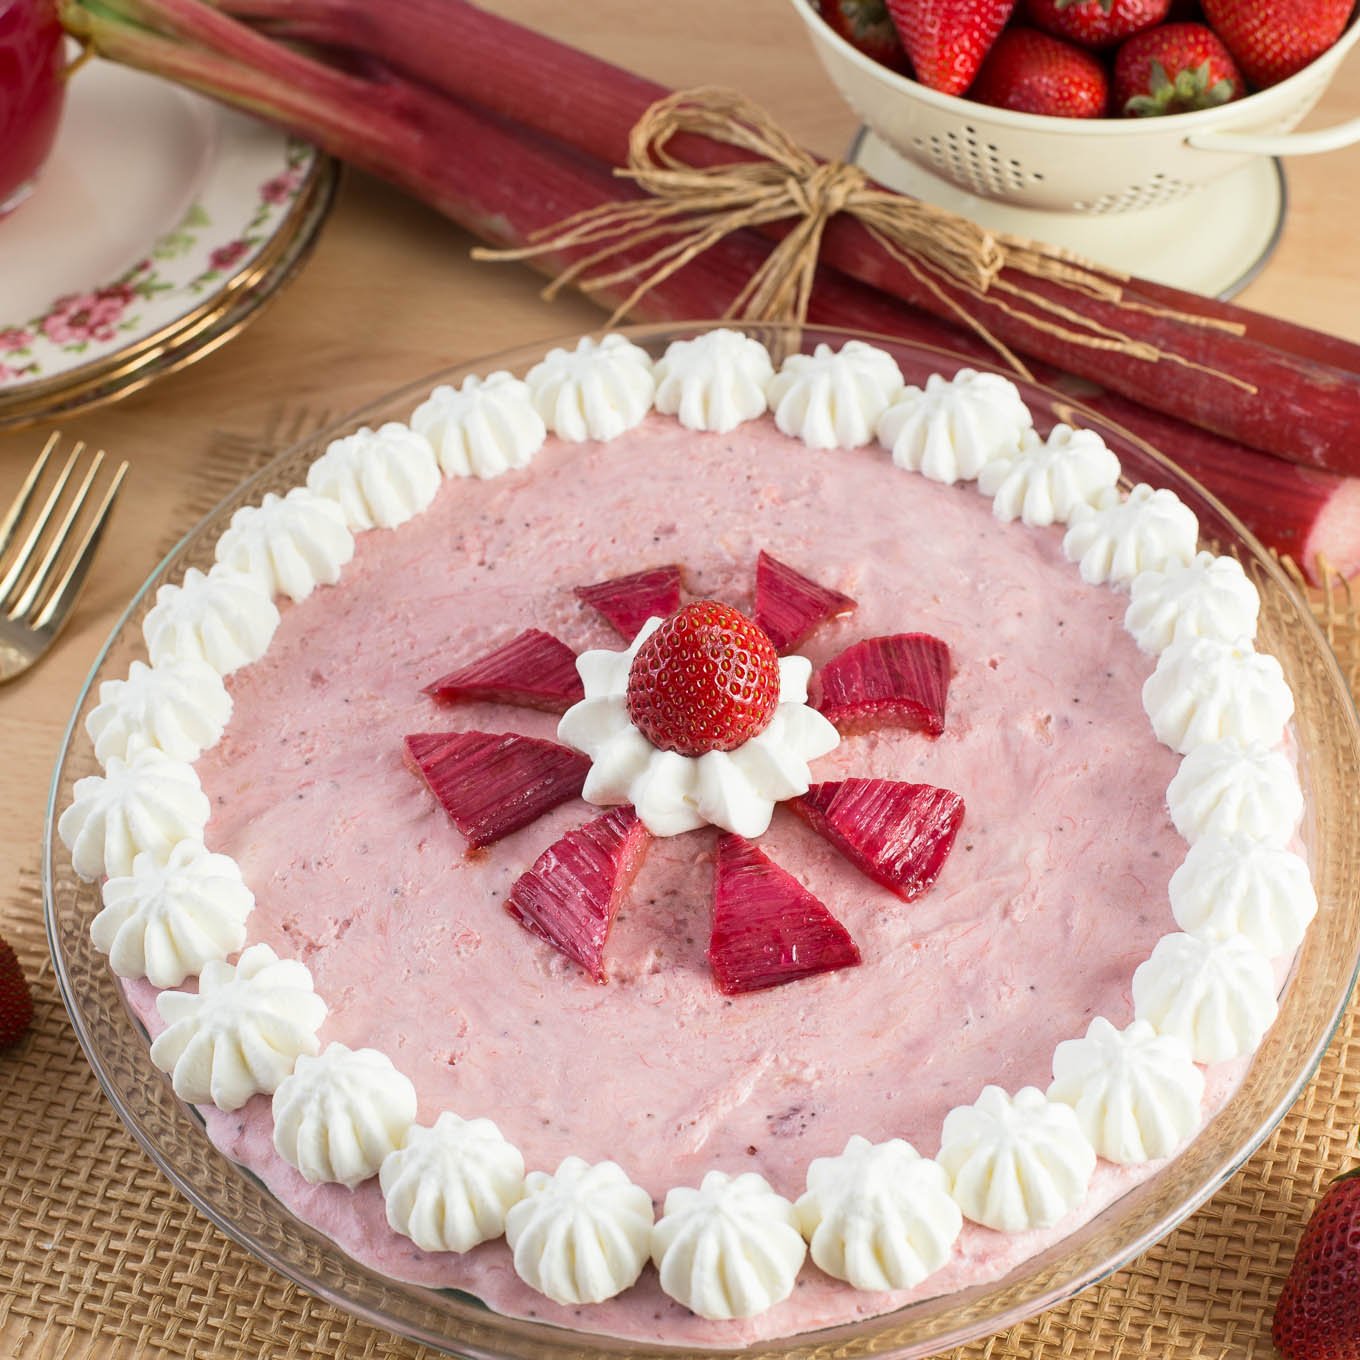

Rhubarb Tarte Tatin
This Rhubarb Tarte Tatin is made with garden fresh rhubarb. It features caramelized rhubarb baked in a buttery pastry crust.
Servings: 6
Calories: 556kcal
Ingredients
- 3 pounds fresh rhubarb
- 5 tablespoons butter
- ¾ cup sugar
Pastry Ingredients
- 1 ¾ cups all-purpose flour
- pinch salt
- 5 ½ ounces unsalted butter chilled and cubed
- 1 egg yolk
- 1-2 tablespoons water cold
Instructions
To make the pastry
- Sift the flour and salt into a large bowl.
- Add the butter, and rub with your fingertips until the mixture forms pea-sized bits. A pastry blender will also work.
- Mix together the egg yolk and 1 tablespoon of cold water, then add to the flour-butter mixture.
- Using a pastry blender mix until the dough just starts to come together. Add more water a bit at a time as needed.
- Press the dough together and shape into a disk.
- Wrap with plastic wrap and refrigerate for a least 30 minutes.
- Keep the dough refrigerated until rhubarb mixture is prepared.
How to prepare the Caramelized Rhubarb Filling
- Cut the fresh rhubarb into 1-2 inch pieces.
- Using a deep 10 inch skillet with an ovenproof handle, add the butter and sugar.
- On medium heat melt the butter and sugar.
- Arrange the rhubarb tightly on top, filling all gaps.
- Cook over low heat for 20-30 minutes, or until it has caramelized (lightly browned) and excess liquid has evaporated.
- Preheat the oven to 375º F.
- Roll out the pastry dough on a lightly floured surface, slightly larger than the skillet.
- Cover the rhubarb mixture with rolled out pastry dough.
- Press down around the edge to enclose completely.
- Bake for 25-30 minutes and the pastry is golden brown.
- Remove from the oven and let rest for 5 minutes.
- Cover the skillet with a serving plate and carefully flip over.
- Serve Tarte Tatin with vanilla ice cream or whipping cream.
Nutrition
Calories: 556kcal | Carbohydrates: 63g | Protein: 7g | Fat: 32g | Saturated Fat: 20g | Polyunsaturated Fat: 2g | Monounsaturated Fat: 8g | Trans Fat: 1g | Cholesterol: 113mg | Sodium: 89mg | Potassium: 705mg | Fiber: 5g | Sugar: 28g | Vitamin A: 1216IU | Vitamin C: 18mg | Calcium: 214mg | Iron: 2mg
✨Follow me on social media ✨
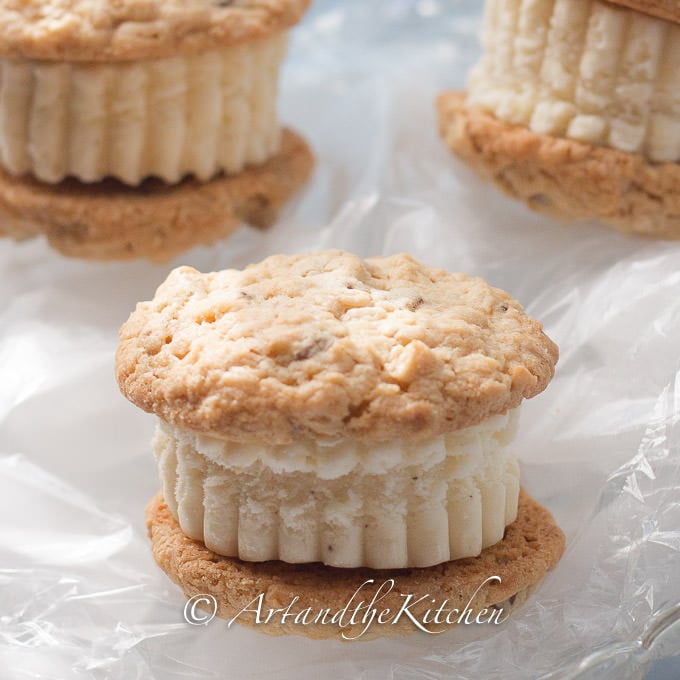
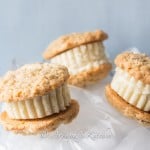
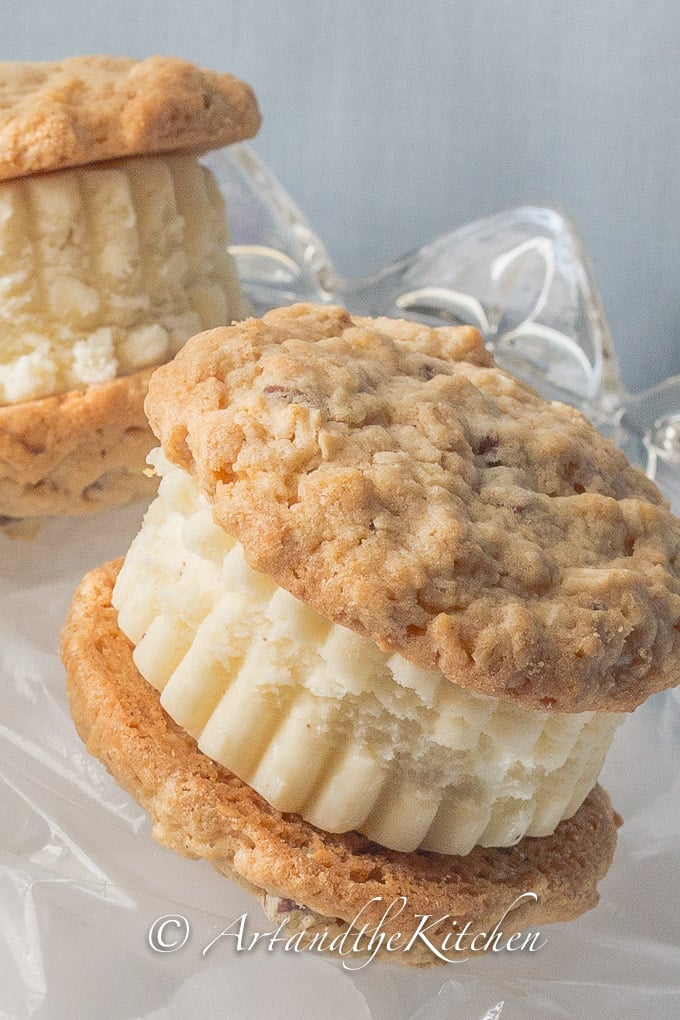
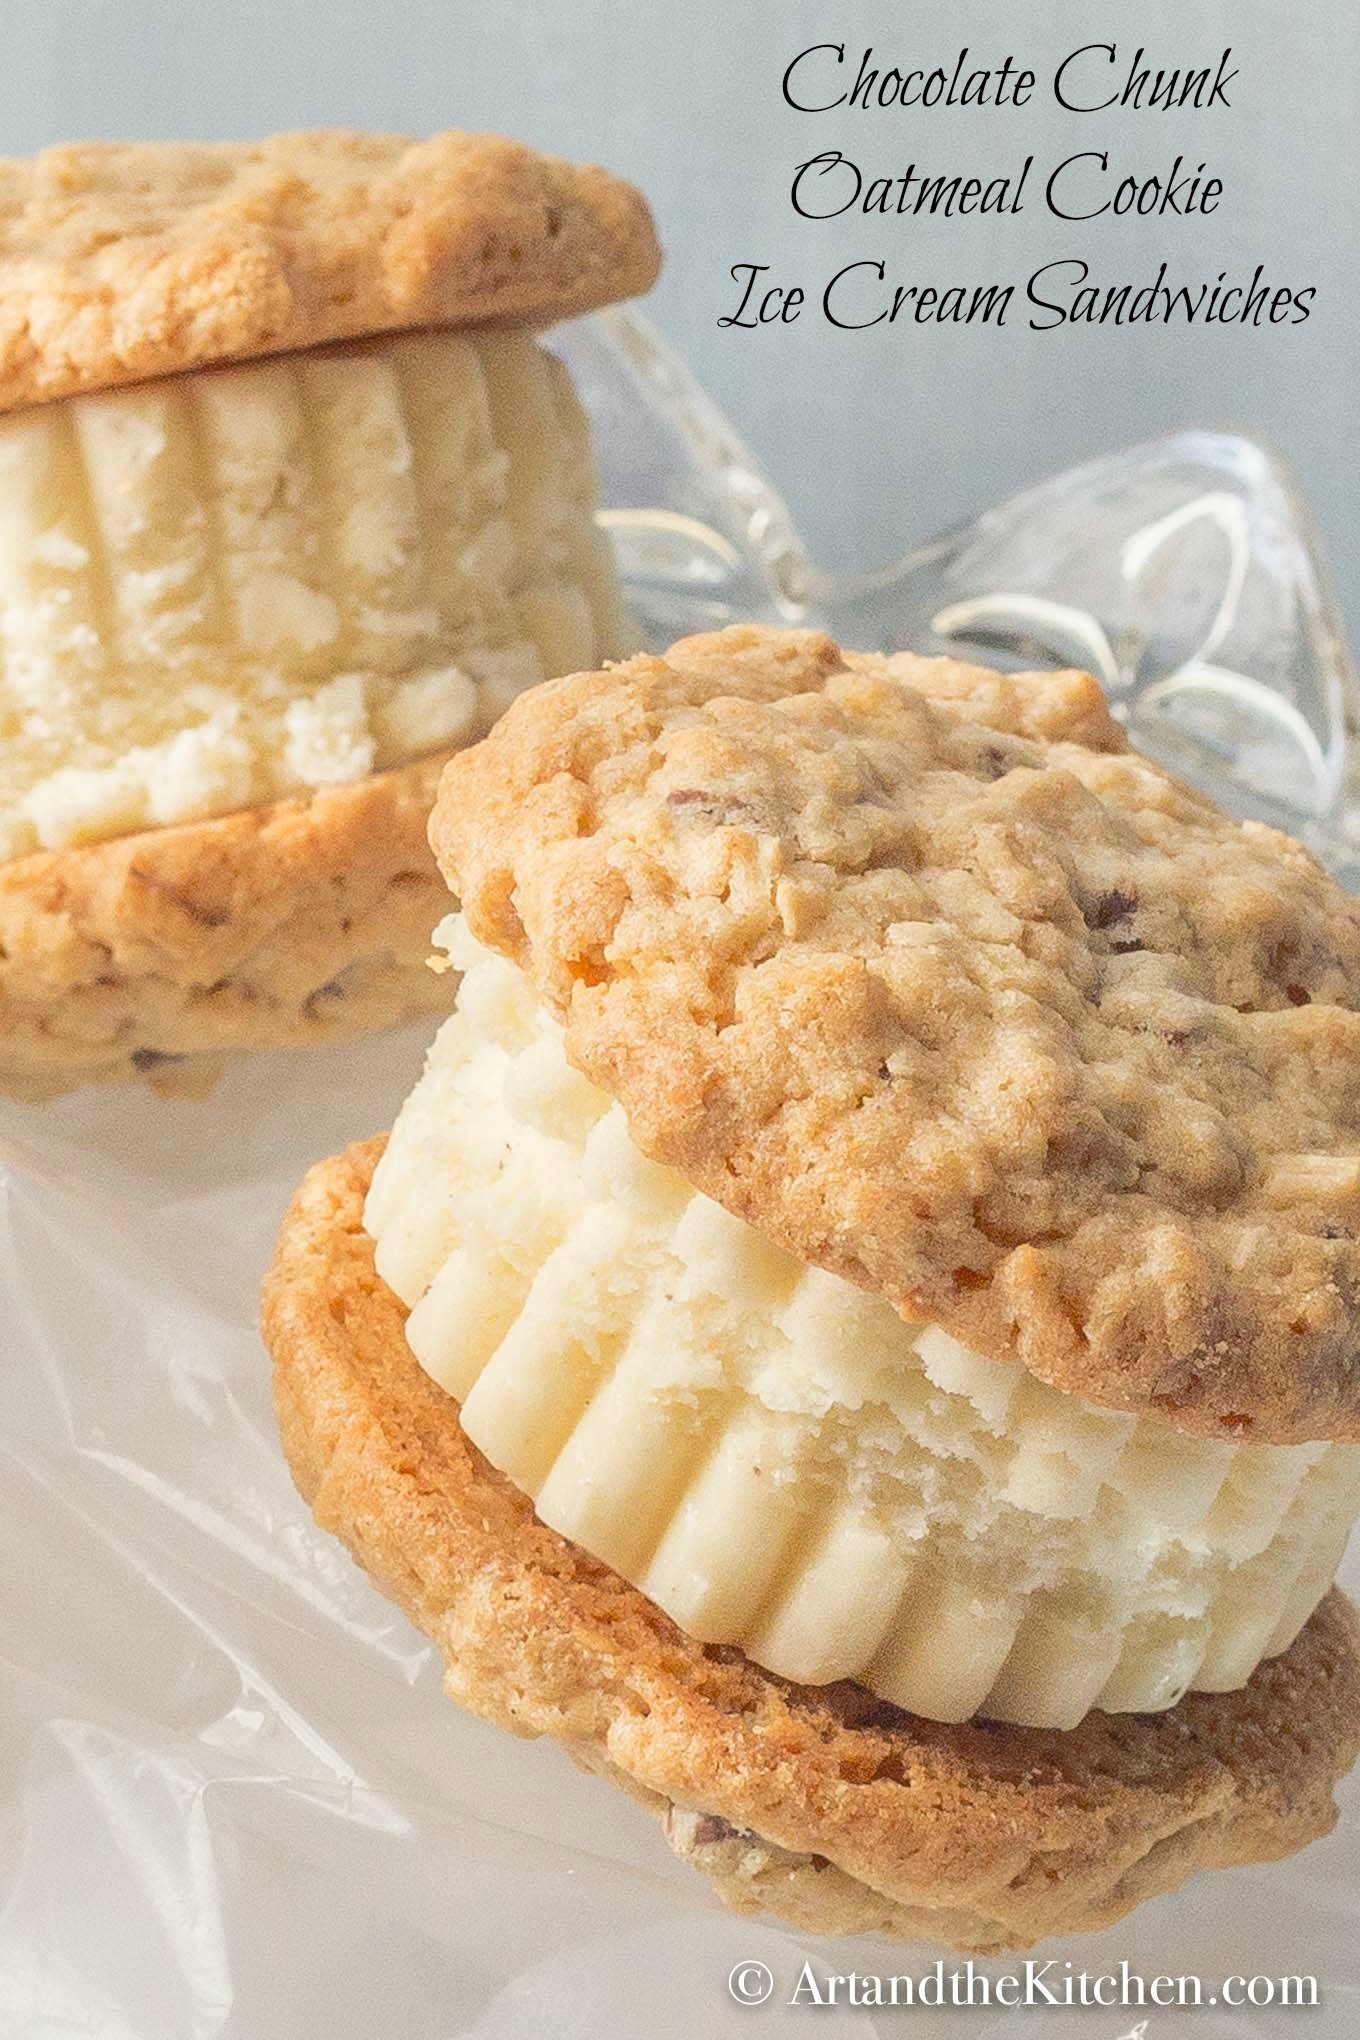
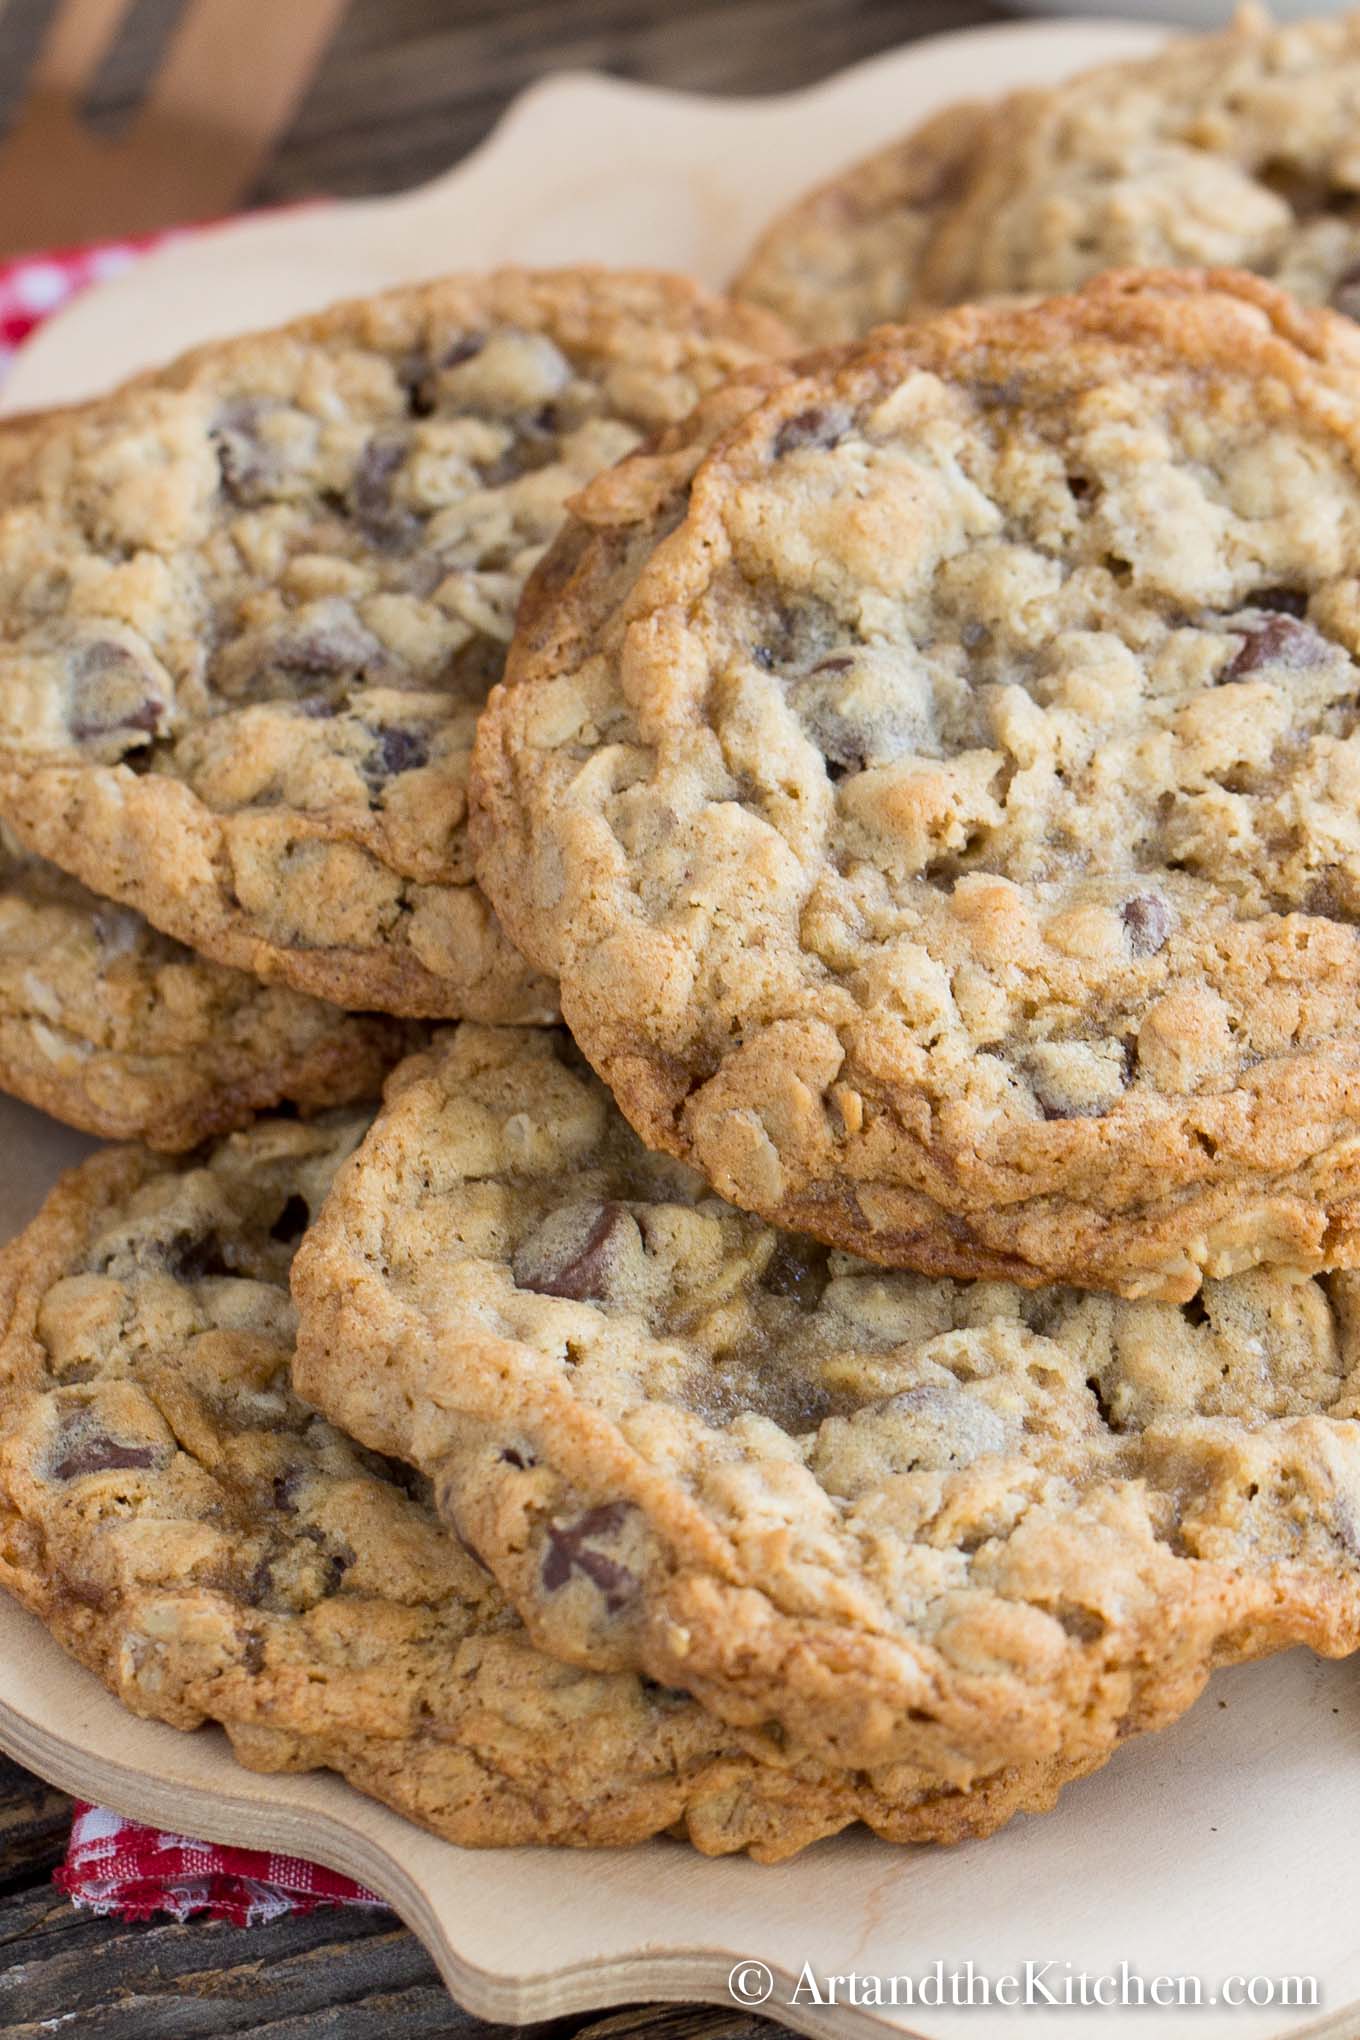
Chocolate Chunk Oatmeal Ice Cream Sandwiches
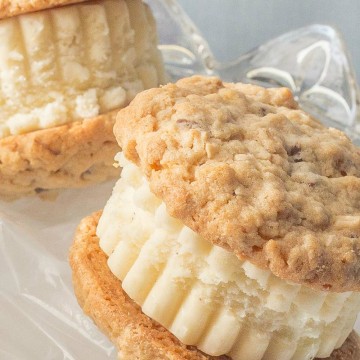
Homemade Chocolate Chunk Oatmeal Ice Cream Sandwiches are easy to make and so yummy!
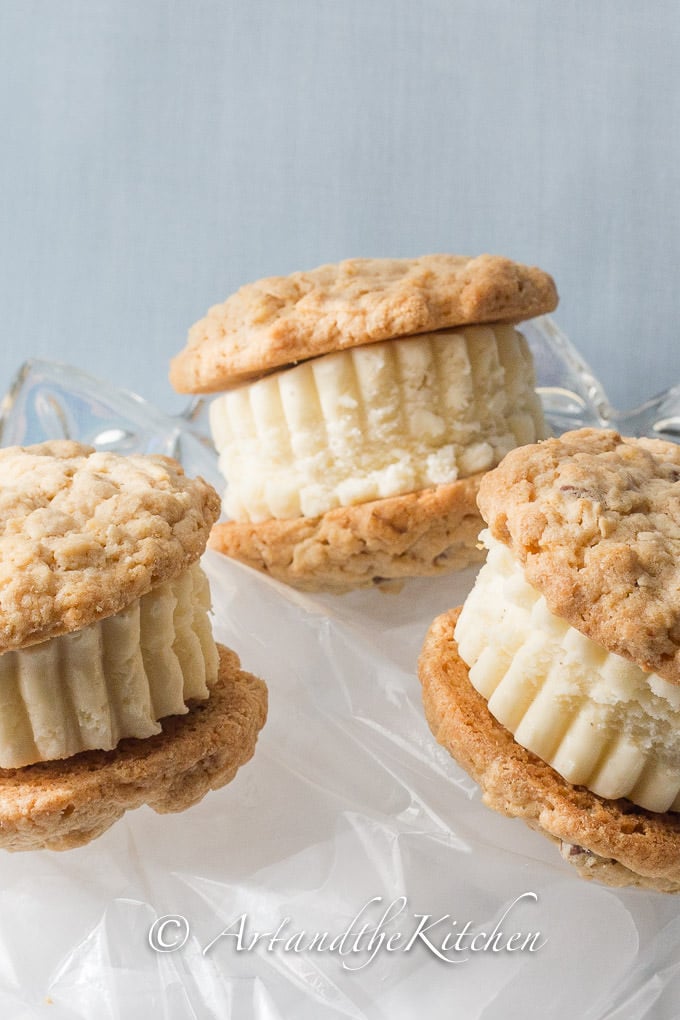
Chocolate Chunk Oatmeal Ice Cream Sandwiches start with a fantastic cookie recipe. Good quality chocolate chunk pieces and gourmet ice cream will give you a superior tasting ice cream sandwich! Another great cookie recipe that makes tasty ice cream sandwiches is my Ginger Cookie recipe. These cookies go well with maple walnut ice cream.
Chocolate Chunk Oatmeal Ice Cream Sandwiches
These homemade Chocolate Chunk Oatmeal Ice Cream Sandwiches are great treat the kids will love!
Servings: 12
Calories: 633kcal
Ingredients
- 1 ½ cup flour
- 1 ½ cup oatmeal
- ¾ cup coconut
- 1 teaspoon baking powder
- ½ teaspoon baking soda
- ½ teaspoon salt
- 1 cup butter
- 1 cup brown sugar
- 1 egg
- 1 vanilla bean or 1 teaspoon vanilla
- 1 cup chocolate chunk pieces
- 1.5 quart vanilla ice cream 48 oz size
Instructions
- In a large mixing bowl beat together butter and sugar until creamy.
- Add vanilla and egg. Mix until well combined.
- In separate bowl mix together flour, oatmeal, coconut, baking powder, baking soda, salt.
- Add flour mix a bit a time to butter mix until combined.
- Stir in chocolate chunks
- Using scooper make 24 even cookies, press. Refrigerate for 15 minutes.(prevents cookie from spreading too much).
- Bake 350 degrees for 10-12 minutes.
- Cool completely.
- Working quickly so ice cream doesn't melt flatten ice cream with rolling pin between sheets of parchment to 1 inch to 1 ½ inch thickness.
- Using cookie cutter same size as cookie cut ice cream into circles. Refreeze if they get too soft.
- Sandwich ice cream between two cookies.
- Wrap each in plastic wrap and place in freezer bag. Freeze until ready to serve.
Nutrition
Calories: 633kcal | Carbohydrates: 70g | Protein: 8g | Fat: 36g | Saturated Fat: 23g | Cholesterol: 107mg | Sodium: 394mg | Potassium: 447mg | Fiber: 3g | Sugar: 49g | Vitamin A: 1000IU | Vitamin C: 0.9mg | Calcium: 205mg | Iron: 2.3mg
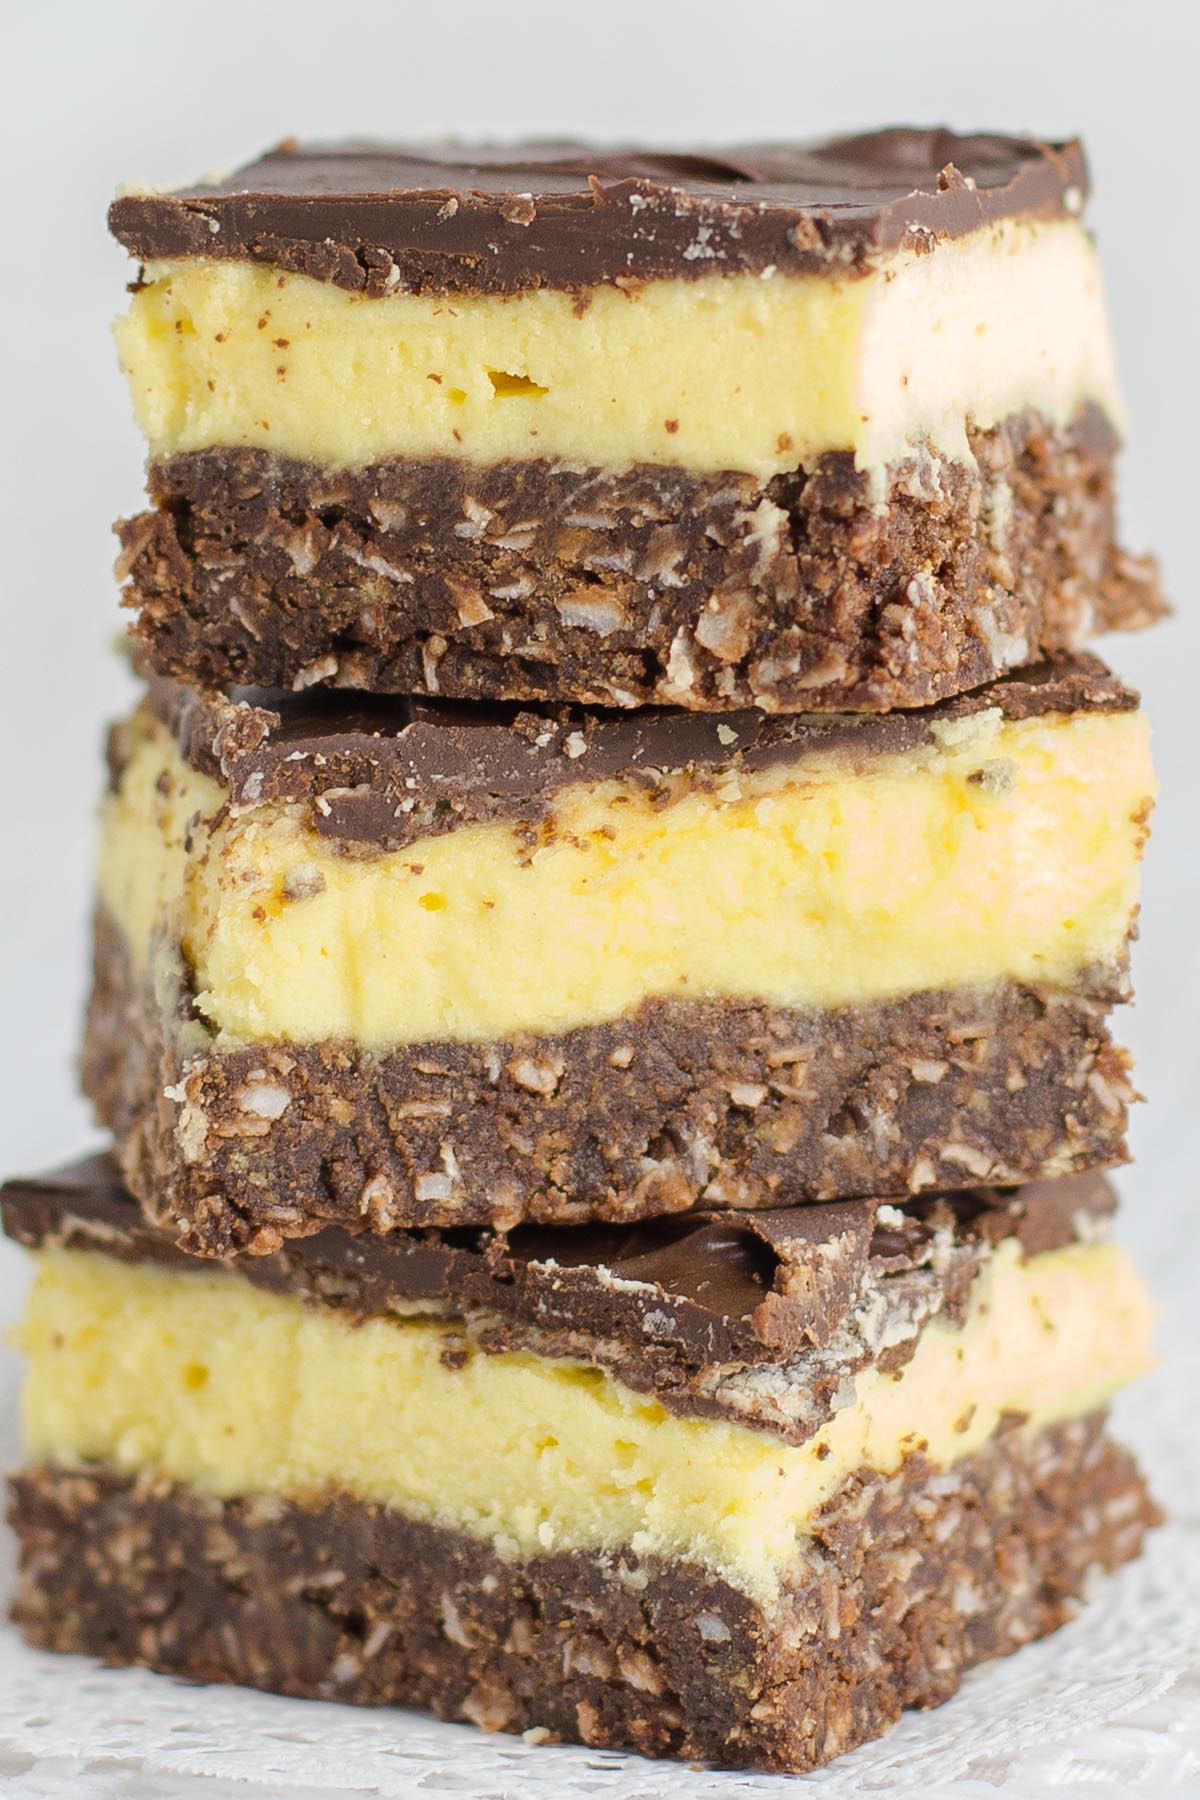
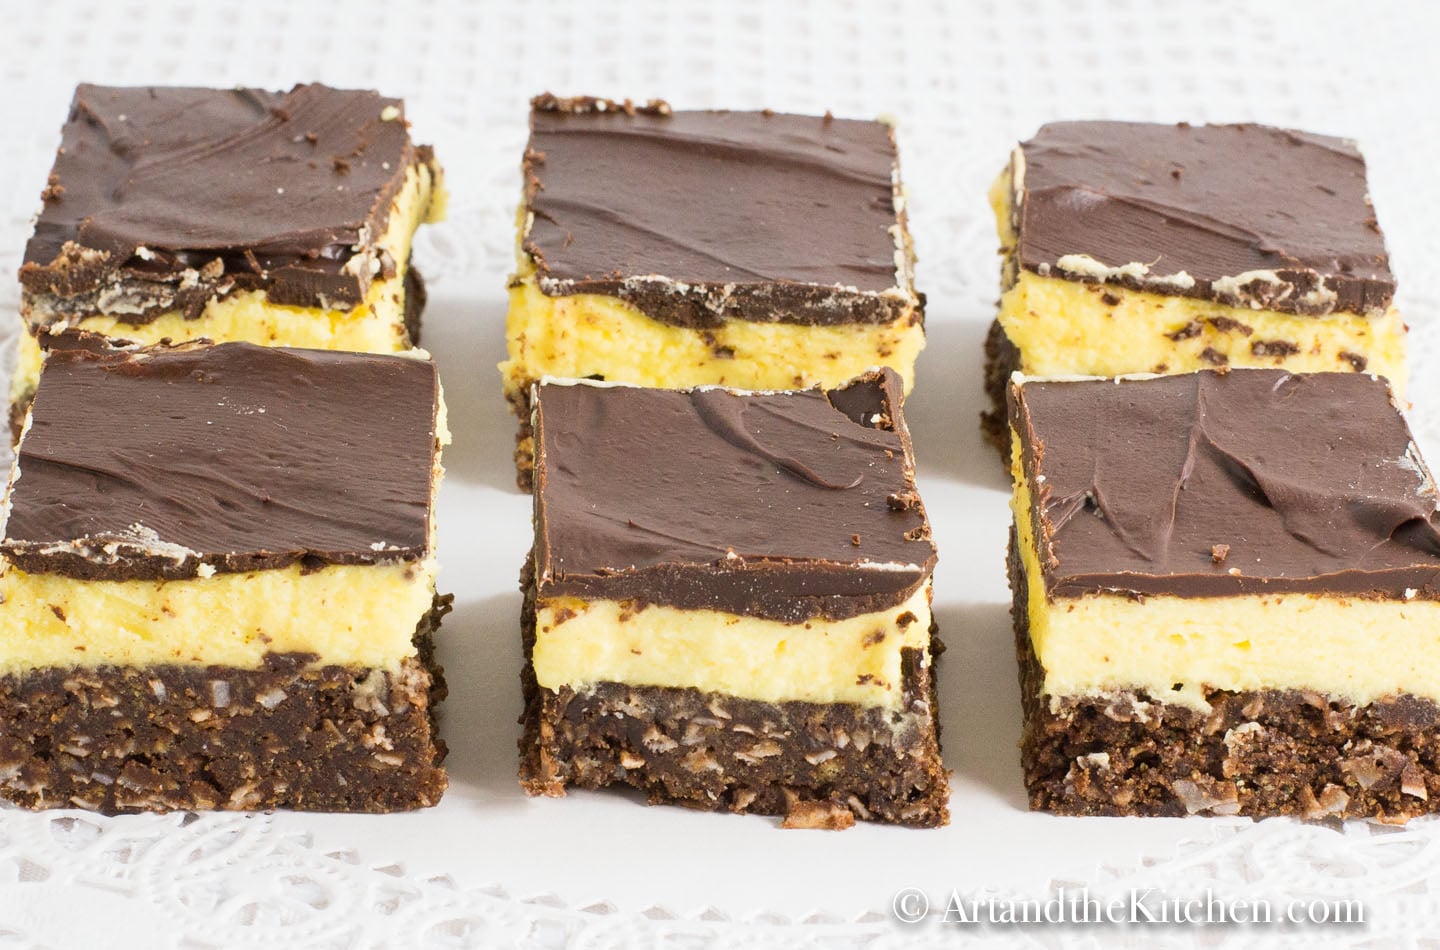
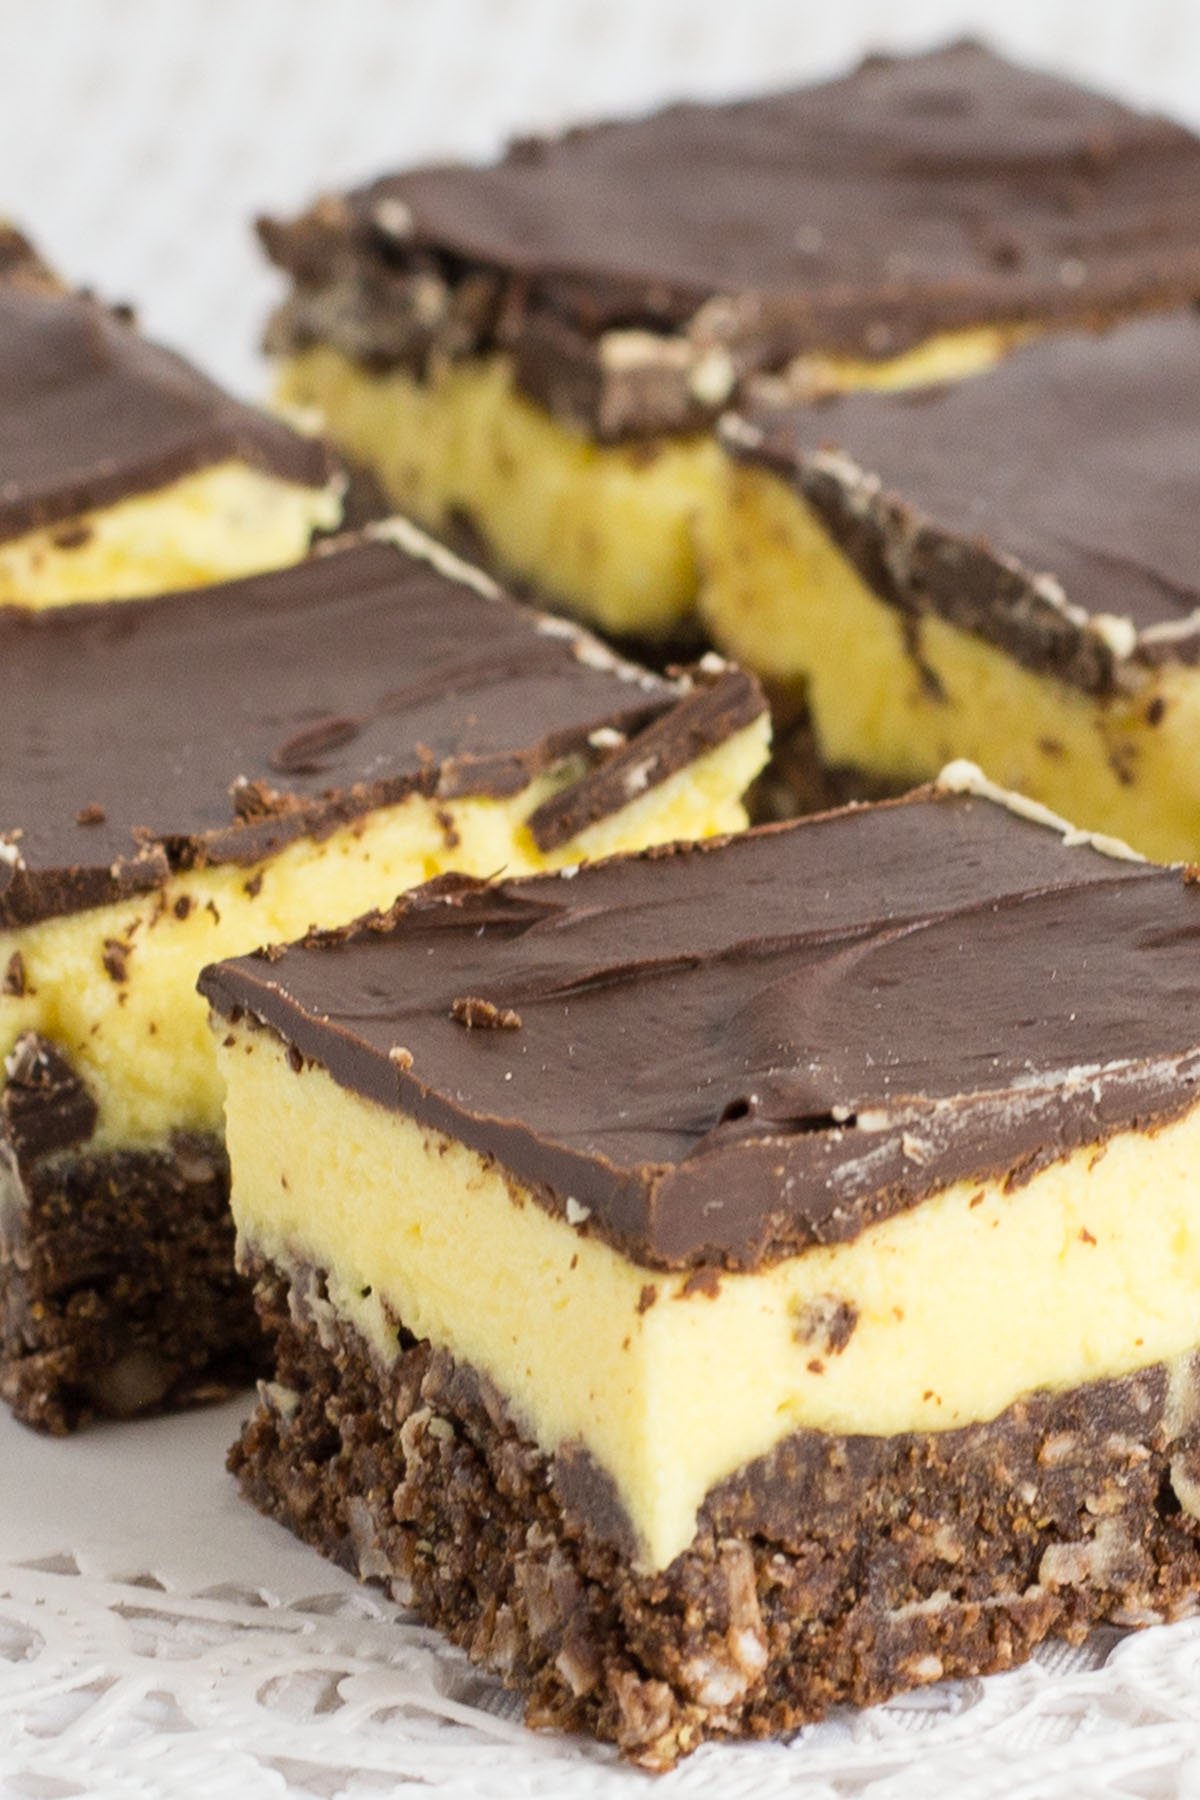
Nanaimo Bars
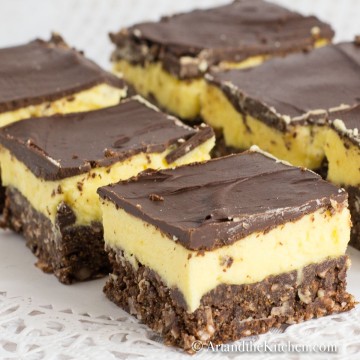
Nanaimo Bars are a true Canadian classic dessert. Delicious layers of chocolate crumb crust, vanilla custard filling and rich chocolate coating.

I do not know of any Canadian baker that does not have a recipe for Nanaimo Bars somewhere in a fundraiser cookbook, recipe card, or scribbled in a notebook. These tasty, sweet treats bring back some very fond memories of my Mom baking for the Holidays. She or someone in our large family always prepared them for the Christmas baking tray or other special occasions. My Mom was a great baker and this is her classic Nanaimo bar recipe. As well, she also made another exceptional Canadian dessert, Old Fashioned Butter Tarts!
Chopped nuts are often included in the chocolate base layer of Nanaimo squares. I enjoy these treats either way, but my son is allergic to nuts so I leave them out. It was actually the good old Nanaimo bar that gave him his first allergic reaction at three years old. We went from having a great time at a Christmas party to the Emergency Ward!
What nuts could be added?
Chopped walnuts are the most common.
Chopped almonds also taste great
Enjoy these other sweet treat recipes!
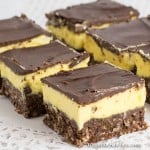
Nanaimo Bars
Delicious layers of chocolate coconut crumb, vanilla custard filling and chocolate coating.
Servings: 36
Calories: 144kcal
Ingredients
Base Layer
- ½ cup butter
- ¼ cup granulated sugar
- 5 tablespoons cocoa
- 1 ¾ cups graham wafer crumbs
- 1 cup coconut
- 1 egg beaten
- ½ cup finely chopped walnuts or almonds optional
Custard Layer
- ½ cup soft butter
- 3 tablespoons milk
- 2 tablespoons vanilla custard powder I like Bird's Brand
- 2 cups icing sugar confectioners' sugar
Top Chocolate Layer
- 4 ounces semi-sweet chocolate chips
- 2 tablespoons butter
Instructions
Base Layer
- Melt the butter, sugar and cocoa in heavy saucepan (medium-low heat).
- Add egg and stir to cook and thicken.
- Remove from heat, stir in graham crumbs and coconut (also nuts if you want to add them).
- Press firmly into 9x9 inch pan.
Custard Layer
- Using a mixer, beat the butter until fluffy.
- Add milk, custard powder and icing sugar.
- Beat until and fluffy and the color turns a pale yellow.
- Spread evenly over the bottom layer.
Top Chocolate Layer
- Melt chocolate chips and butter over low heat.
- Cool, but only to point that the chocolate is still runny, yet cool enough that it does't melt the custard layer.
- Spread evenly on top of custard layer.
- Refrigerate until set.
- Cut with sharp knife into squares.
Notes
*before cutting if chocolate hardens too much, leave sit at room temperature for a while to prevent chocolate from cracking apart.
Nutrition
Calories: 144kcal | Carbohydrates: 15g | Protein: 1g | Fat: 9g | Saturated Fat: 5g | Polyunsaturated Fat: 1g | Monounsaturated Fat: 2g | Trans Fat: 0.2g | Cholesterol: 22mg | Sodium: 78mg | Potassium: 61mg | Fiber: 1g | Sugar: 10g | Vitamin A: 189IU | Vitamin C: 0.1mg | Calcium: 14mg | Iron: 1mg
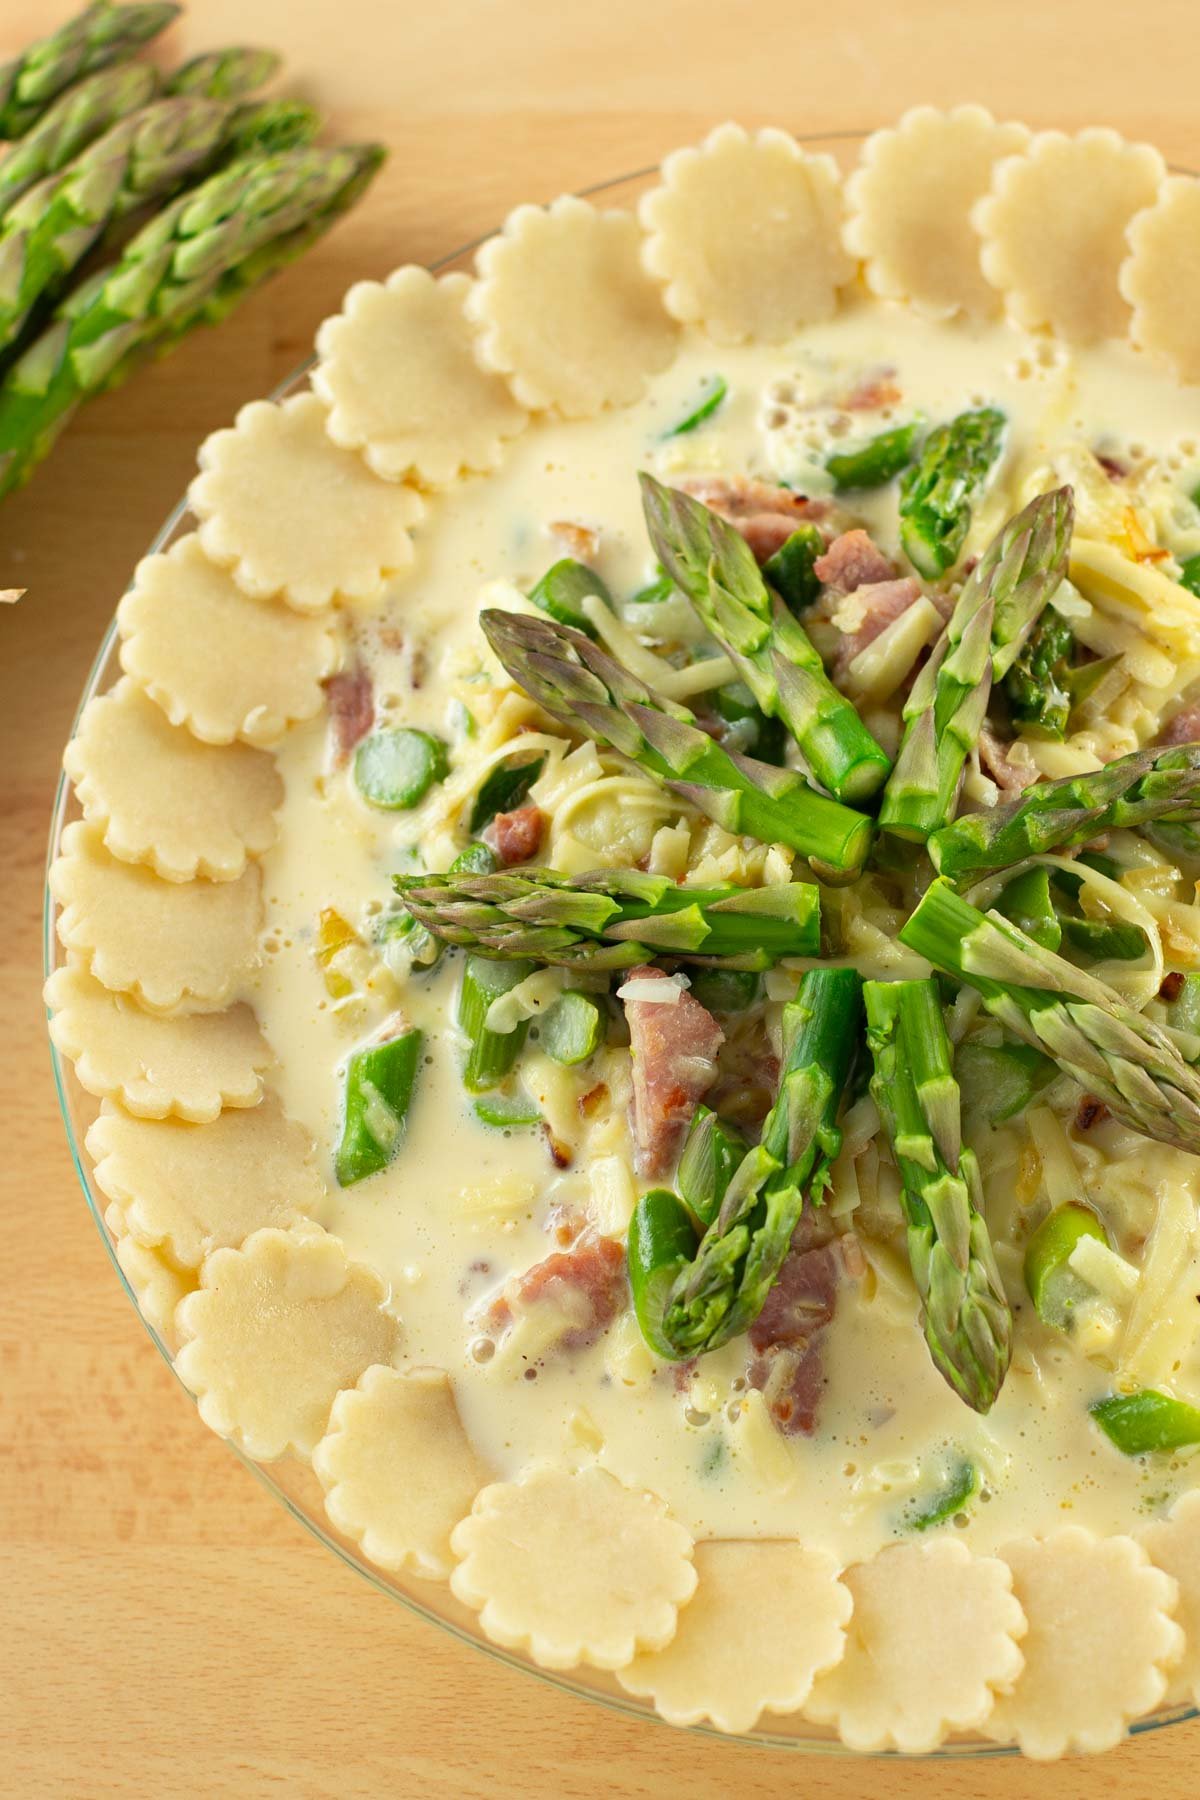
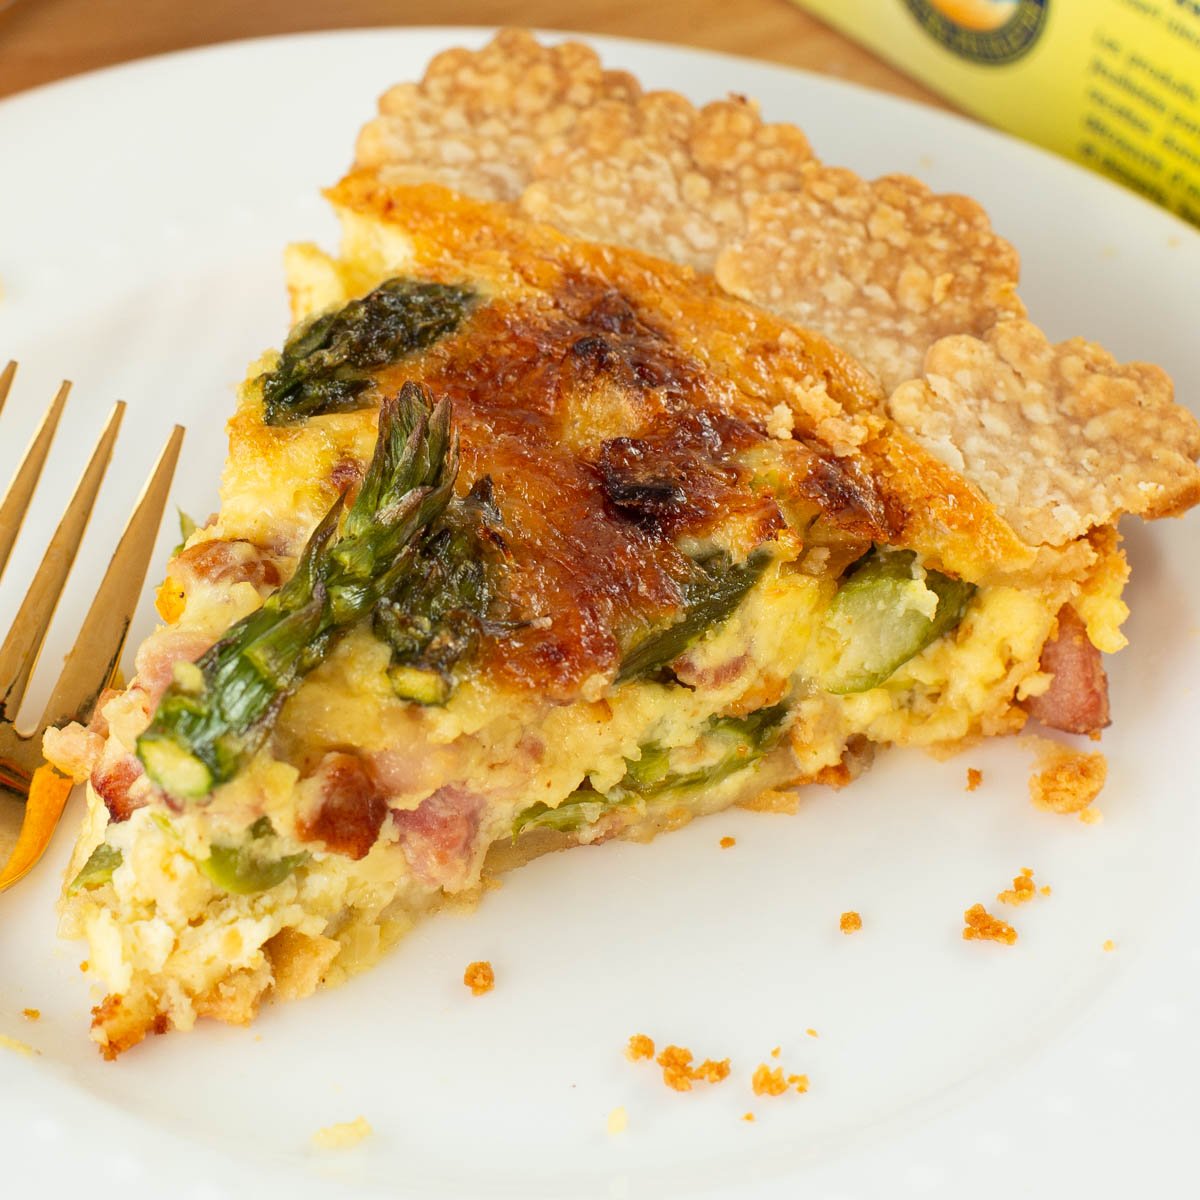
Asparagus and Gruyere Cheese Quiche

Fresh Asparagus and Gruyere Cheese Quiche is a wonderful recipe to make for breakfast or brunch. This exceptional quiche recipe is so quick and easy to prepare and perfect for special occasions like Mother's Day or Easter brunch.

Spring is such a wonderful time of the year. The trees start to bud and produce beautiful blossoms and the perennials poke their heads out of the ground. As well, the grocery stores begin to supply a tasty collection of fresh seasonal produce. One of my favourite spring vegetables is asparagus. I am fortunate to have asparagus that grows in my garden. It is amazing fresh, roasted or in tasty recipes like this quiche or Shrimp Asparagus Carbonara.
You will love this delicious quiche recipe that is loaded with spring fresh asparagus, Gruyere cheese and bacon!
Ingredients
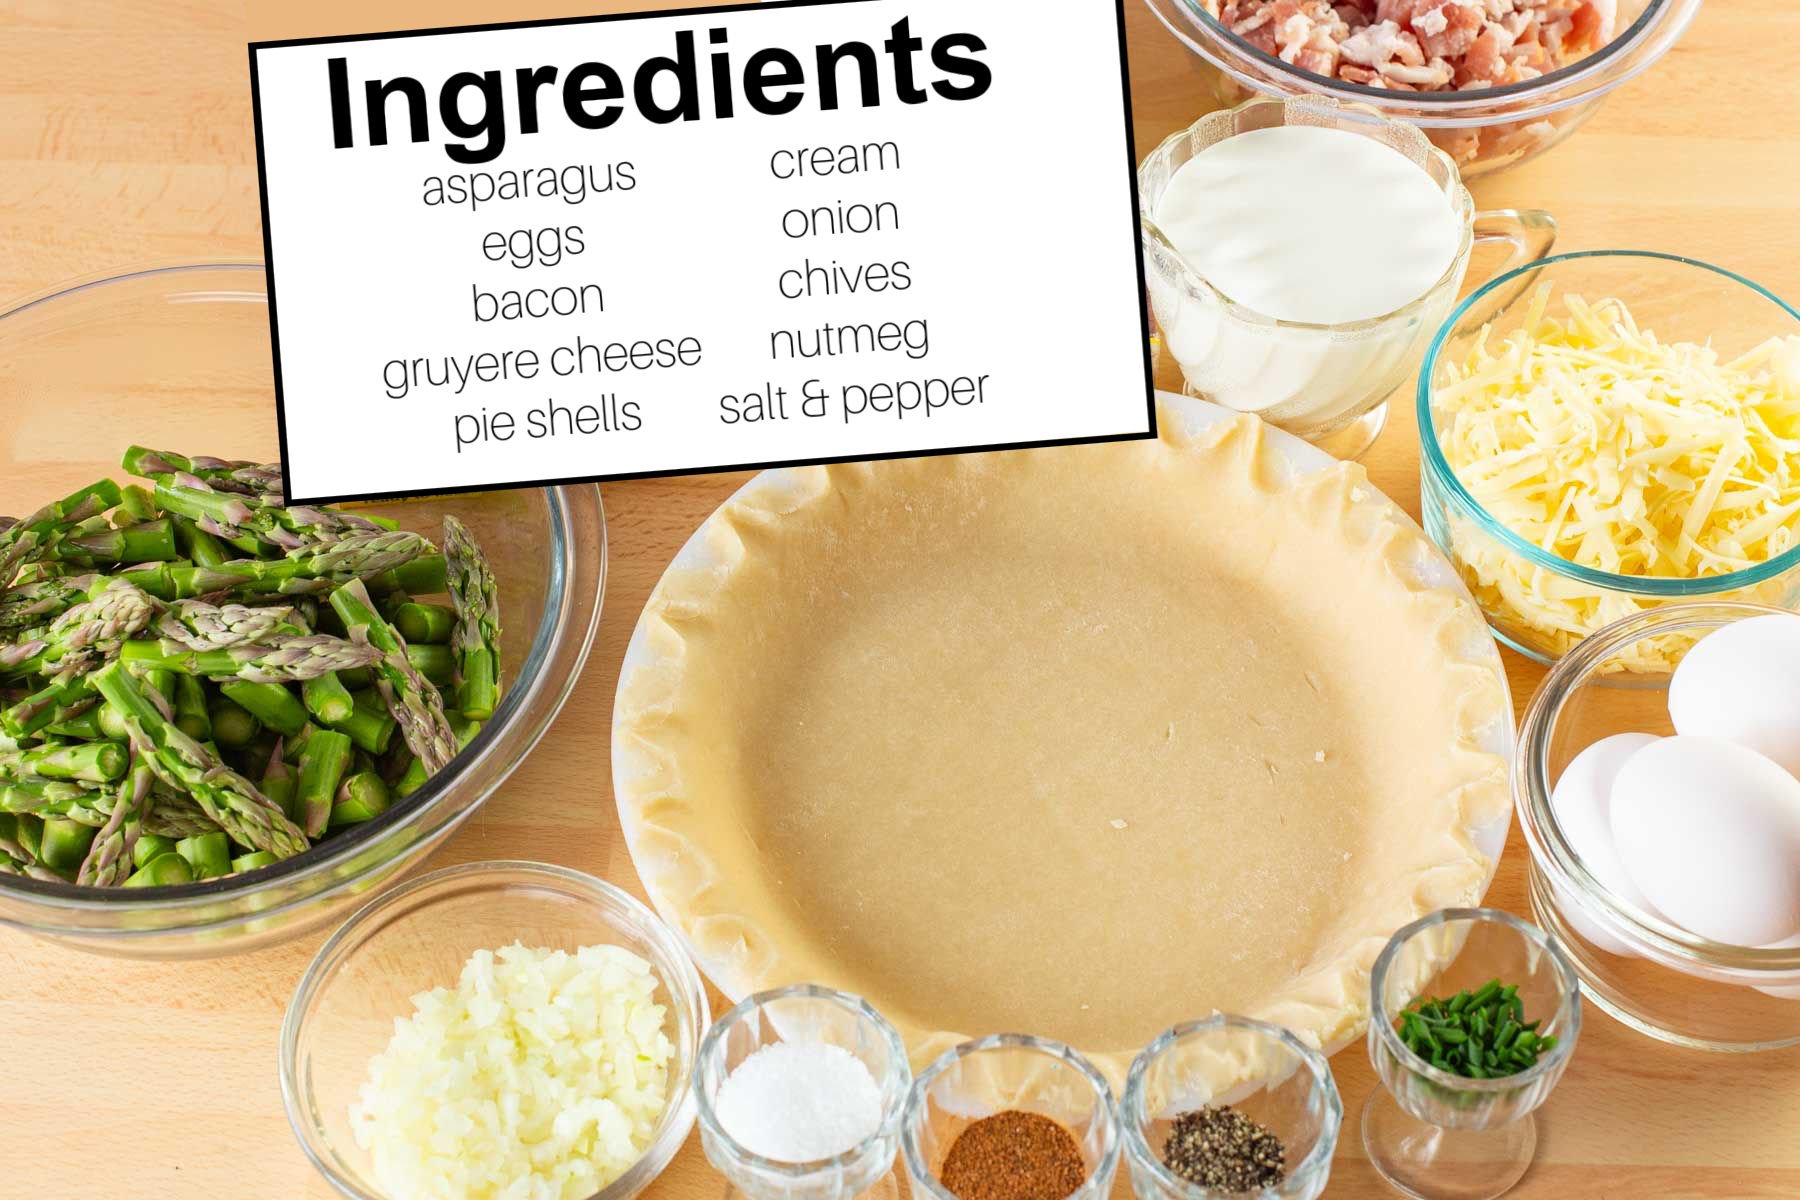
- Pie Crust - For this recipe I used a store-bought pie crust but if you prefer a homemade pie crust try the recipe I use in Grandma's Apple Pie.
- Gruyere Cheese - my favorite cheese to use in quiche recipes. It has a sweet and nutty flavor that melts just right! You can substitute with cheddar cheese or Swiss cheese.
- Eggs - fresh large eggs.
- Asparagus - use fresh asparagus for maximum flavor, discarding the woody ends. In a pinch frozen asparagus will work.
- Cream - full fat cream bakes quiche to an ideal consistency.
- Bacon - I trim most of the fat from the bacon, then fry just until slightly crisp.
- The combination of sautéed onions, nutmeg, chives, salt and pepper enhance the flavor profile of this quiche.
Looking for more breakfast and brunch recipes to try that are perfect an elegant meal for company, yet simple enough for everyday. Try these!

Reader are loving this recipe
I got so many compliments from this!!
- Danielle says - Loving this for an easy Mother's Day breakfast that will impress!
⭐⭐⭐⭐⭐
This post was originally published April 28, 2016. Occassionally I update with fresh tips, content, and photos. Current update April 12th, 2024.

Fresh Asparagus and Gruyere Cheese Quiche
Easy to make quiche with fresh asparagus, gruyere cheese and bacon!
Servings: 6
Calories: 704kcal
Ingredients
- 2 unbaked pie shells
- 6 ounces bacon chopped
- ½ cup onion finely chopped
- 8 ounces fresh asparagus chopped
- 1 ½ cups gruyere cheese shredded
- 4 large eggs
- 1 cup heavy cream
- pinch ground nutmeg
- 2 tablespoons fresh chives chopped
- ½ teaspoon salt
- ¼ teaspoon pepper
Instructions
- Preheat the oven to 350º F.
- In a large skillet cook the bacon until slightly crisp.
- Add the onion and asparagus, sauté until the asparagus is tender but still crisp.
- Transfer to a bowl and set aside to cool.
- Whisk together the eggs and cream.
- Add a pinch of nutmeg, salt, pepper and chives to the egg mixture.
- Toss together the shredded gruyere cheese and asparagus mixture.
- Spread evenly into the pie crust.
- Pour egg and cream mixture over the asparagus layer.
- Using a small circular cookie cutter to cut shapes from the remaining pie shell. Arrange around the quiche to create a decorative edge.
- Arrange several asparagus spears on top to decorate.
- Bake for 50-60 minutes until the center of the quiche is set. If the top begins to brown too much, cover with a pie crust shield or foil. Continue baking until done.
- Let stand for 10-15 minutes before serving.
Video
Nutrition
Calories: 704kcal | Carbohydrates: 32g | Protein: 23g | Fat: 54g | Saturated Fat: 25g | Polyunsaturated Fat: 5g | Monounsaturated Fat: 20g | Trans Fat: 0.1g | Cholesterol: 209mg | Sodium: 903mg | Potassium: 316mg | Fiber: 2g | Sugar: 3g | Vitamin A: 1395IU | Vitamin C: 4mg | Calcium: 402mg | Iron: 3mg
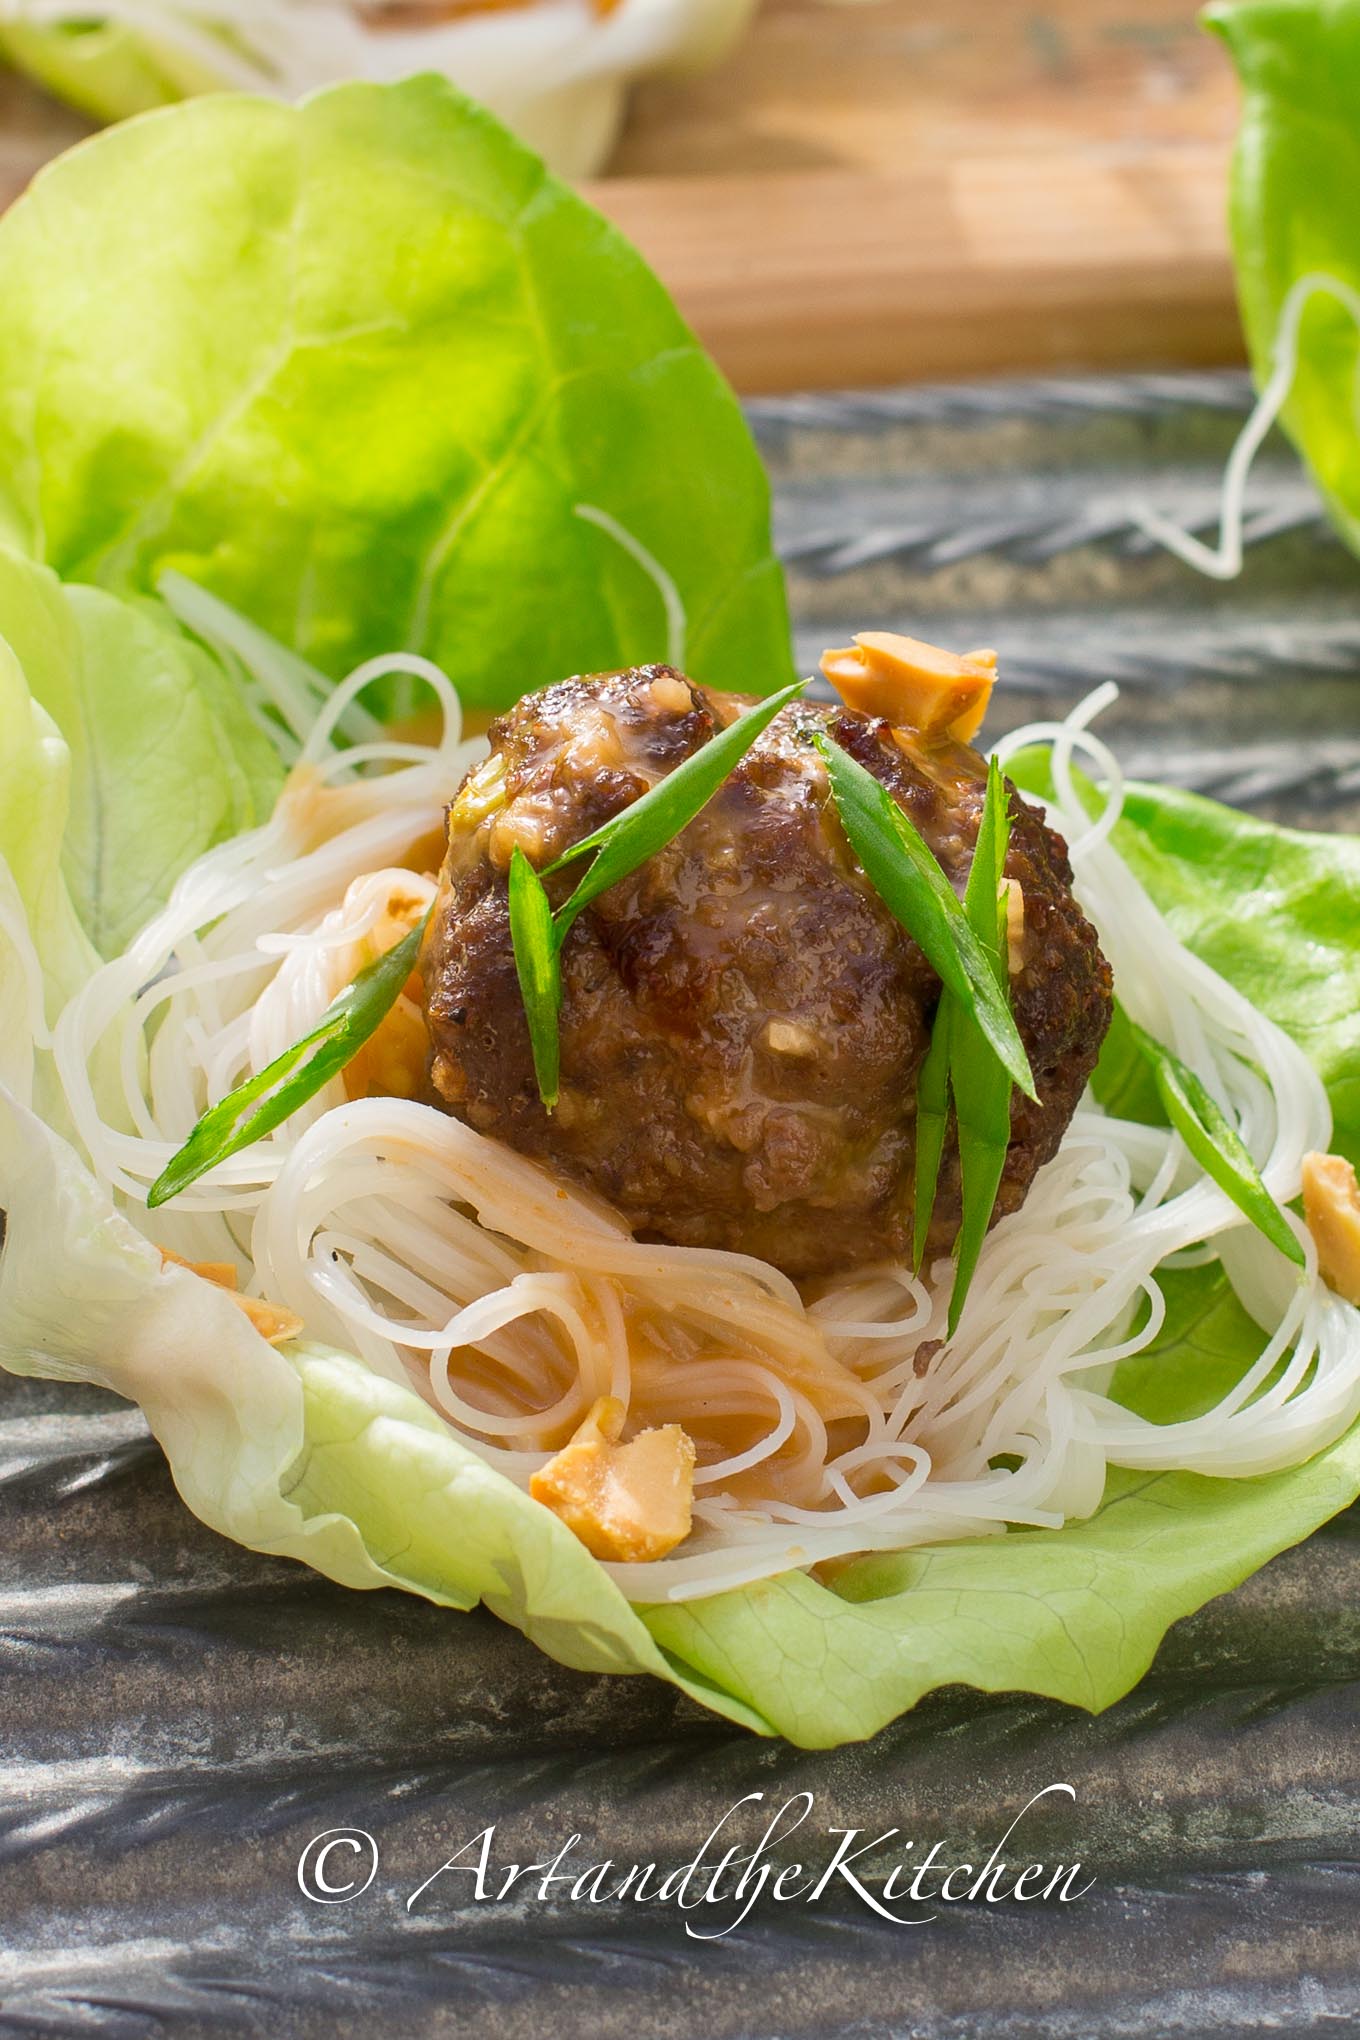
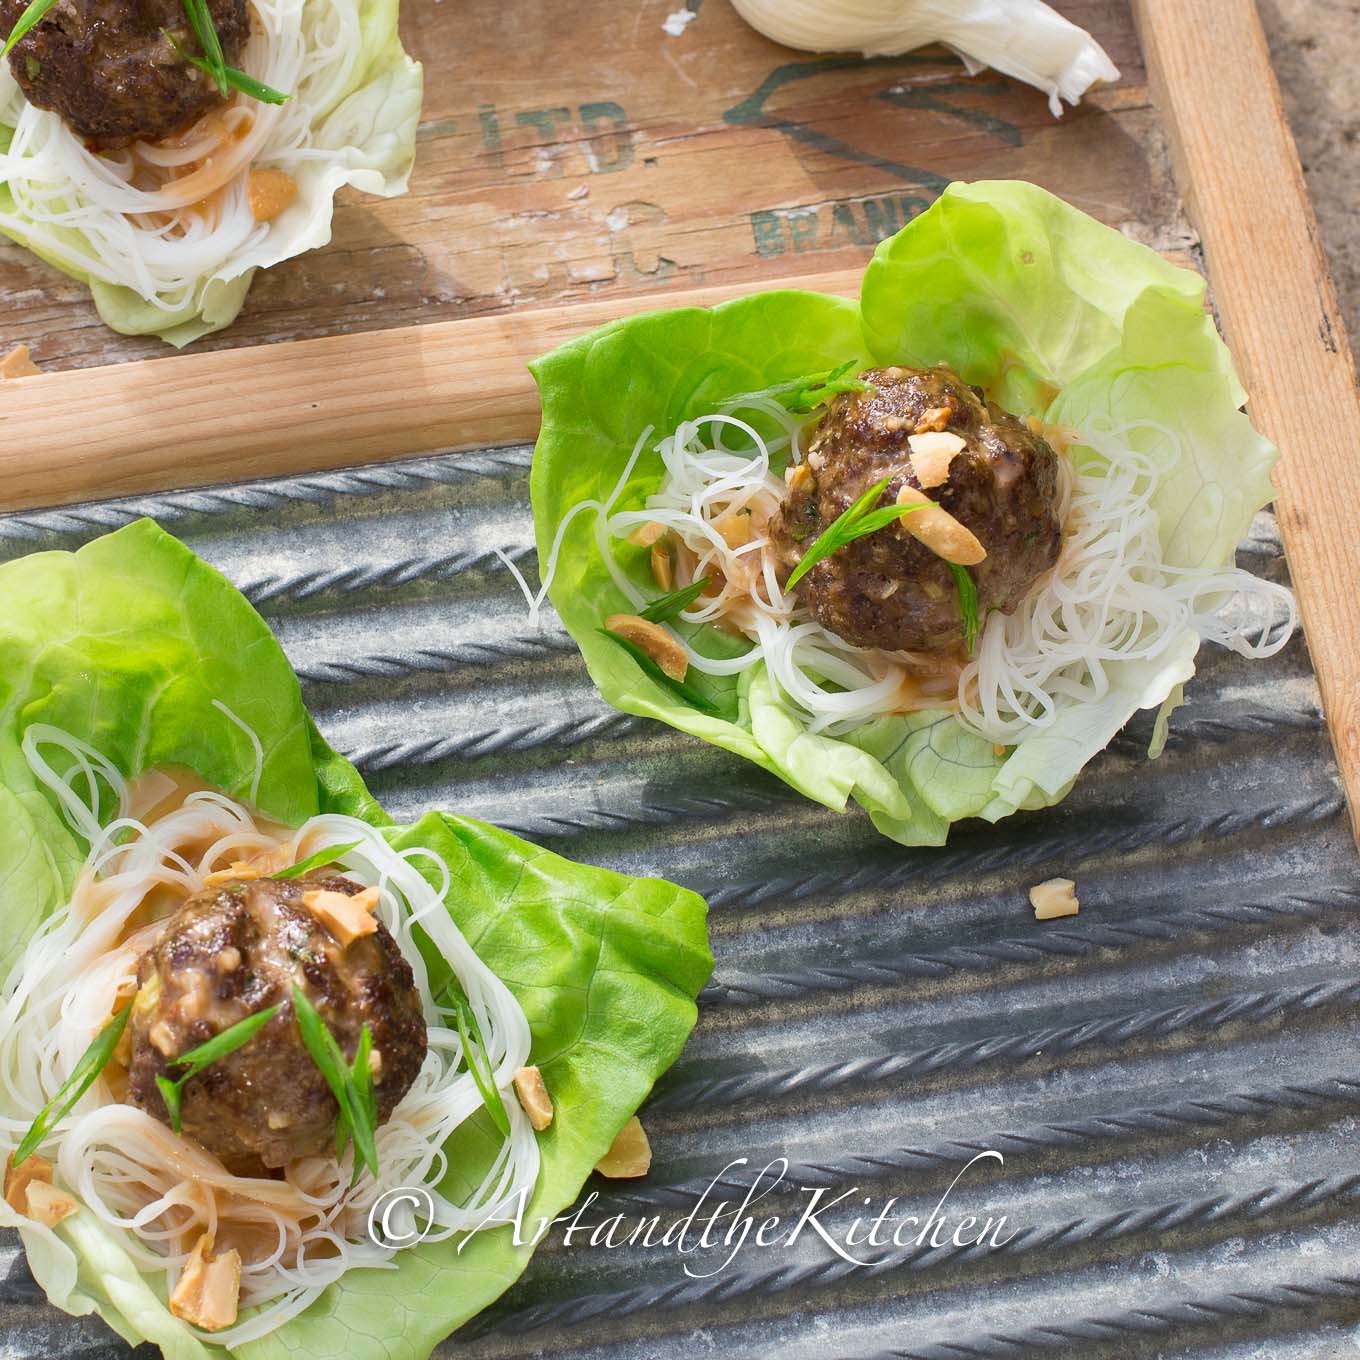
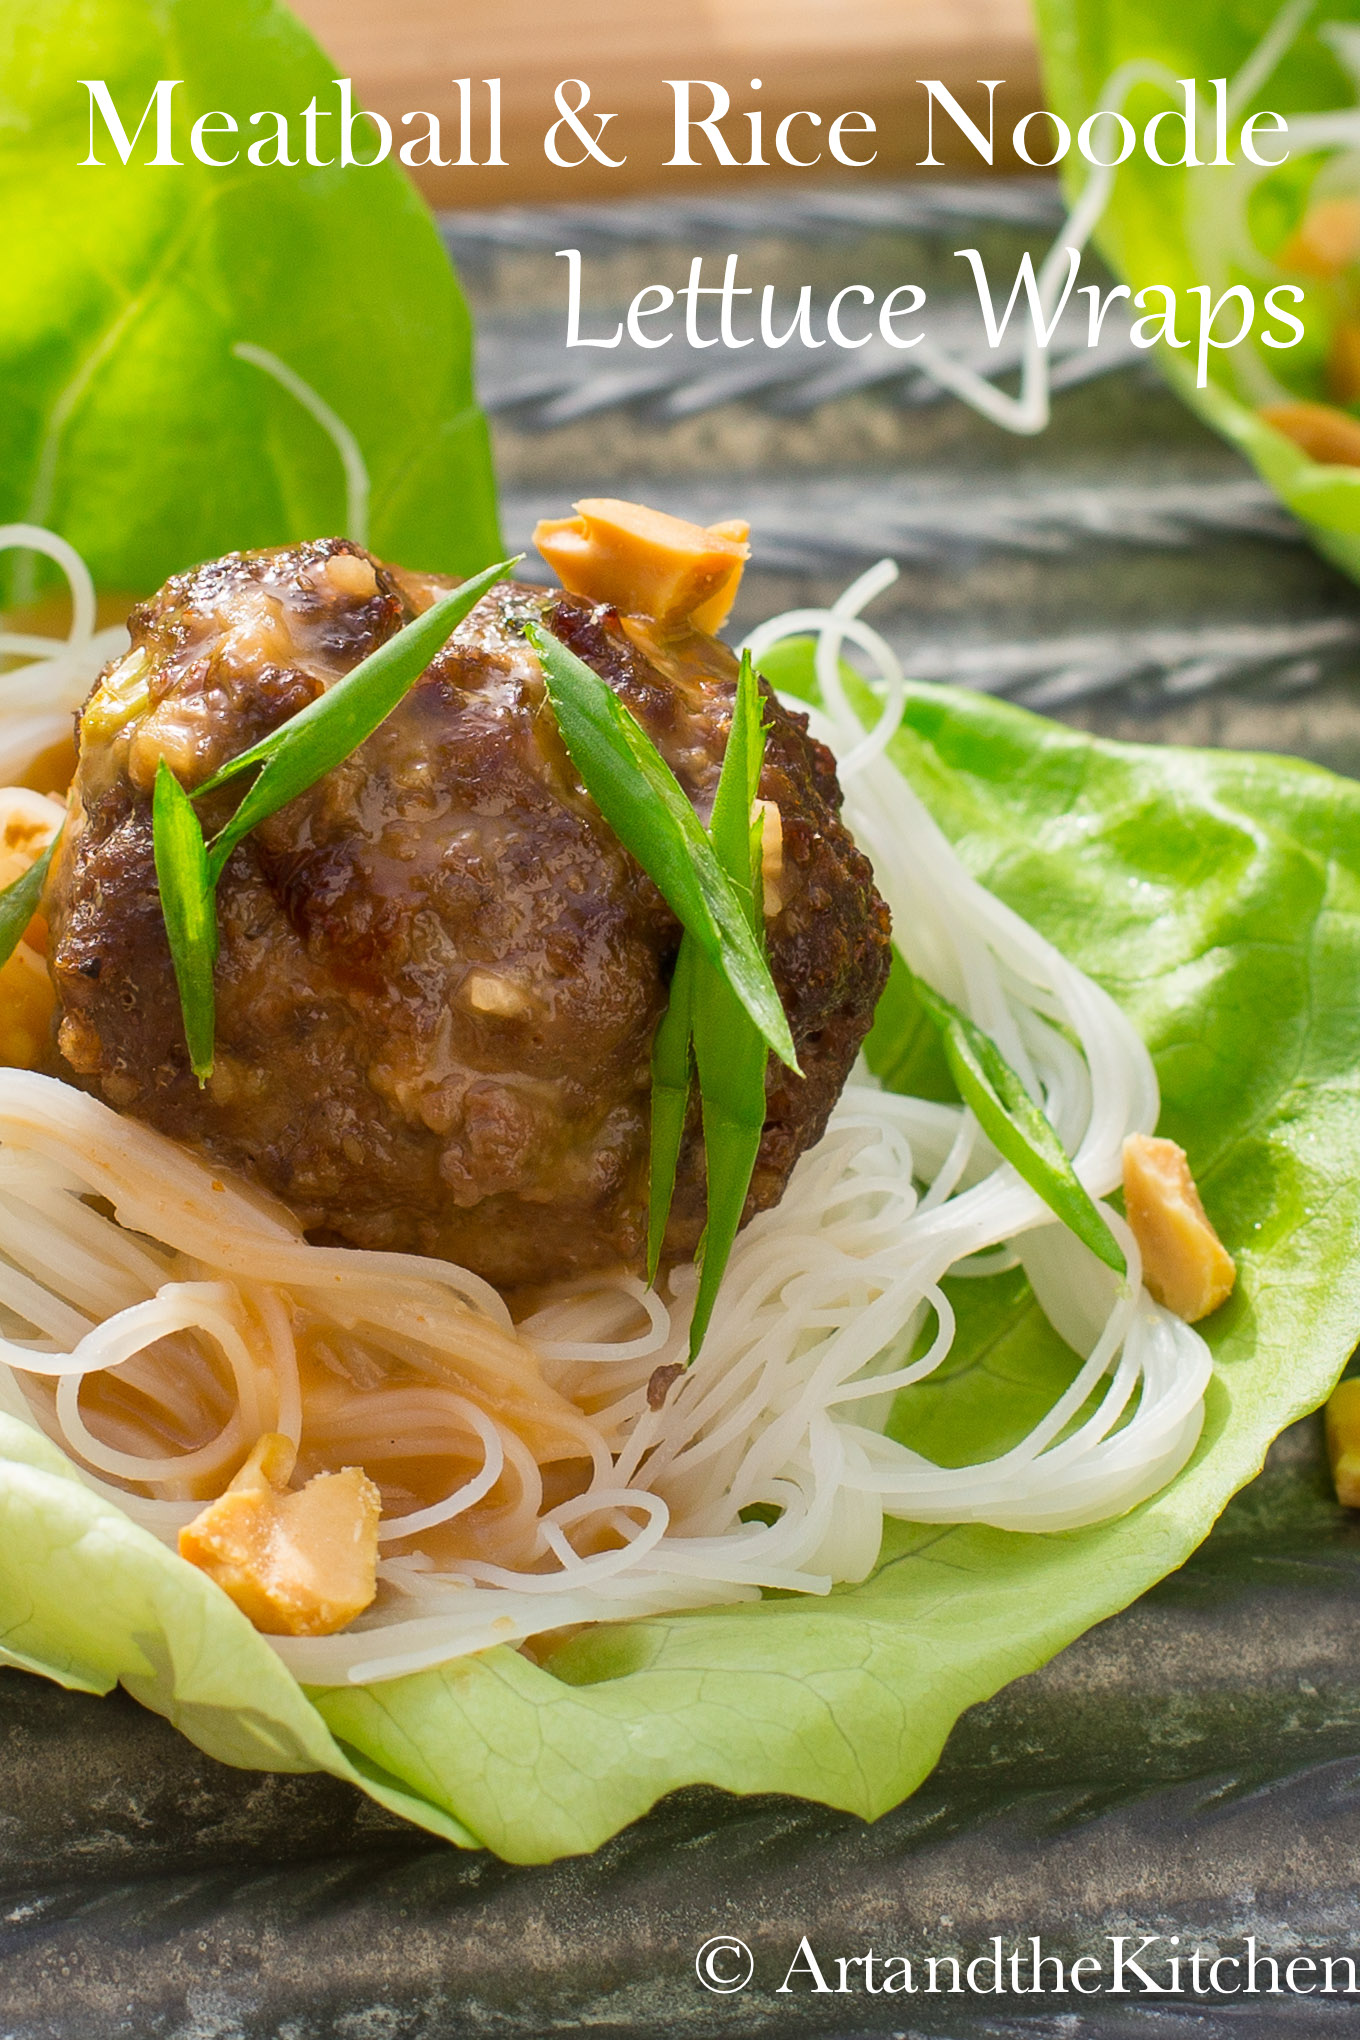
Meatball and Rice Noodle Lettuce Wraps
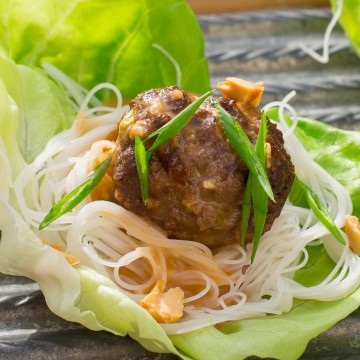
This Asian inspired recipe for Meatball and Rice Noodle Lettuce Wraps is great as an appetizer or even main course.

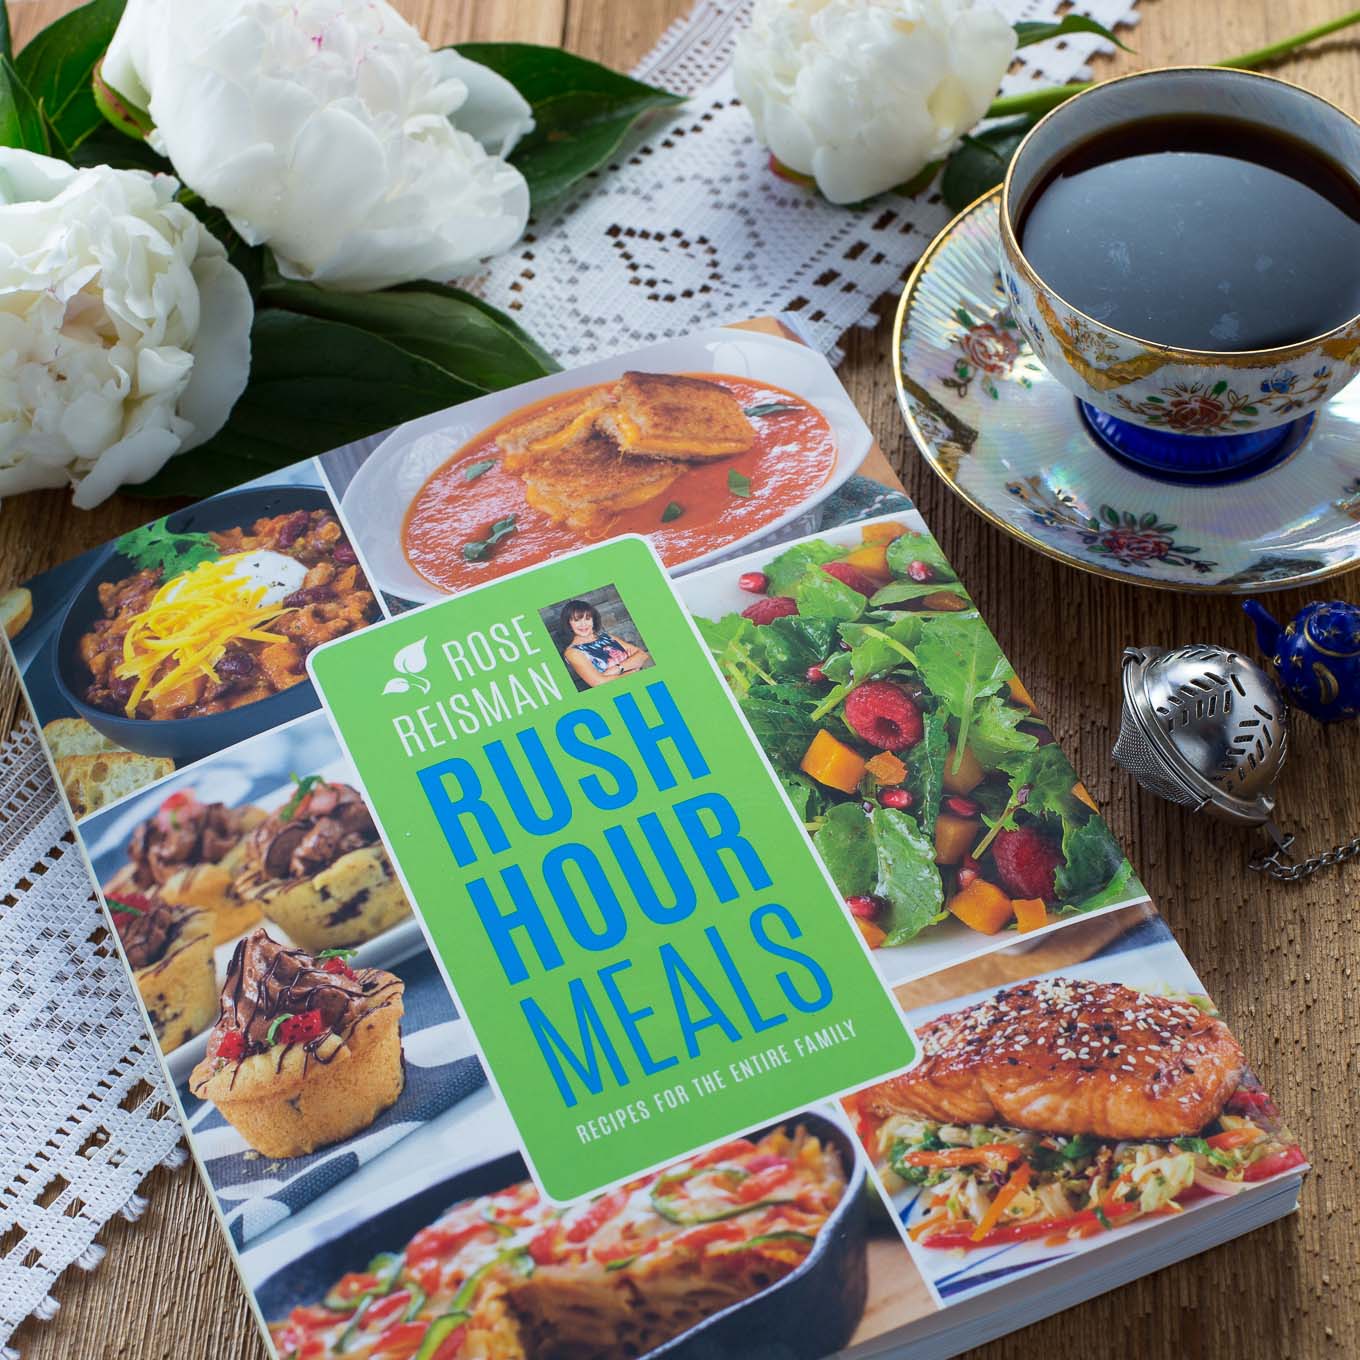
This recipe is from a great cookbook I had the pleasure of reviewing Rush Hours Meals by Rose Reisman. Rose Reisman is one of my favourite cookbook authors. Back in 1993 I bought my first Rose Reisman cookbook and the stained, worn out pages are proof of how much I enjoy her recipes. Her new book Rush Hour Meals is all about preparing good food even when life gets crazy busy! With a bit of planning feeding your family delicious, nutritious meals is easy. Most of the recipes in this cookbook can be made in 30 minutes or less. One of the first recipes I tried was Meatball and Rice Noodle Lettuce Wraps. Wow, this was so tasty!
These meatballs pack a ton of flavour. I loved how the recipe called for servings them over a bed of lettuce and rice noodles, but they would be great with rice as well.

Meatball and Rice Noodle Lettuce Wraps
Meatball and Rice Noodle Lettuce Wraps are a healthy appetizer that is also perfect for lunch or dinner!
Servings: 10
Calories: 148kcal
Ingredients
- Sauce
- ¾ cup canned light coconut milk 185 ml
- ⅓ cup reduced-sodium beef or chicken broth 80 ml
- 2 teaspoon fresh lemon juice 10 ml
- 2 tablespoon hoisin sauce 30 ml
- 2 teaspoon packed brown sugar 10ml
- 1 teaspoon cornstarch 5 ml
- 1 teaspoon minced peeled fresh ginger 5 ml
- 1 teaspoon minced garlic 5ml
- 1 teaspoon Sriracha or your favourite hot sauce 5 ml
- For MEATBALLS
- 1 lb extra lean ground beef 500g
- 1 egg
- ¼ cup hoisin sauce 60 ml
- ¼ cup finely diced green onion 60 ml
- ¼ cup unseasoned dry breadcrumbs 60 ml
- 2 tablespoon finely chopped cilantro leaves 30 ml
- 2 teaspoon minced garlic 10 ml
- 1 ½ teaspoon minced peeled fresh ginger 7ml
- salt and pepper
- 2 oz dried thin rice noodles 60g
- 10 Boston lettuce leaves
- GARNISH optional
- ¼ cup diced red bell pepper 60ml
- 2 teaspoon toasted sesame seeds 10ml
- 1 tablespoon crushed peanuts 15 ml
Instructions
- Preheat oven to 425ºF (220ºC). Line a baking sheet with foil and lightly spray with vegetable oil.
- To make the sauce: In a bowl, combine the coconut milk, stock, lemon juice, hoisin, sugar, cornstarch, ginger, garlic and Sriracha and stir until the cornstarch is dissolved. Set aside.
- To make the meatballs: In a bowl, combine the beef, egg, hoisin, onions, breadcrumbs, cilantro, garlic, ginger, and salt and pepper. Using your hands, form about thirty 1-inch (2.5 cm) meatballs. Place on the prepared baking sheet and bake in the preheated oven for 10 minutes or until internal temperature reaches 165º (74ºC) when tested with a cooking thermometer.
- In a small skillet over medium heat, cook the prepared sauce until slightly thickened, about 2 minutes.
- Meanwhile, in a saucepan of boiling water, cook the noodles according to the package instructions. Drain well.
- Top each lettuce leaf with an equal amount of the cooked noodles. Top noodles with 3 meatballs and drizzle with the sauce. Garnish with red pepper, sesame seeds or peanuts if you like.
Nutrition
Calories: 148kcal | Carbohydrates: 13g | Protein: 12g | Fat: 5g | Saturated Fat: 2g | Cholesterol: 45mg | Sodium: 249mg | Potassium: 240mg | Fiber: 1g | Sugar: 4g | Vitamin A: 670IU | Vitamin C: 6.8mg | Calcium: 27mg | Iron: 1.7mg
 *Thank you to Whitecap Publishing for the complimentary book. I enjoyed reviewing it. All opinions express in this post are mine.
Be sure to follow me and get my latest recipes on Pinterest, Instagram Facebook and Twitter.
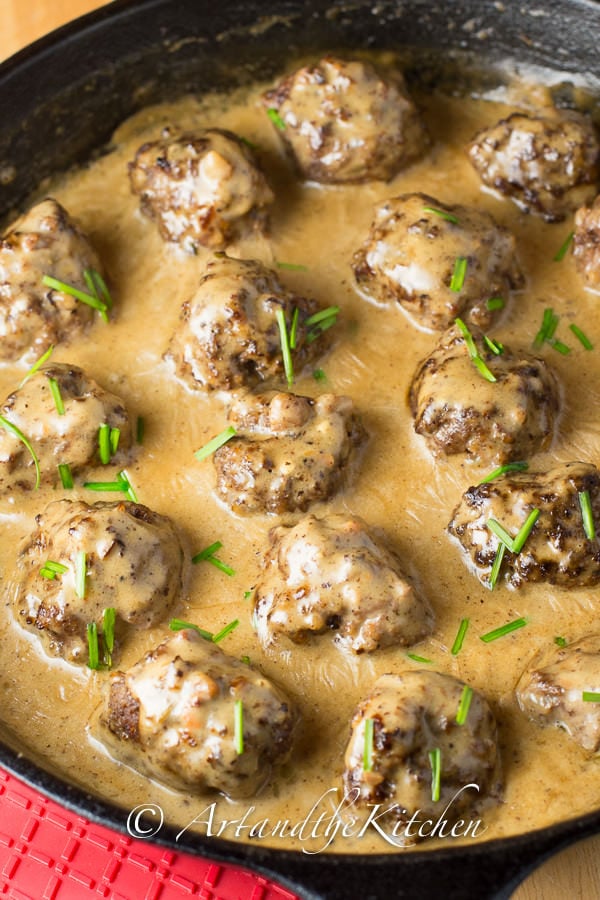
Another great meatball recipe to try is my very popular recipe for Swedish Meatballs
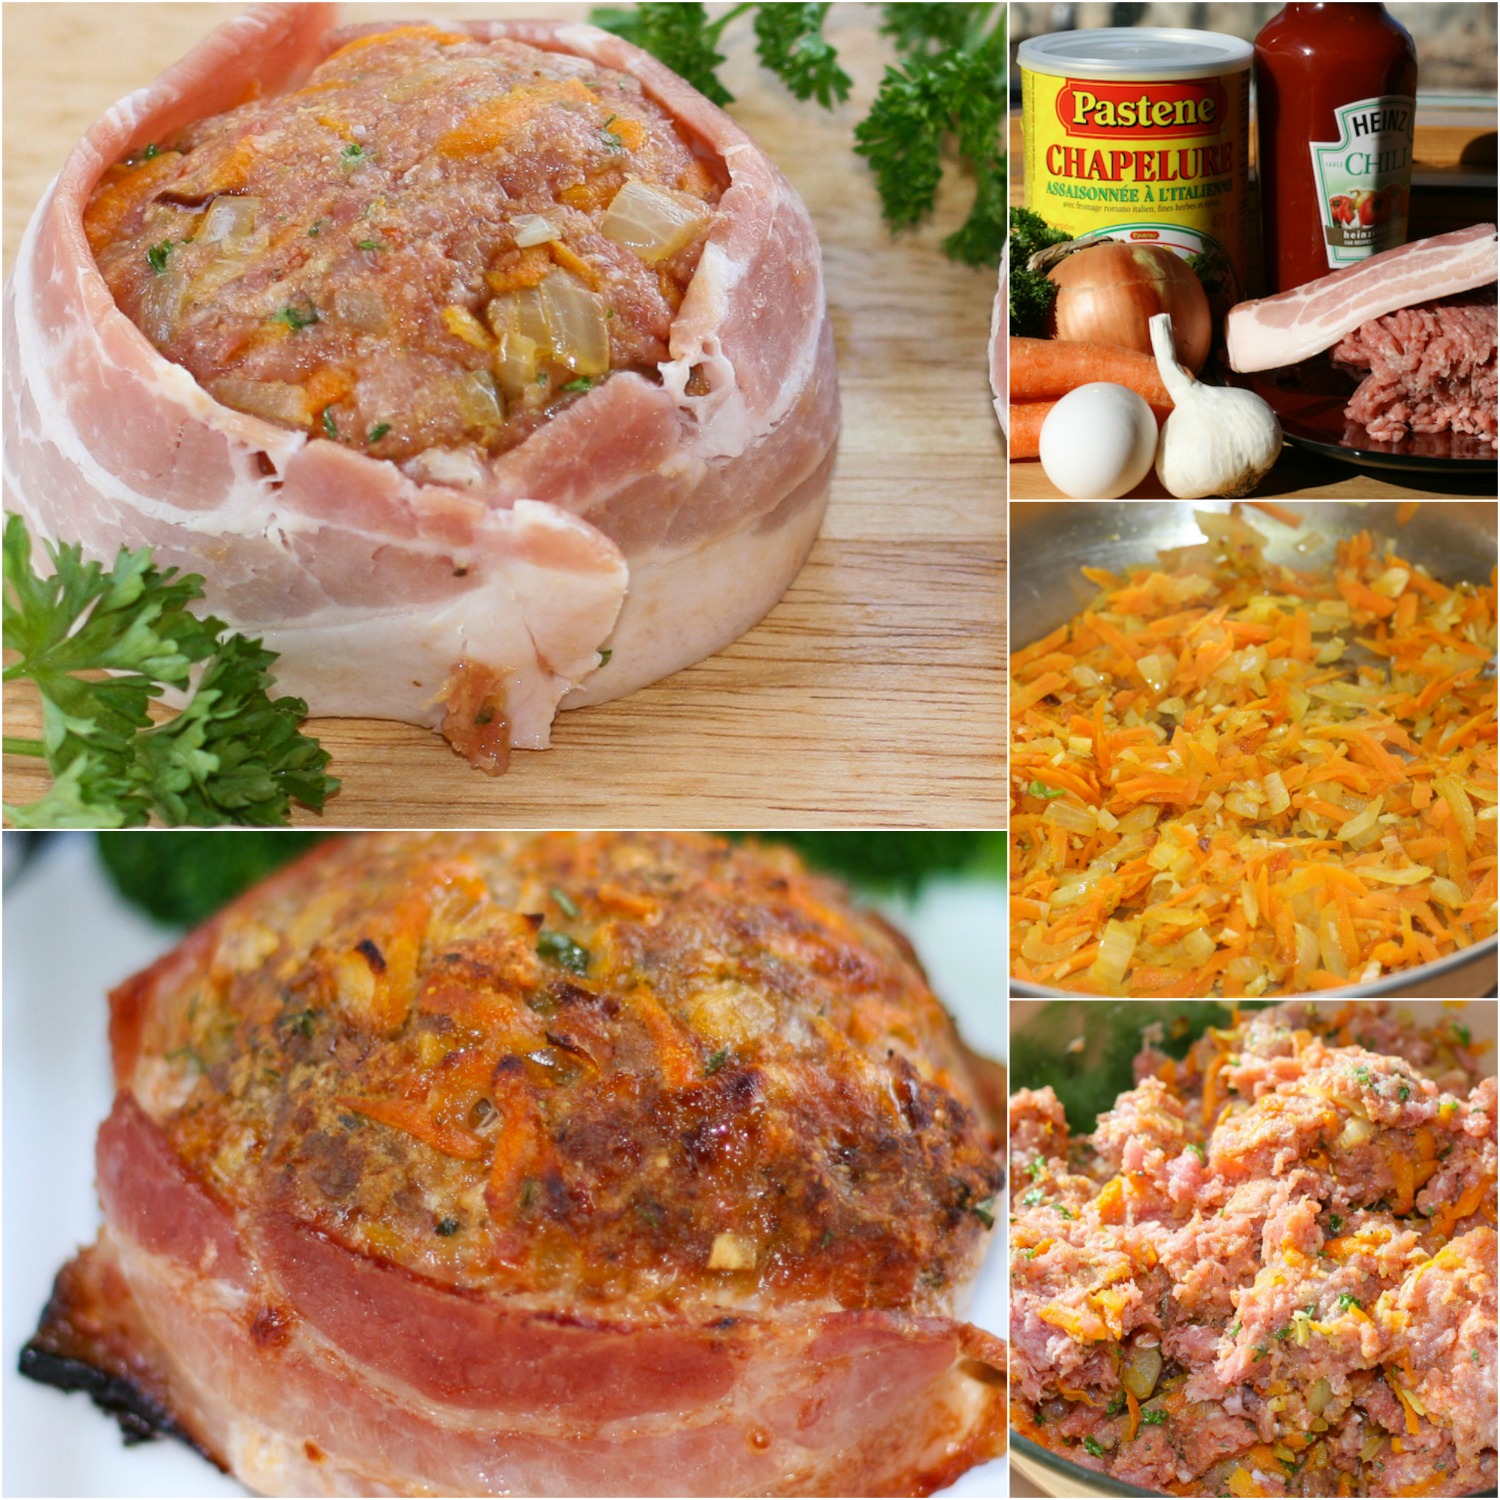
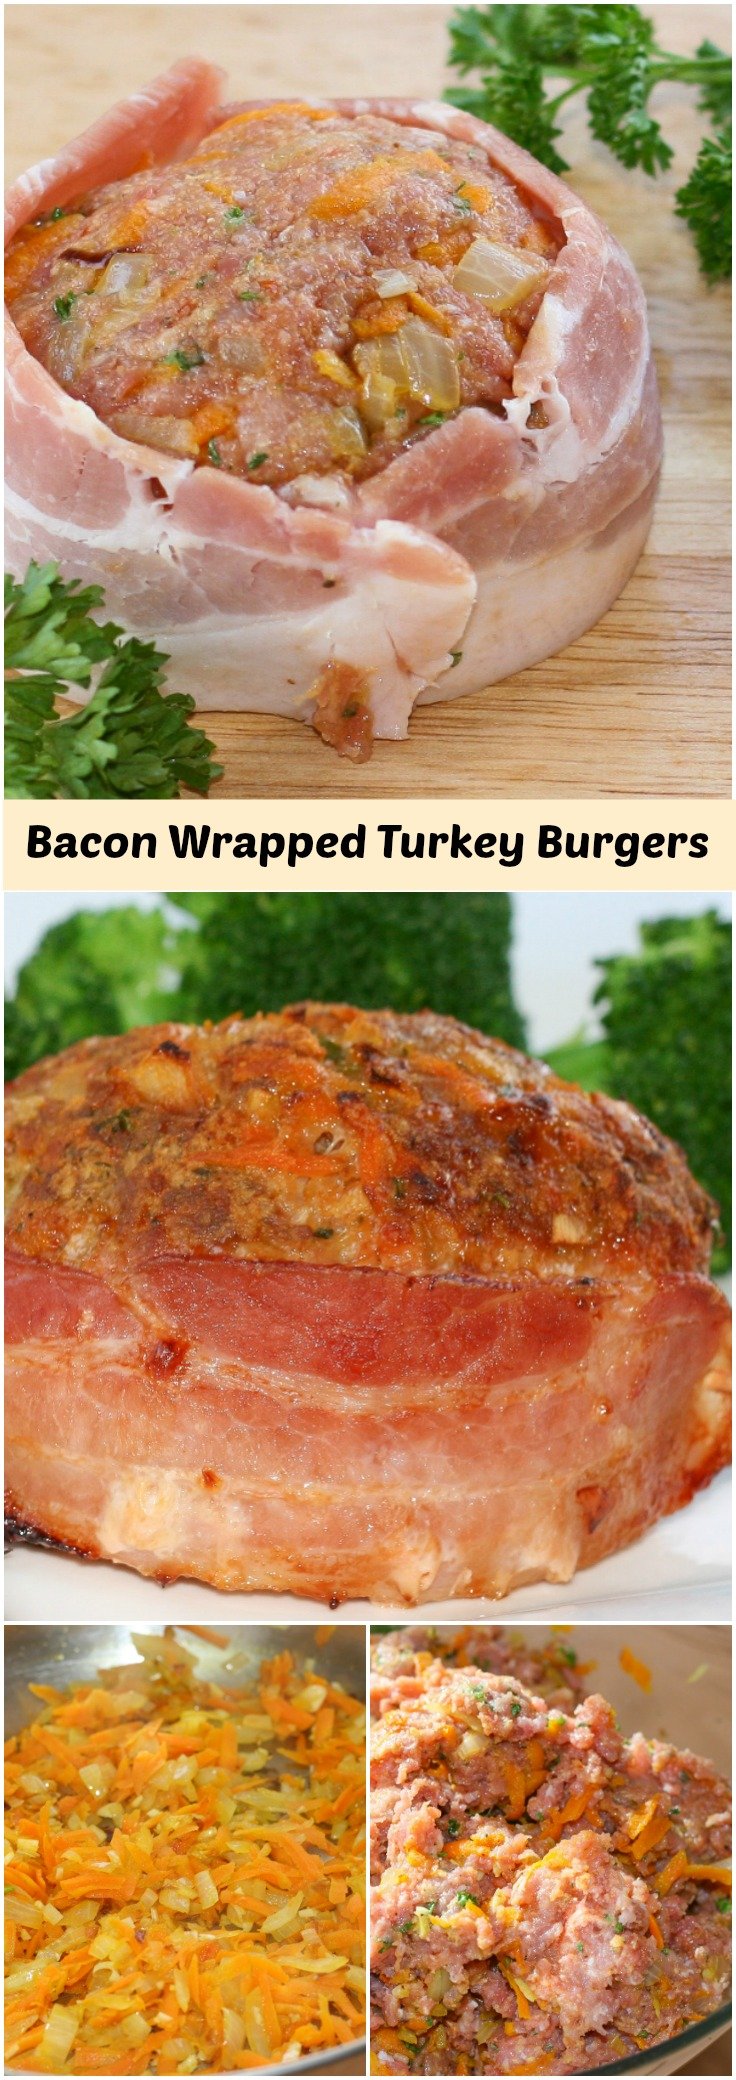
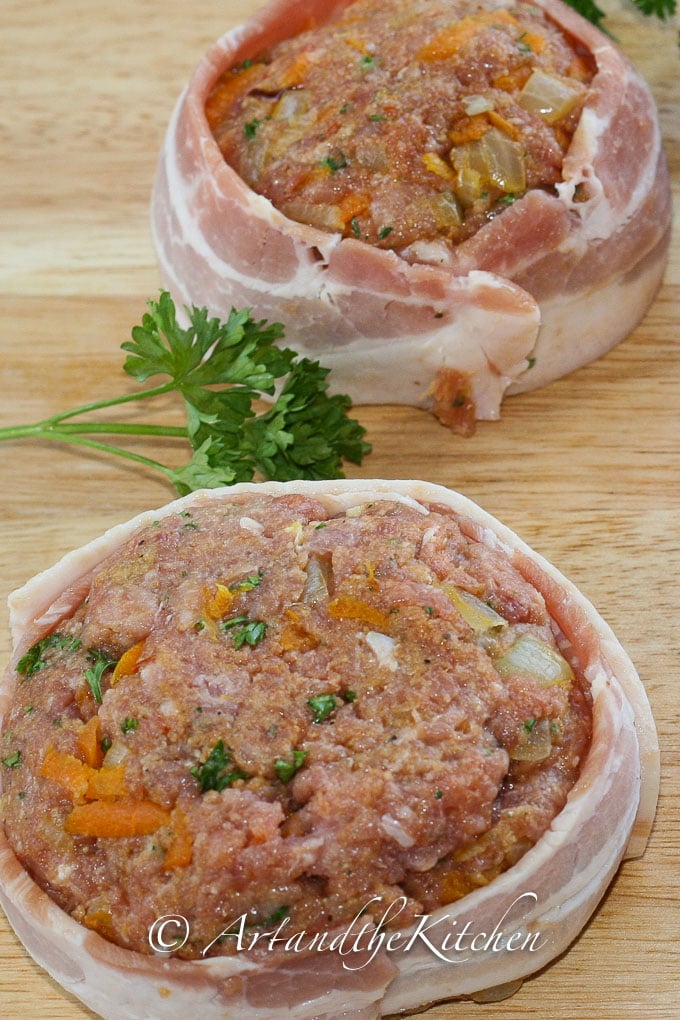
Bacon Wrapped Turkey Burgers

This recipe for Bacon Wrapped Turkey Burgers is loaded with flavour! Bake in the oven or grill on the BBQ. Simply skip the bacon for a low fat healthier version.
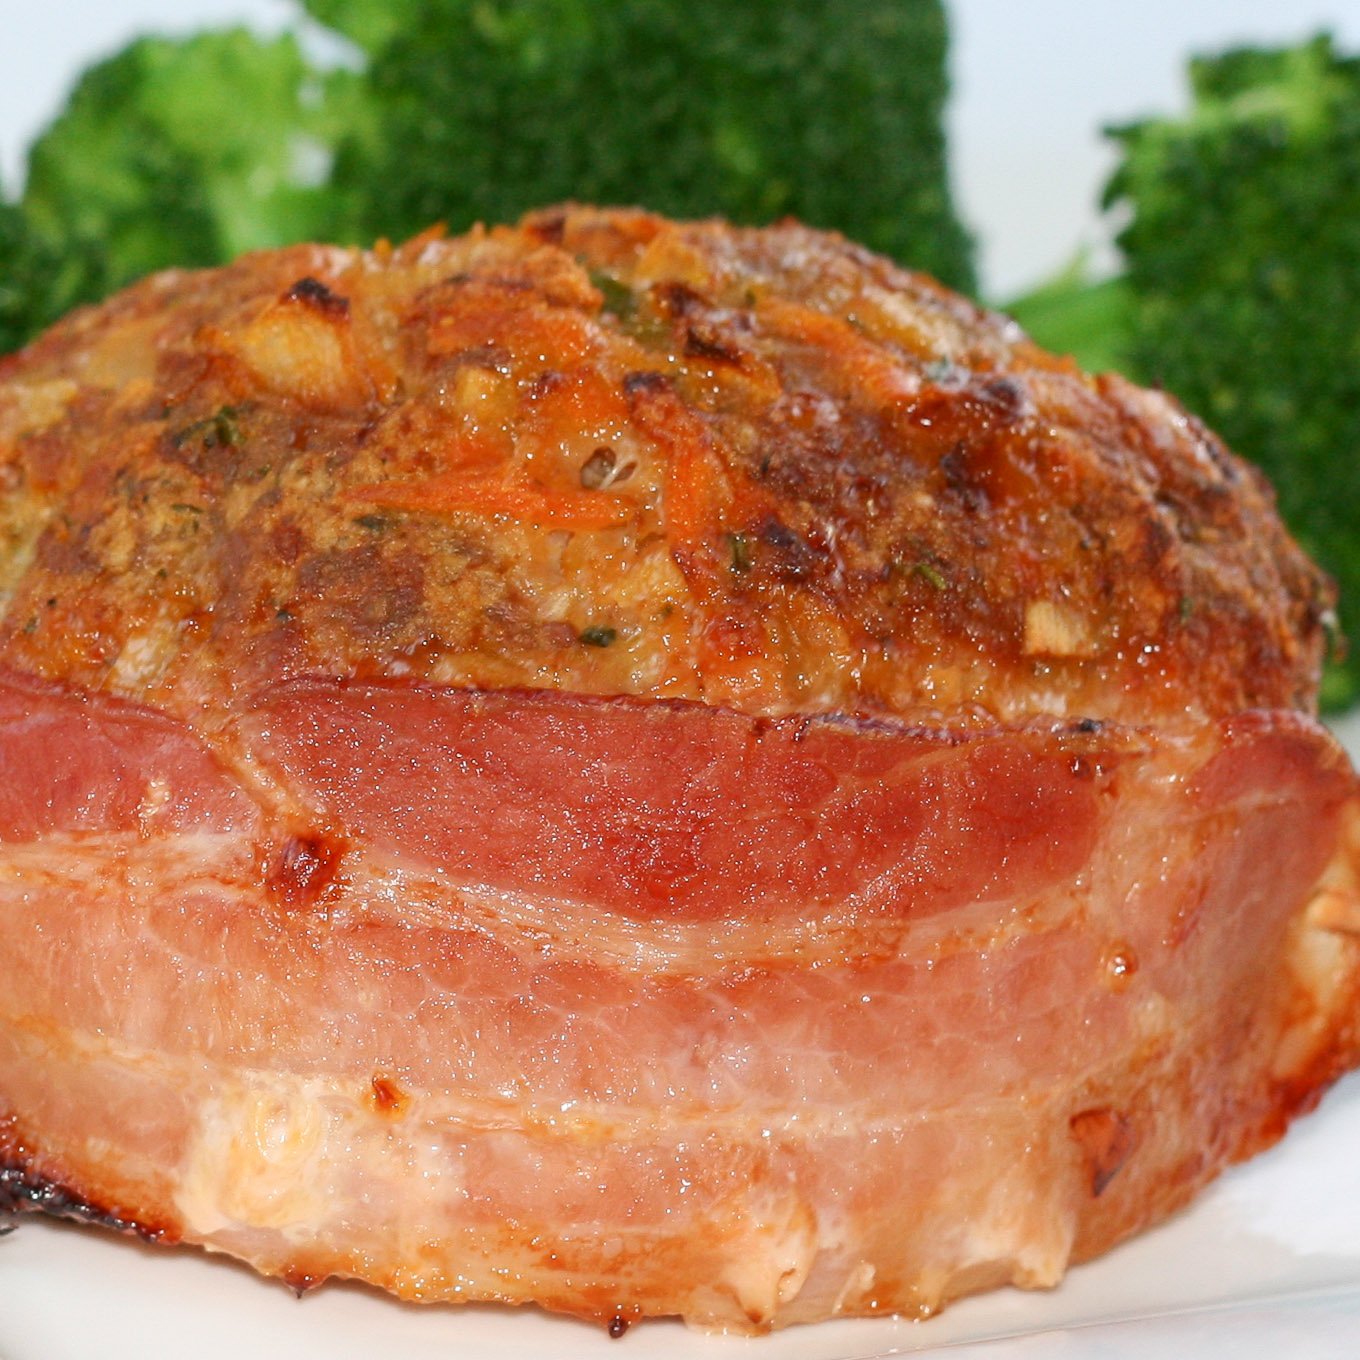
Ground turkey is a great alternative to ground beef if you are trying to cut back the amount of red meat you eat. It can be used as a substitution for ground beef in chilis, soups, stews, and even meatloaf. Use "ground turkey breast" instead of "ground turkey" to reduce the fat. I usually adjust and modify the spices used as ground turkey can taste a bit more bland than ground beef. For my Bacon Wrapped Turkey Burgers I used seasoned breadcrumbs and chili sauce to add some great flavour.
Be careful not to overcook especially if using ground turkey breast, or you will have dry burgers. One of the best kitchen gadgets I ever invested in was a meat thermometer. Takes the second guessing out of whether your meat is done or not.
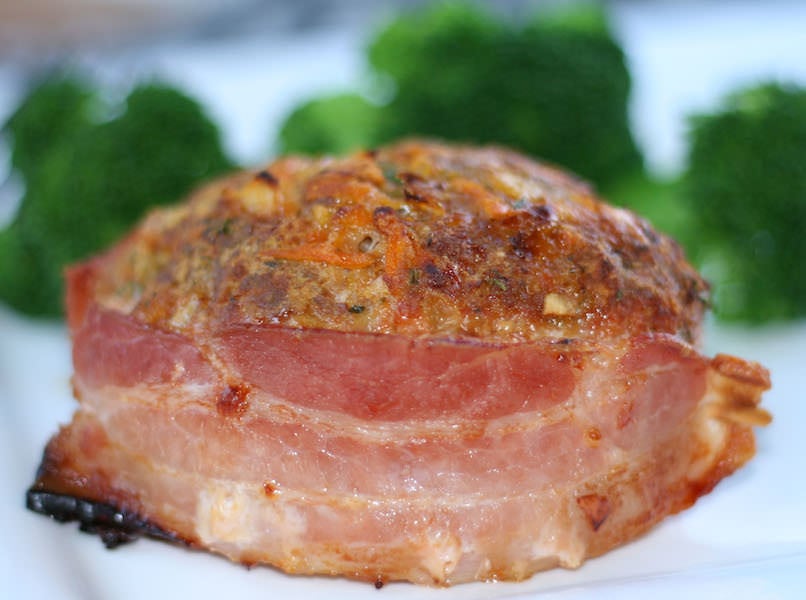

Bacon Wrapped Turkey Burgers
This recipe for Bacon Wrapped Turkey Burgers is loaded with flavour! Bake in the oven or grill on the BBQ. Simply skip the bacon for a low fat healthier version.
Servings: 4
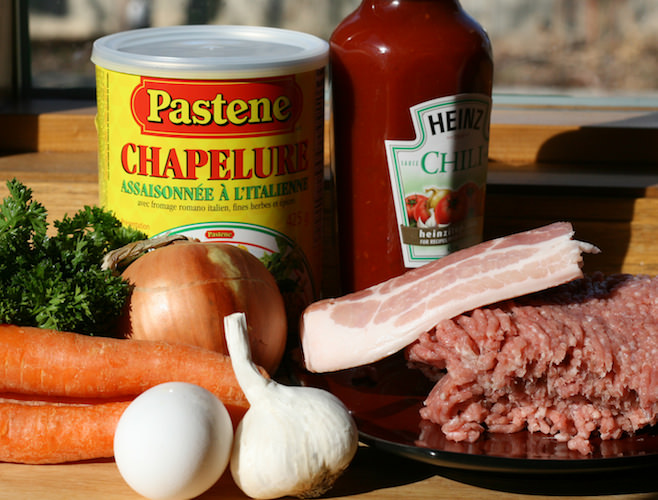
Ingredients
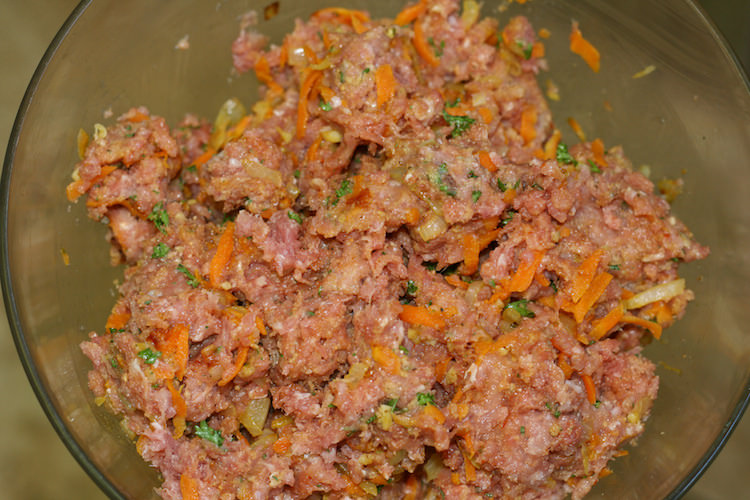
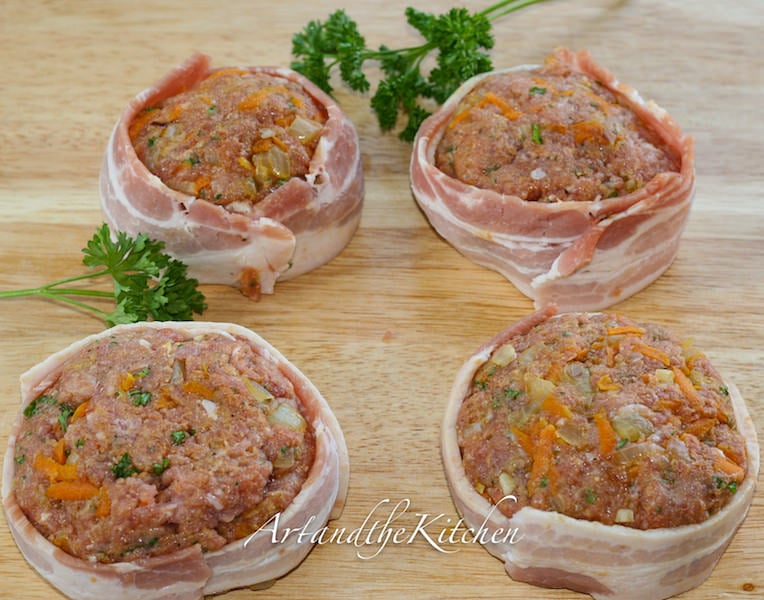
- 1 lb ground turkey
- 1 cup carrots grated
- 1 medium onion finely chopped
- 1 clove garlic finely chopped
- ¼ cup fresh parsley finely chopped
- ¼ cup seasoned breadcrumbs
- 2 tablespoon Chili Sauce
- 1 egg lightly beaten
- 4-8 strips thick cut bacon
- 1 tablespoon olive oil for sautéing
Instructions
- Heat oil in large frying pan, sauté carrots and onions until tender.
- Add garlic and cook for additional 2 minutes. Set aside.
- In large bowl, combine ground turkey, breadcrumbs, parsley, chili sauce, and egg.
- Add carrot/onion/garlic mixture.
- Mix until just blended, don't overwork or burgers will be tough.
- Divide into 4 portions and shape into thick patties.
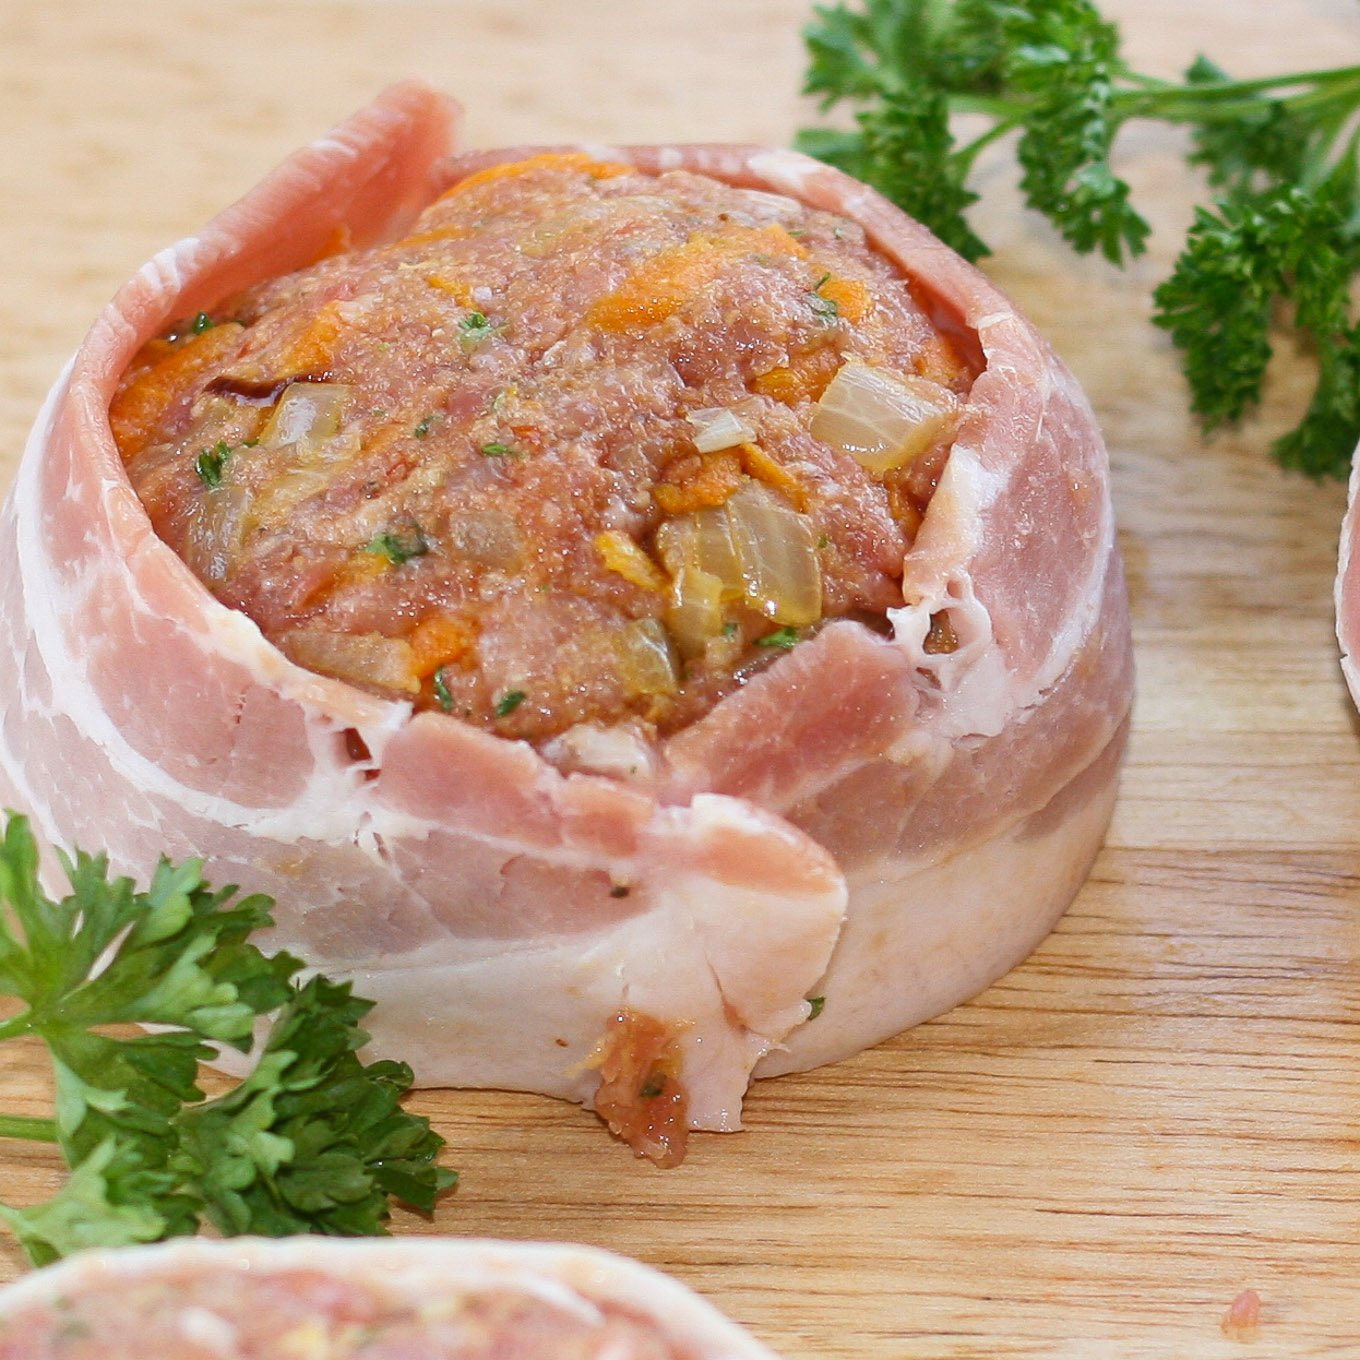
- Wrap bacon around and secure with toothpick.
- Place patties on greased baking sheet (I use cooking spray)
- Bake in oven at 375 degrees for about 30-40 minutes or grill on the BBQ
- (Internal temperature of 165 degrees)
Notes
adapted from Inspired.ca
Step by step instructions
 Ingredients:
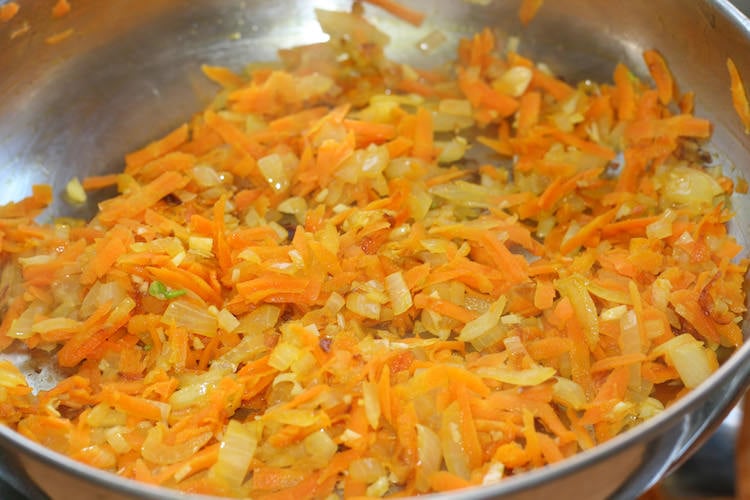
Saute carrots, onion, garlic until tender in 1 tbsp. olive oil.
Combine all ingredients together, don't over work mixture.
Form into patties, wrap with bacon. Bake 375 for about 30-40 minutes or grill on the BBQ until done.
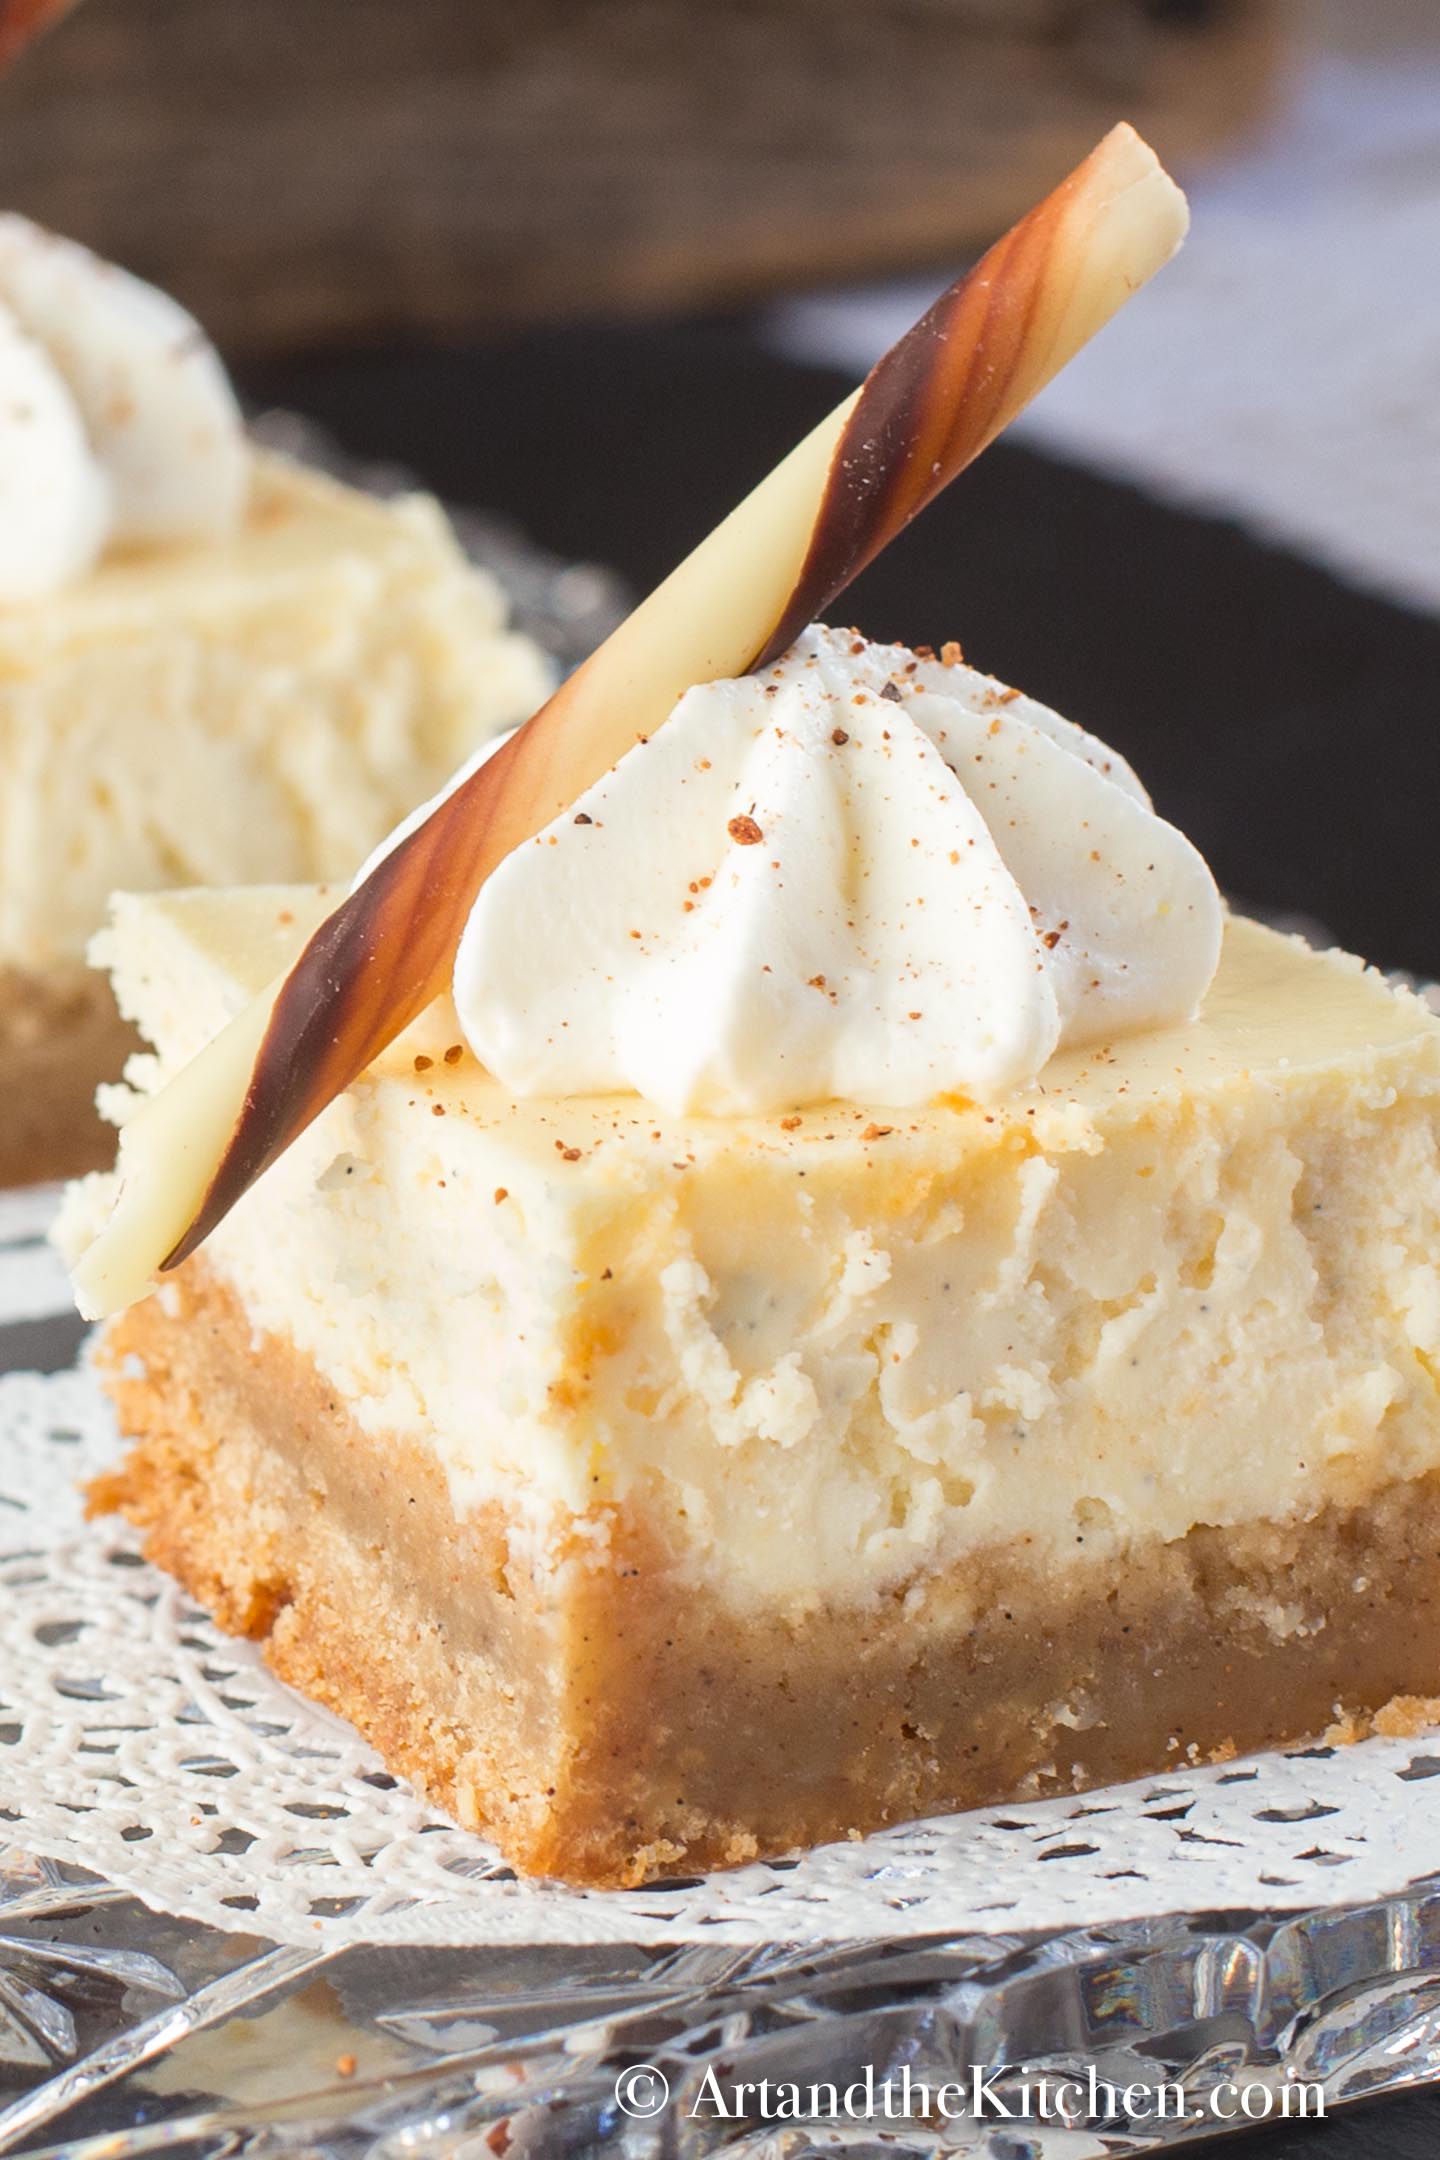
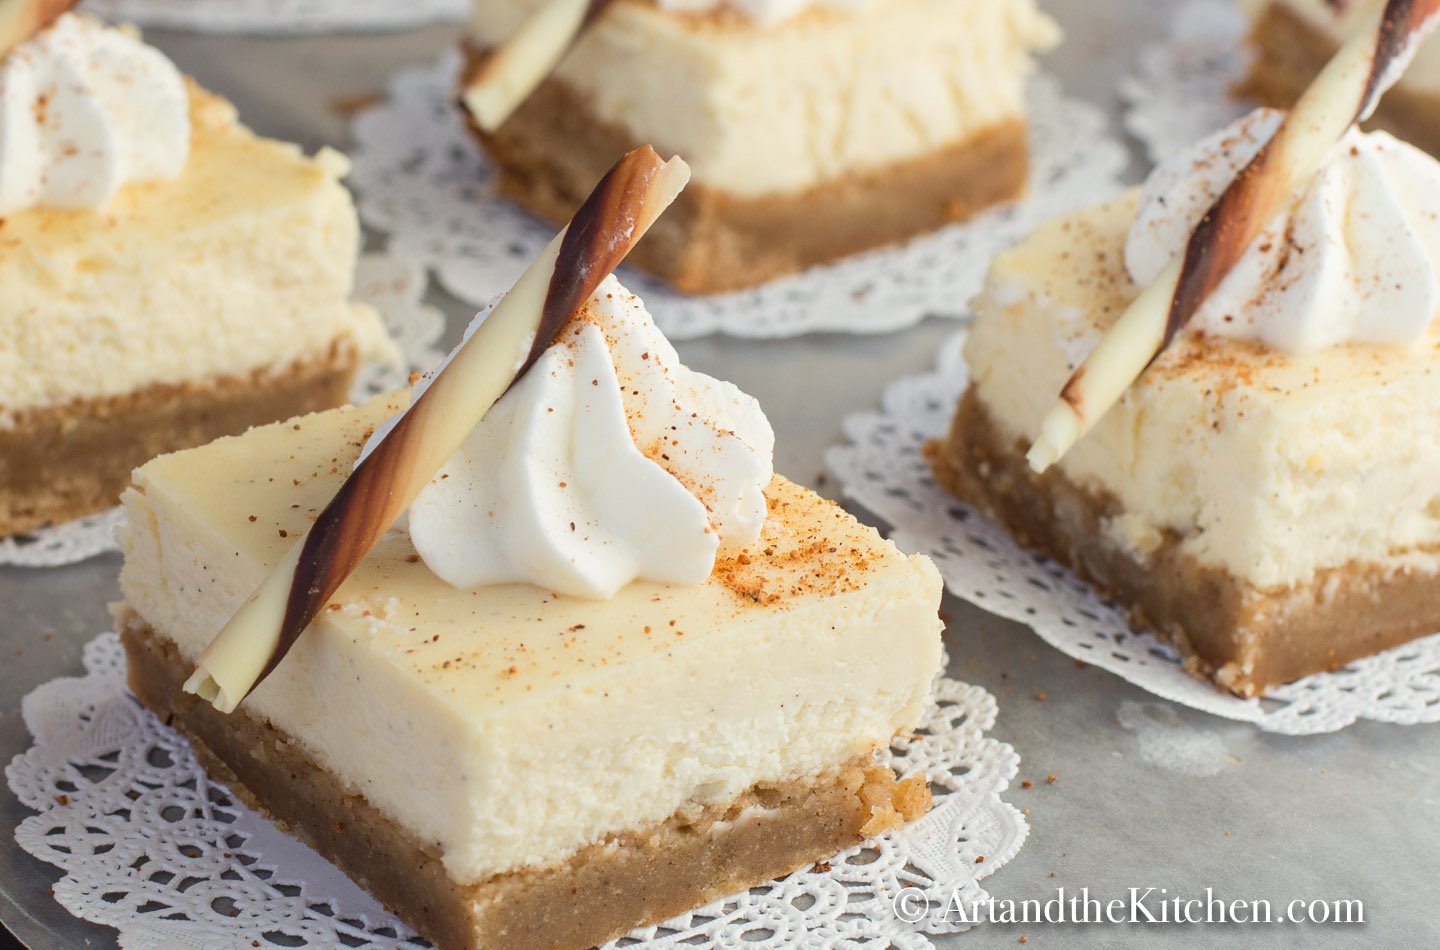
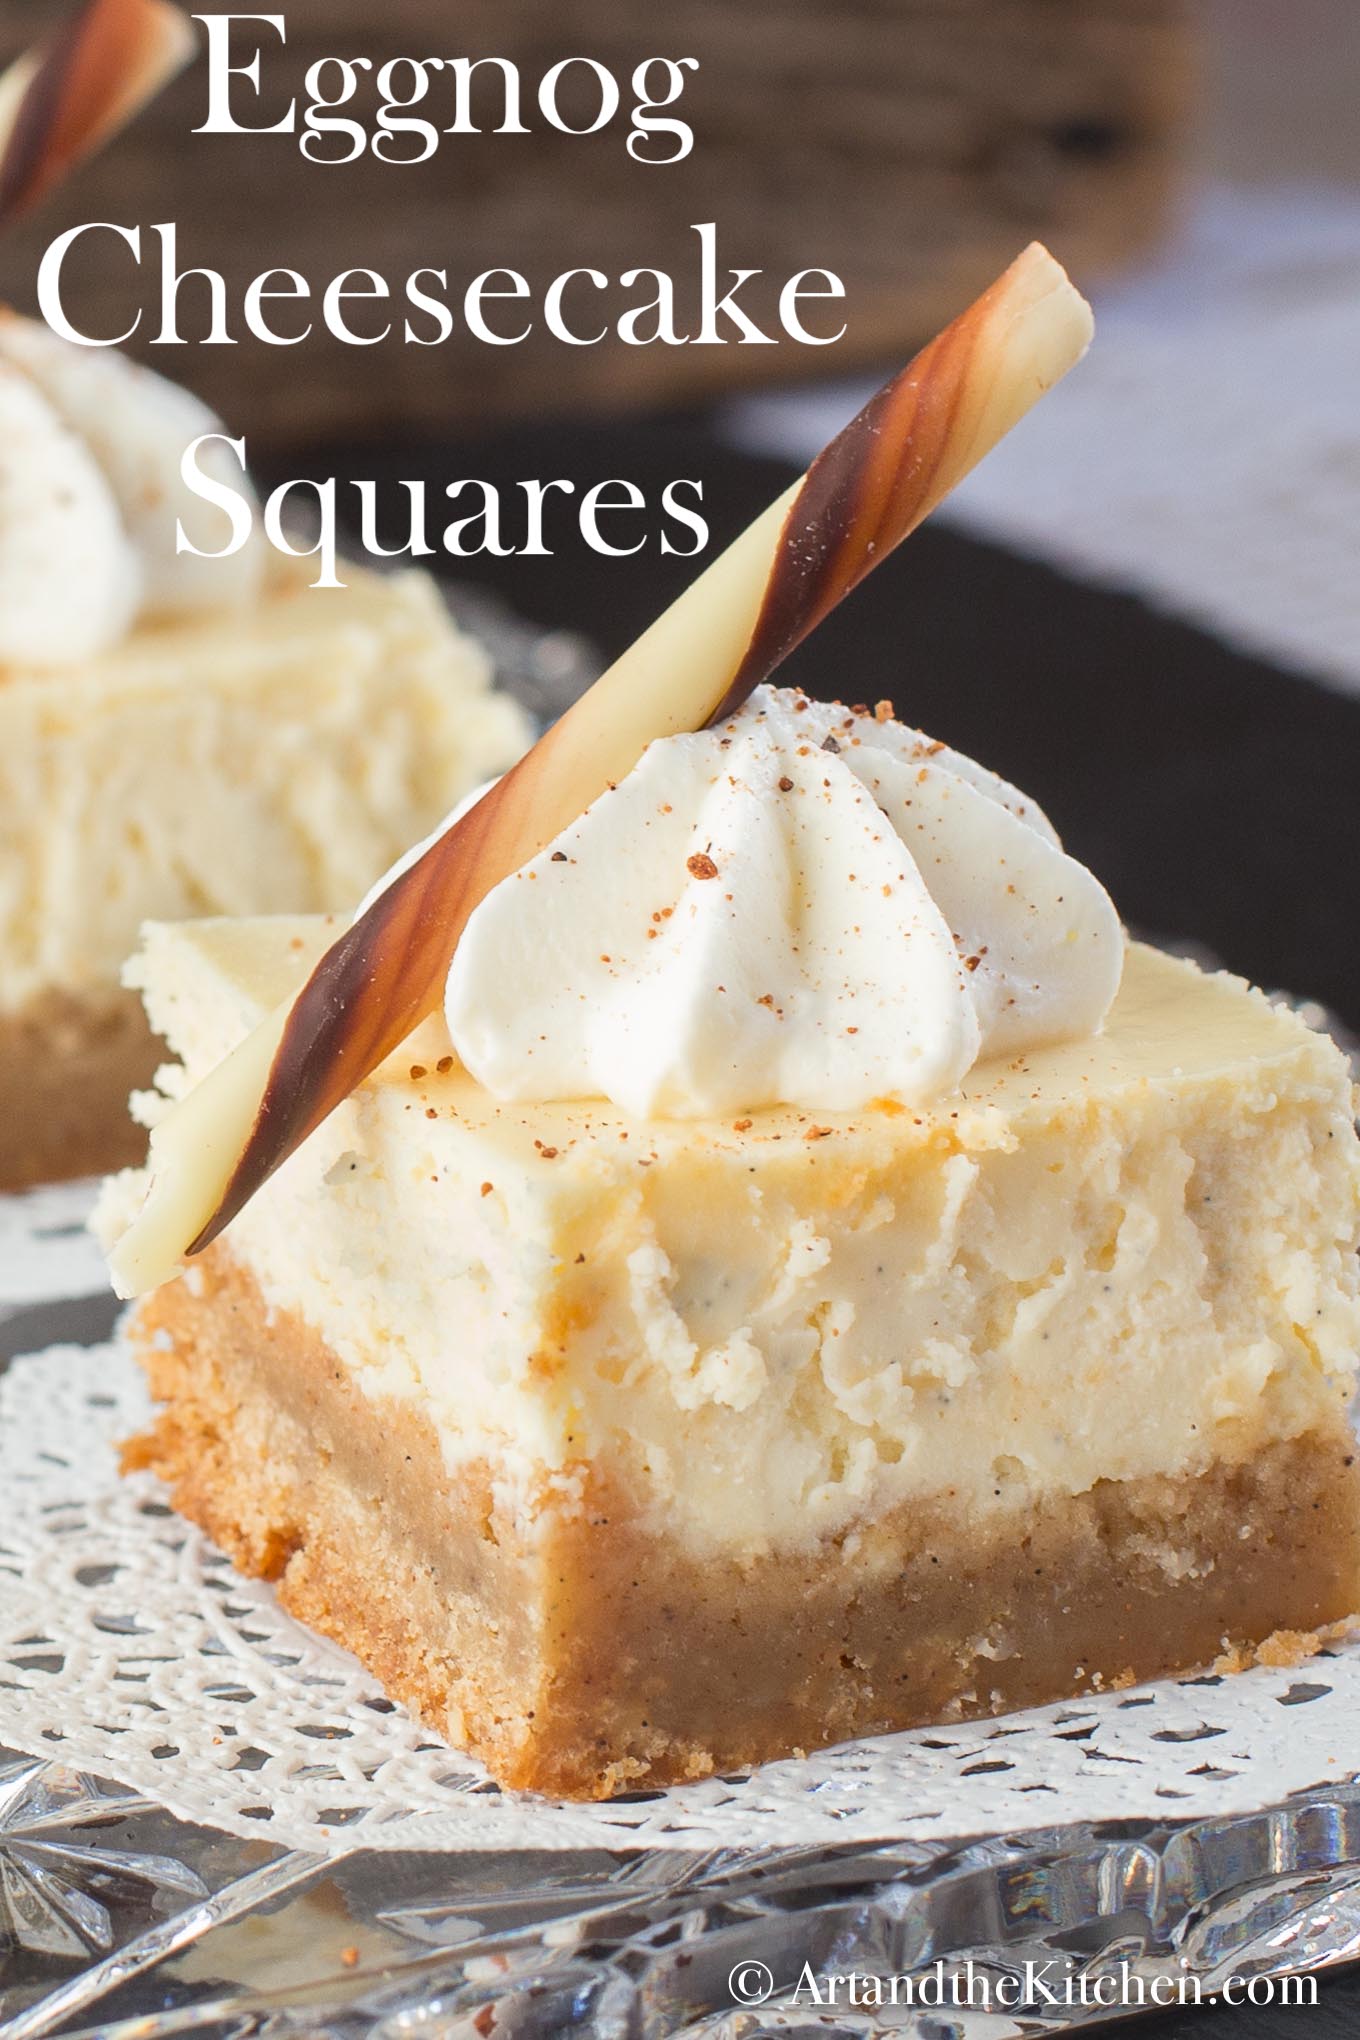
Eggnog Cheesecake Squares
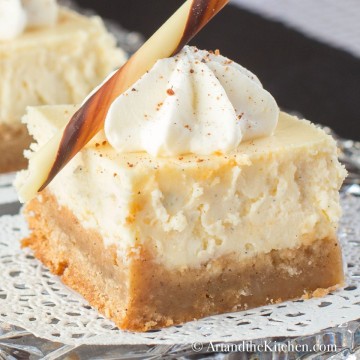
These Eggnog Cheesecake Squares are made with a creamy, smooth cheesecake layer and a Holiday spice brownie crust.
One sure way to know the Holiday season has begun is when you can finally buy eggnog in the grocery stores. In addition to making some awesome drinks, I love using eggnog to bake with. Some of my other favorite recipes using eggnog are Eggnog Fudge and Eggnog White Chocolate Cranberry Cookies.
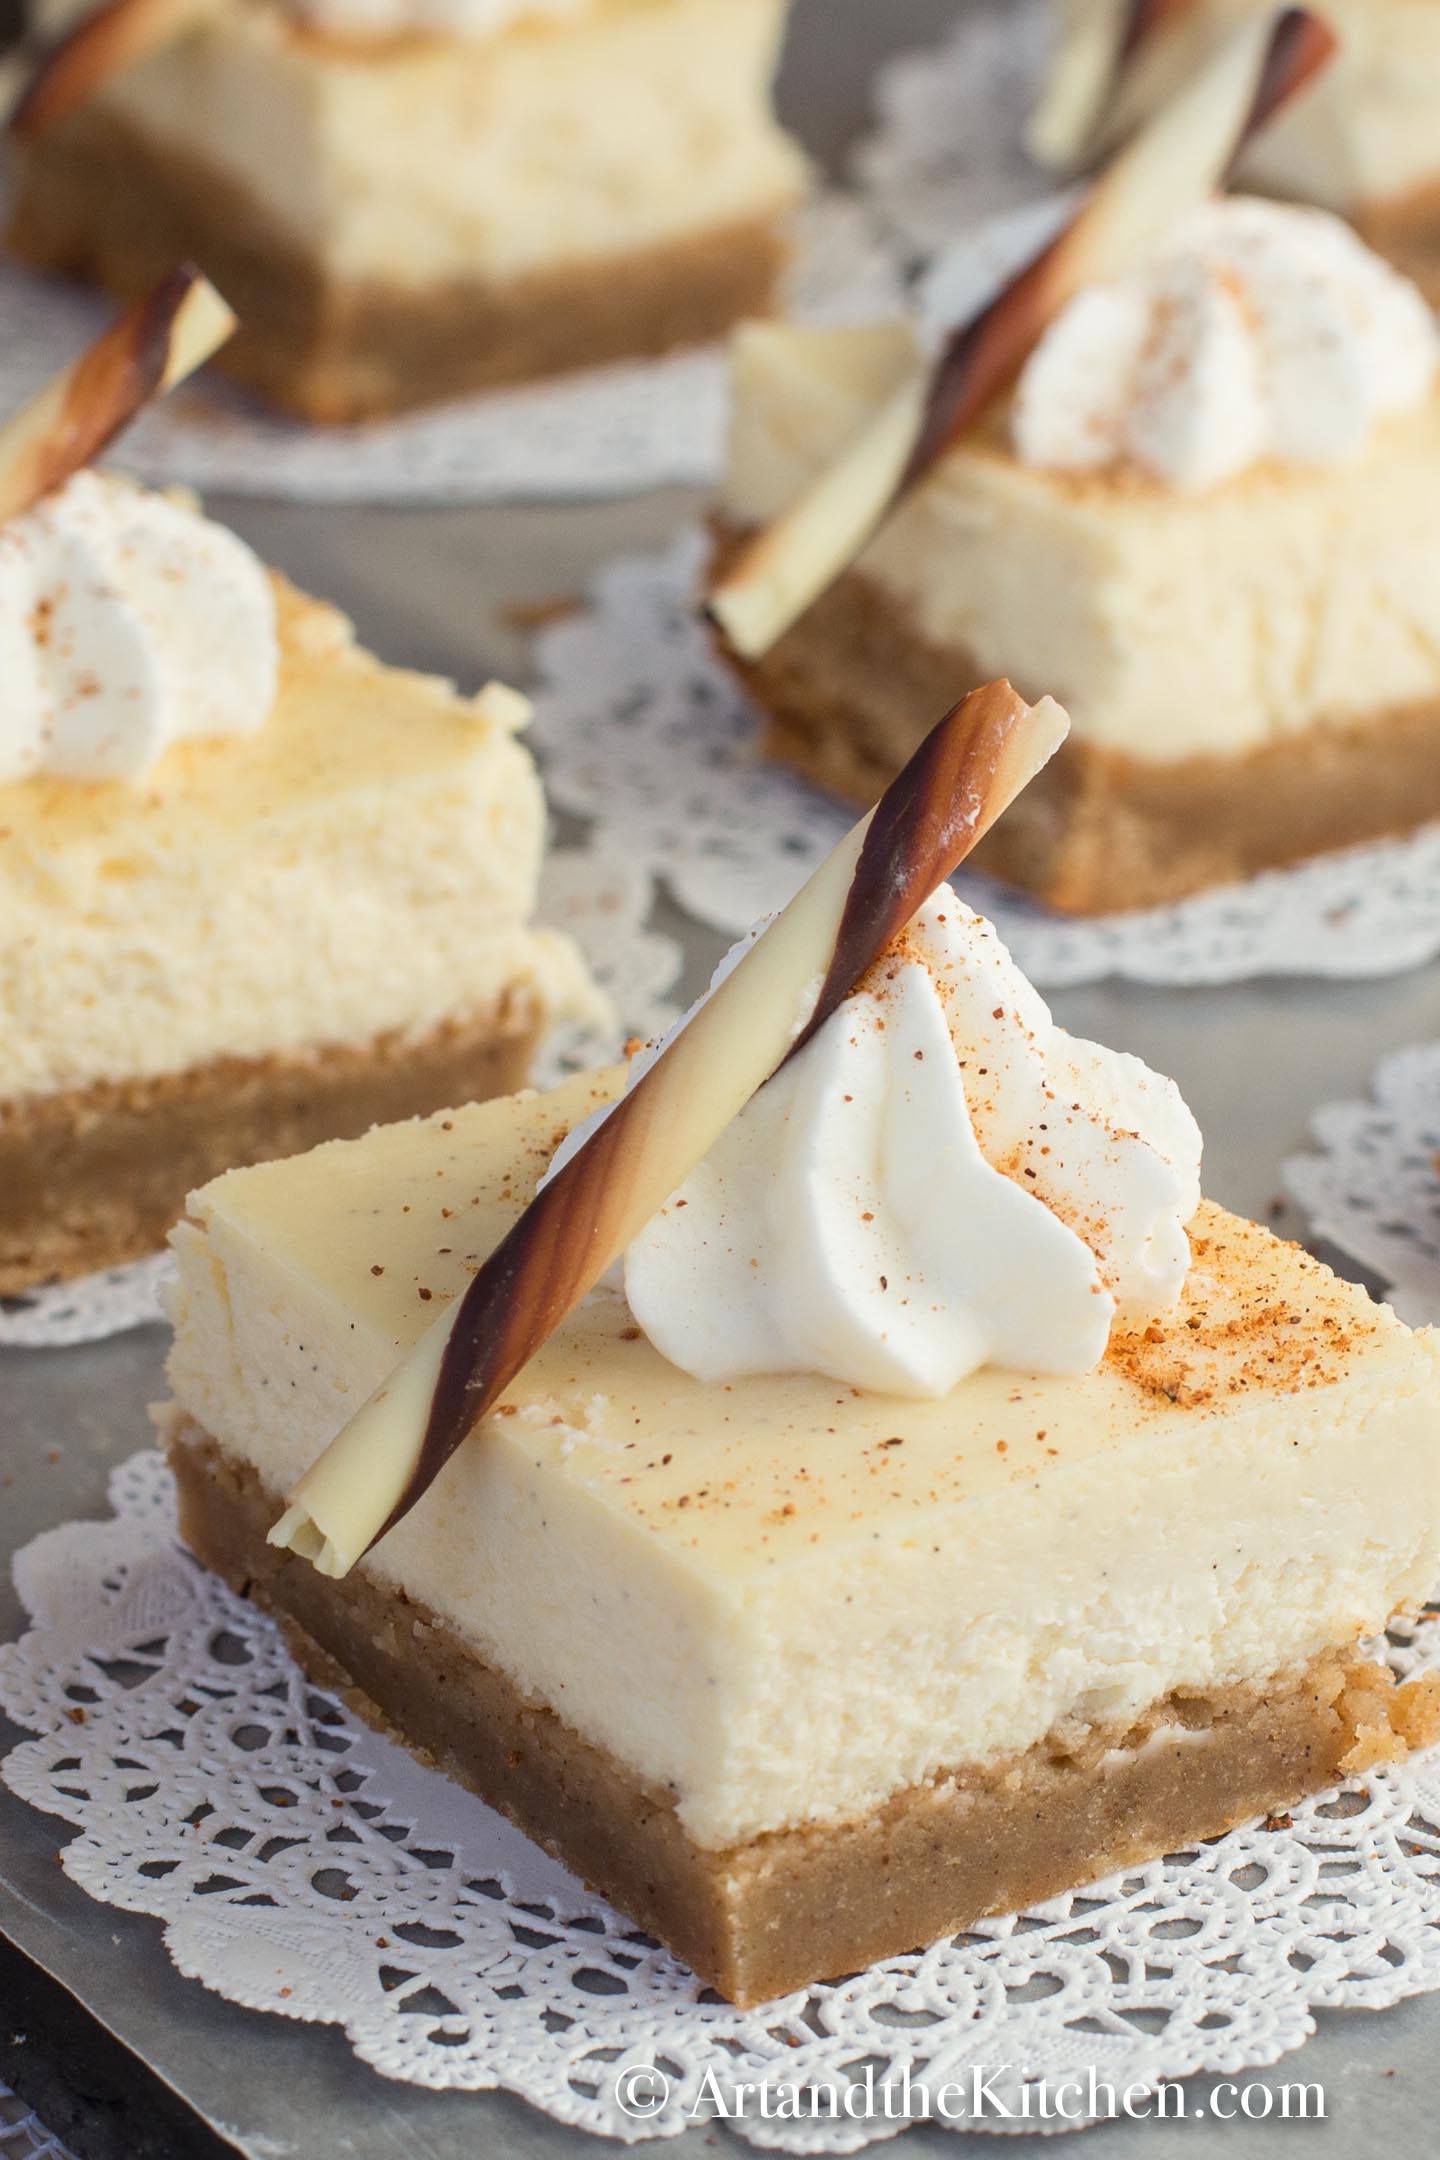 This recipe for Eggnog Cheesecake Squares is so good! Made with a homemade brownie crust topped with eggnog flavored cheesecake. The brownie crust is created with Holiday flavors of nutmeg, ginger, cloves, and cinnamon.
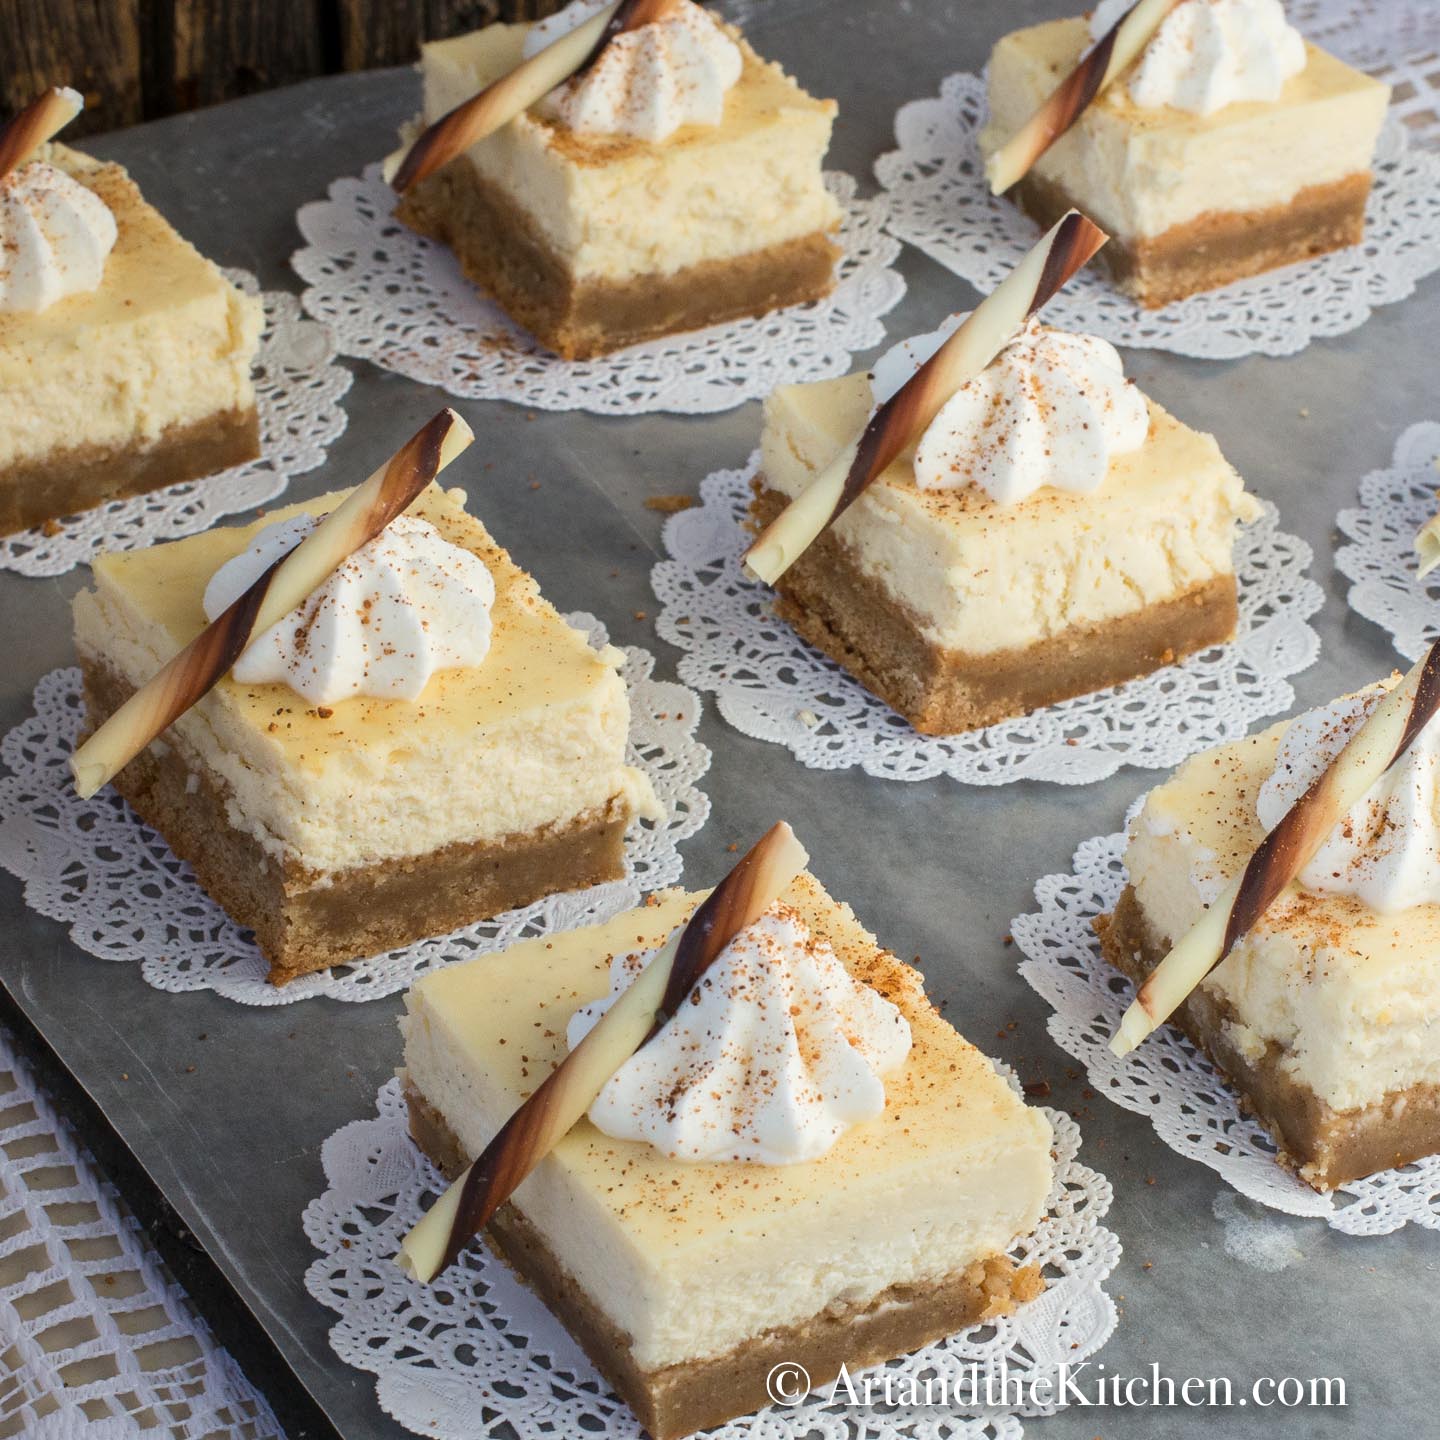
Tips for making the perfect cheesecake squares.
- I think the spice brownie crust is what makes these eggnog cheesecake squares irresistible, but if you want something a bit quicker you can use a simple graham crust or my recipe for Gingersnap crust.
- Using a vanilla bean gives incredible vanilla flavor, but they are expensive and hard to find. One teaspoon of pure vanilla extract is a good substitution.
- Use full fat cream cheese and make sure it is at room temperature before starting! Butter, eggs and eggnog should also be a room temperature.
- What kind of eggnog do I use? The full fat, gourmet style, to give a smooth creamy texture to the cheesecake.
- When cutting into squares, wipe the knife clean with a damp cloth between slices.
- Store covered in the refrigerator. You can also freeze these squares in airtight container.

Eggnog Cheesecake Squares
These Eggnog Cheesecake Squares are made with a creamy, smooth cheesecake layer and a Holiday spice brownie crust.
Servings: 16
Calories: 268kcal
Ingredients
- Ingredients for Spice Brownie Crust:
- 1 cup all purpose flour
- ¼ teaspoon ginger
- ¼ teaspoon nutmeg
- ½ teaspoon cinnamon
- ⅛ teaspoon cloves
- ¼ teaspoon salt
- ½ cup butter softened
- 1 cup brown sugar packed
- 1 egg
- 1 vanilla bean or 1 teaspoon vanilla extract
- Eggnog Cheesecake Layer Ingredients
- 2 packages cream cheese 8 oz package size room temperature
- ⅓ cup granulated sugar
- 1 vanilla bean or 1 teaspoon pure vanilla extract
- ¾ cup full fat eggnog
- 2 eggs
Instructions
- Preheat oven 350º. Grease 8x8 inch cake pan.
- Blend together flour, ginger, nutmeg, cinnamon, cloves and salt, set aside.
- With electric mixer beat butter and brown sugar until fluffy.
- Mix in vanilla and egg.
- Blend in flour mixture, just until combined, don't over mix.
- Pour into cake pan and spread evenly.
- Bake 350º for 20 minutes or until the top is lightly browned.
- Prepare cheesecake batter while brownie crust bakes.
- Using and electric mixer beat cream cheese with sugar until fluffy.
- Add eggnog and vanilla, mix until combined.
- On low speed add eggs, one at a time.
- When brownie based is baked, reduce heat to 300º.
- Remove from oven and pour cheesecake mixture on top of brownie base.
- Return to oven and continue to bake 40-50 minutes until top has browned slightly.
- Cool at room temperature. Then cover and refrigerate until ready to serve.
- Top with whipped cream and a sprinkle of nutmeg.
Nutrition
Calories: 268kcal | Carbohydrates: 26g | Protein: 4g | Fat: 17g | Saturated Fat: 10g | Cholesterol: 84mg | Sodium: 200mg | Potassium: 97mg | Fiber: 1g | Sugar: 19g | Vitamin A: 626IU | Vitamin C: 1mg | Calcium: 63mg | Iron: 1mg
More tasty Eggnog recipes to try.
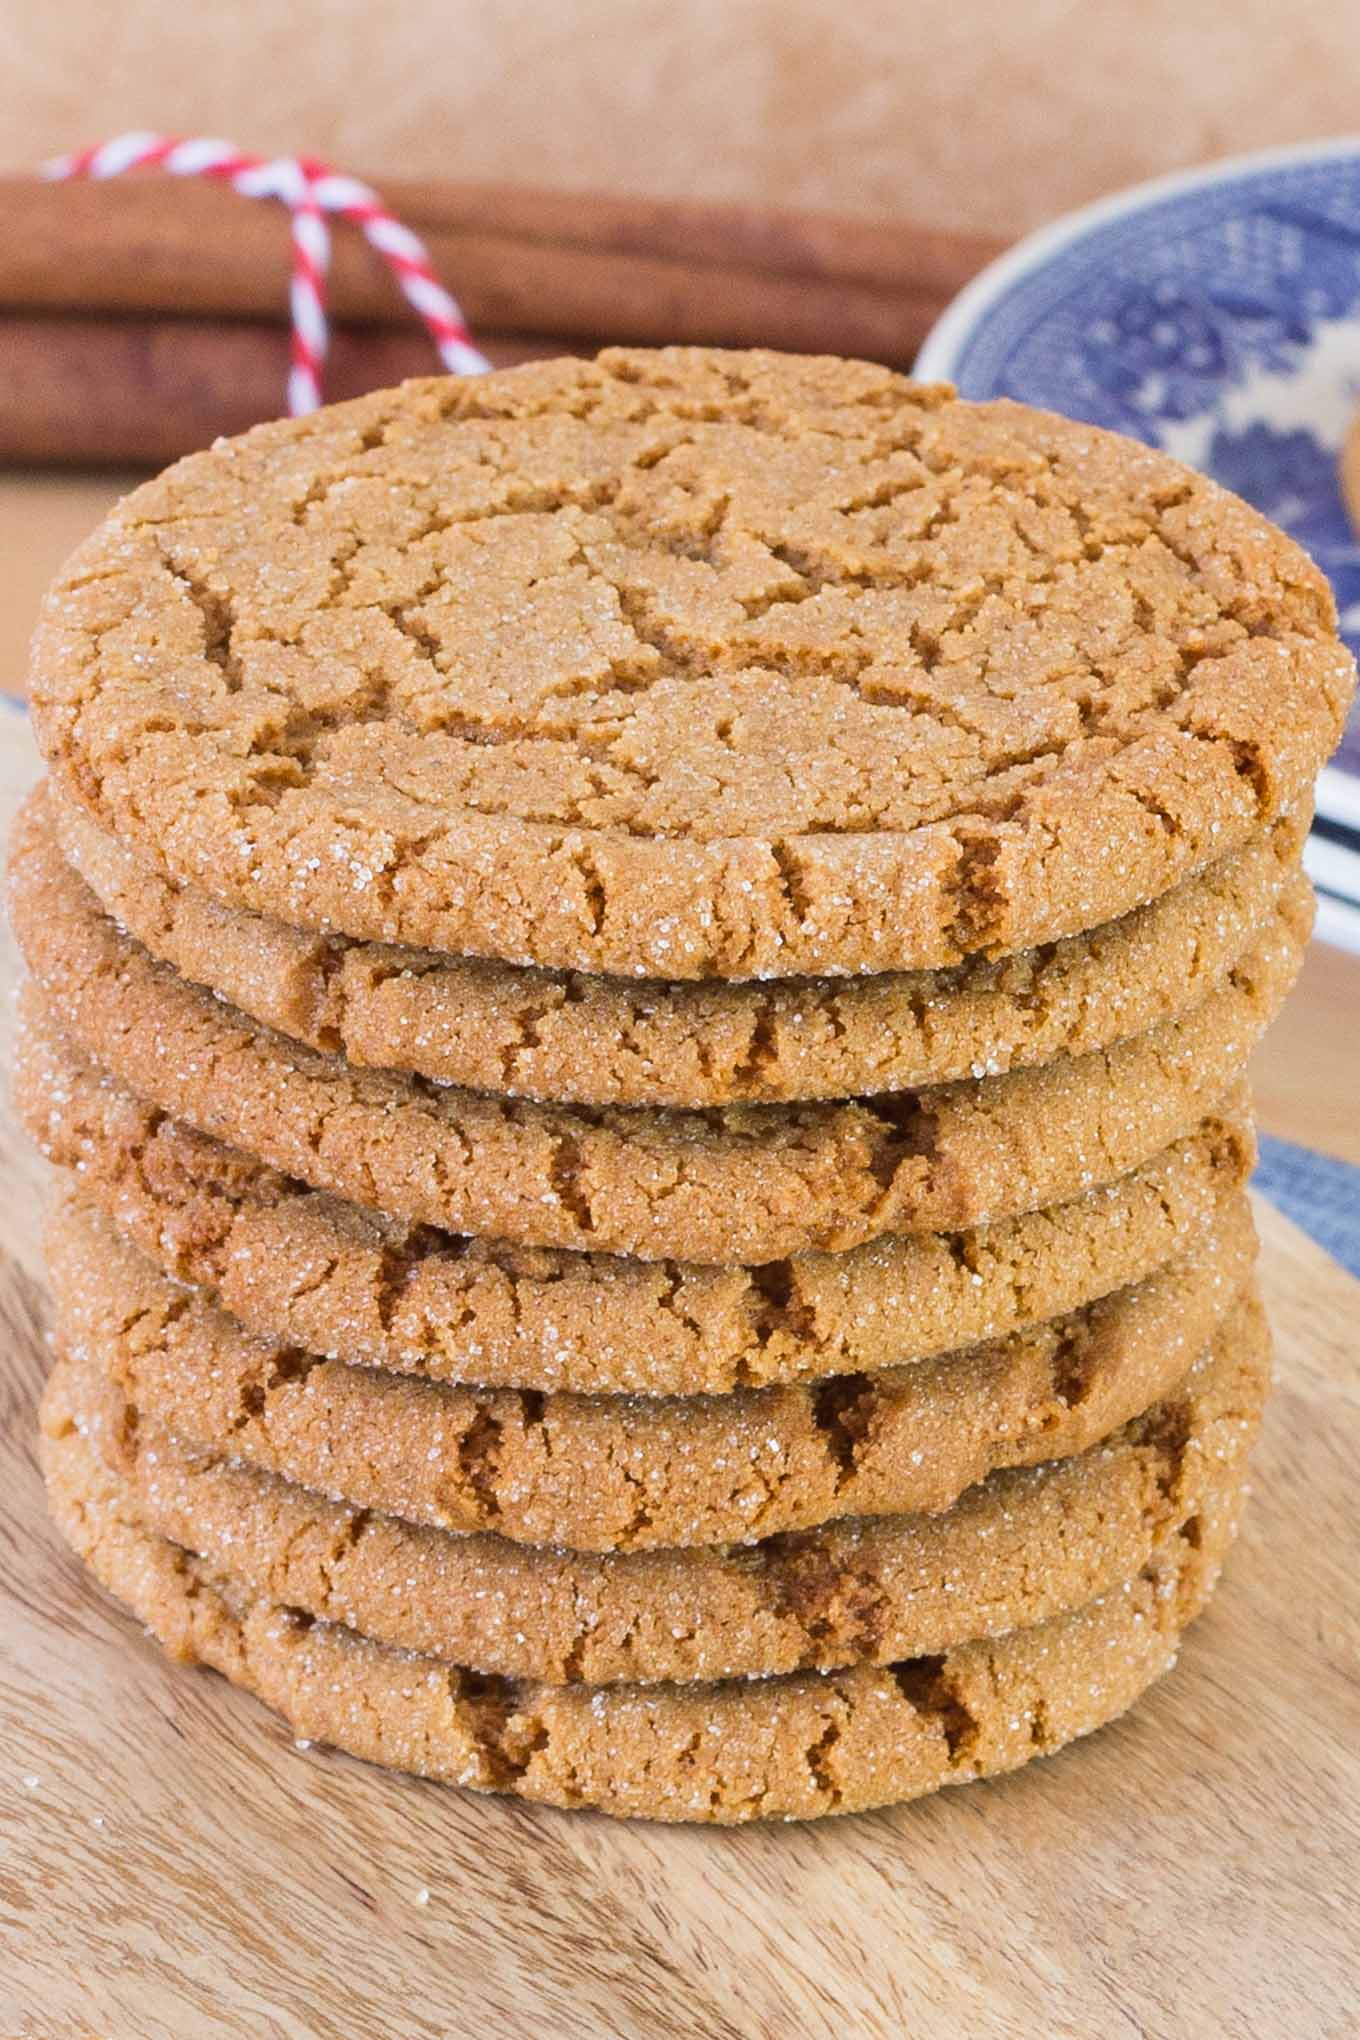
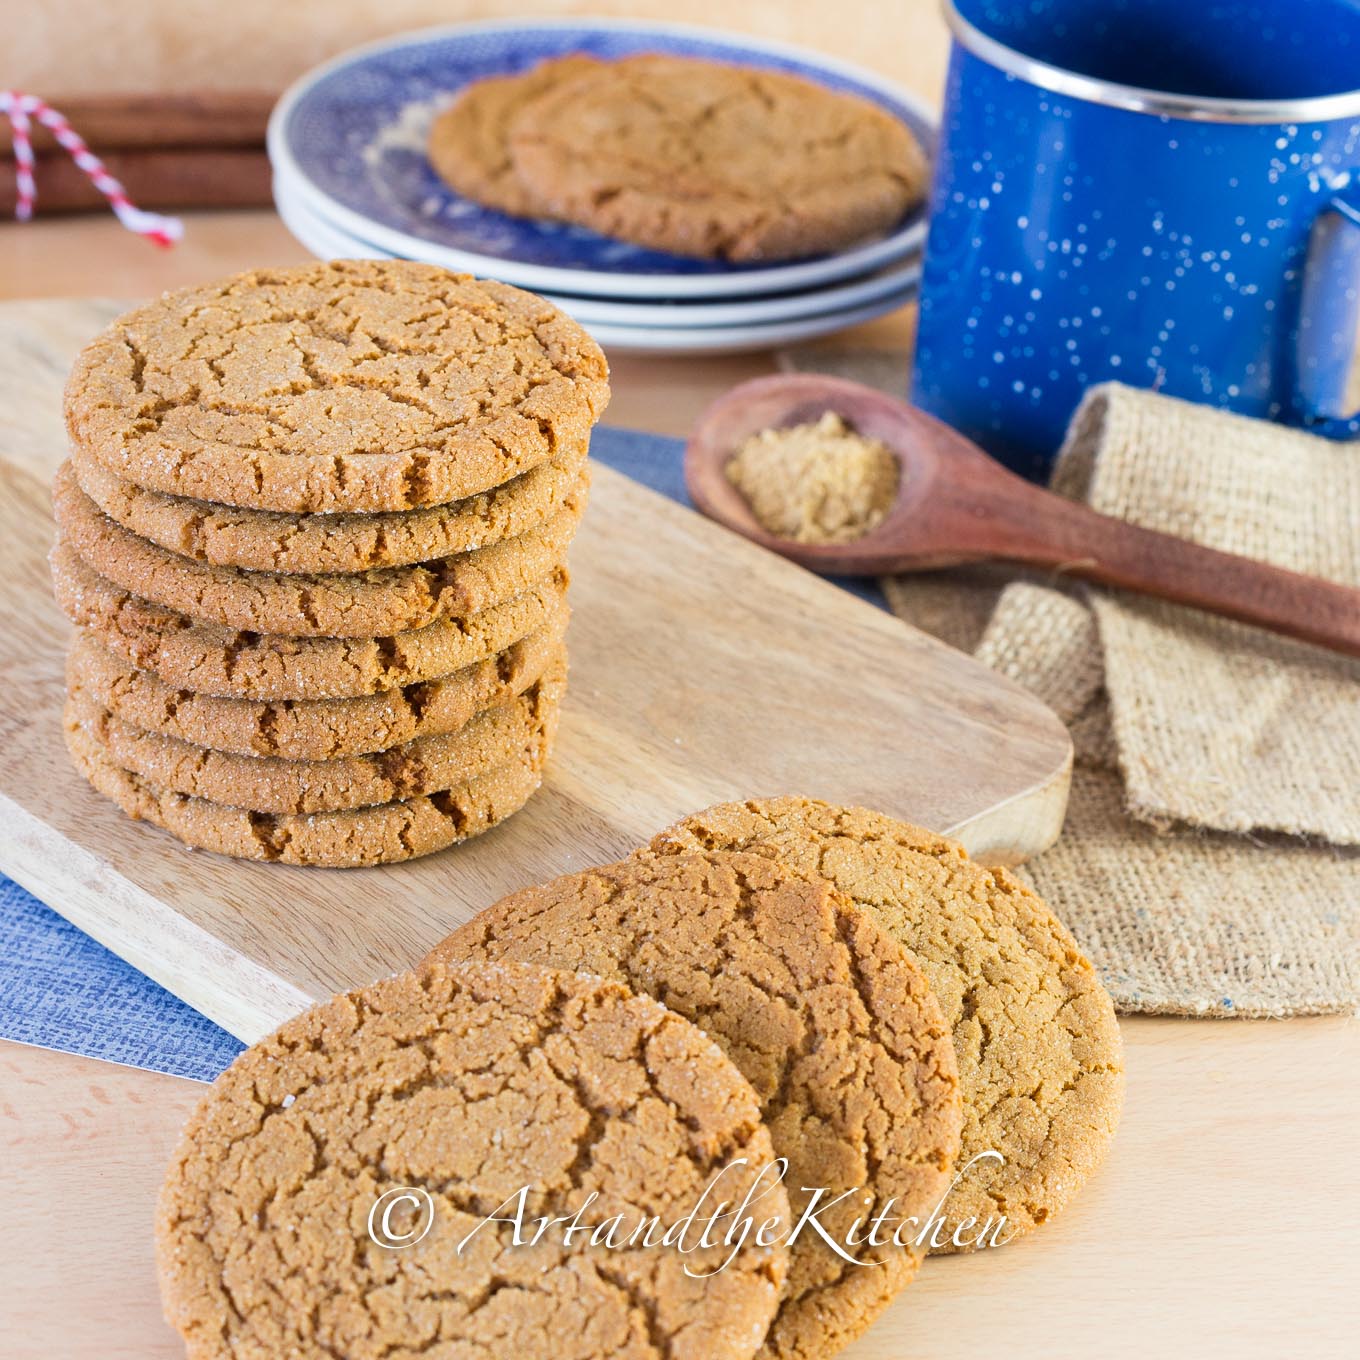
Ginger Cookies
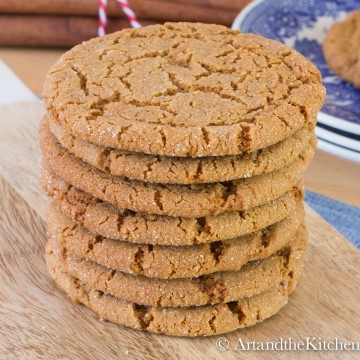
This recipe for Ginger Cookies is perfectly spiced, crispy on the outside, chewy on the inside. Great ginger and molasses flavour.
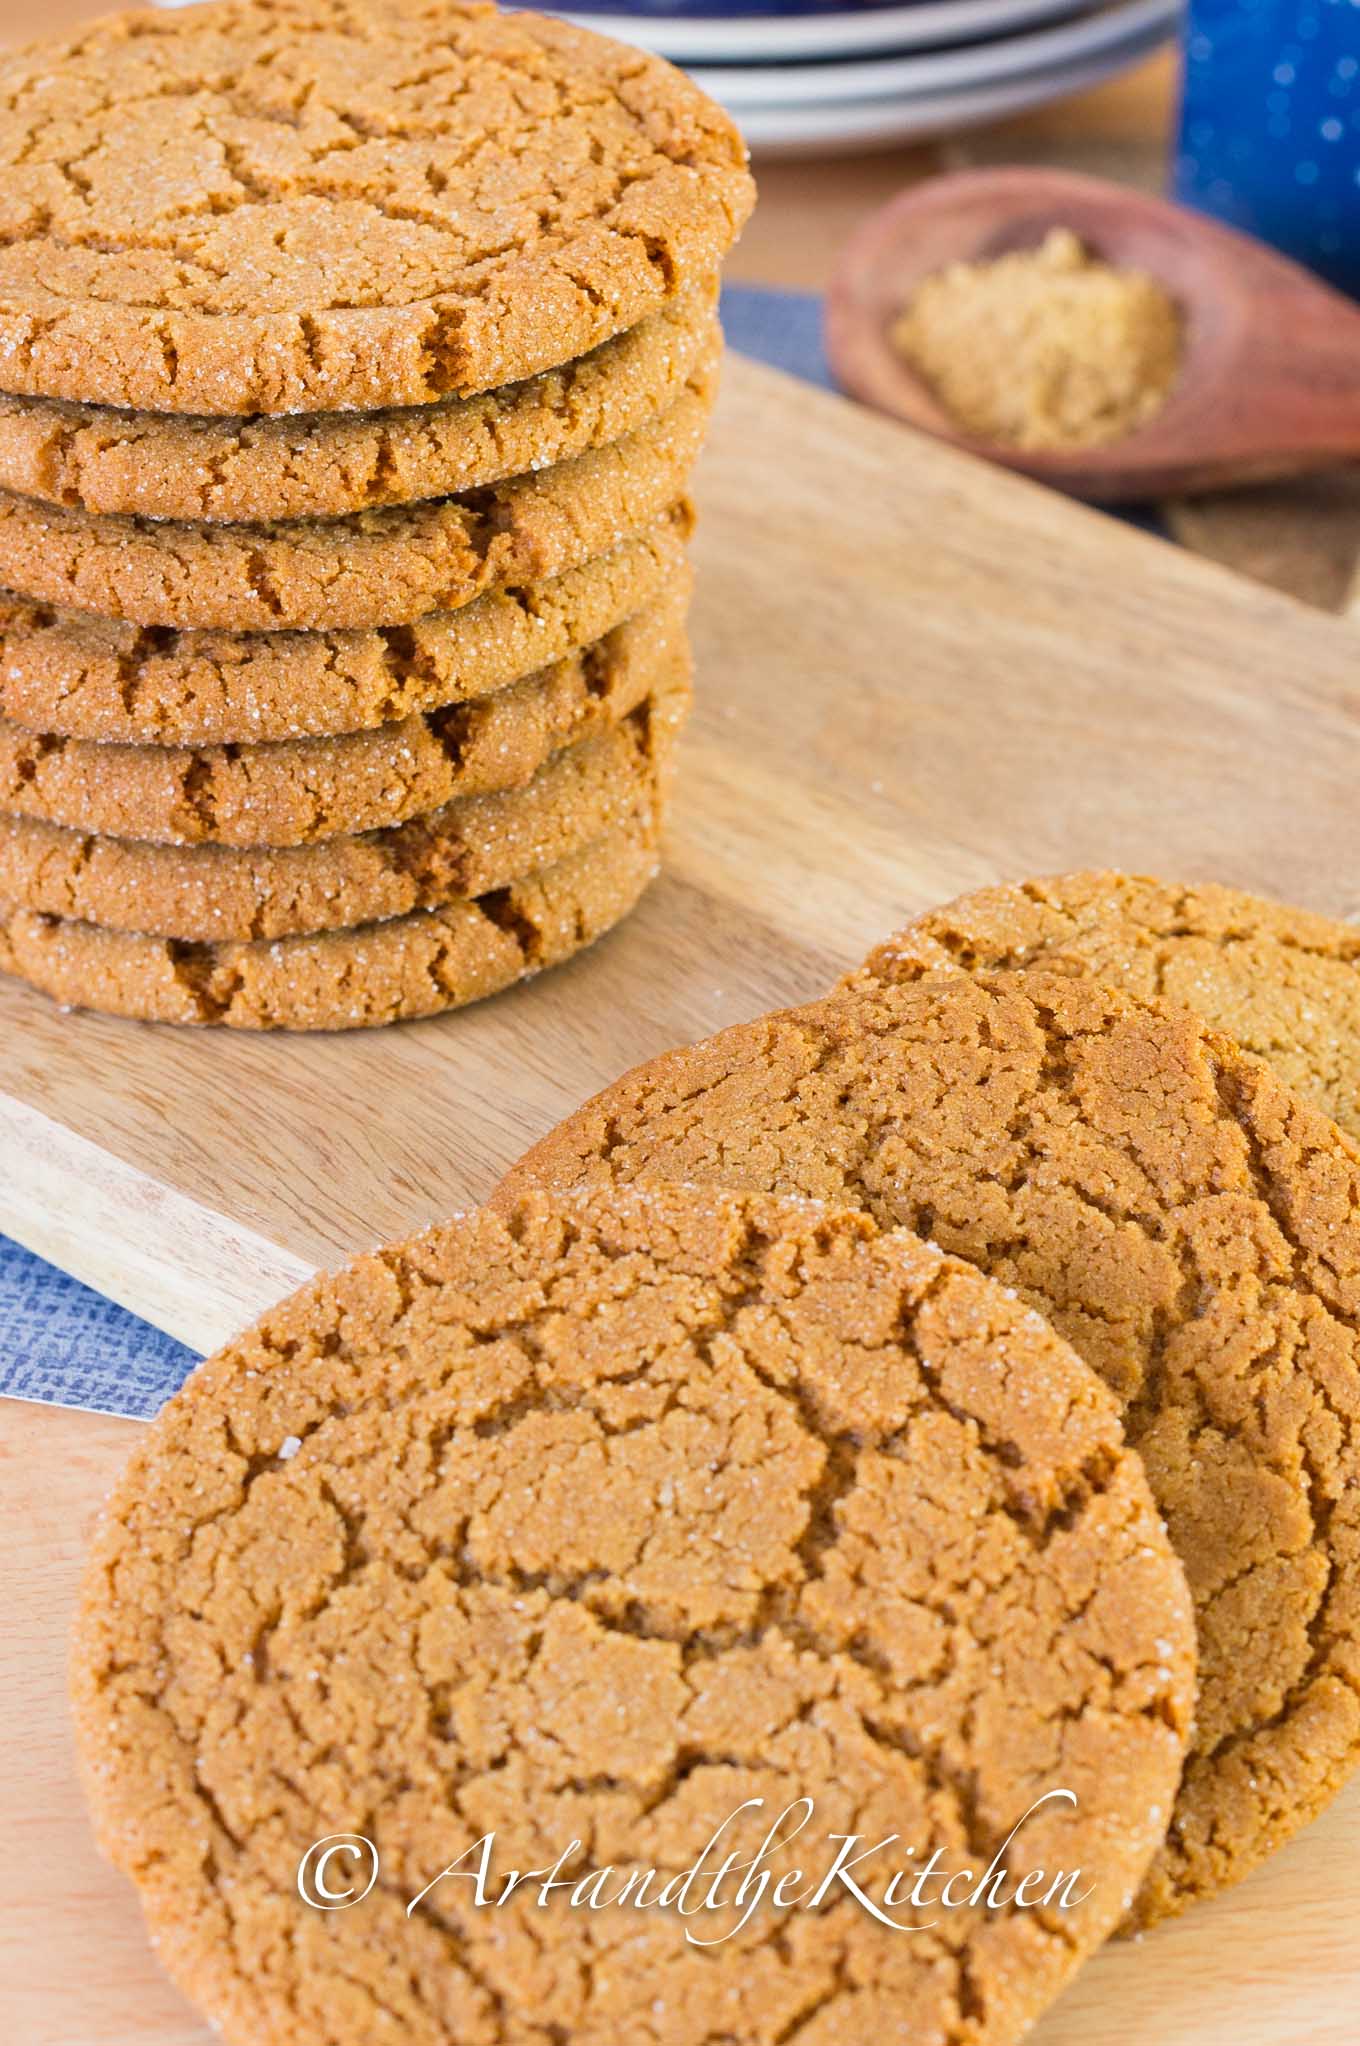
My recipe for Ginger Cookies uses fancy molasses. For a bolder flavour try using cooking molasses or blackstrap molasses. These bakery style cookies will fly off the plate!
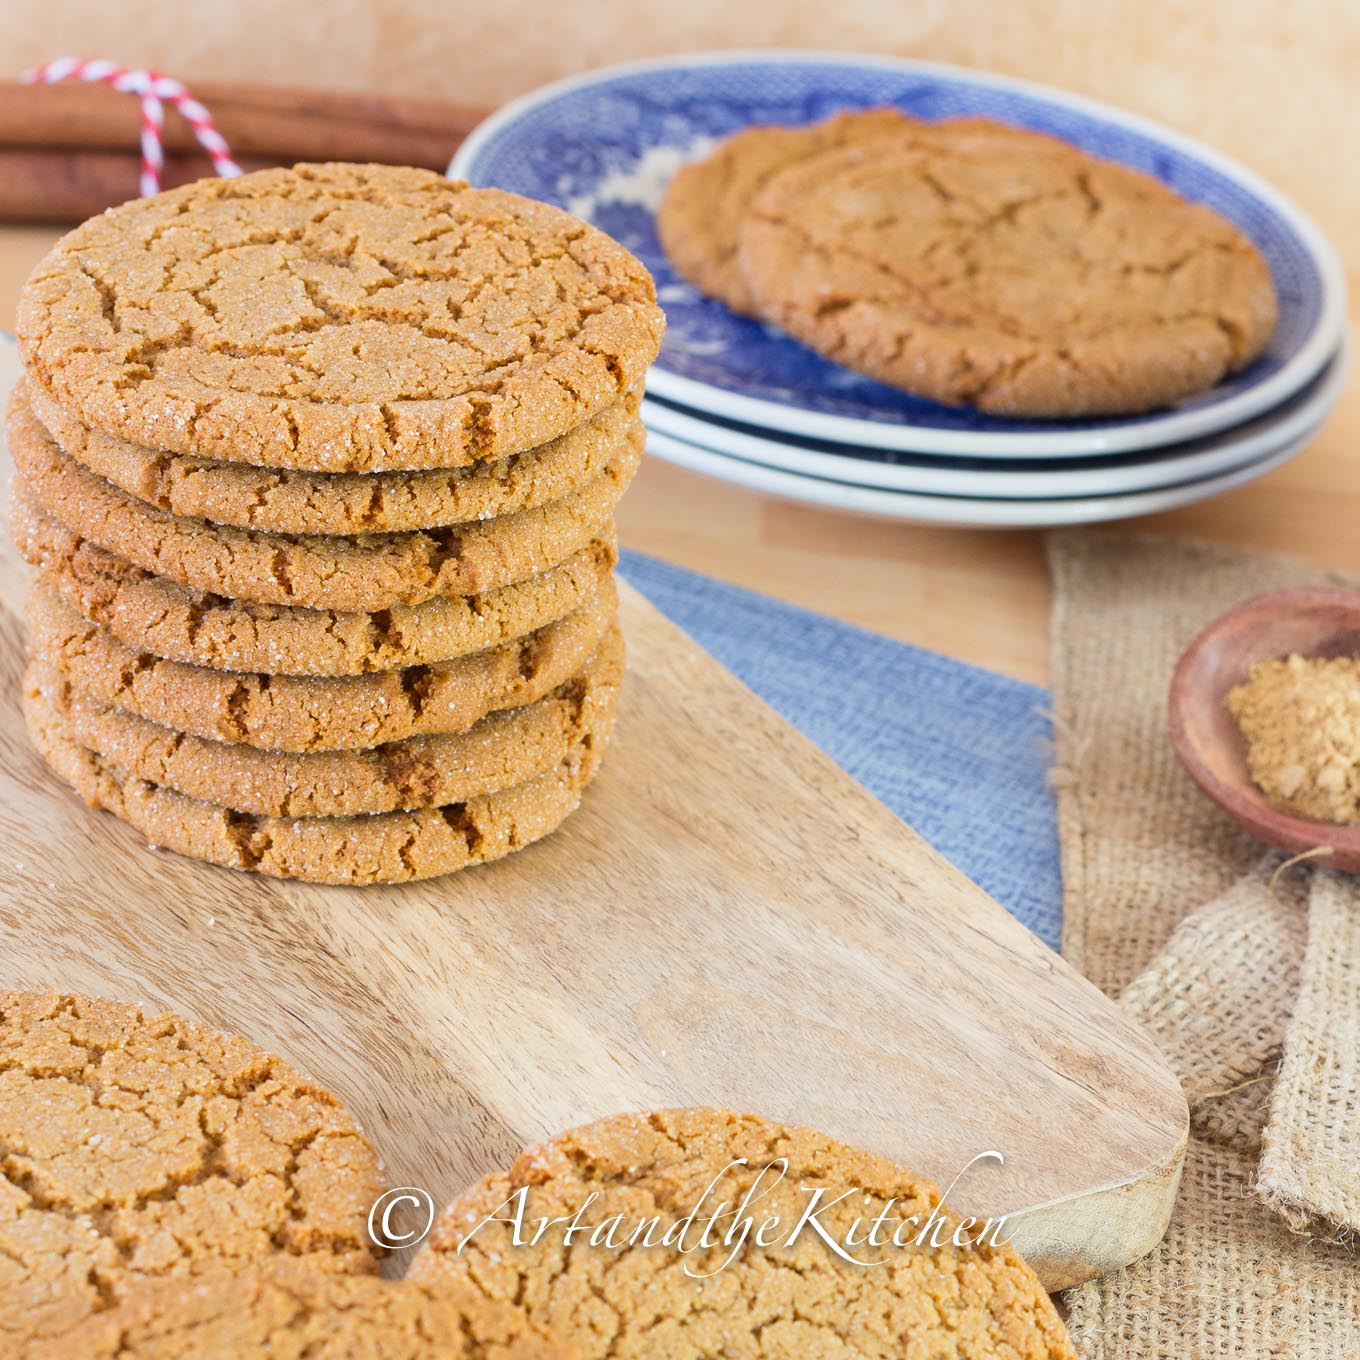
Making cookies is one of those simple things in life that bring back fond memories of baking in the kitchen with our Mom's and Grandmas. There's nothing that compares to a fresh batch of cookies coming out of the oven, and kids eagerly waiting for them to cool off enough to enjoy. These Ginger Cookies fill the house with the wondrous, spicy aroma of fall flavours.

Ginger Cookies
Ginger Cookies with a ton of flavour and are crisp on the outside, soft on the inside.
Servings: 24
Calories: 149kcal
Ingredients
- 2 ½ cups all purpose flour
- 2 ¼ teaspoon baking soda
- ¼ teaspoon salt
- 1 tablespoon ground ginger
- ½ teaspoon allspice
- ¾ cup butter room temperature
- ½ cup light brown sugar
- ½ cup granulated sugar plus ⅓ cup for coating
- 6 tablespoon Fancy Molasses I like Crosby's brand
- 1 large egg
Instructions
- Preheat oven o 350º F. Line cookie sheets with parchment paper.
- In medium bowl, add flour, baking soda, salt, ginger and allspice. Use a whisk to combine all ingredients together.
- In large mixing bowl, beat together butter, brown sugar and ½ cup granulated sugar until light and fluffy.
- Beat in molasses and egg.
- Gradually stir in flour mixture until just combined. (don't over mix)
- Flatten into a disk, wrap in plastic, and freeze for 20 minutes.
- Divide dough into 24 balls. (appx. 2 tbsp.each)
- Place ⅓ cup granulated sugar in bowl. Roll ball in sugar to coat.
- Place on cookie sheet at least 3 inches apart, and using bottom of a glass, flatten down.
- Bake 350º F for 10-12 minutes until brown. Cool on wire rack.
Notes
Recipe courtesy of Crosby's cookbook, Simple Fare. A great collection of recipes that reminds us that cooking can be a great way to slow down, unwind and reconnect in the kitchen.
Nutrition
Calories: 149kcal | Carbohydrates: 22g | Protein: 1g | Fat: 6g | Saturated Fat: 3g | Cholesterol: 22mg | Sodium: 198mg | Potassium: 100mg | Sugar: 12g | Vitamin A: 185IU | Calcium: 19mg | Iron: 1mg
Be sure to follow me and get my latest recipes on Pinterest, Instagram Facebook and Twitter.
Check out some more of my tasty cookie recipes
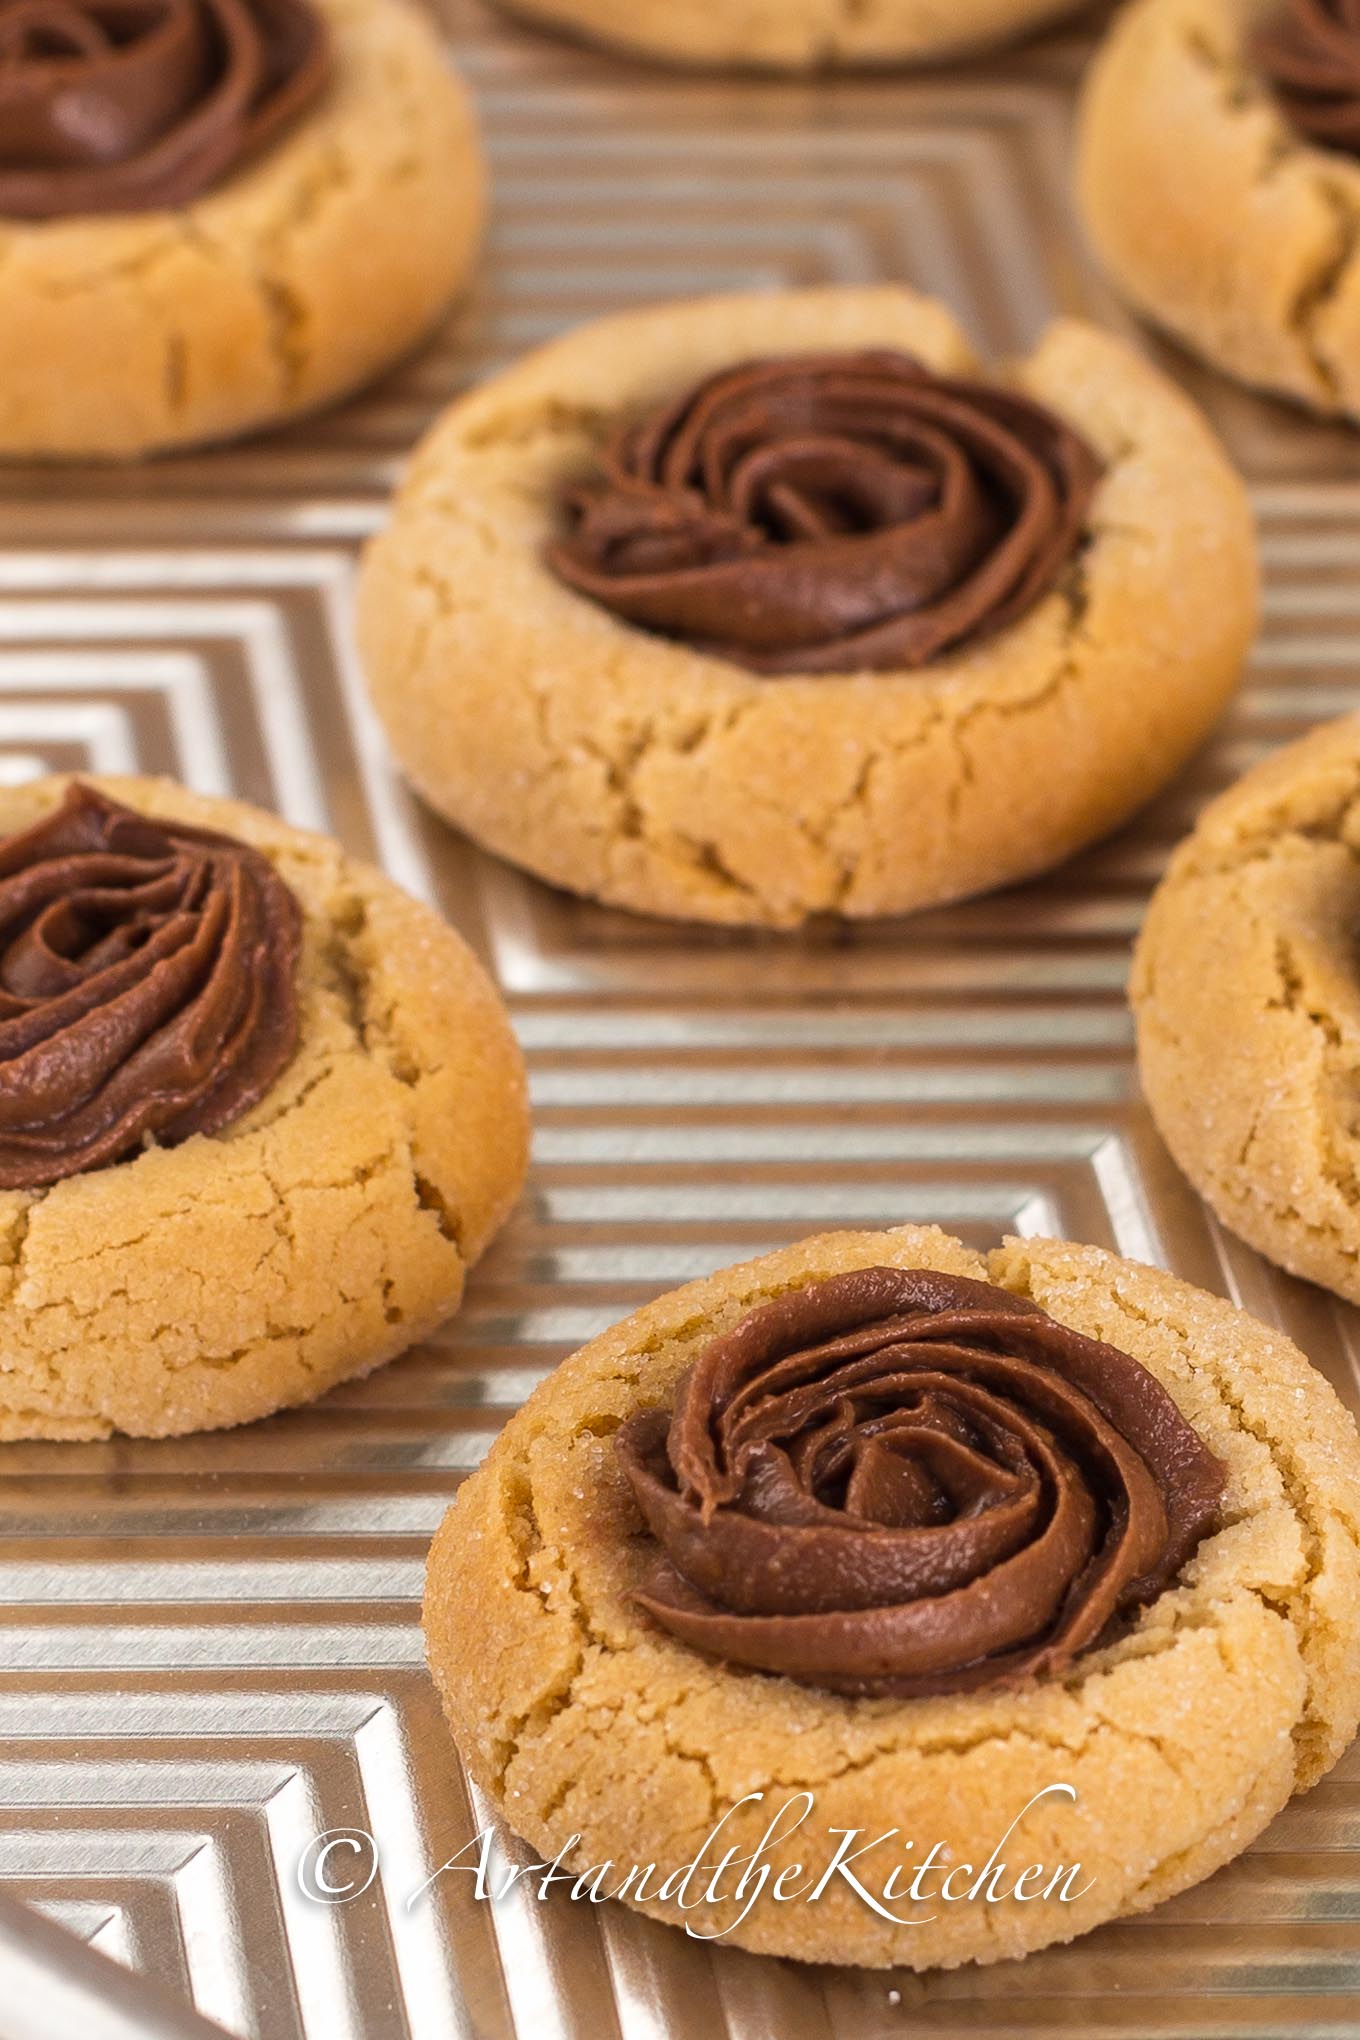
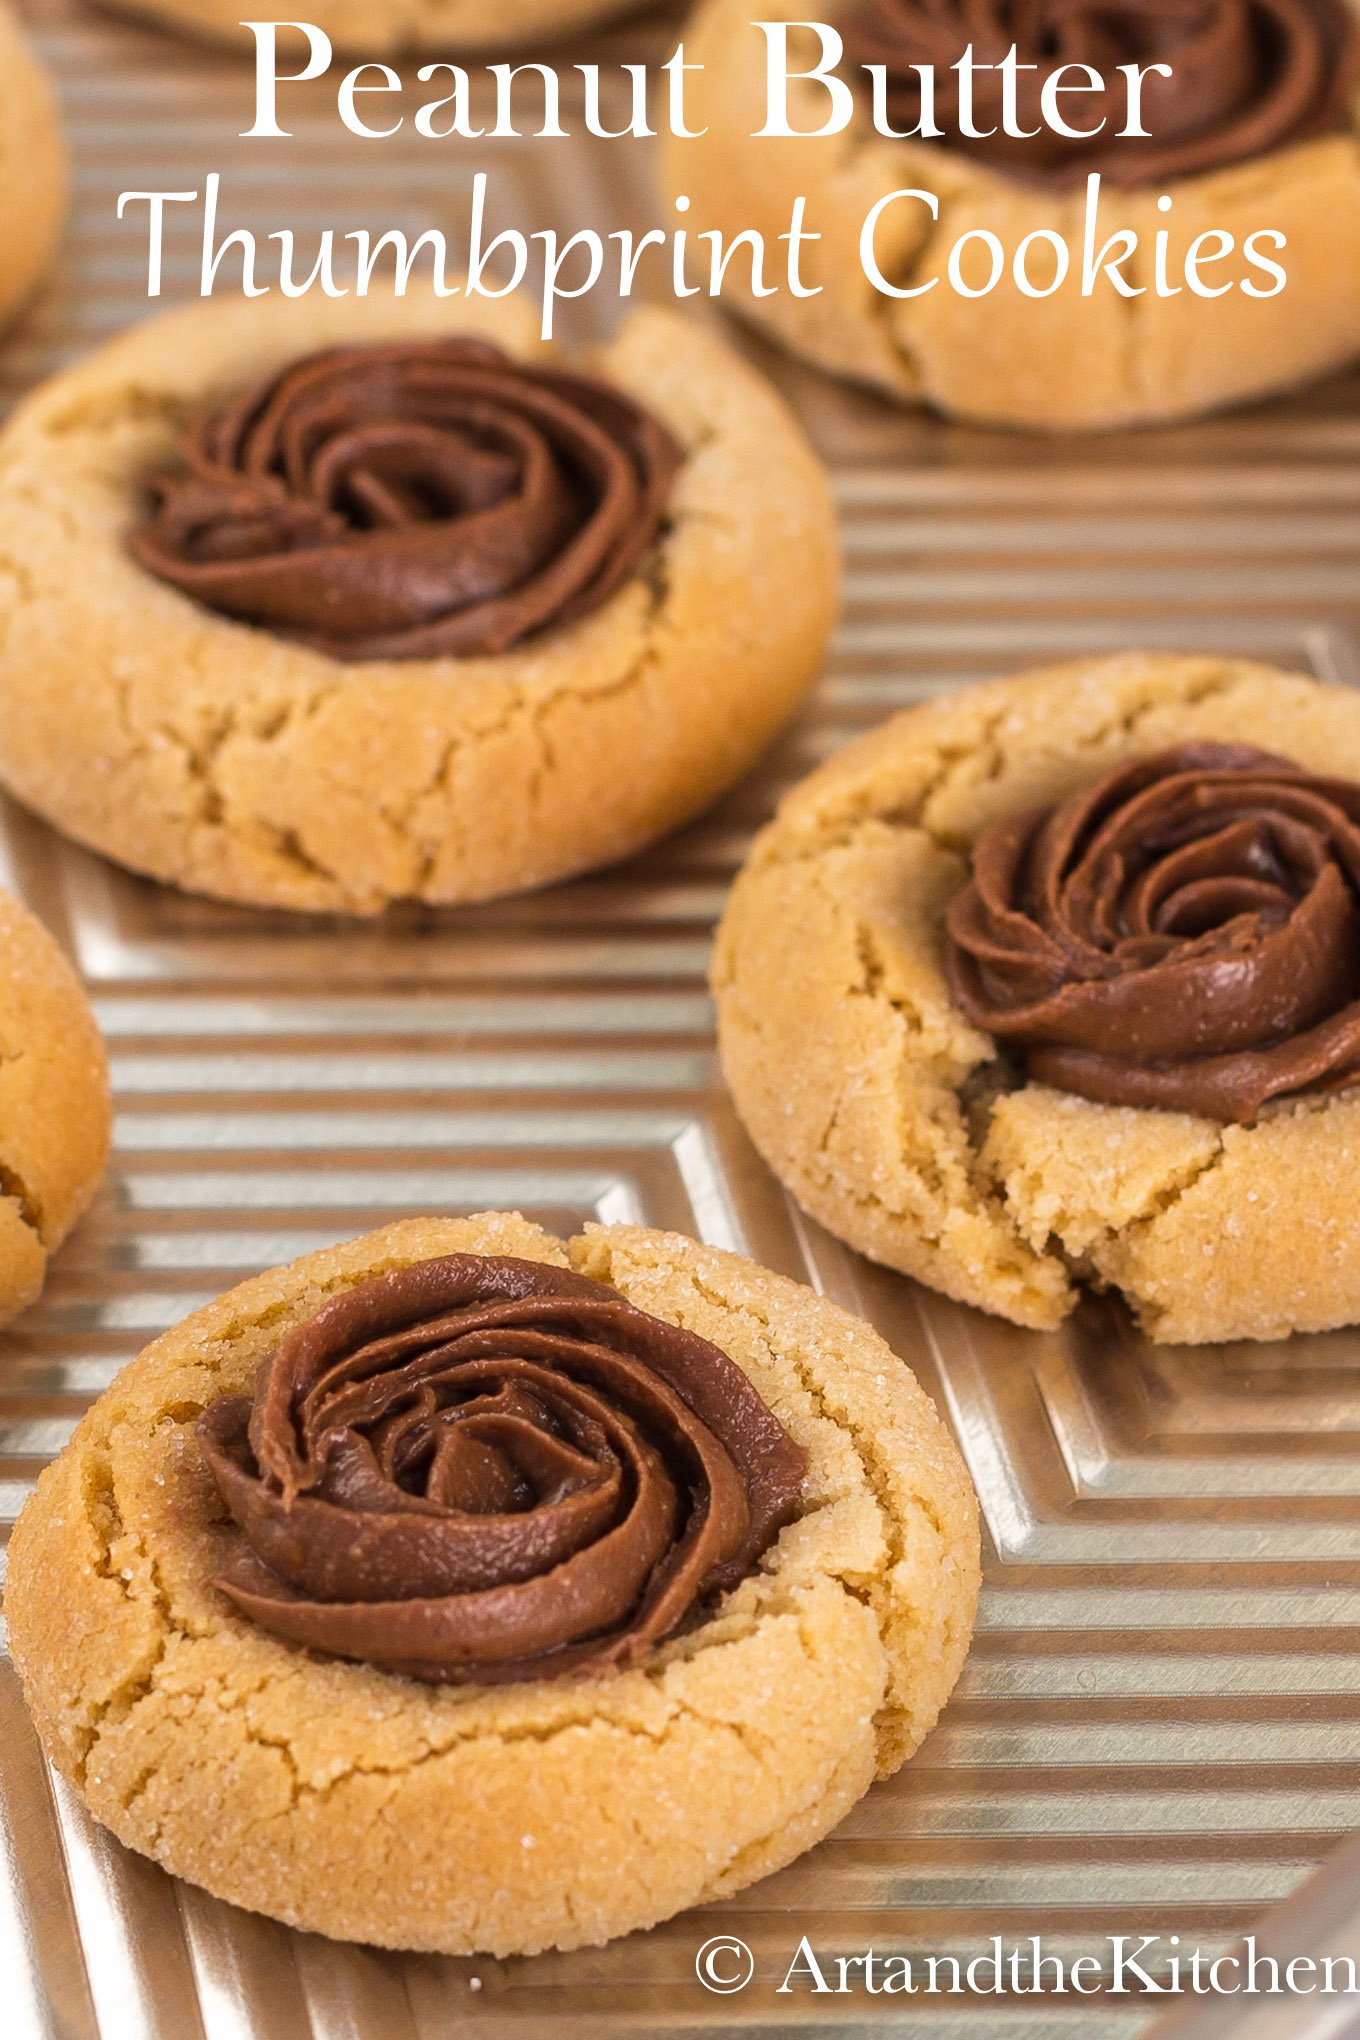
Peanut Butter Thumbprint Cookies

Gingerbread Cookies
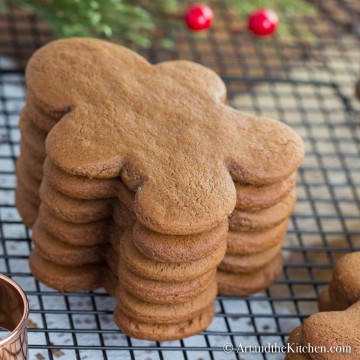
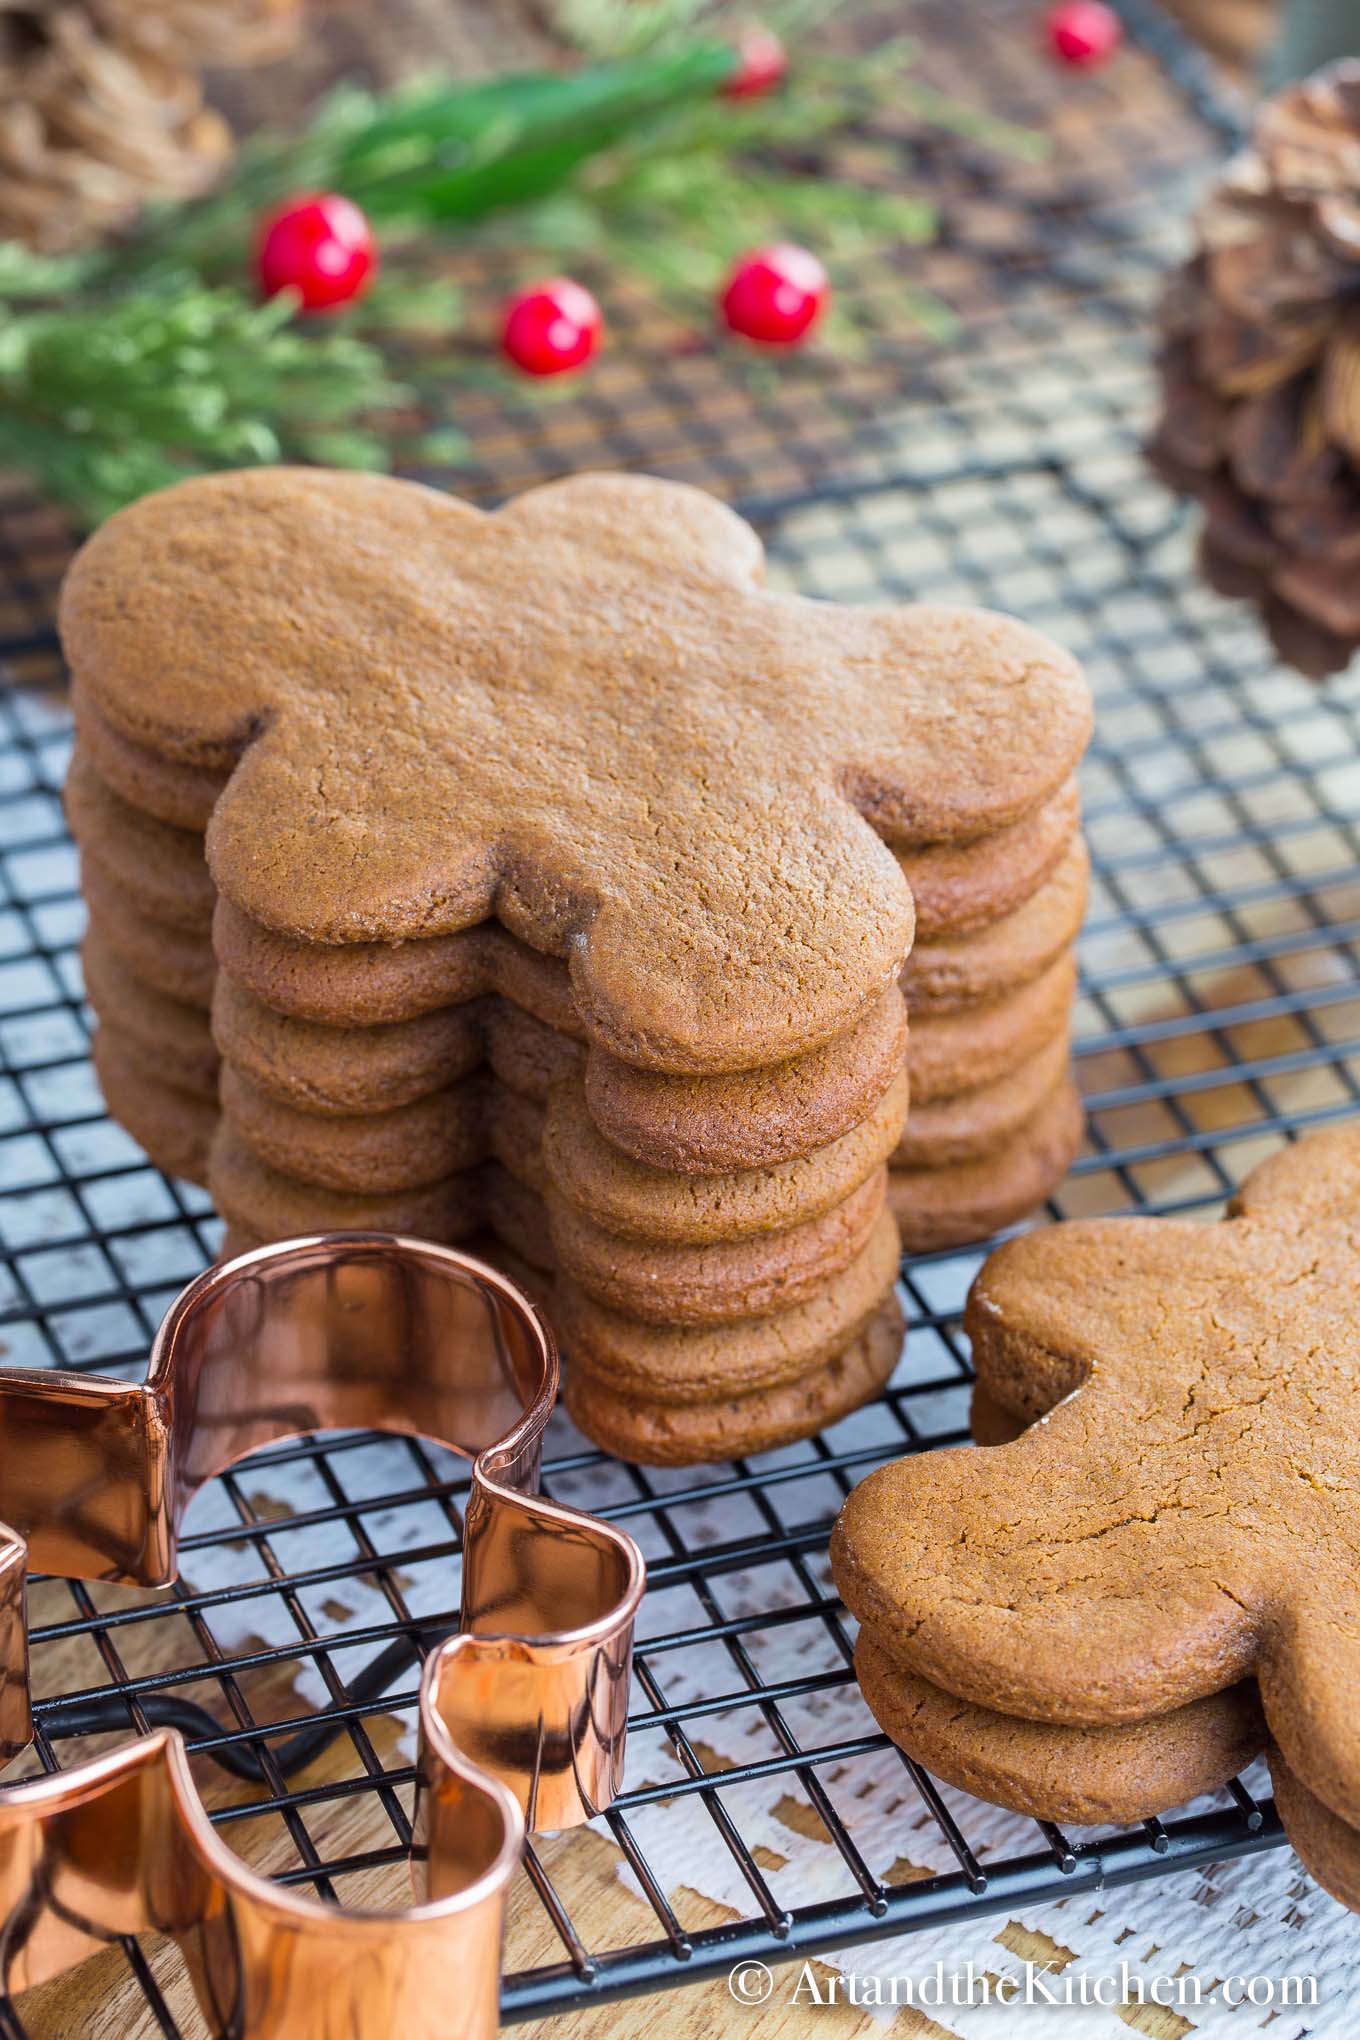
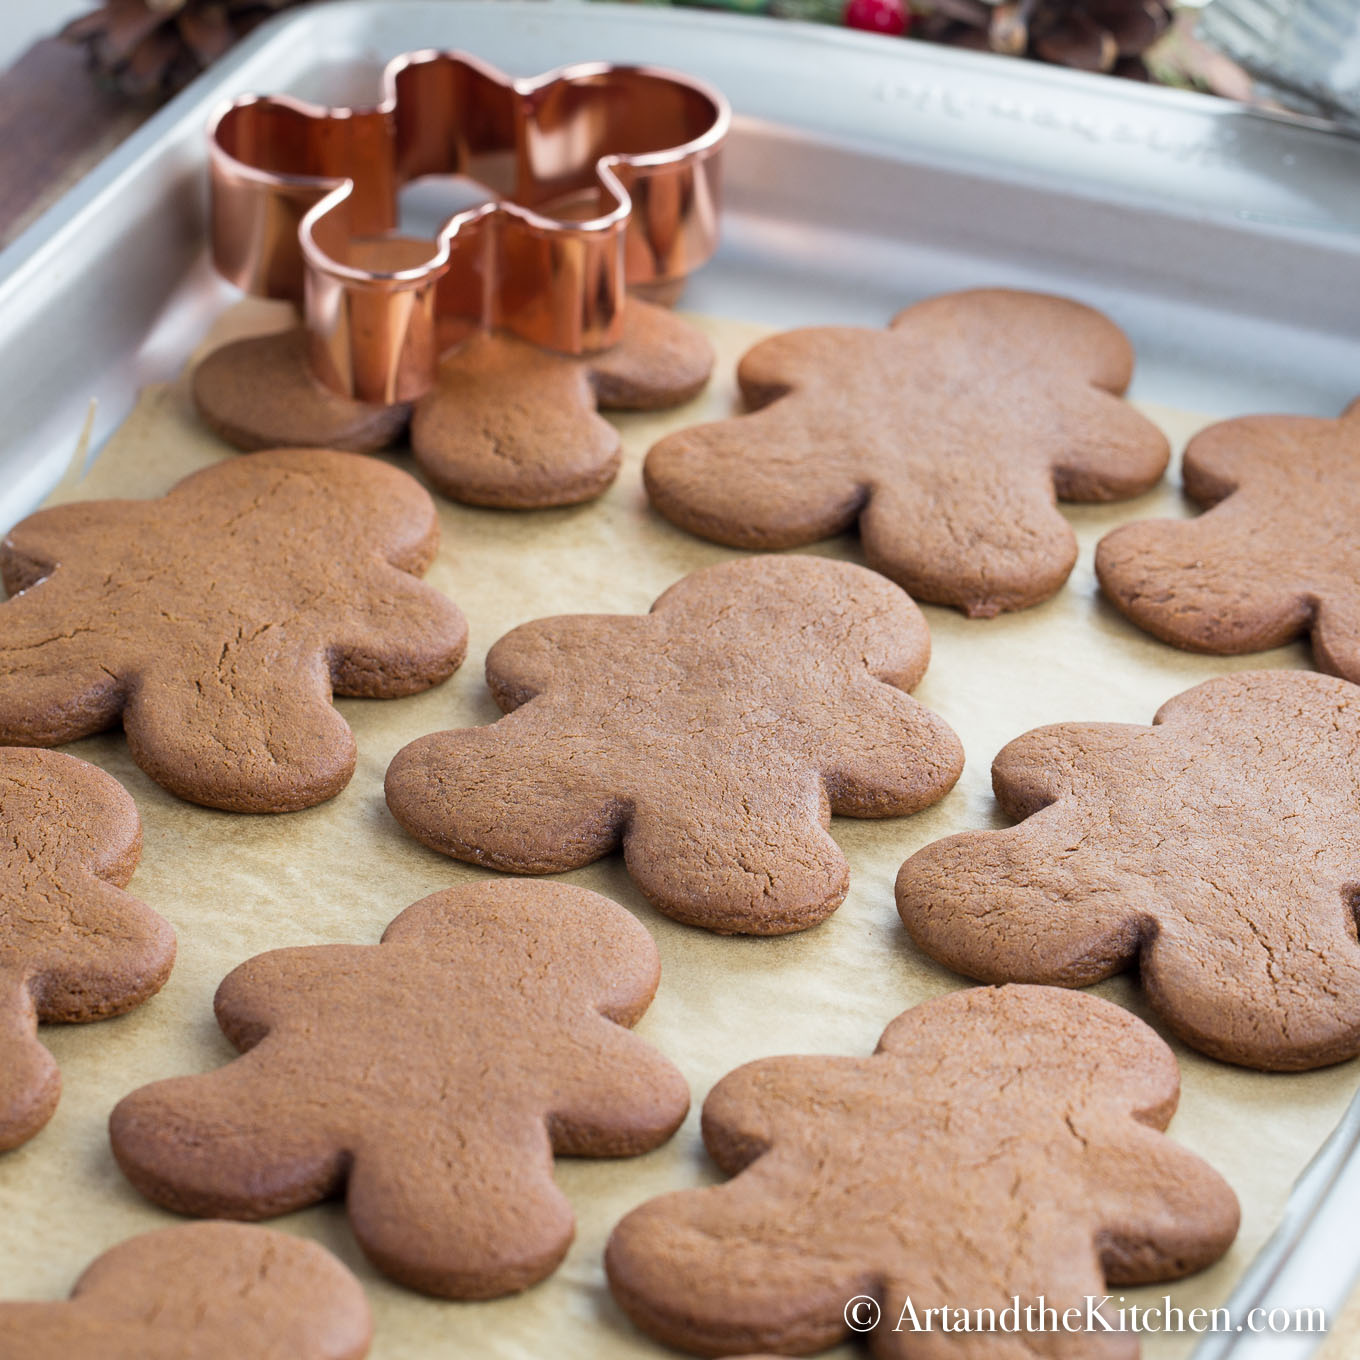
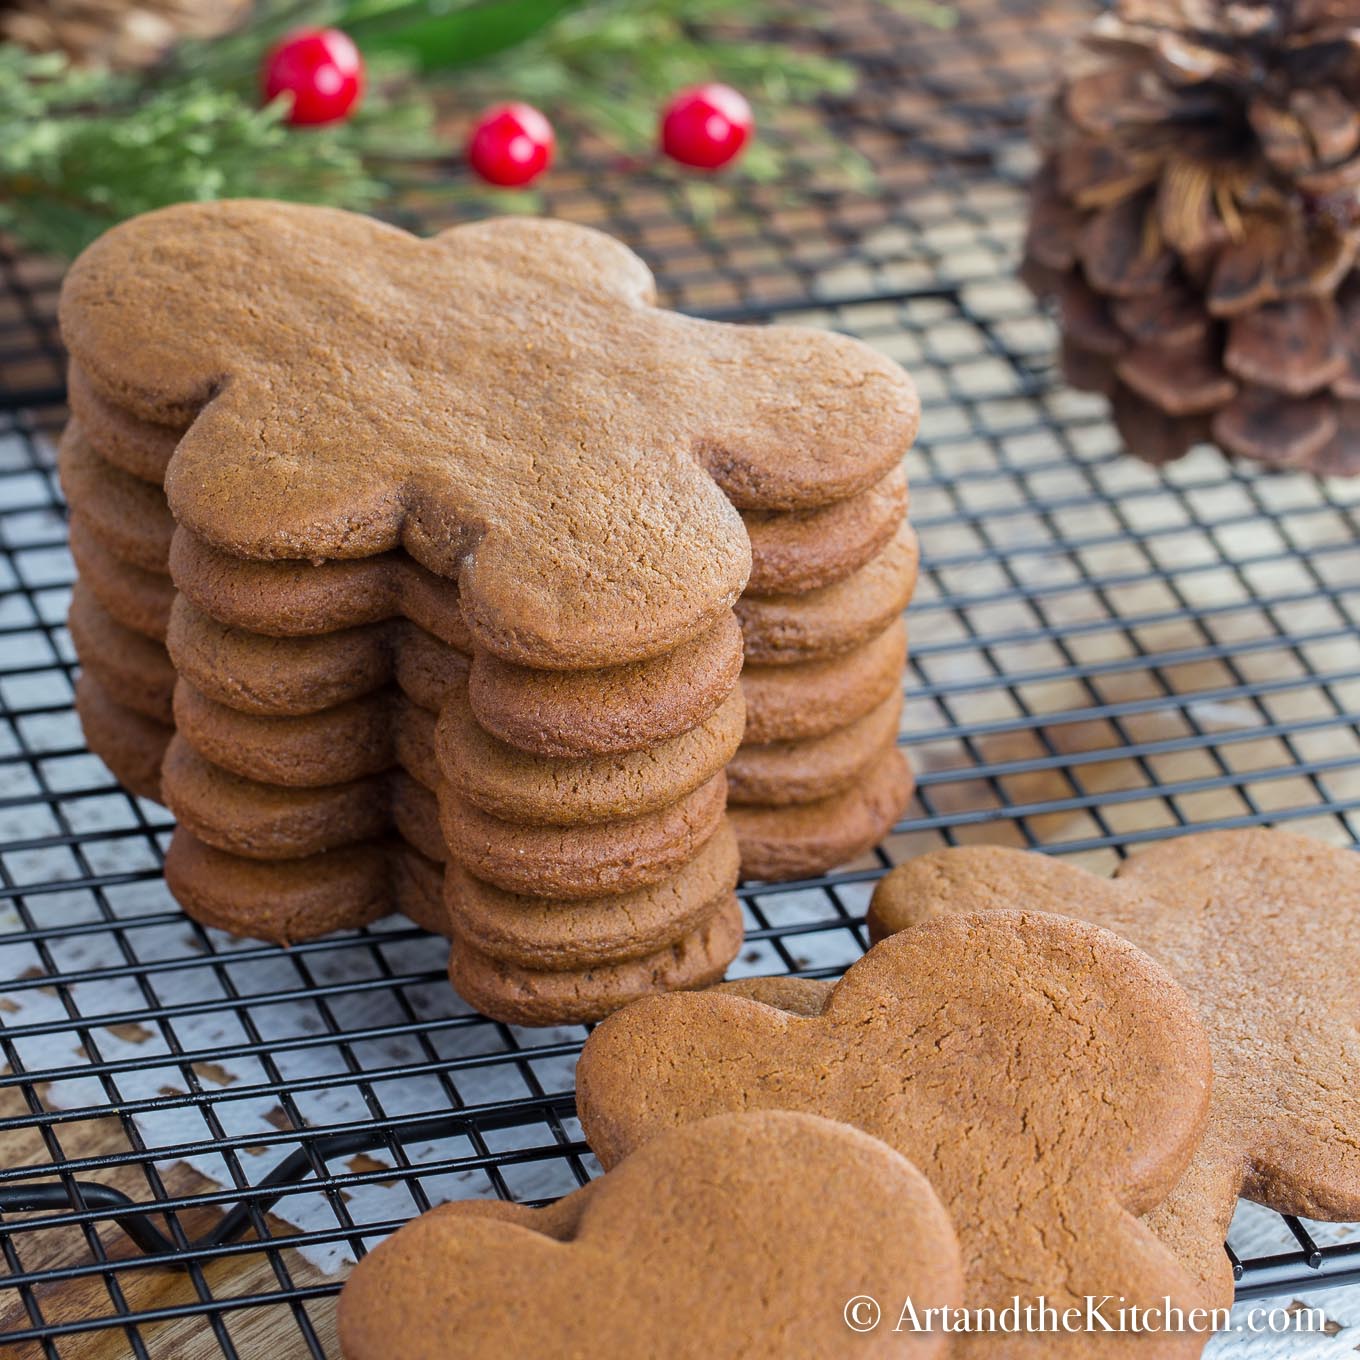
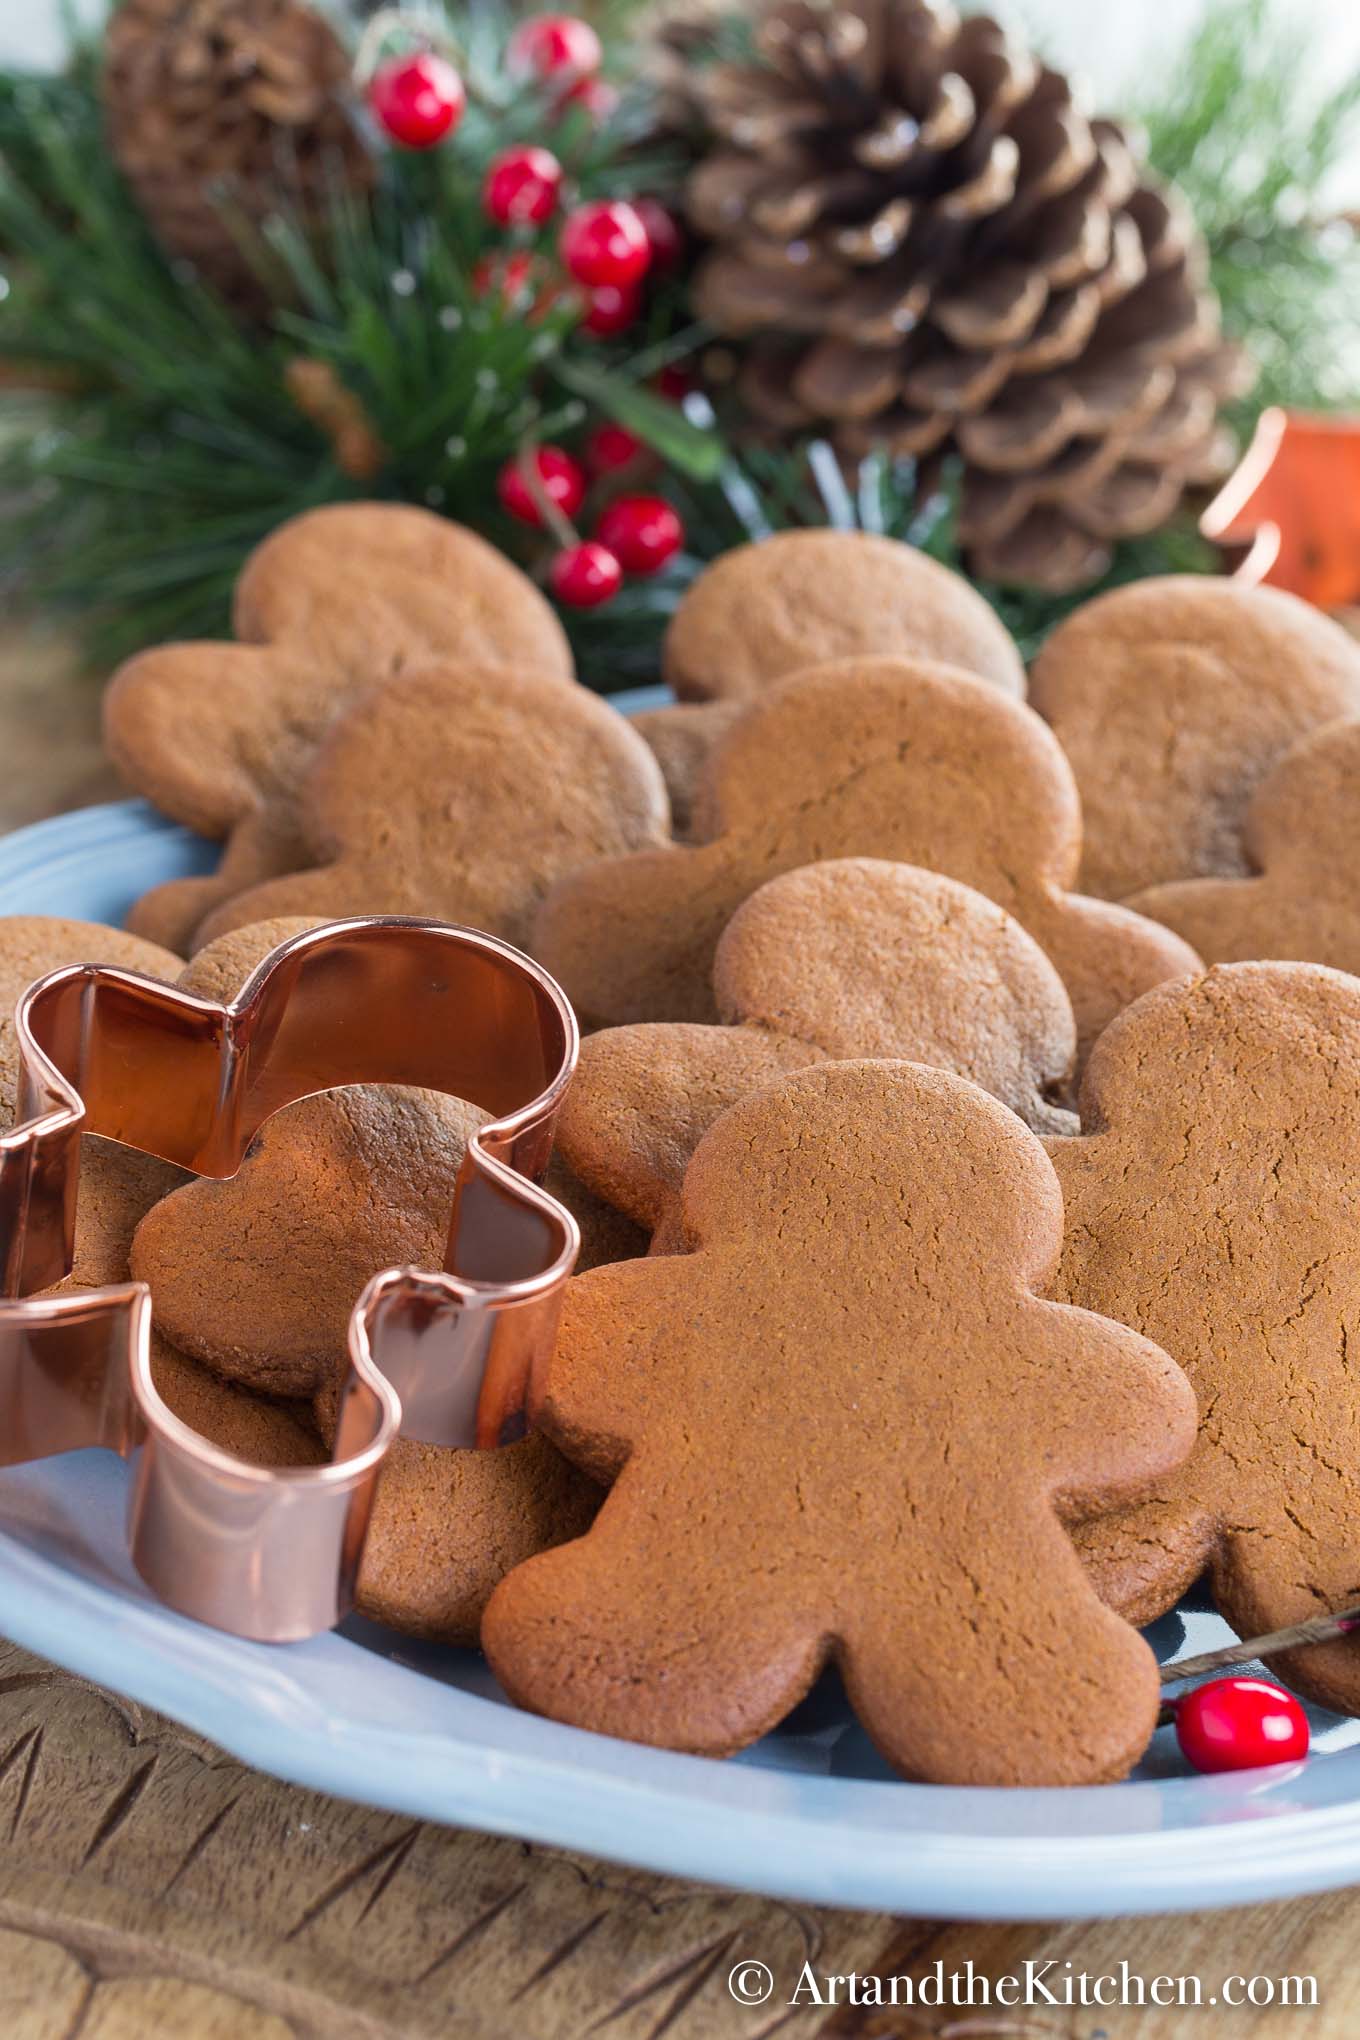
One of my best ever recipes for Gingerbread Cookies. Just the right amount of spice and they bake into perfect shapes.
Gingerbread Cookies are always a must for Holiday baking. The smell of these cookies baking is sure to put everyone in the Christmas spirit. I've tested many recipes over the years and this is, by far, my favourite. The optional orange zest adds a great depth of flavour to the cookies, but if you like a more traditional flavour simply omit the orange zest.
I use fancy molasses in my recipe, for a bolder flavour try cooking molasses. 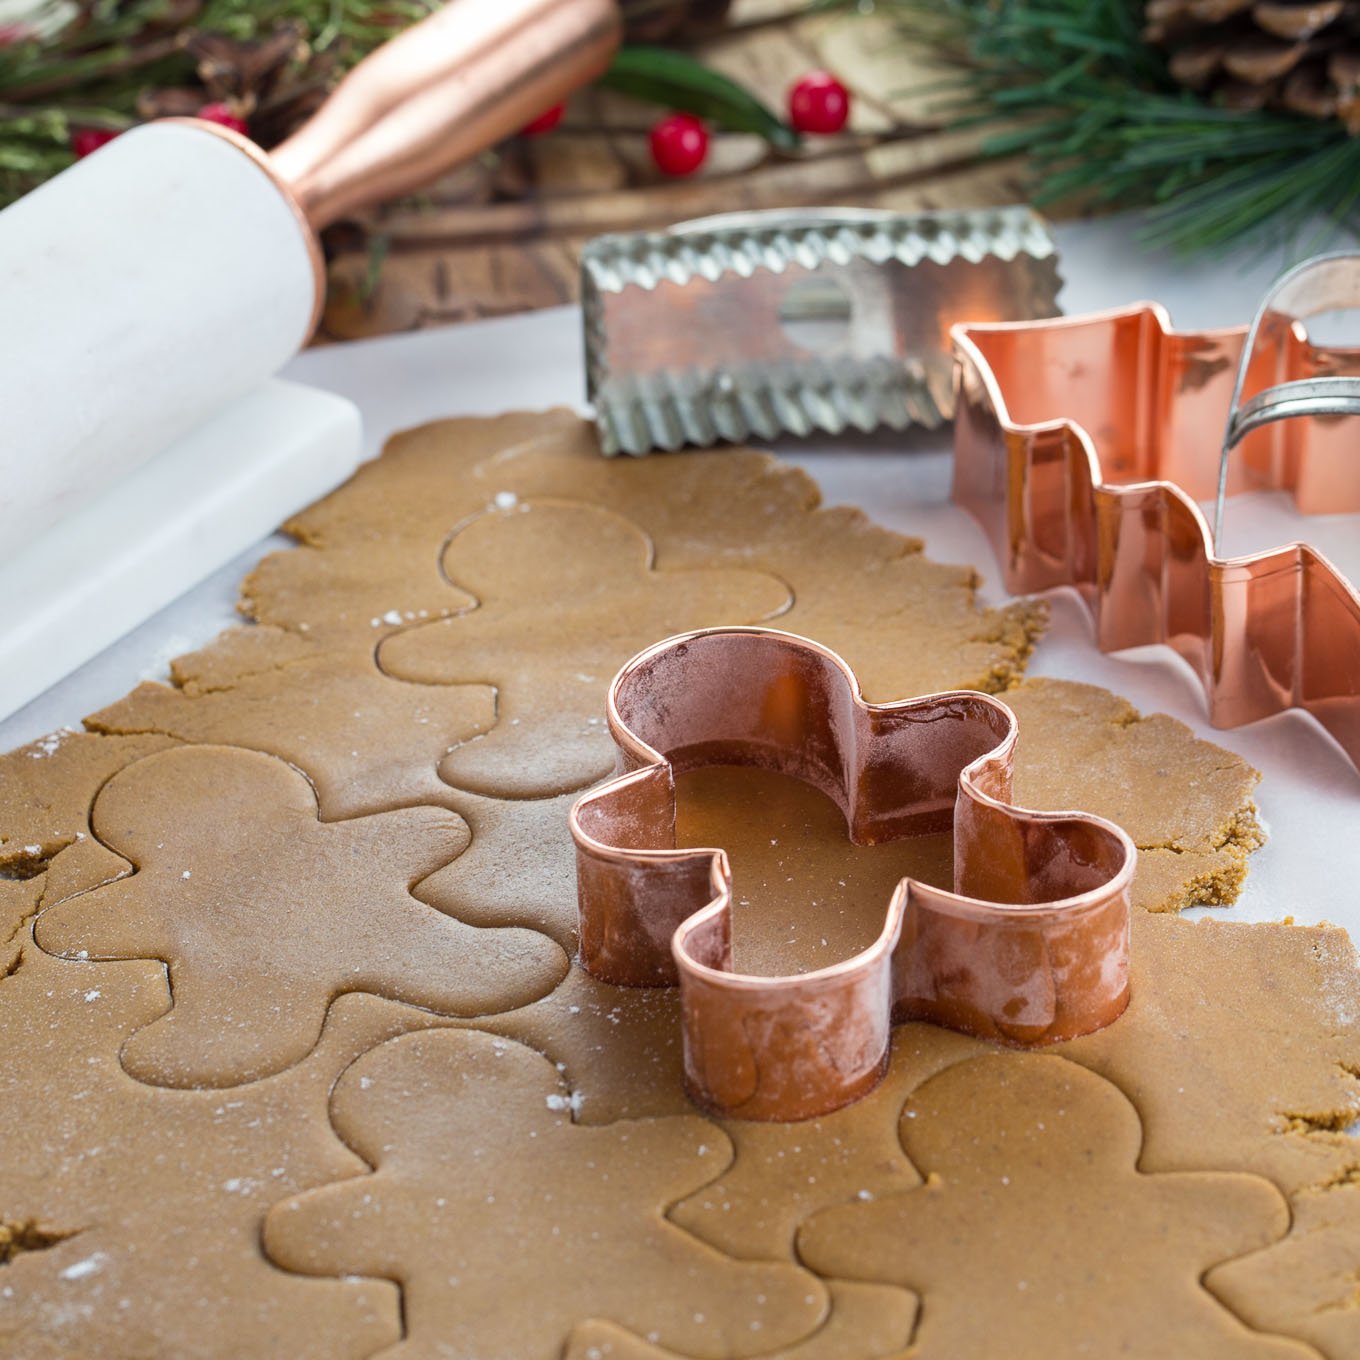
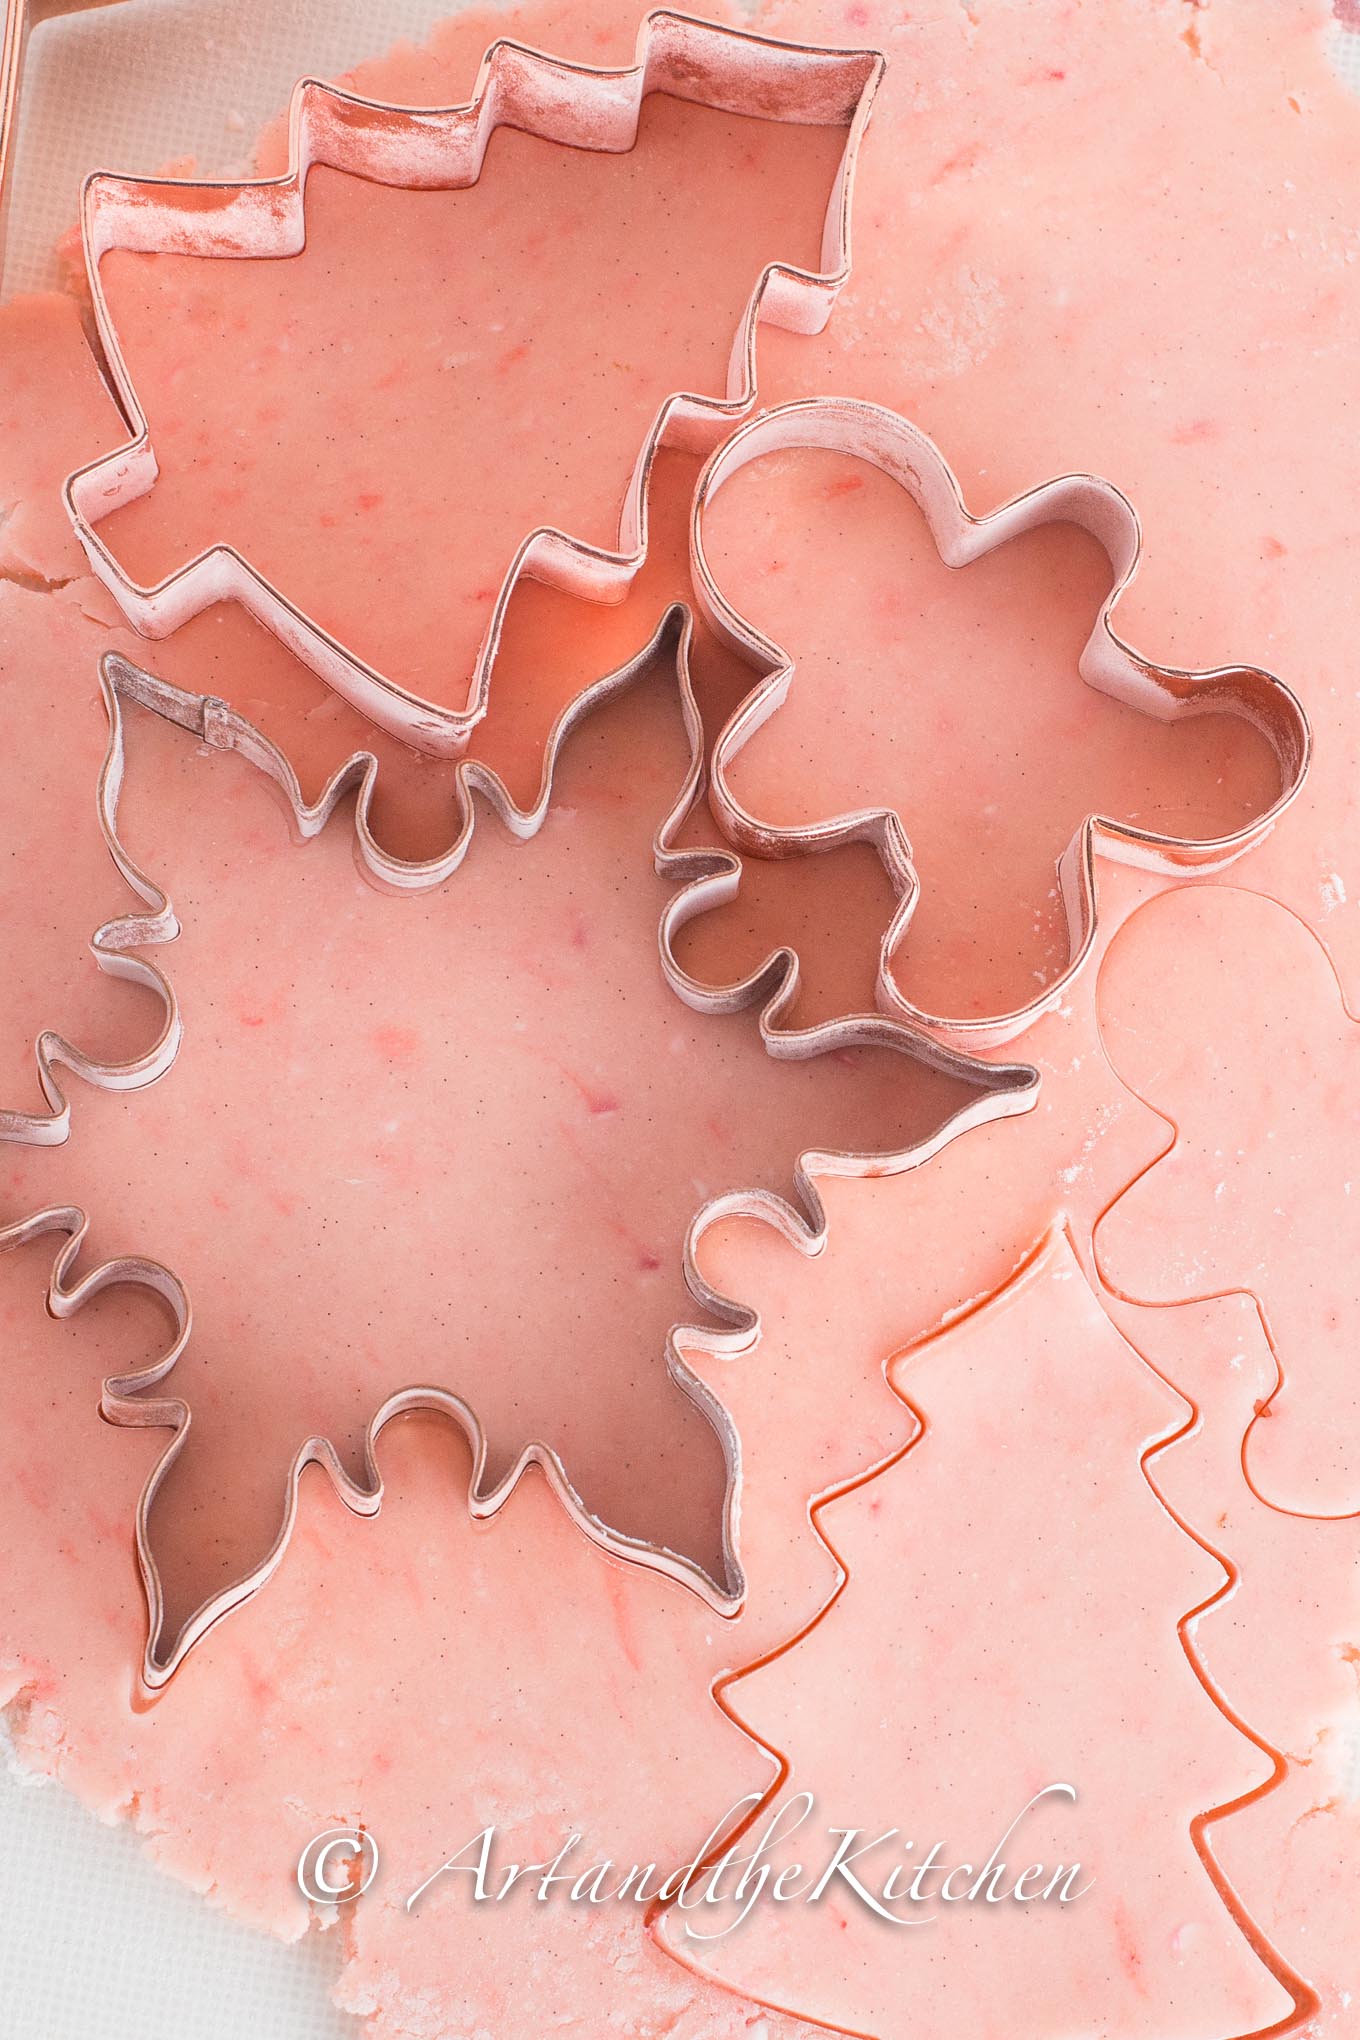
This Gingerbread Cookie recipe cuts perfect shapes and bakes maintaining great edges. The key is to place cutout cookies in freezer for 5-10 minutes before baking. This prevents them from spreading as they bake.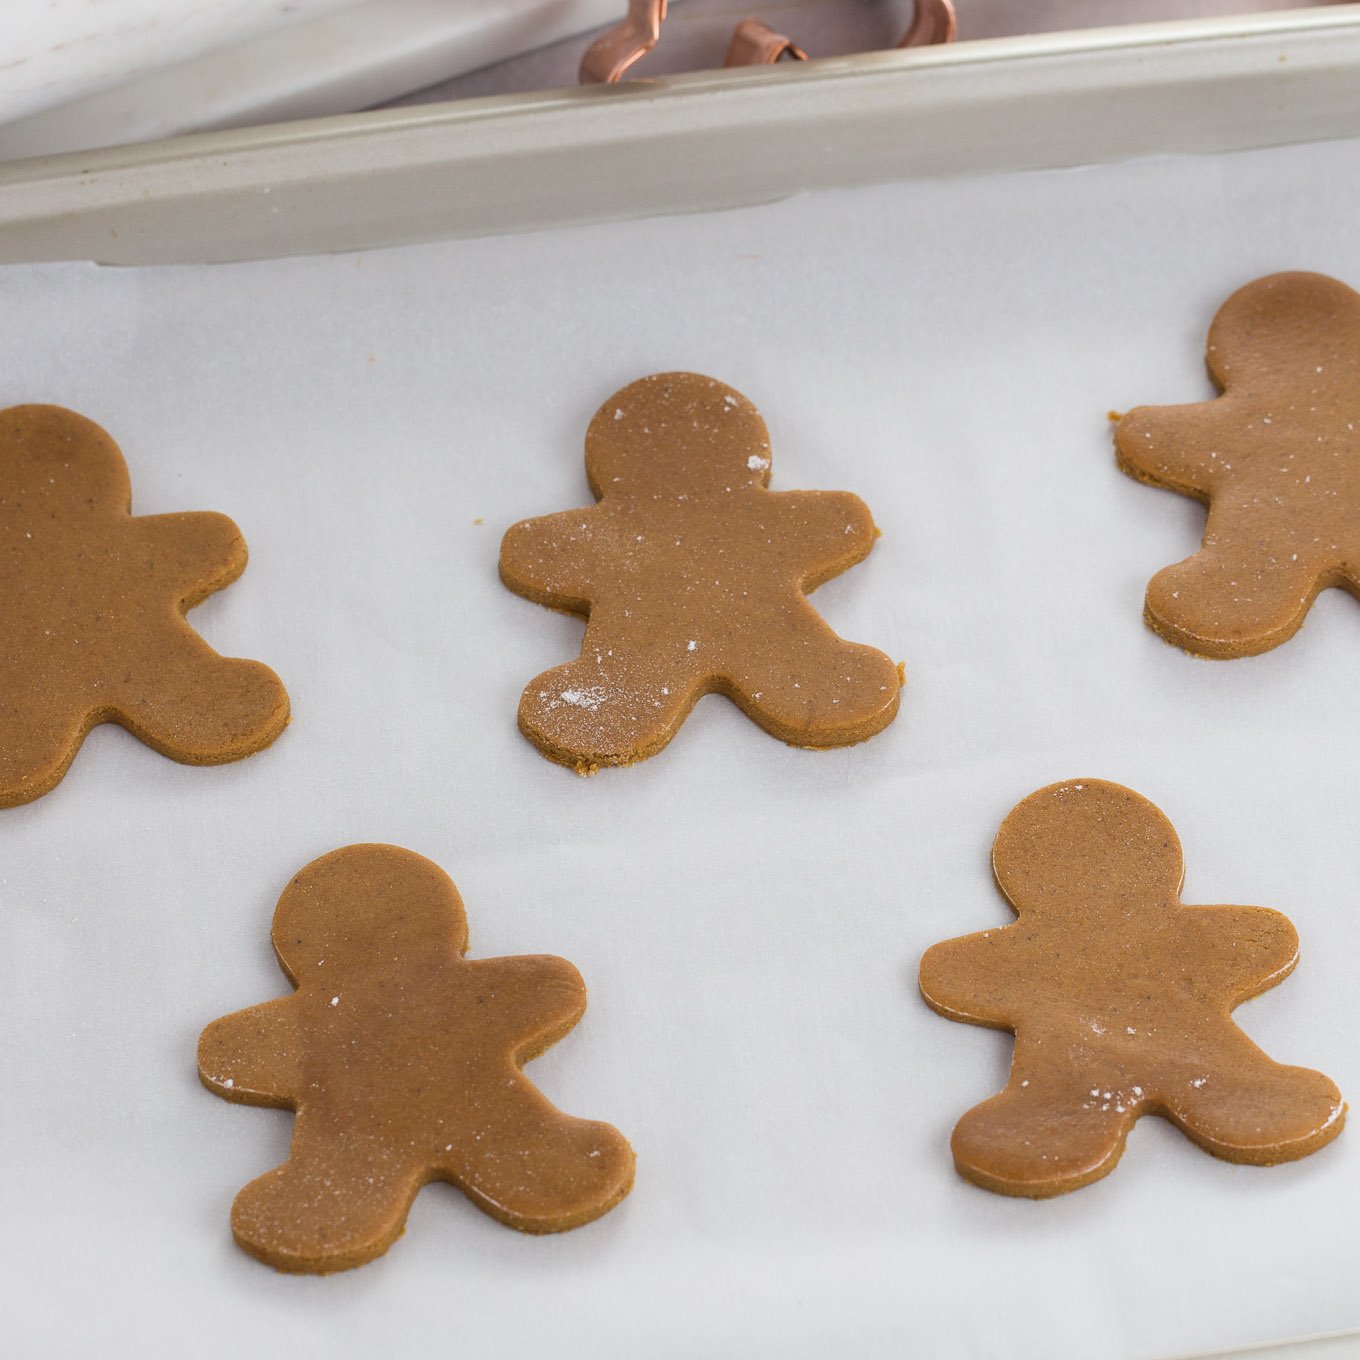
Gingerbread Cookies
One of my favourite recipes for Gingerbread Cookies. Just the right amount of spice and they bake into perfect shapes.
Servings: 24
Calories: 159kcal
Ingredients
- 3 ½ cups all-purpose flour
- 2 teaspoon ground ginger
- 1 teaspoon baking soda
- 1 ½ teaspoon ground cinnamon
- ½ teaspoon ground cloves
- ¼ teaspoon table salt
- 4 oz unsalted butter ½ cup, softened
- ¾ cup sugar
- 1 large egg
- ¾ cup molasses fancy molasses
- 2 teaspoon orange zest grated optional
Instructions
- In a medium bowl, whisk the flour, ginger, baking soda, cinnamon, cloves, and salt.
- Using a standing mixer fitted with the paddle attachment, beat the butter and sugar until light and fluffy.
- Add the egg, mixing until combined, then add molasses and orange zest. Beat on medium speed until smooth, stopping to scrape the bowl as necessary.
- On low speed, slowly add in the dry ingredients, mixing just until the flour is incorporated.
- Place dough onto a lightly floured parchment paper and flatten to a 1-inch thickness. Cover with plastic wrap and refrigerate 3 hours or overnight.
- Preheat oven to 350°F. Line baking sheets with parchment.
- Roll out dough on a floured surface, about ¼” (6mm) thickness.
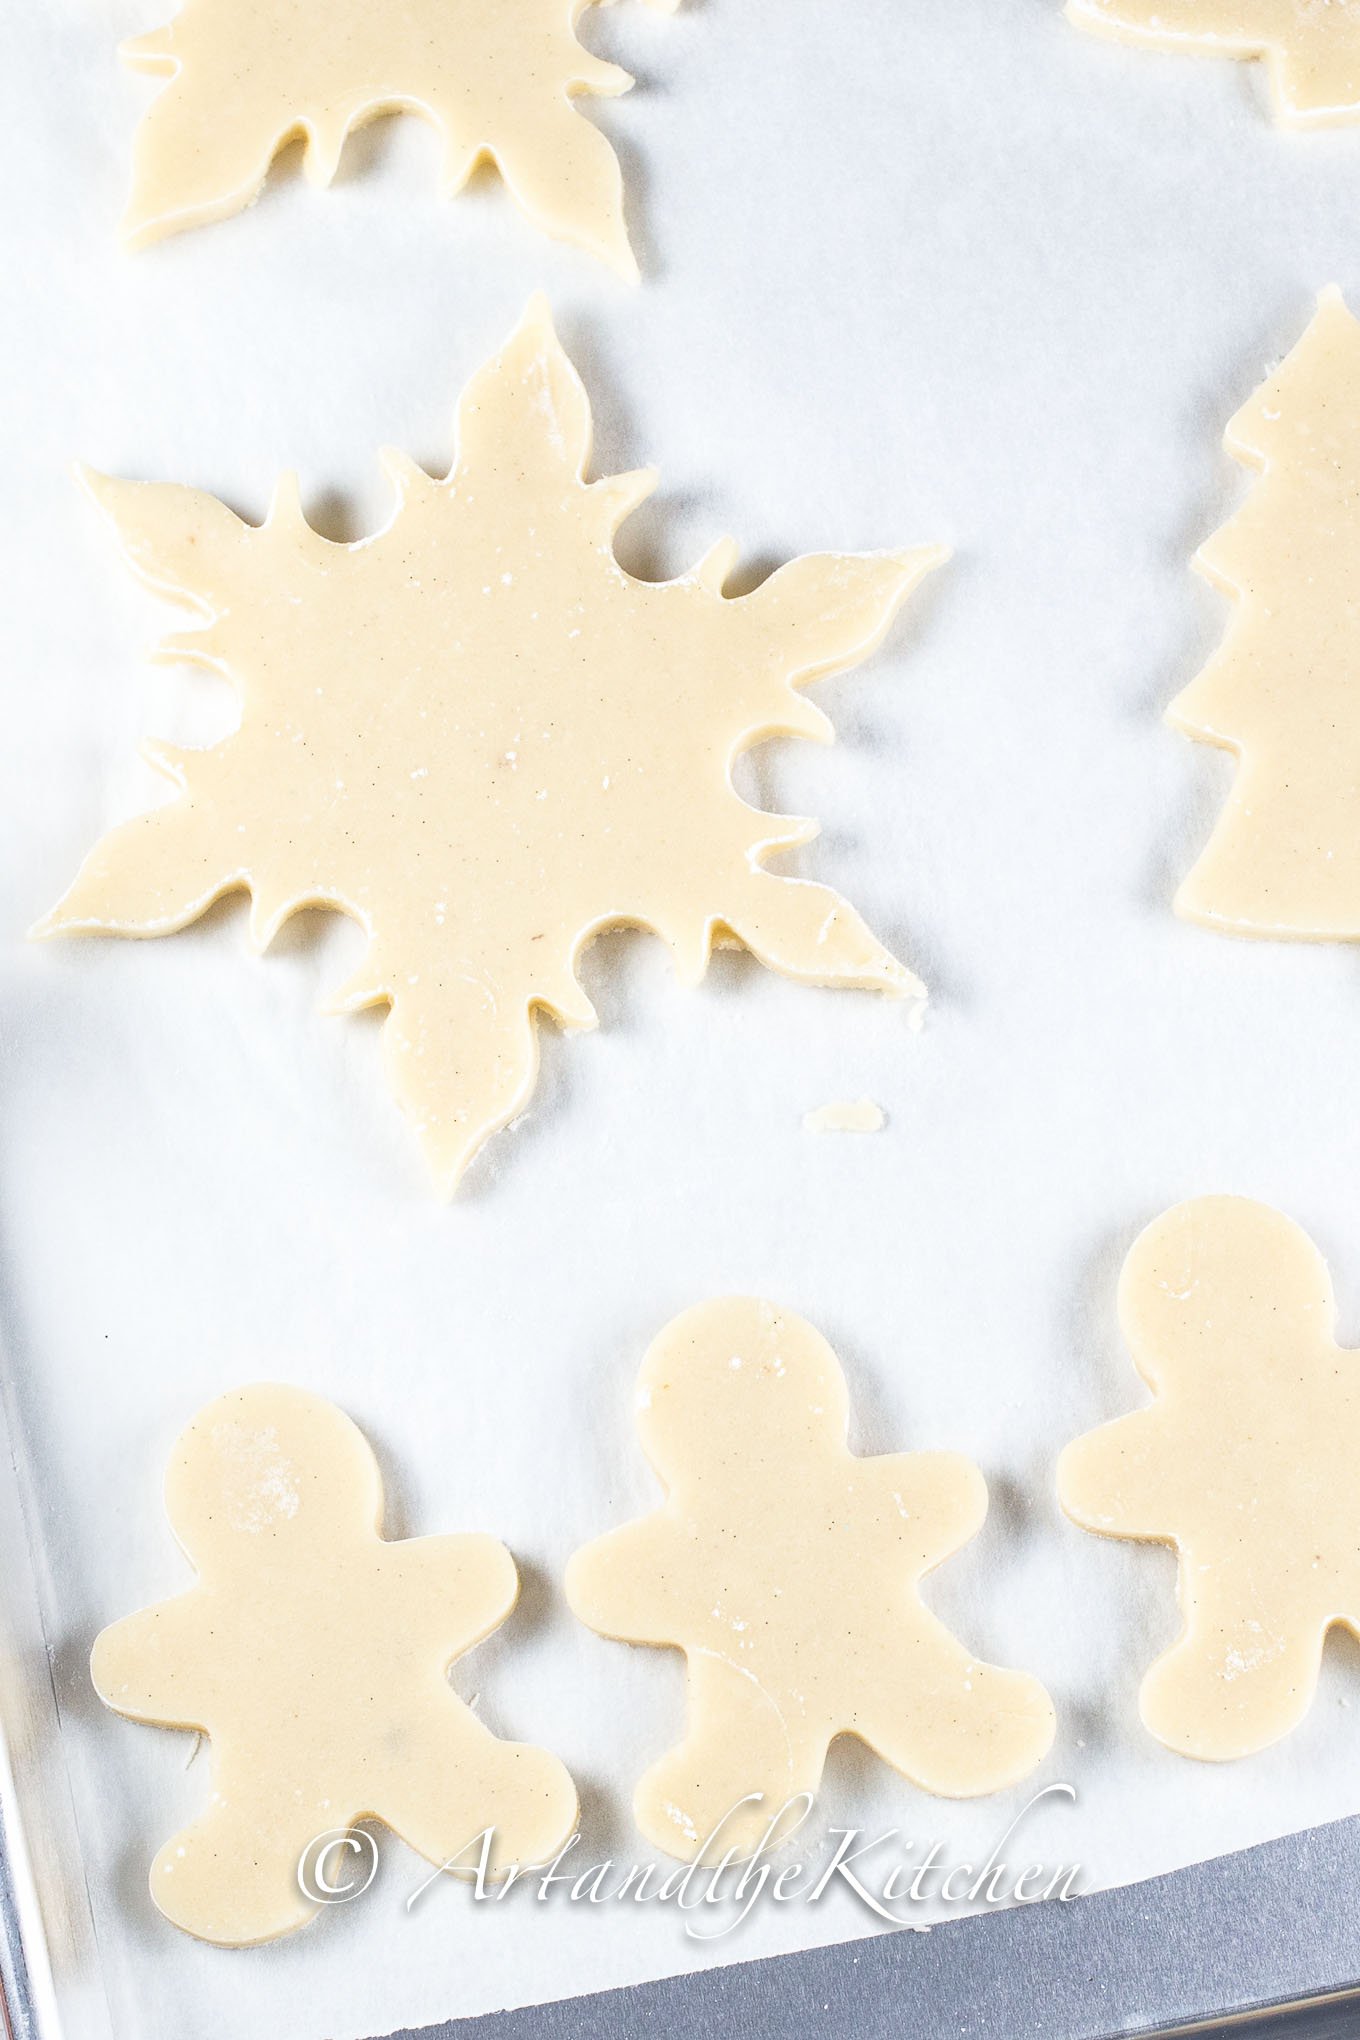
- Cut gingerbread into desired shapes and place on cookie sheets.
- Place cutout cookies in freezer for 5-10 minutes.
- Bake 10-12 minutes. Remove from oven and place on a wire rack to cool.
- Decorate as desired. Store in airtight container. Freeze up to 3 months.
Nutrition
Calories: 159kcal | Carbohydrates: 28g | Protein: 2g | Fat: 4g | Saturated Fat: 3g | Cholesterol: 18mg | Sodium: 85mg | Potassium: 179mg | Fiber: 1g | Sugar: 14g | Vitamin A: 129IU | Vitamin C: 1mg | Calcium: 28mg | Iron: 1mg
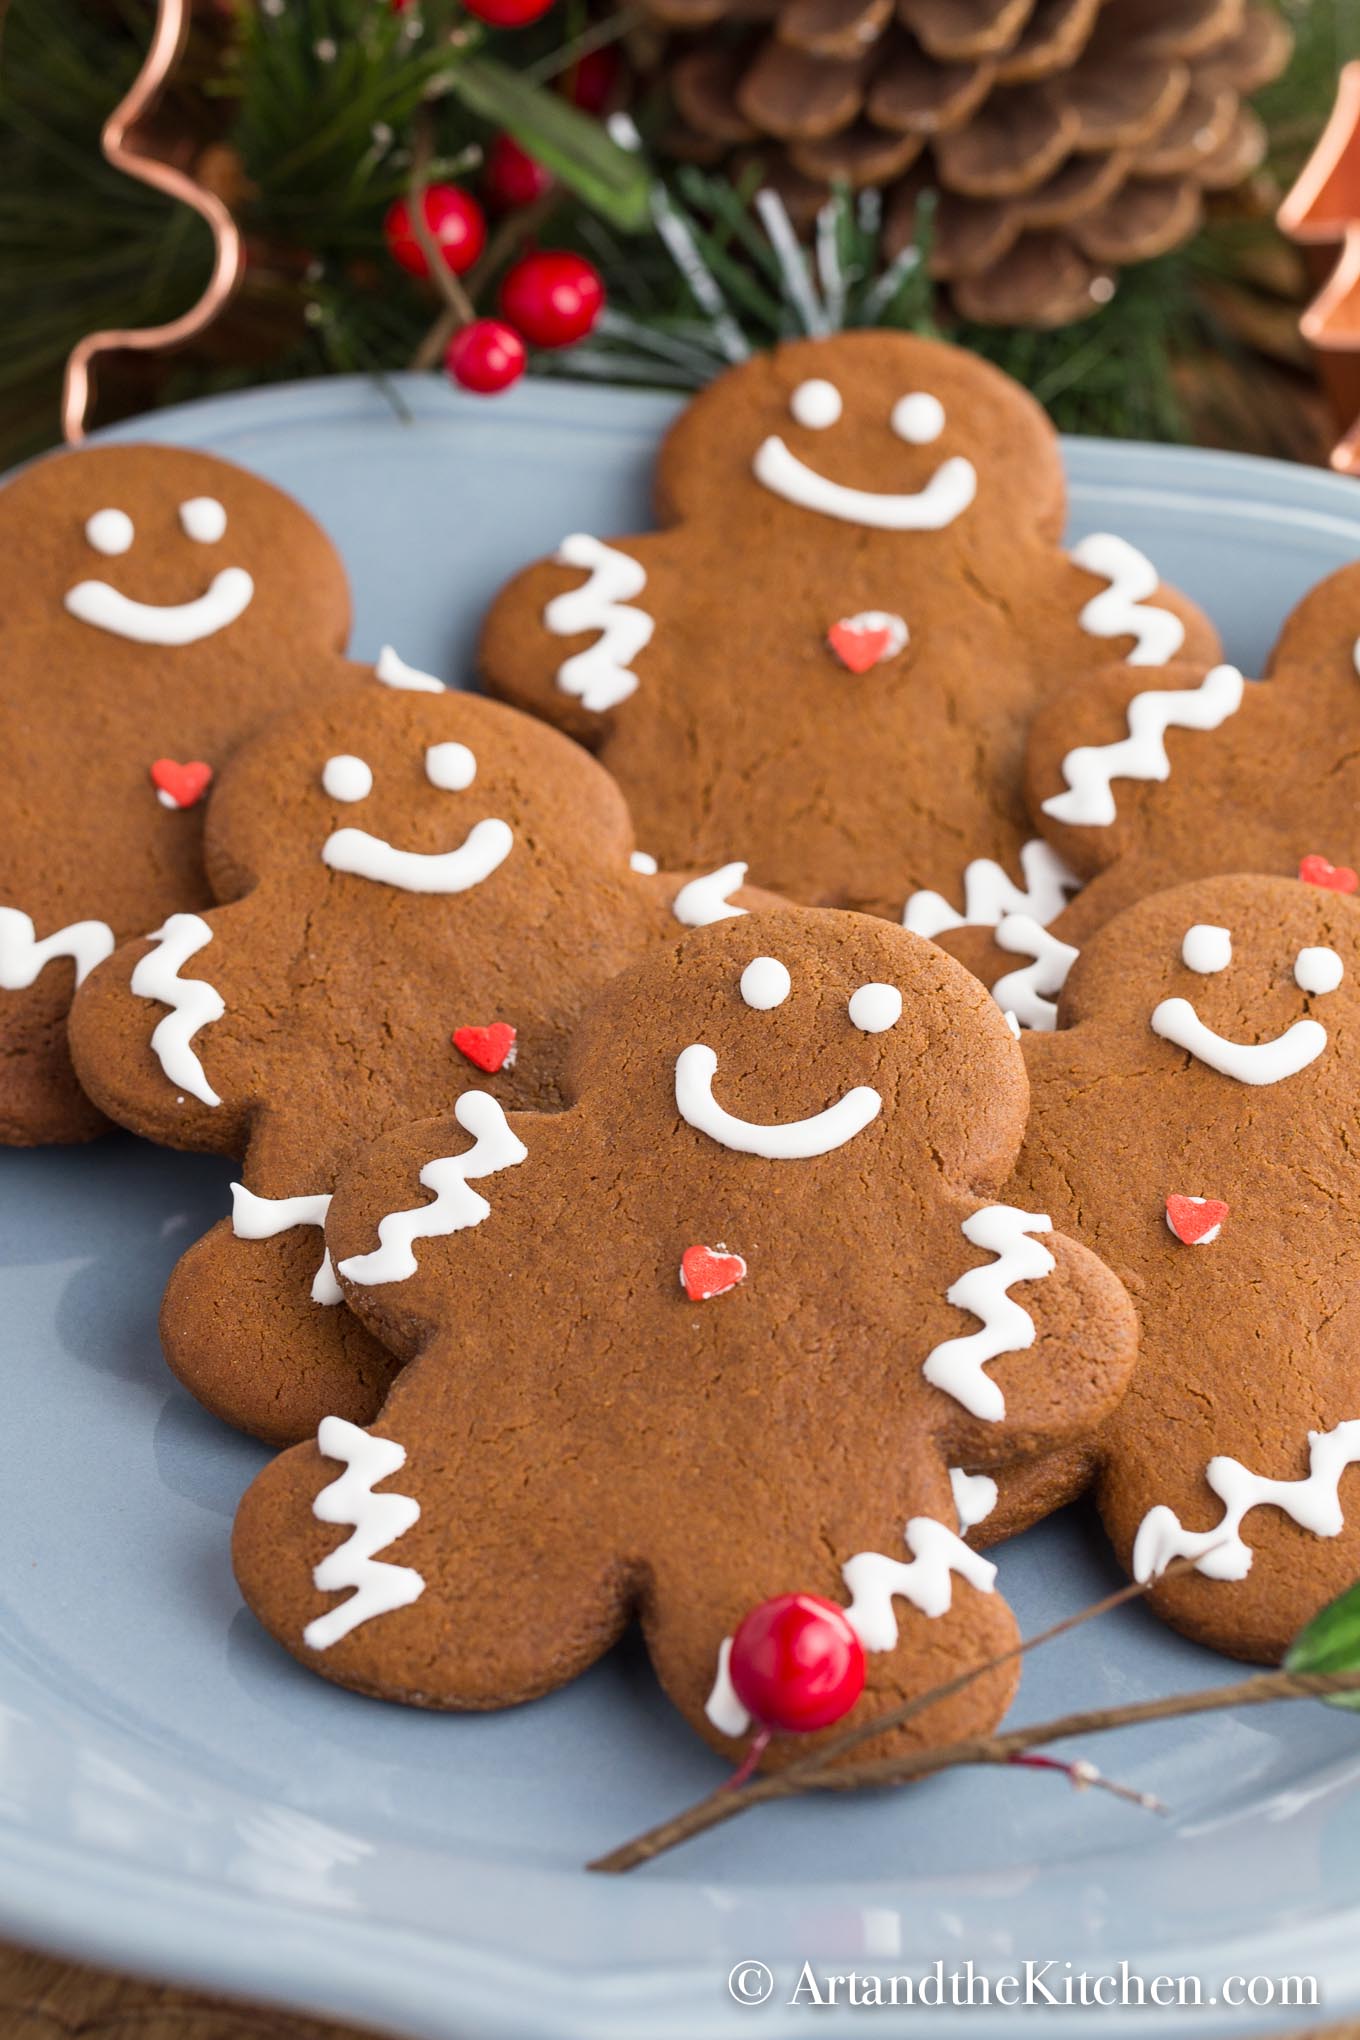
One of my favourite things to do during the Holiday Season is decorating cookies with family and friends. Kids love decorating Christmas cookies. It doesn't matter how they are decorated, they still taste great! I usually decorate my cookies with Royal Icing. Check out my easy to follow instructions for decorating cookies with Royal Icing here.
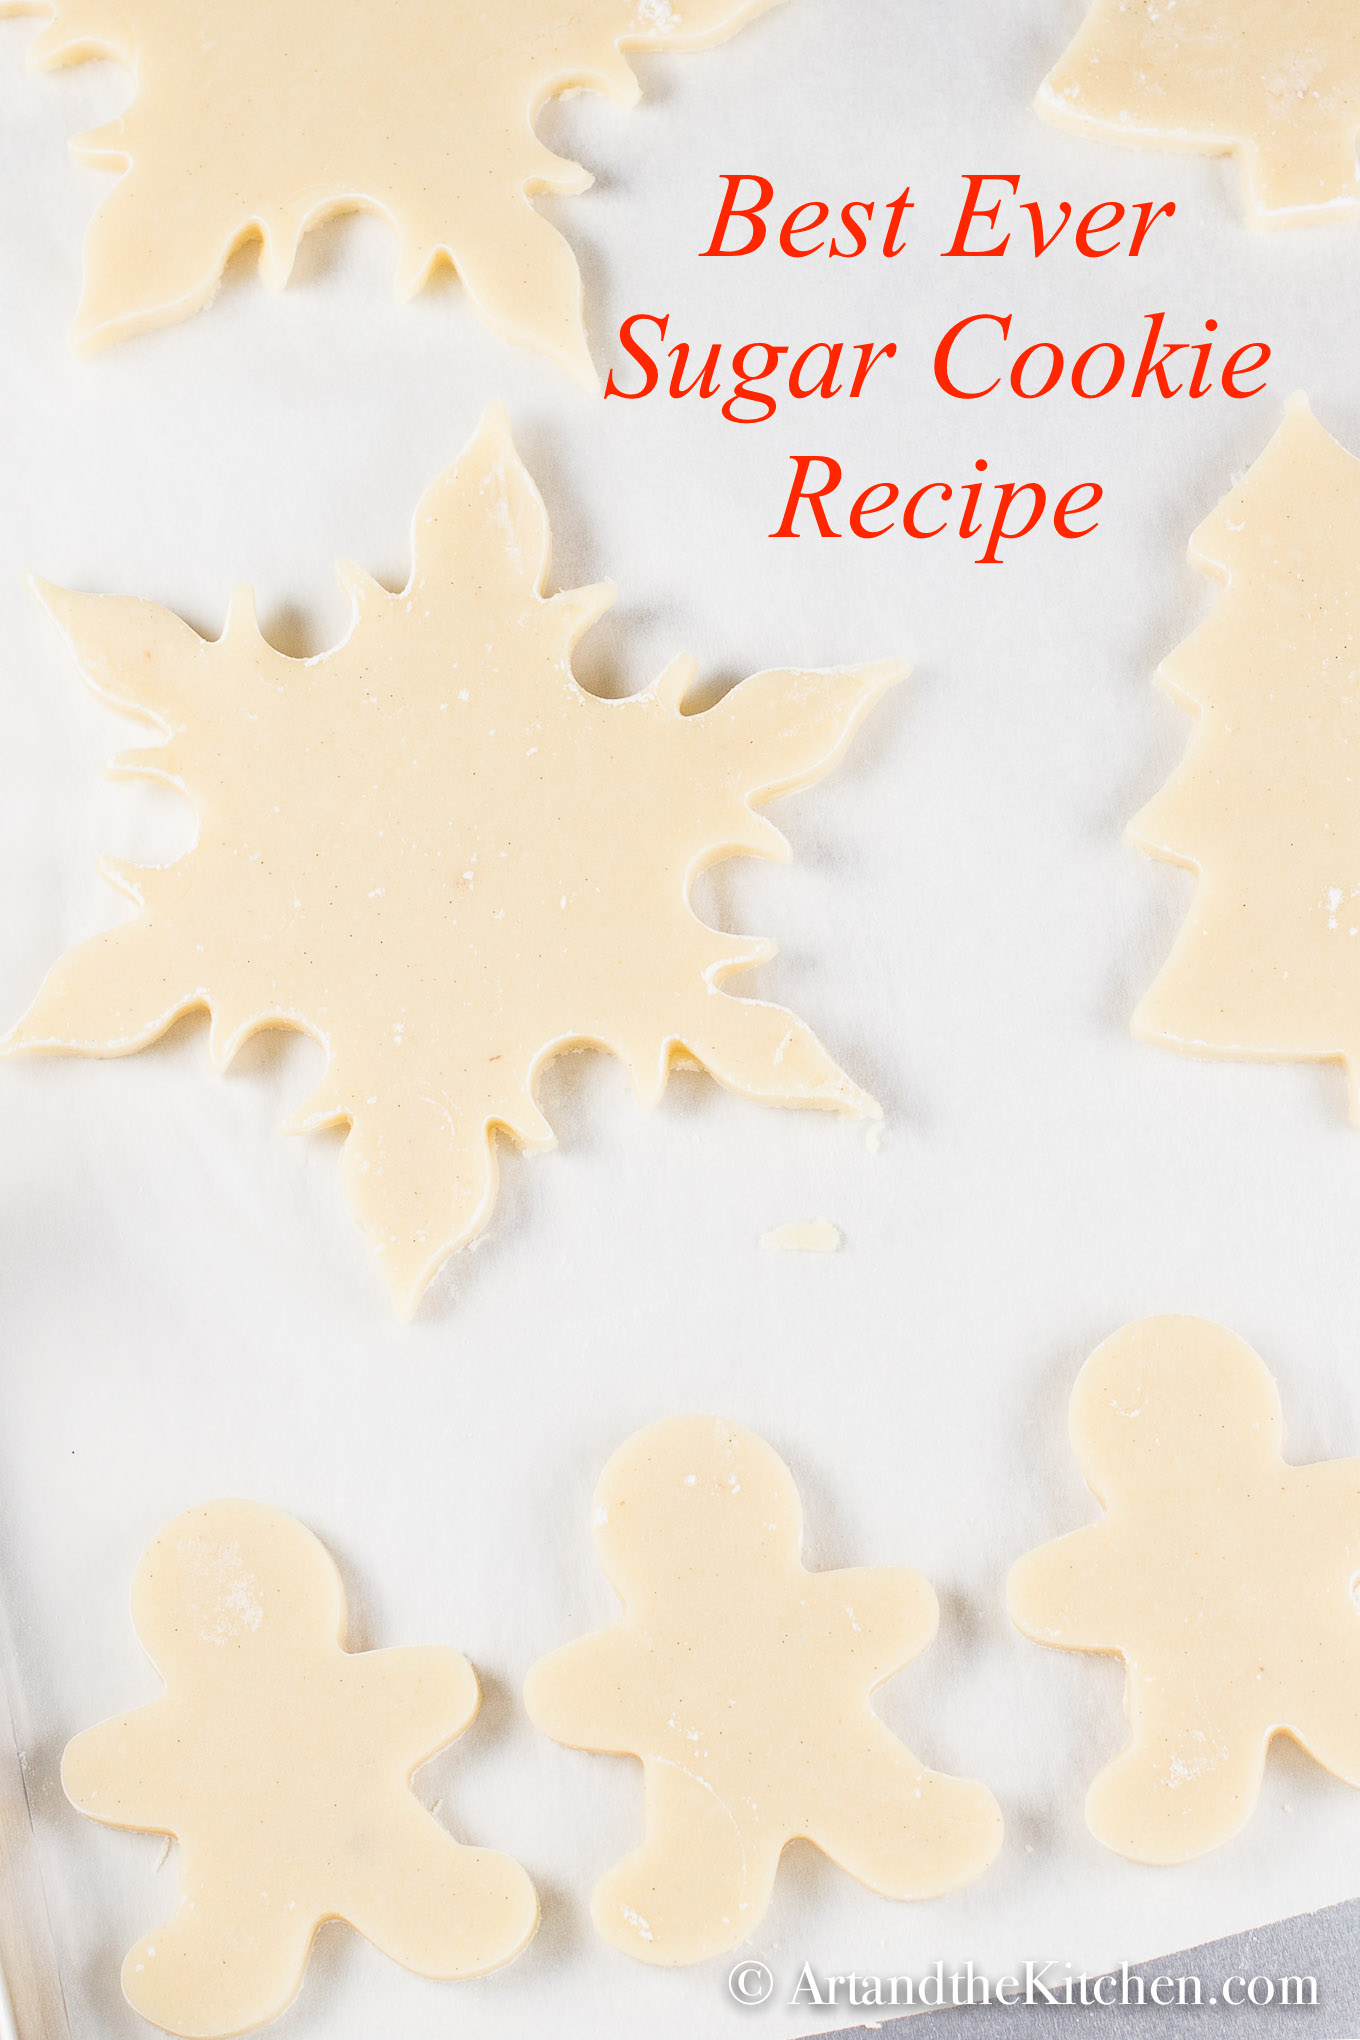
For more great cutout cookie recipes try my Candy Cane Sugar Cookies and Best Ever Sugar Cookies recipes!
Be sure to follow me and get my latest recipes on Pinterest, Instagram Facebook and Twitter.
Your support of my blog is greatly appreciated!
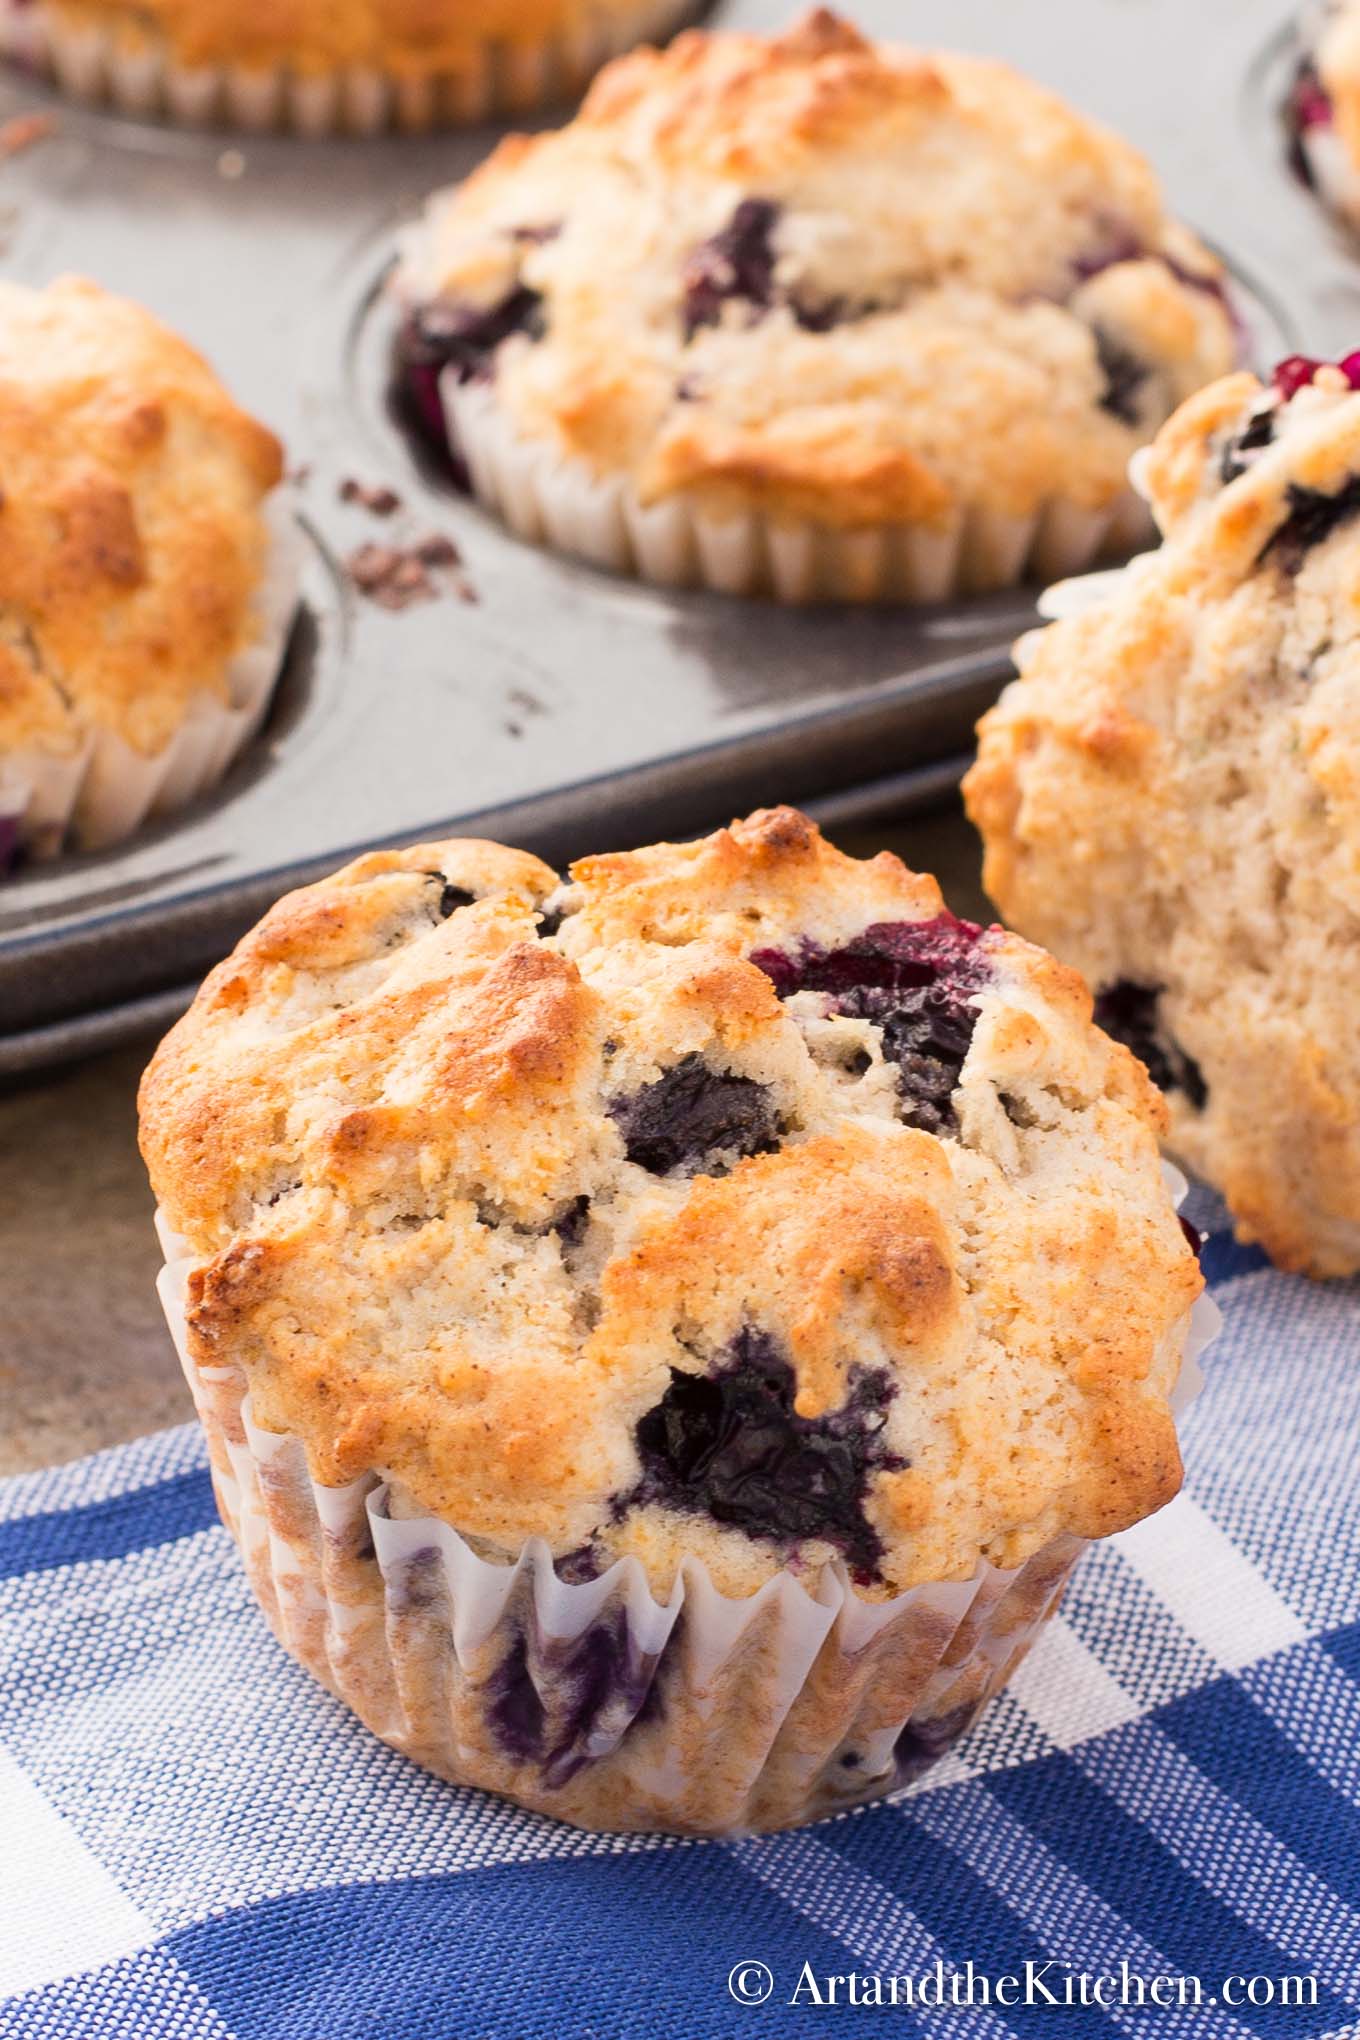
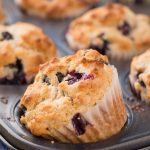
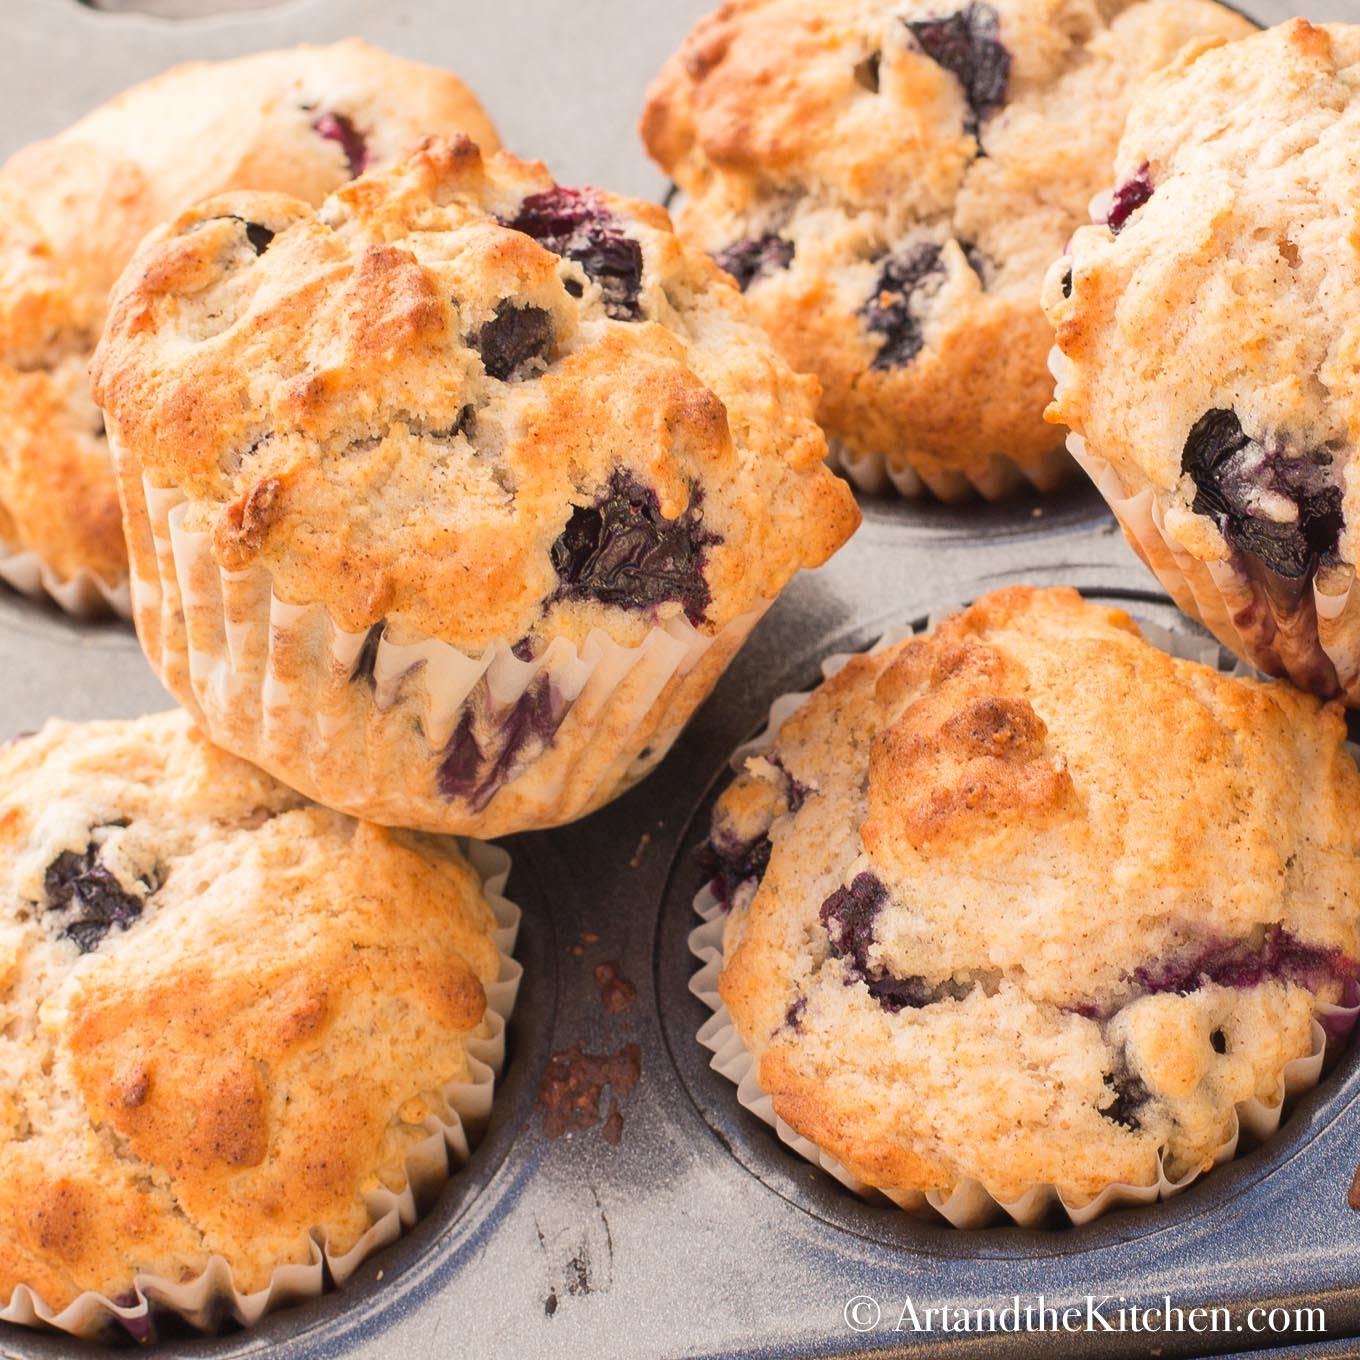
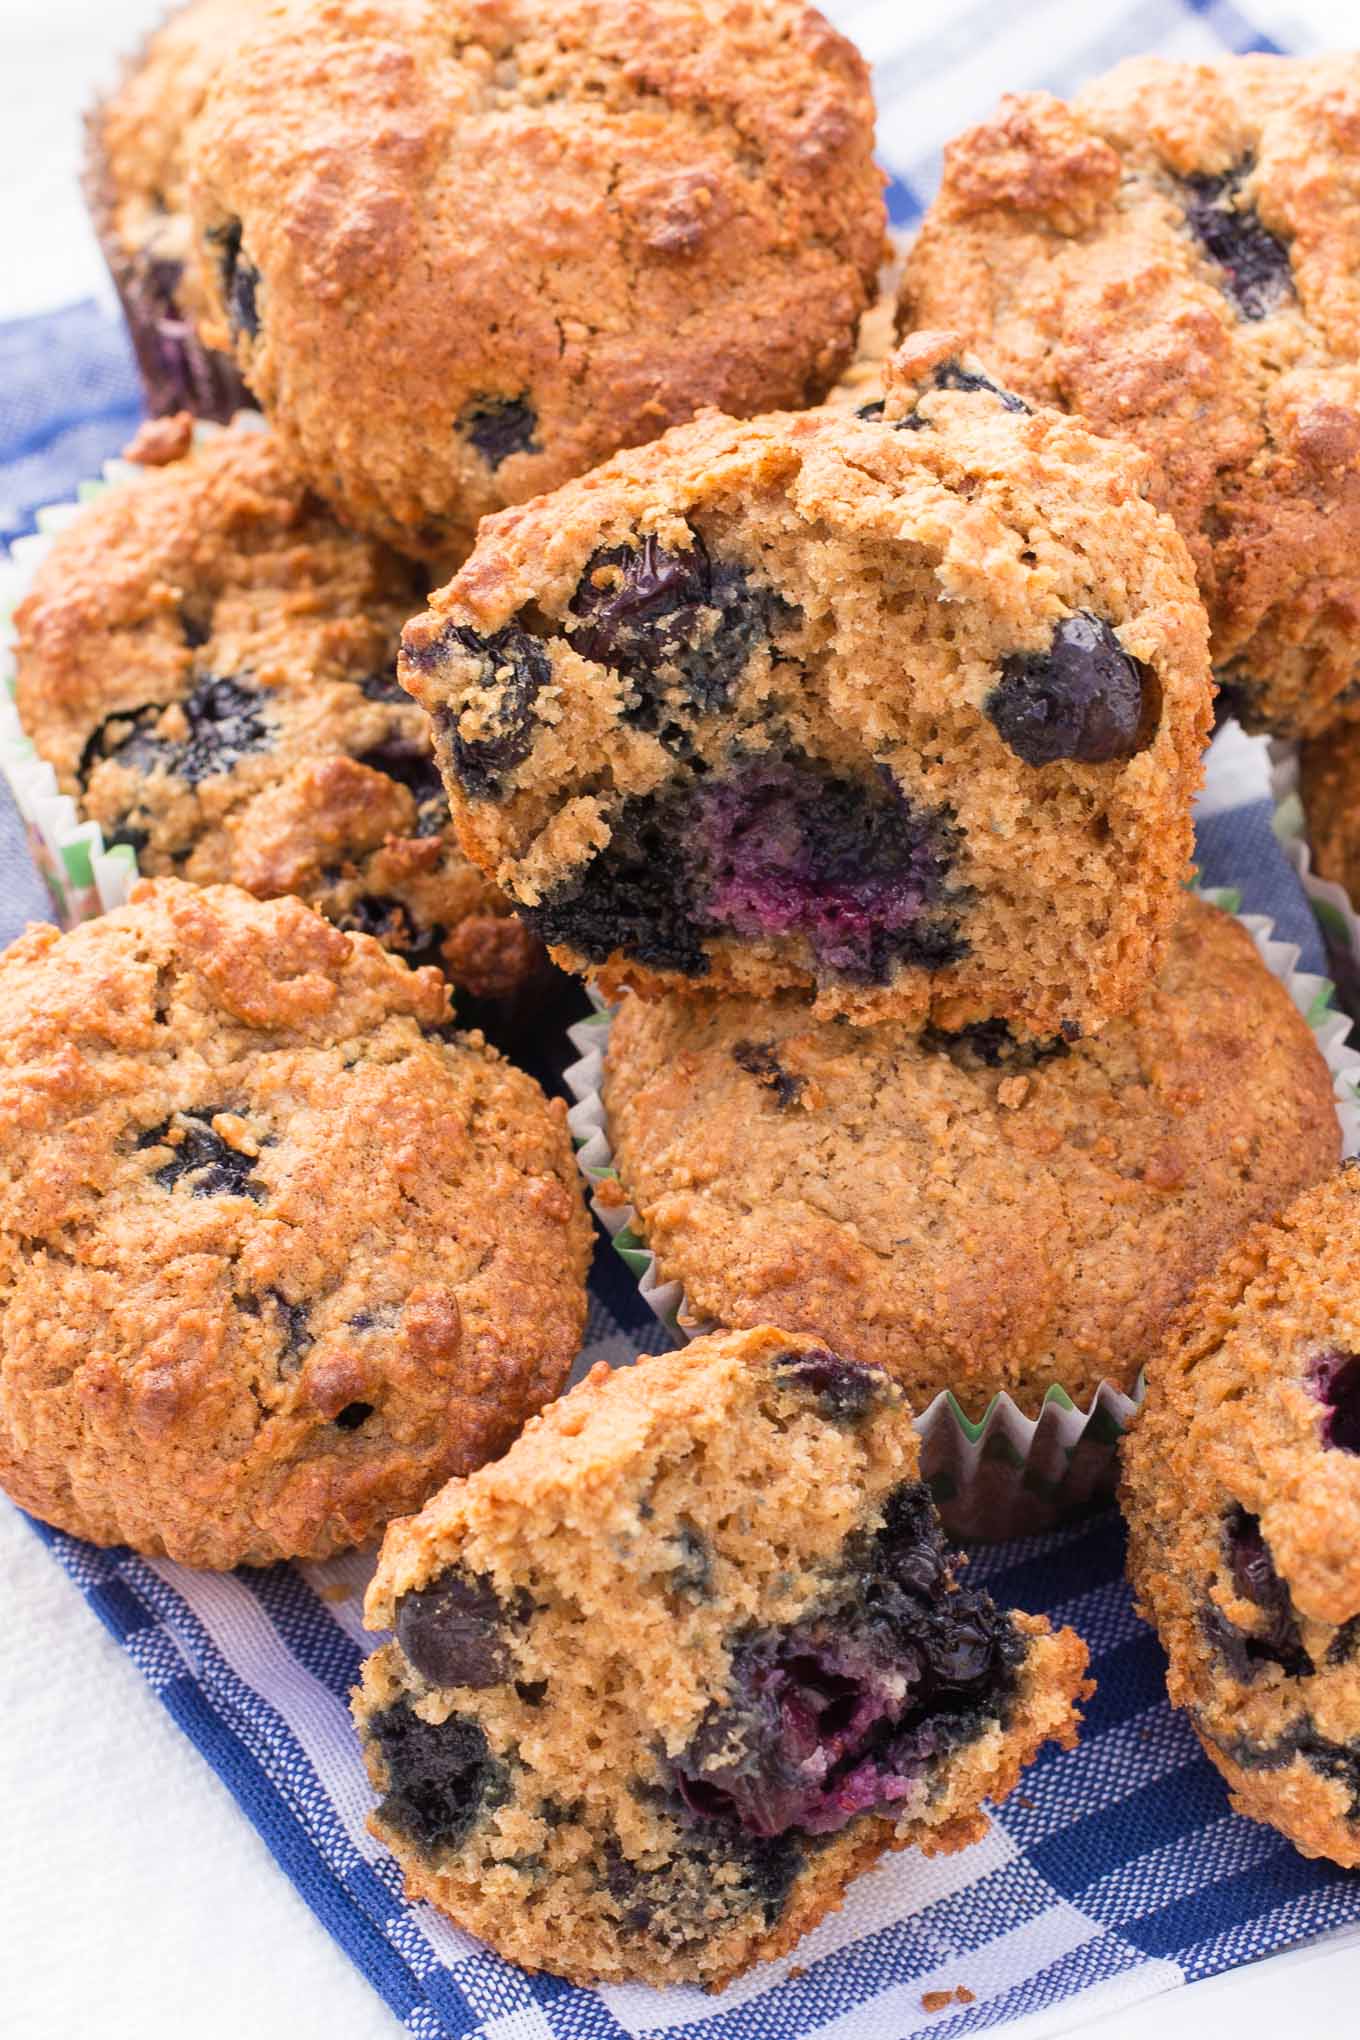
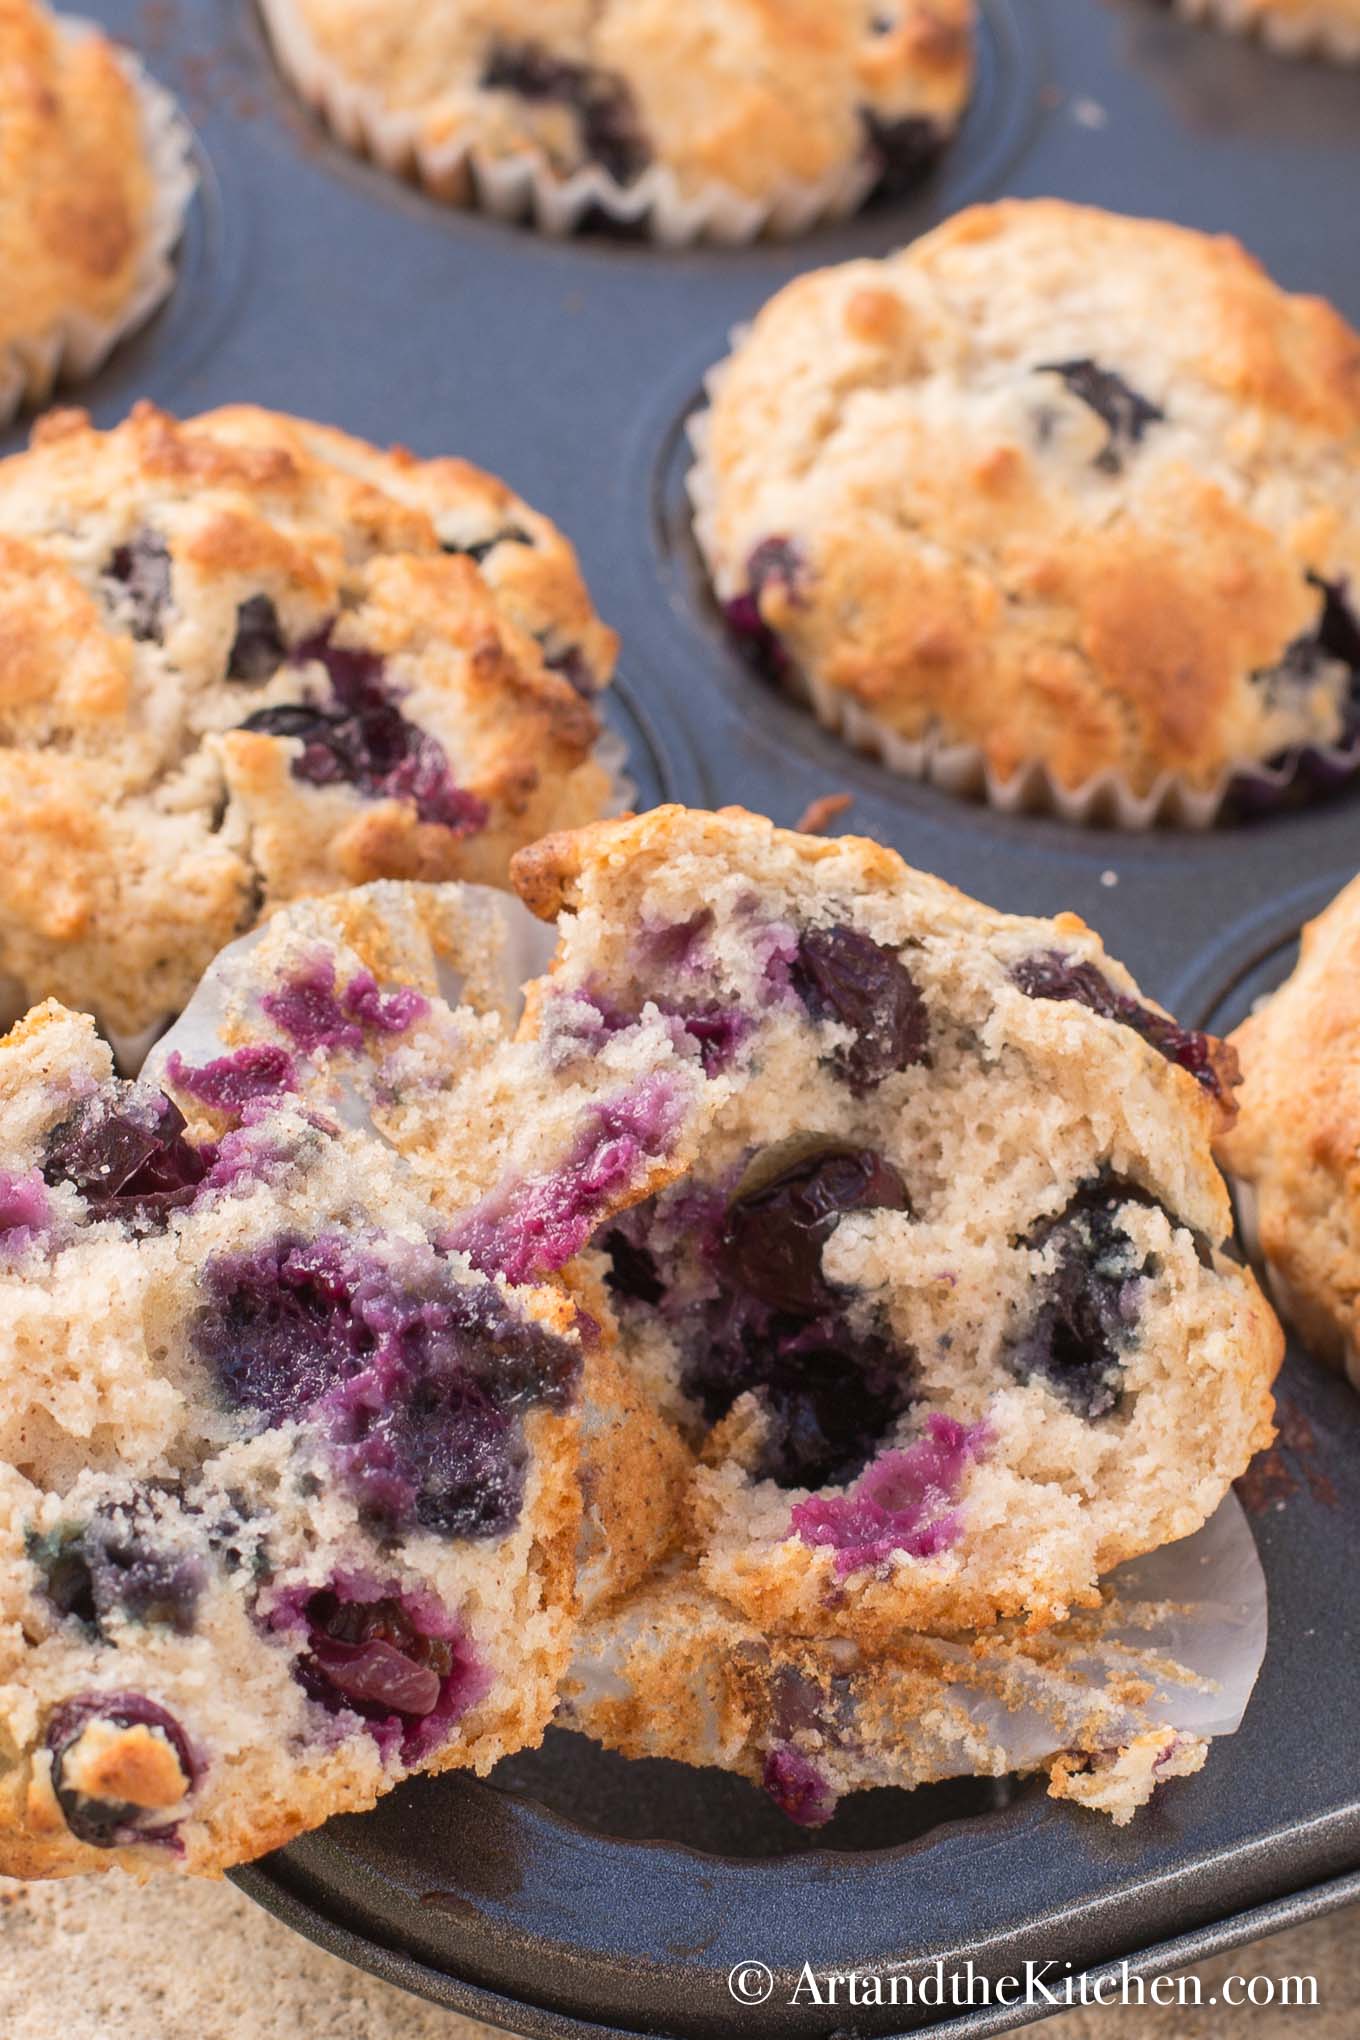
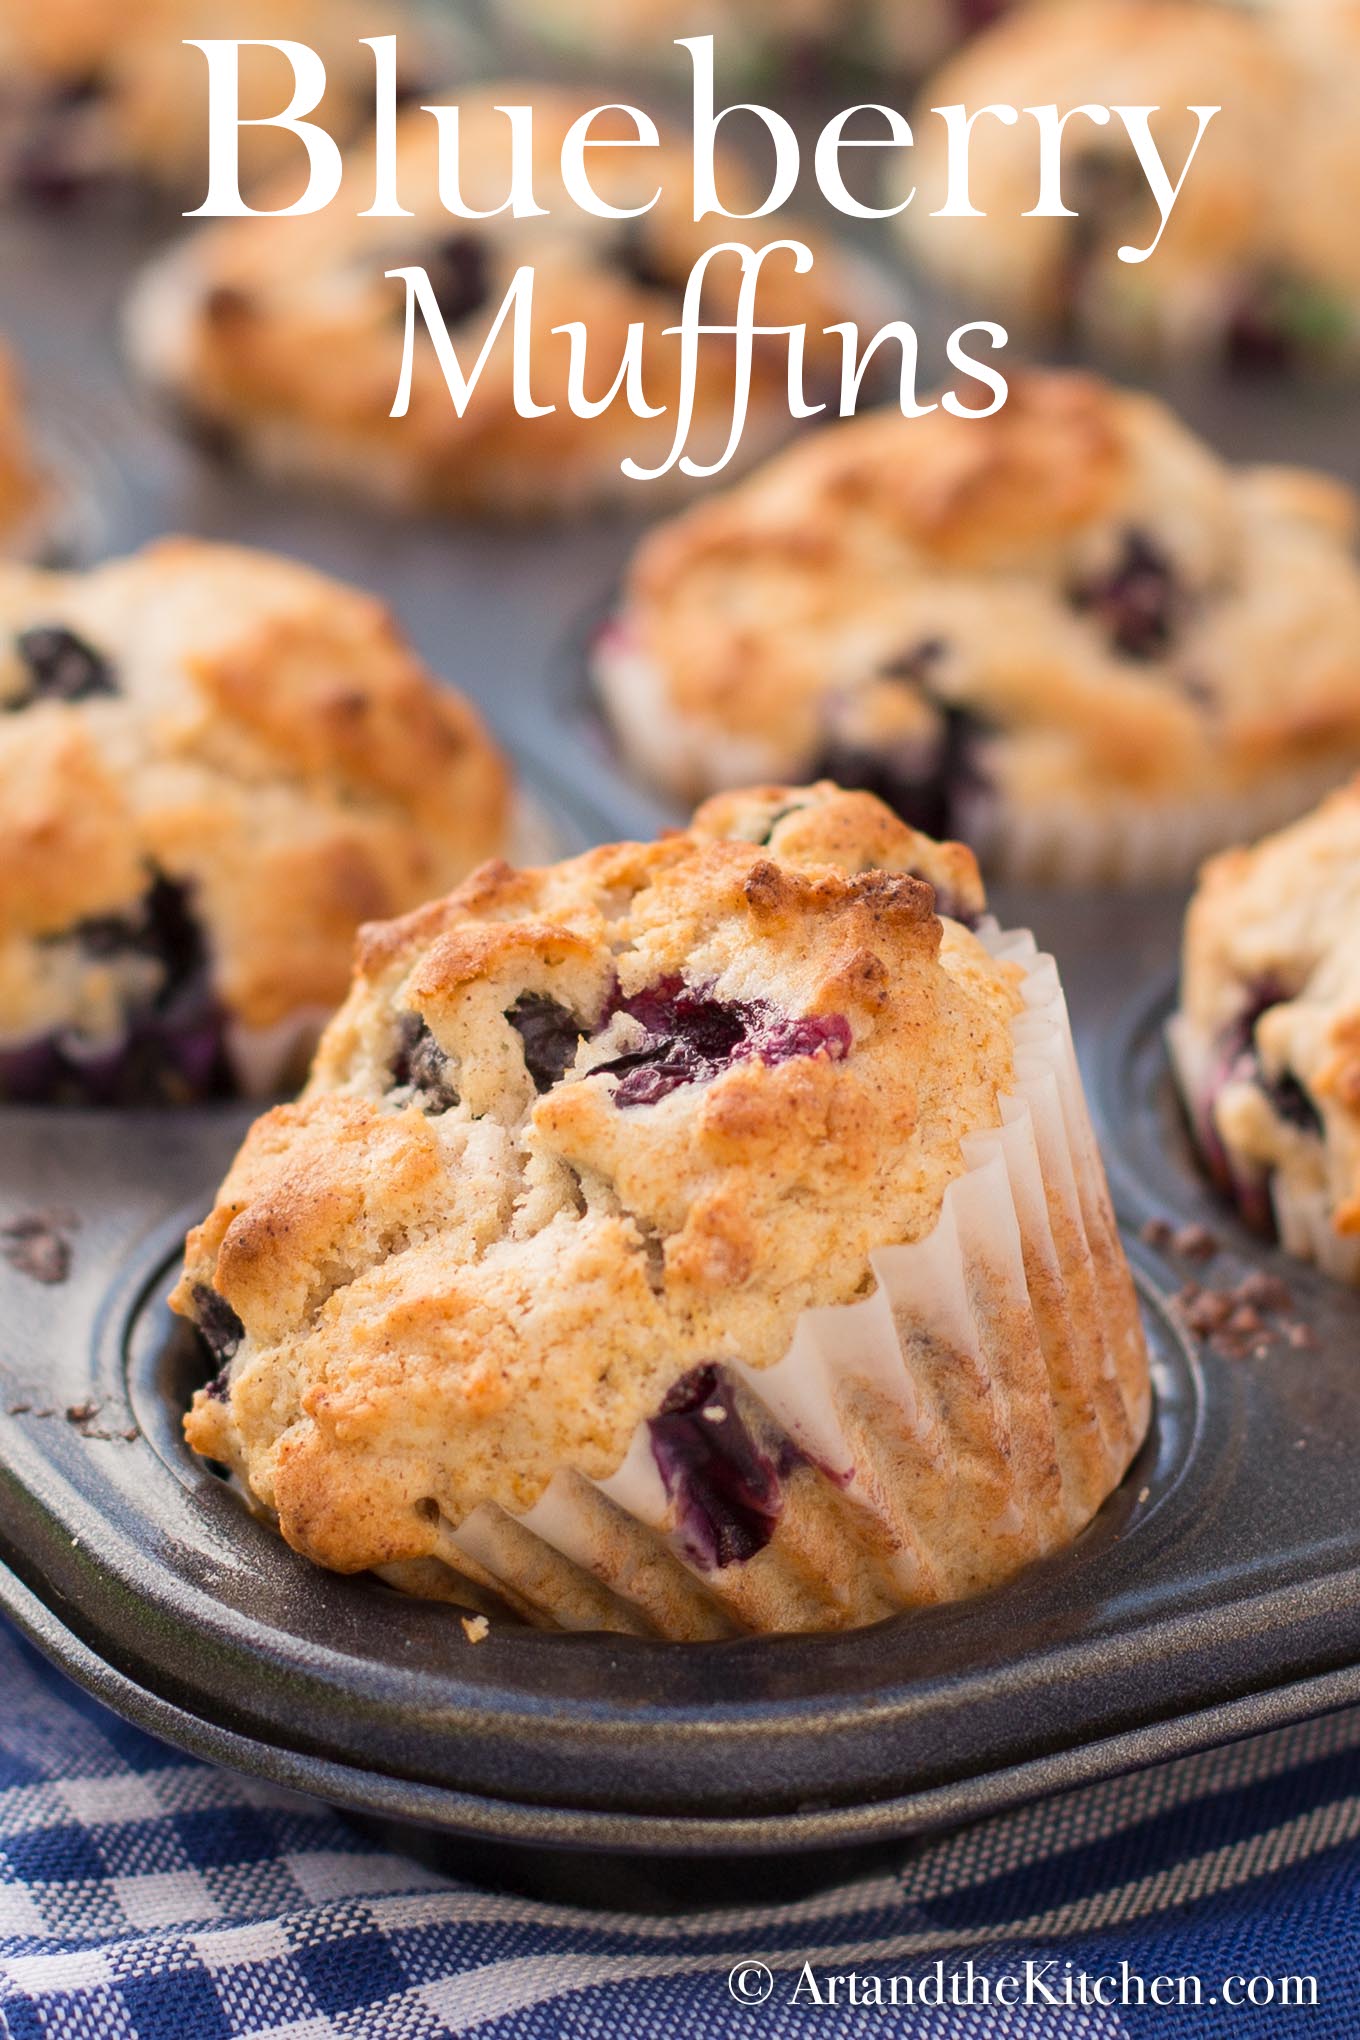
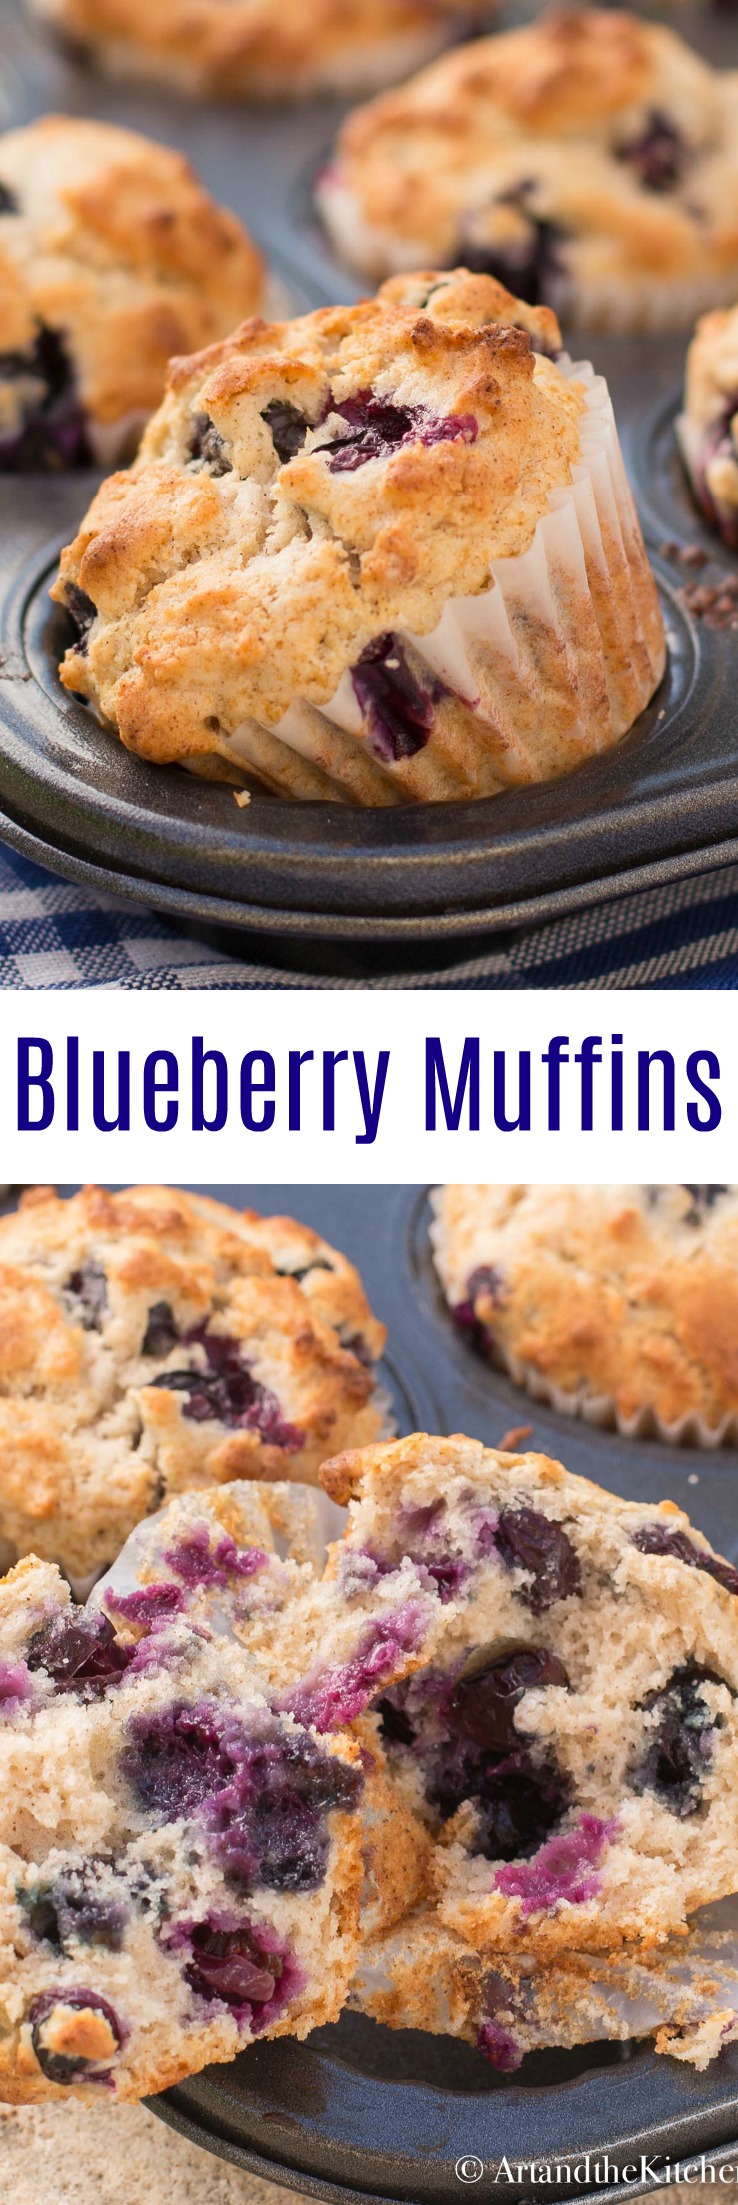
Blueberry Muffins

This recipe for Blueberry Muffins is buttery and moist, great for breakfast or anytime snack.
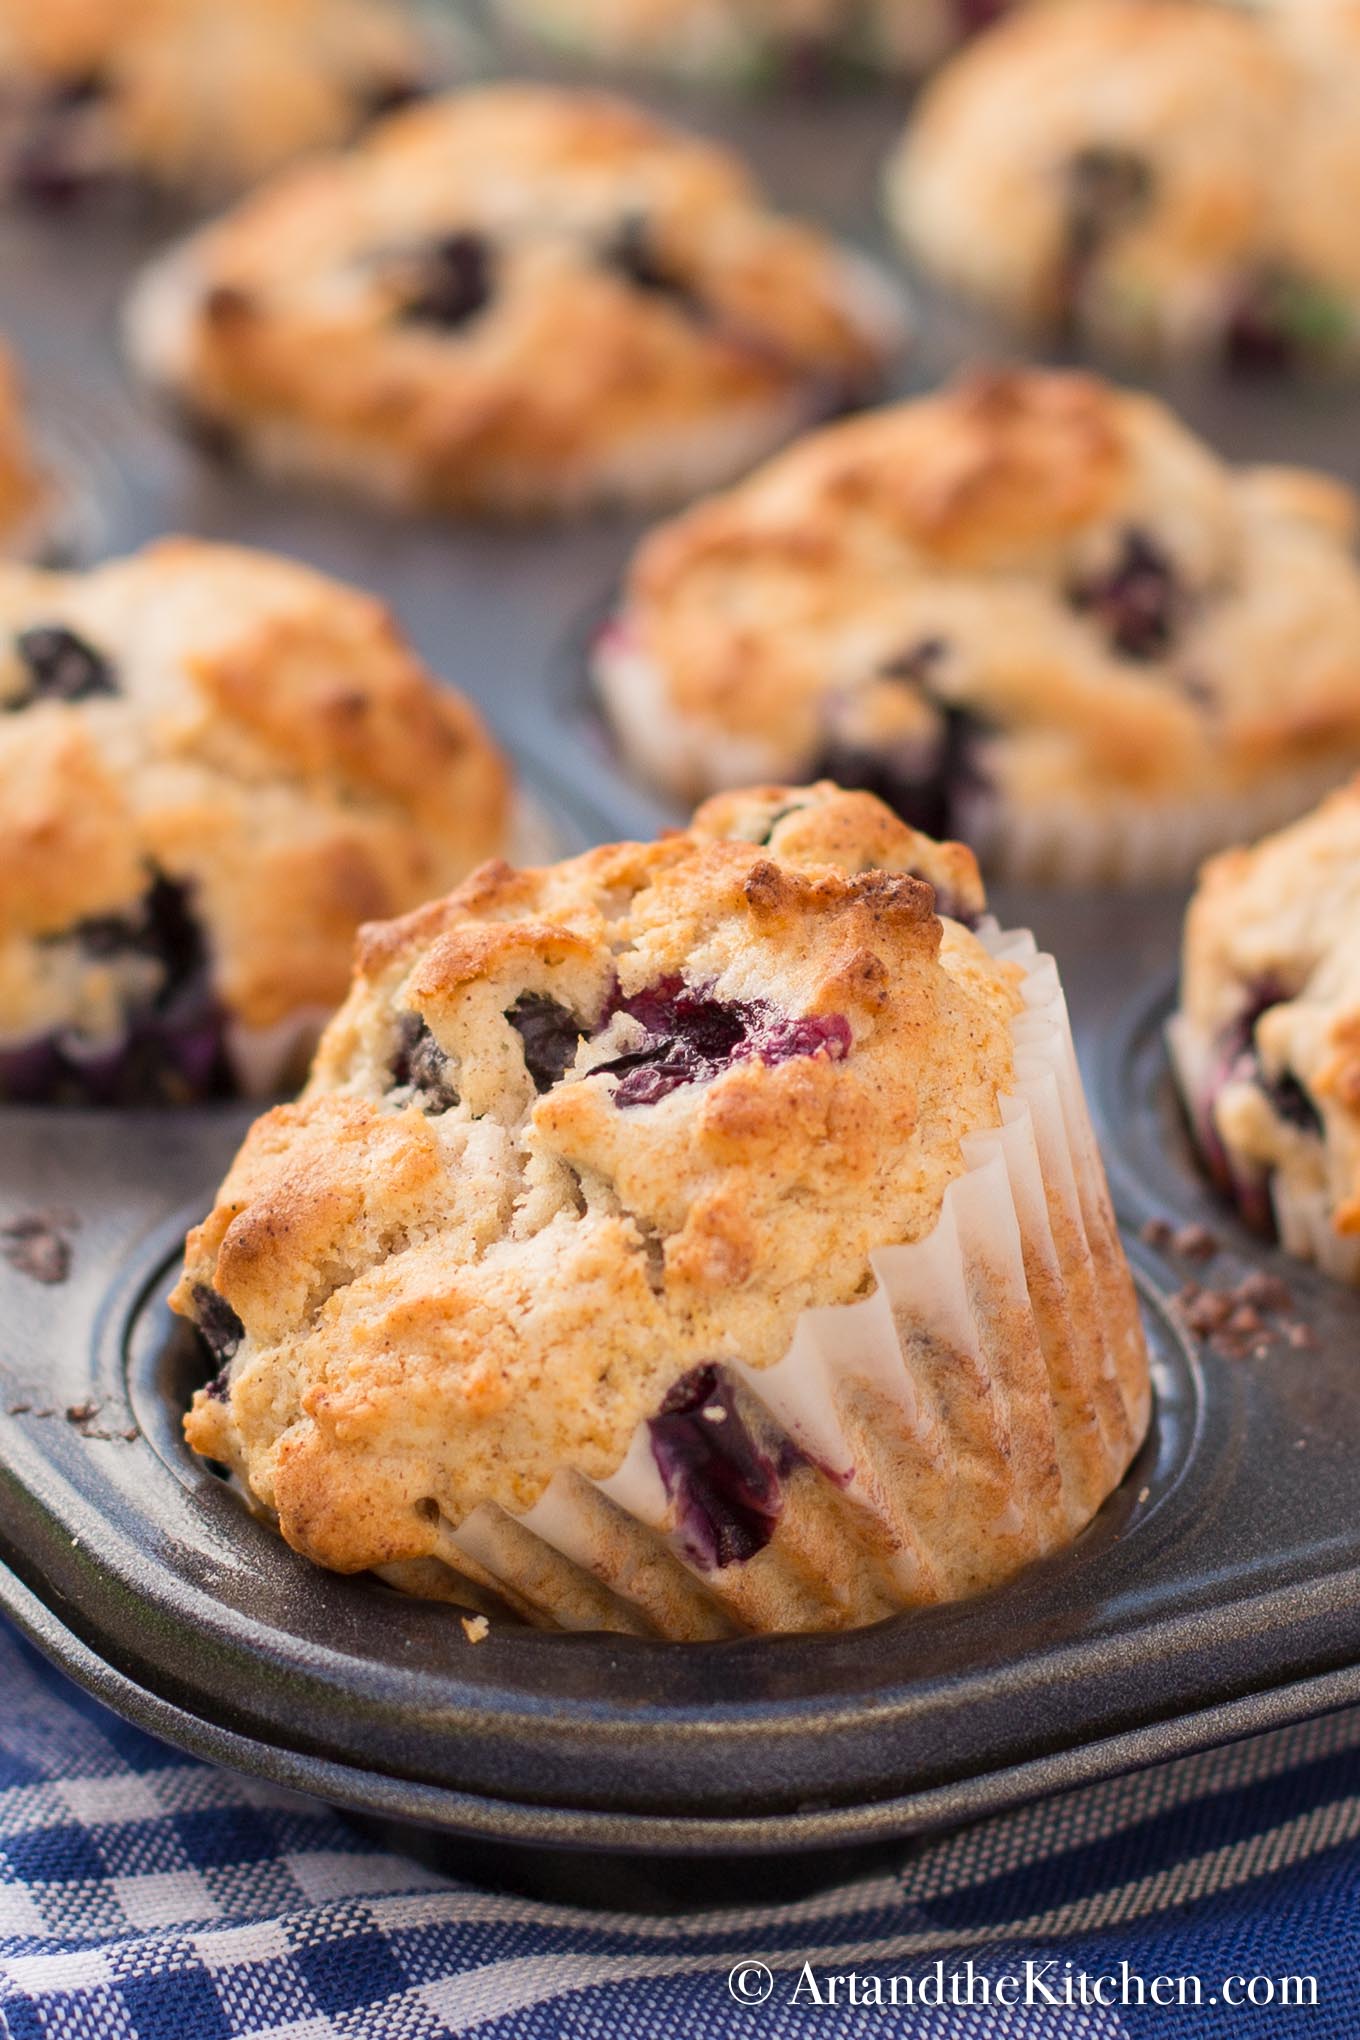
Who doesn't love a homemade muffin right out of the oven and still warm. Pure comfort food. This recipe makes a great muffin batter that works well with a variety of fruit, such as strawberries, raspberries or cranberries. Better yet add a combination of fruits. My favourite is blueberries and this recipe is loaded with them.
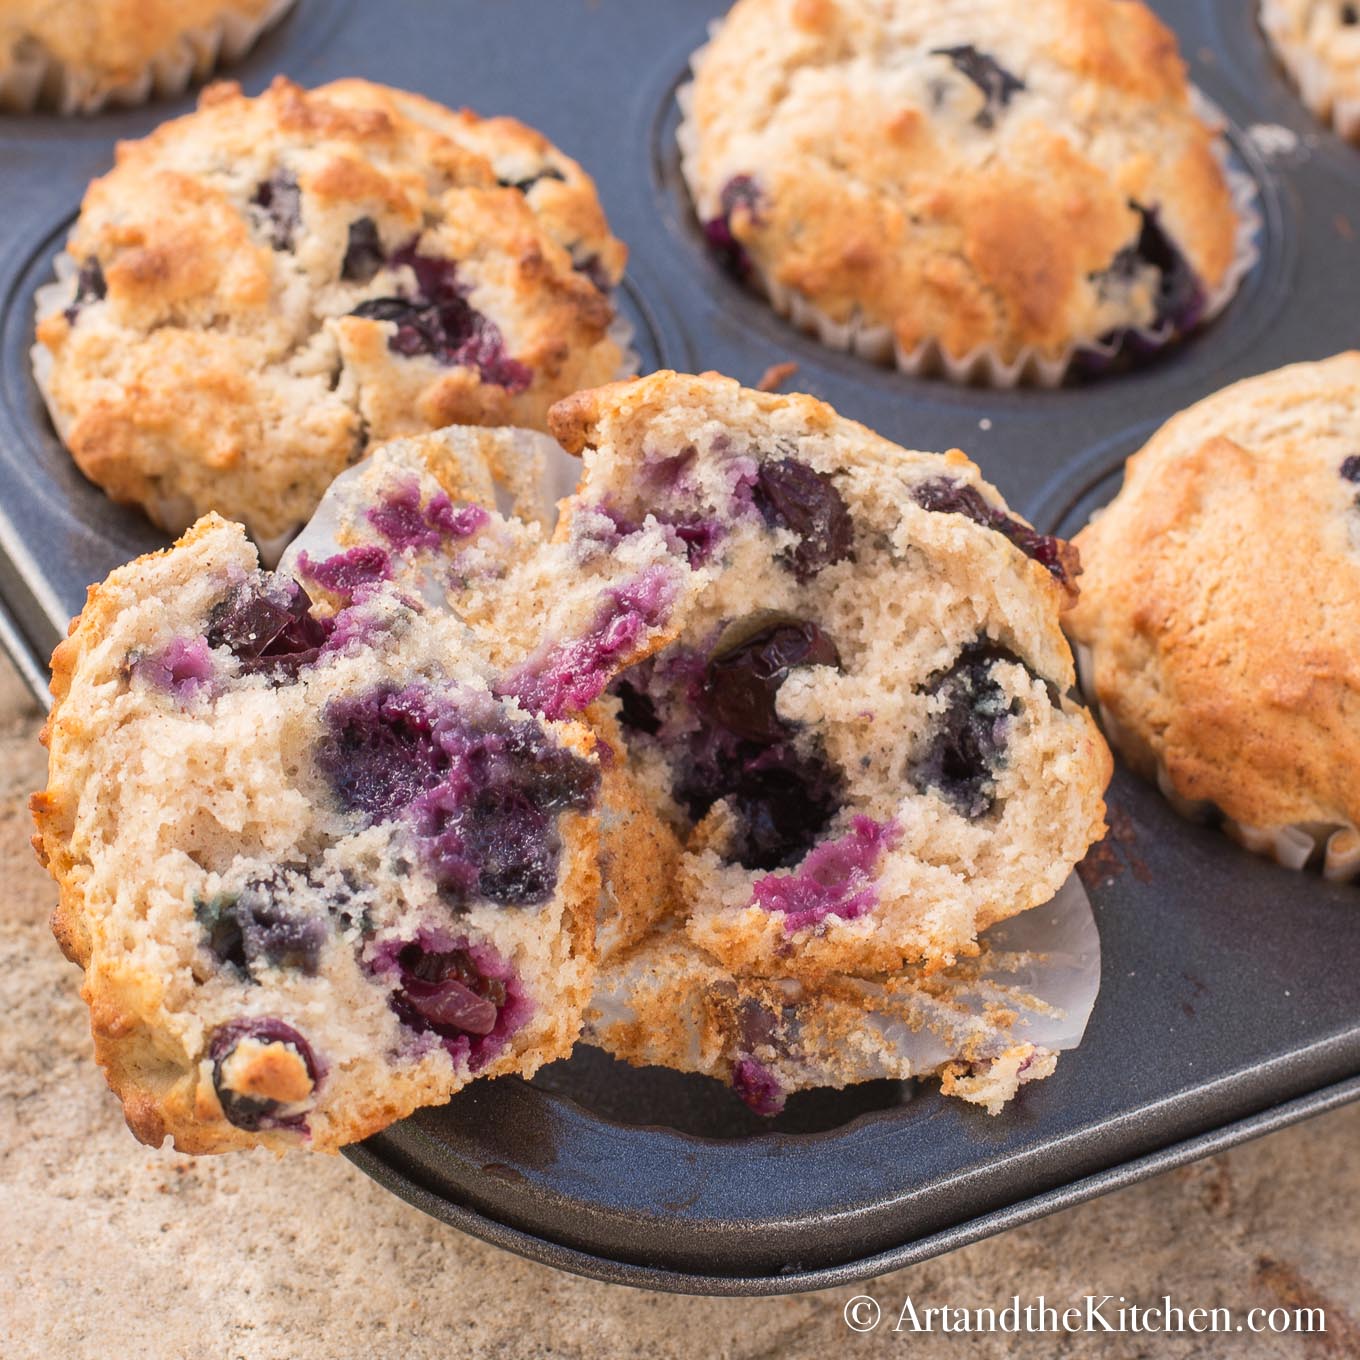
I prefer to use fresh blueberries but frozen will work as well. One key tip to making perfect muffins is to not over mix the batter. Simply fold the wet ingredients into the dry using a spatula and combine just until mixed, about 10 strokes.
Blueberry Muffins
This recipe makes a great muffin batter that works well with a variety of fruit
Servings: 12
Calories: 226kcal
Ingredients
- ⅔ cups butter melted
- ⅔ cup granulated sugar
- ⅔ cup milk room temperature
- 1 large egg room temperature
- 1 teaspoon pure vanilla extract
- 1 ¾ cups all purpose flour
- 1 tablespoon baking powder
- 1 teaspoon cinnamon
- ¼ teaspoon salt
- 1 ½ cups fresh blueberries
Instructions
- Preheat oven to 400ºF
- Line muffin pan with paper liners
- In large bowl whisk together flour, baking powder, cinnamon and salt.
- In medium bowl , using a whisk combine together butter, sugar, milk, egg and vanilla.
- Gently stir blueberries into butter mixture.
- Using a spatula fold butter mixture into flour mixture.
- Don’t over mix, just until combined!
- Divide batter equally into muffin tin.
- Bake until tops are golden brown 15-17 minutes.
- Let cool in pan 15 minutes before transferring to wire rack.
Nutrition
Calories: 226kcal | Carbohydrates: 29g | Protein: 3g | Fat: 11g | Saturated Fat: 6g | Cholesterol: 42mg | Sodium: 151mg | Potassium: 160mg | Fiber: 1g | Sugar: 13g | Vitamin A: 365IU | Vitamin C: 1.8mg | Calcium: 70mg | Iron: 1.1mg
Looking for a healthier blueberry muffin, be sure to try my Blueberry Bran Muffins.
here's a great image for Pinterest
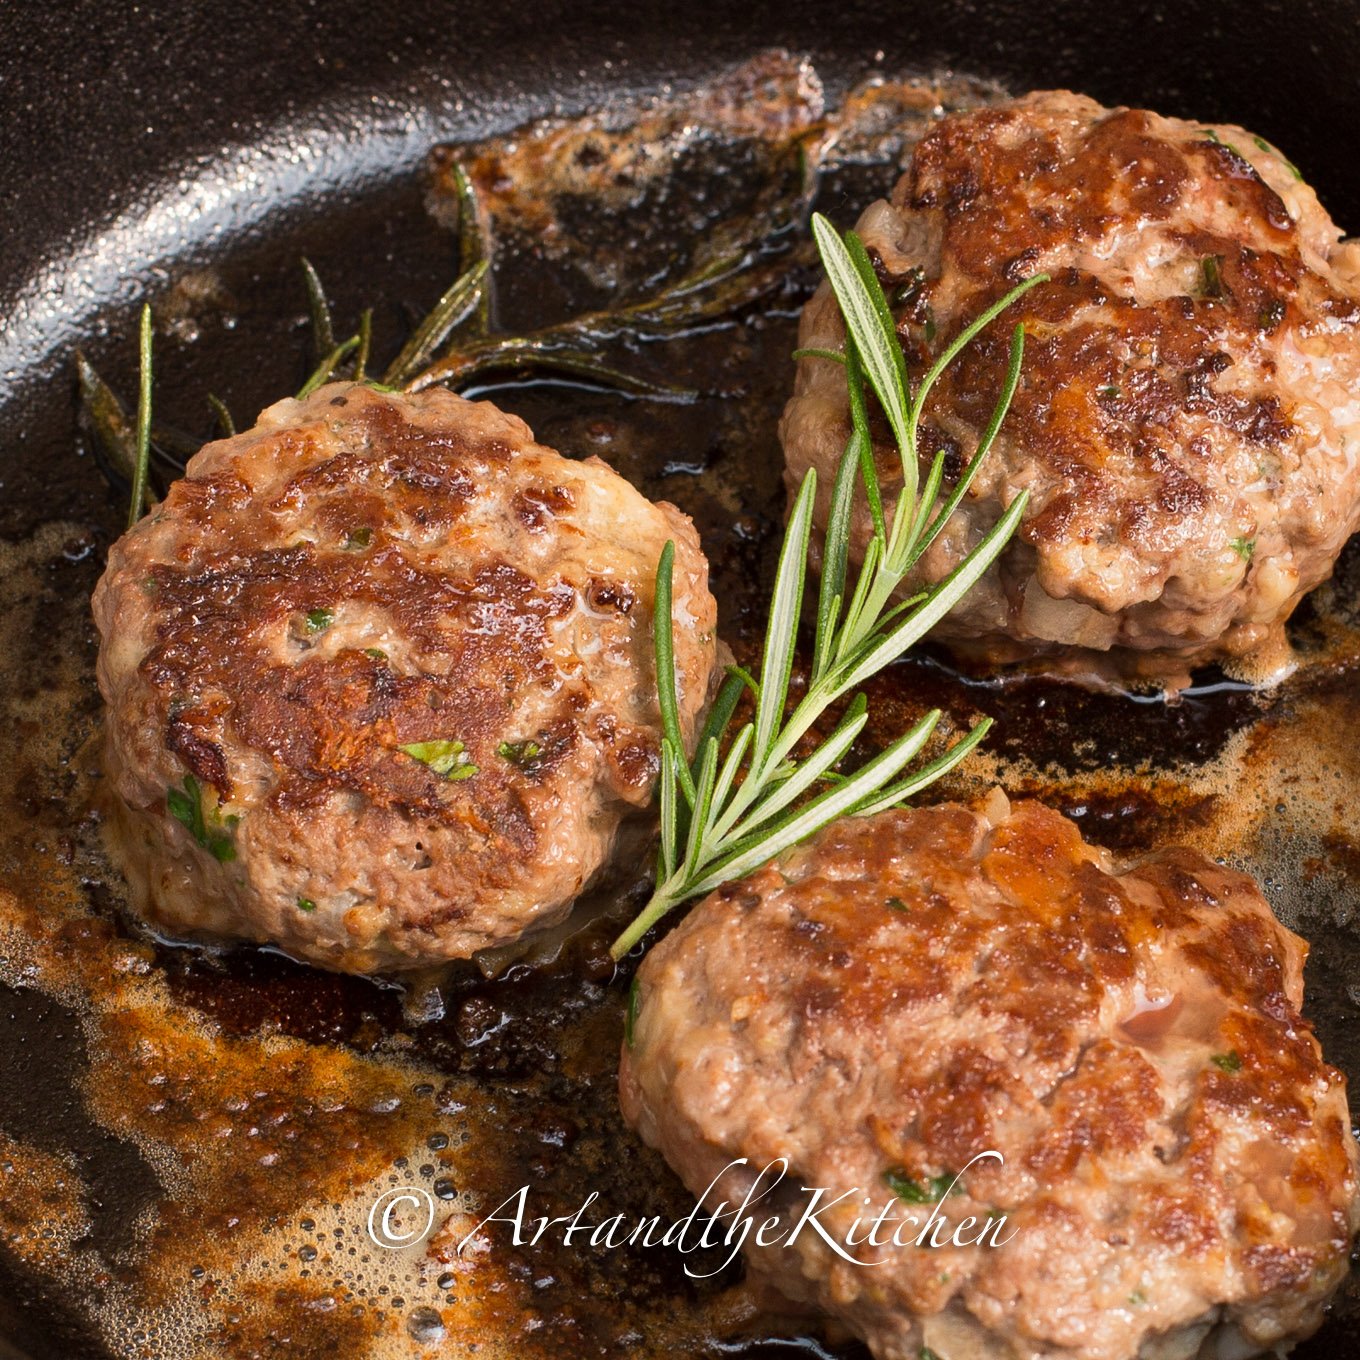
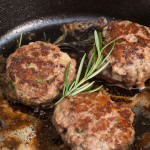
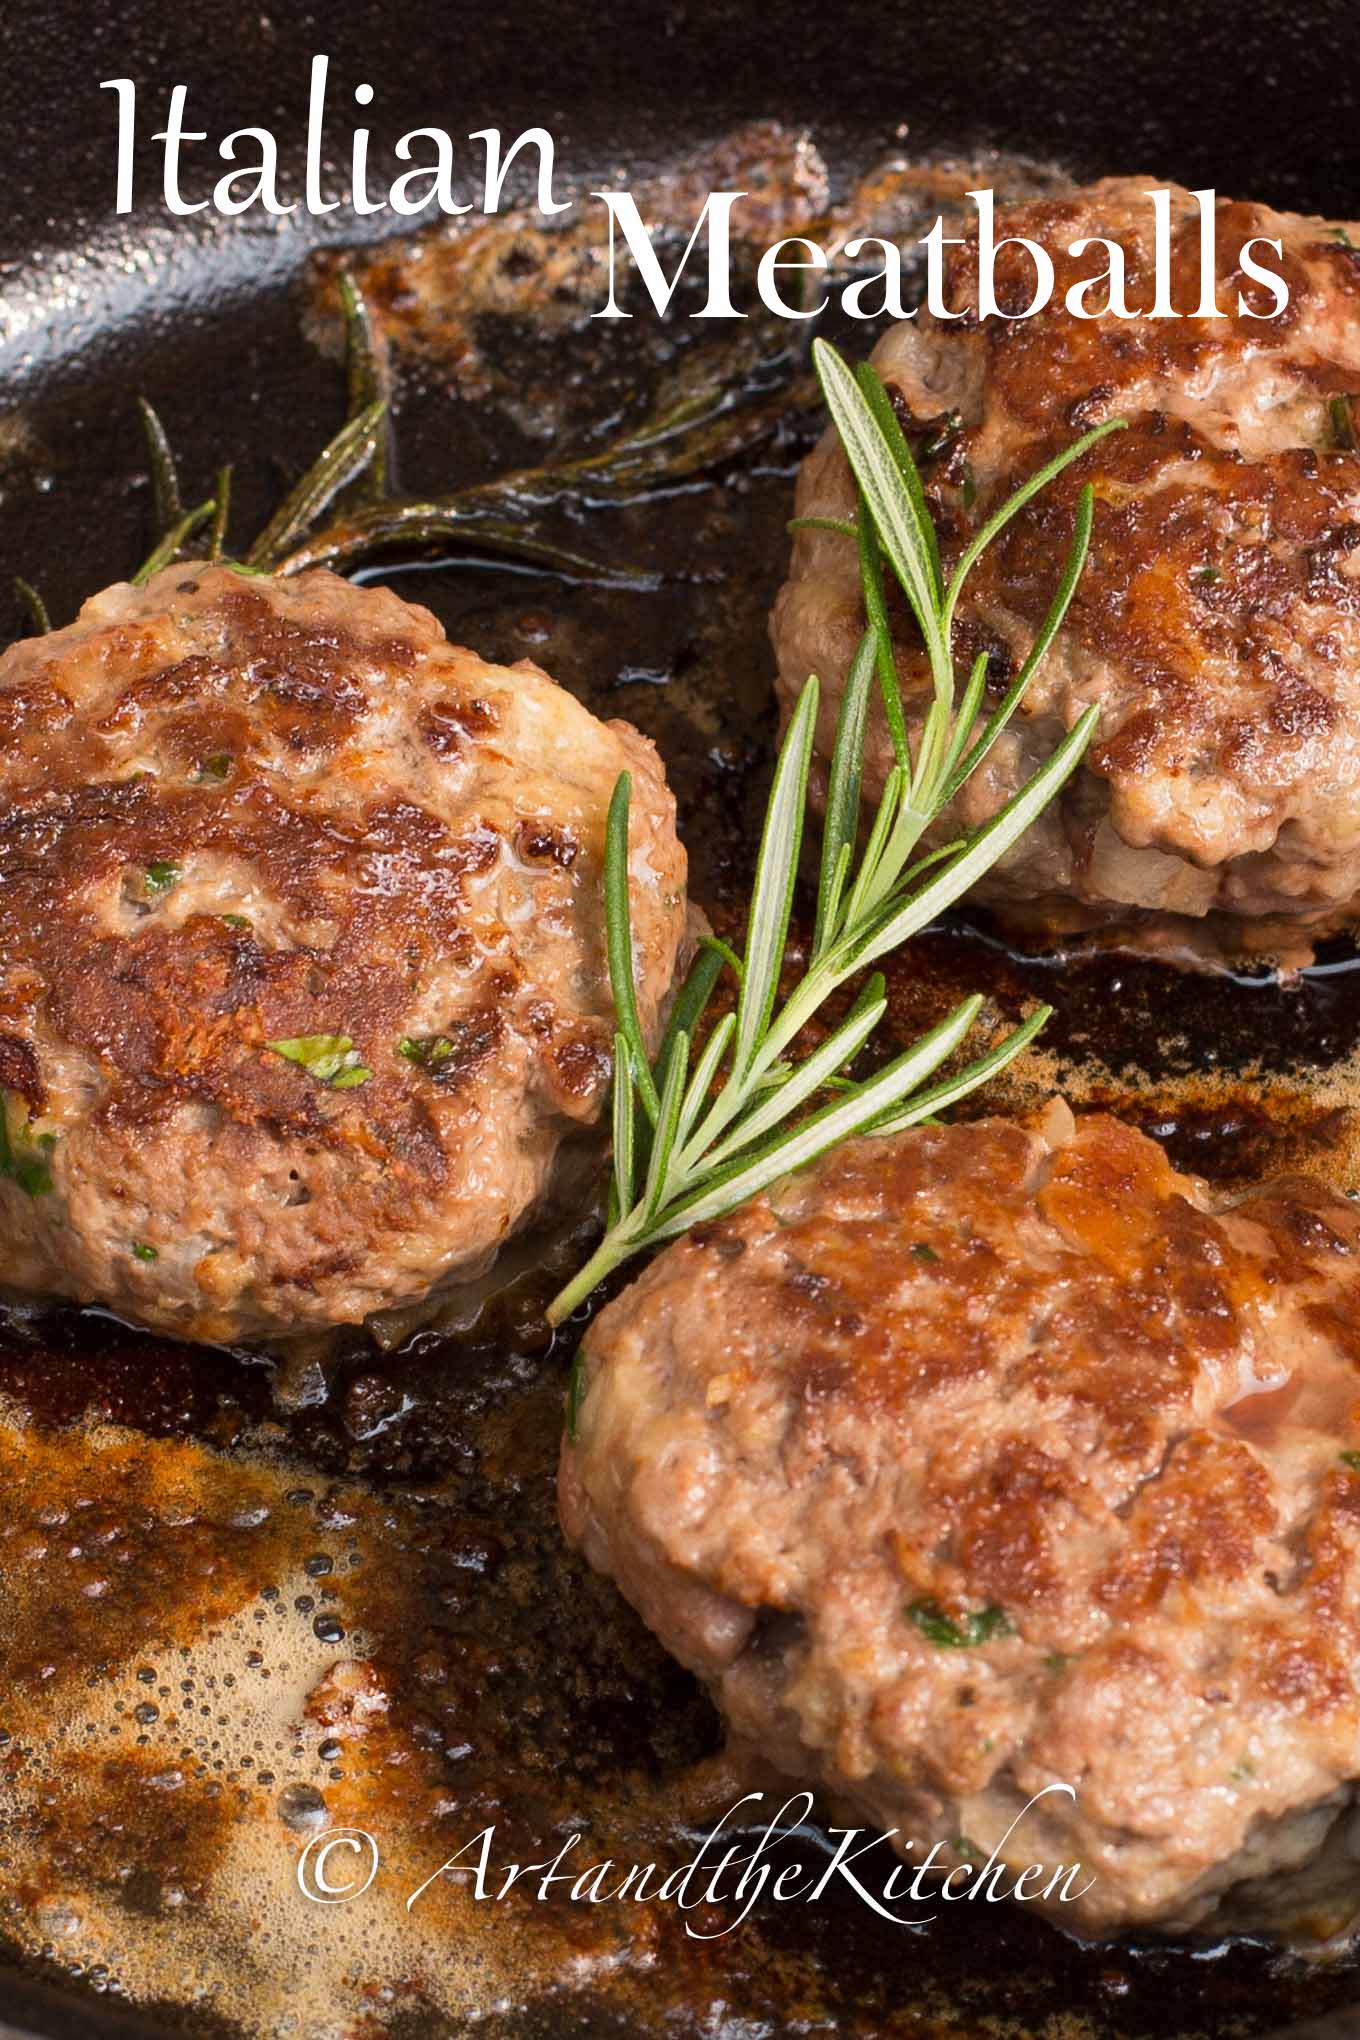
Favourite Italian Meatballs
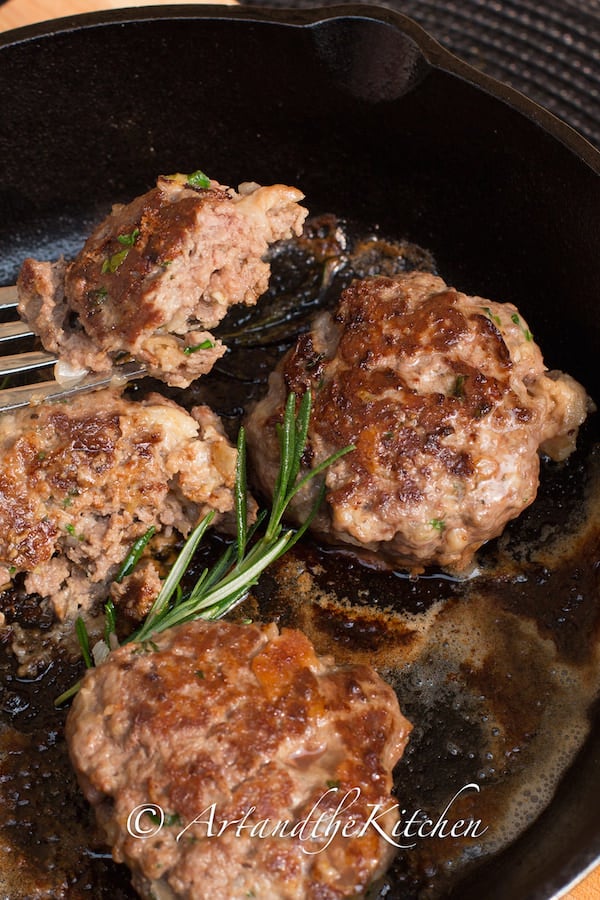
A hint of lemon, rosemary and Grana Padano cheese add amazing flavour to my Favourite Italian Meatballs.
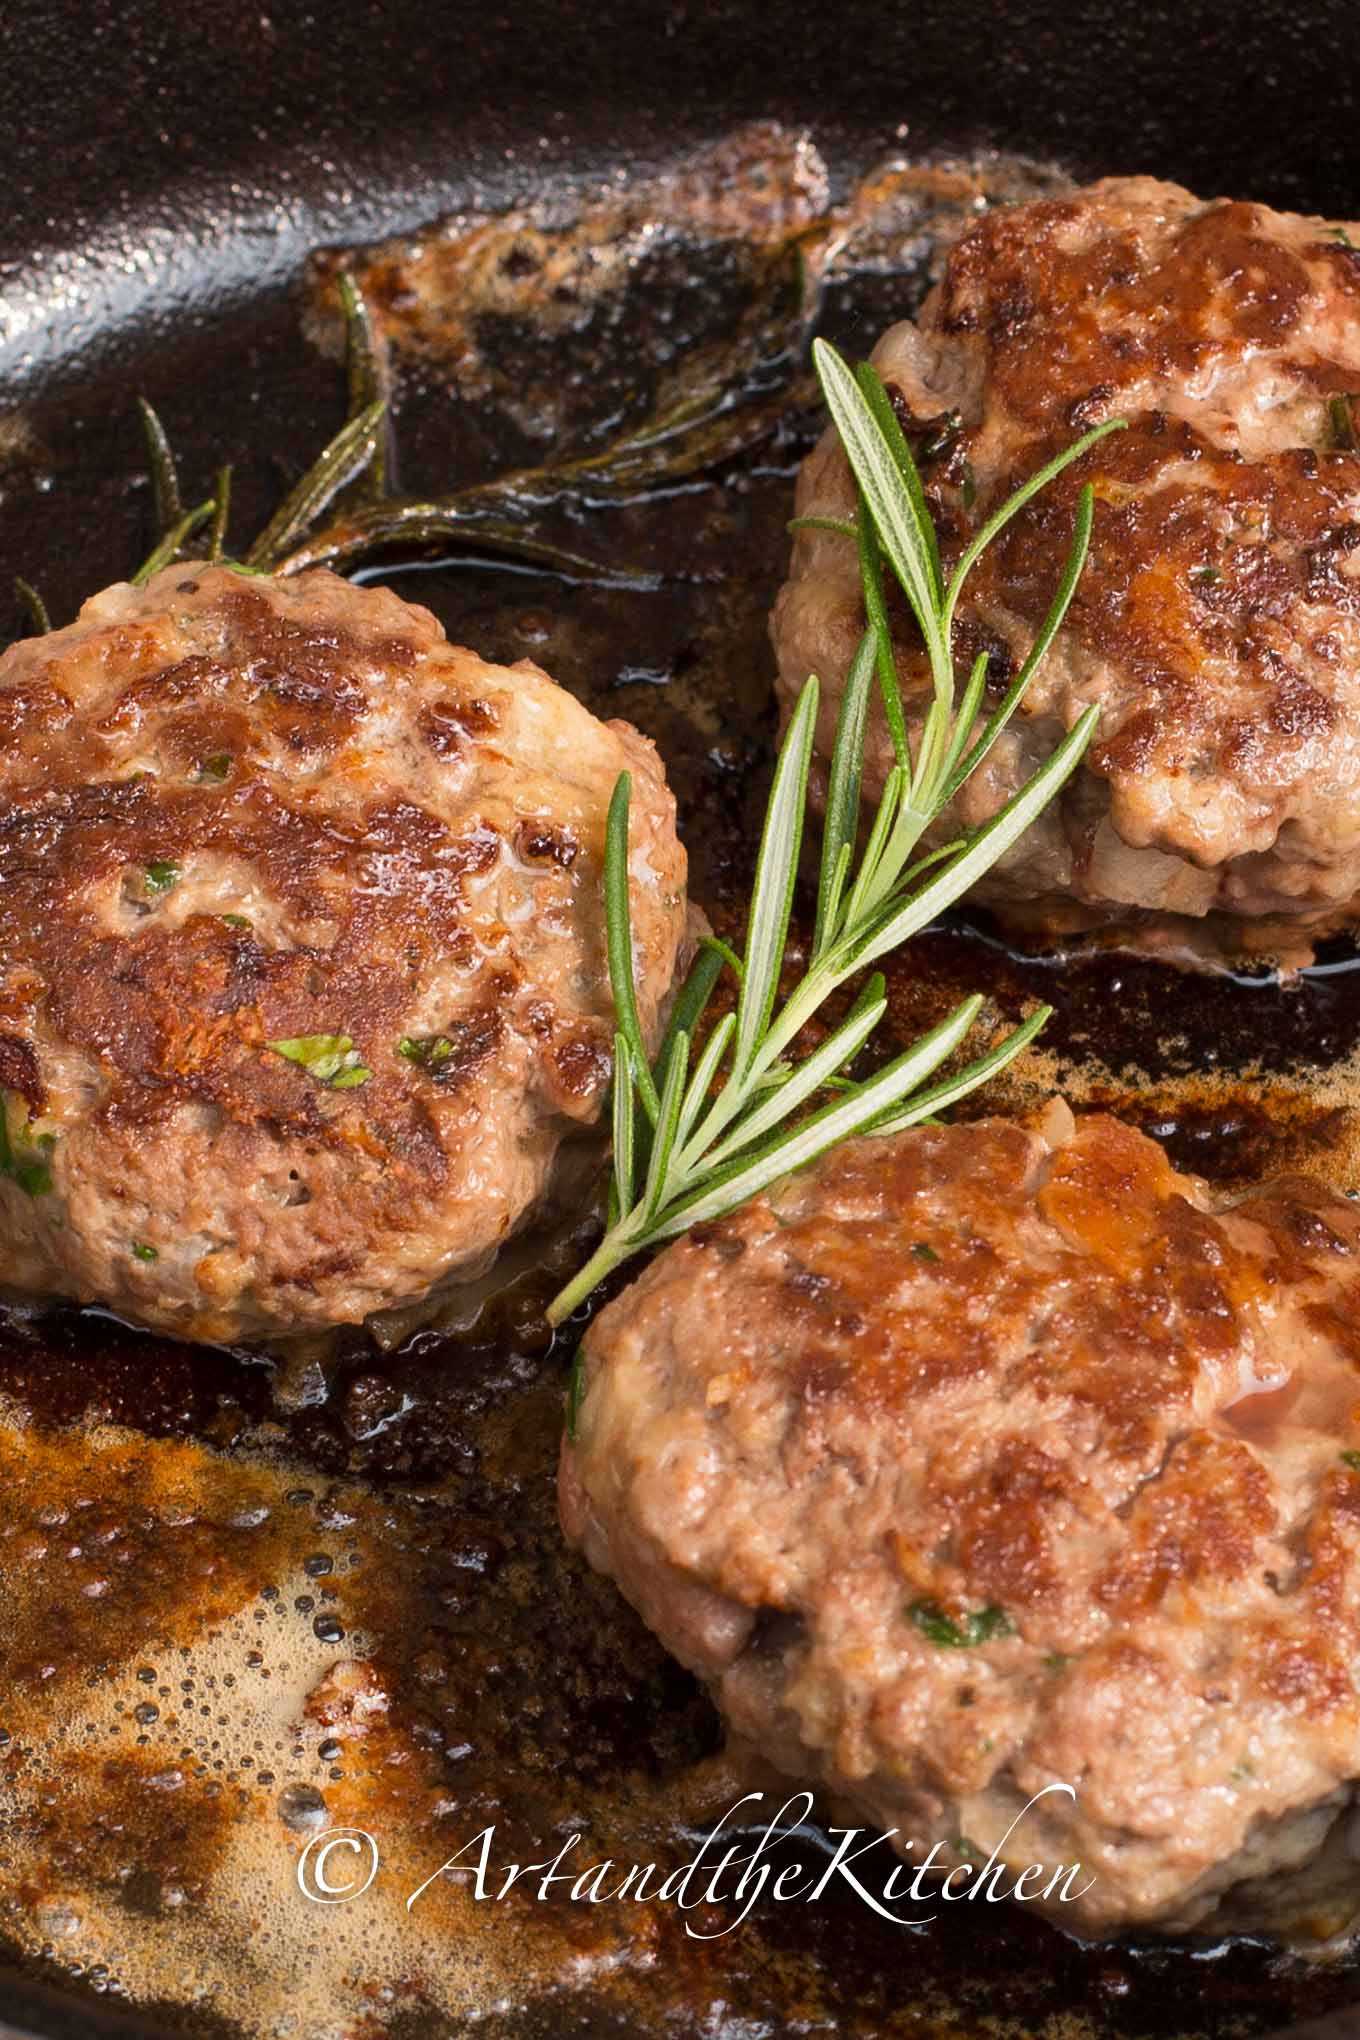
Some meatballs recipes can be dry and boring, but My Favourite Italian Kitchen Meatballs recipe makes the best meatballs ever! The flavour is exceptional with the addition of ingredients such as Grana Padano cheese, white wine, rosemary and surprisingly, lemon zest. This fantastic meatball recipe is from Luca Manfe, the winner of Season 4 MasterChef.
If you like to cook chances are you are a collector of cookbooks. Although we have an abundance of recipes available to us via Pinterest, Facebook, and the many wonderful food blogs, I still enjoy browsing though a cookbook page by page. My husband and I love watching the TV show Masterchef, and my favourite contestant was Luca Manfe. His new cookbook "My Italian Kitchen" has many wonderful Italian recipes! One exceptional recipe is Luca's recipe for My Mother's Meatballs. In addition to being a great meatball recipe it also makes great burgers and meatloaf.
Favourite Italian Meatballs
The flavour is exceptional with the addition of ingredients such as Grana Padano cheese, white wine, rosemary and surprisingly, lemon zest.
Servings: 12
Calories: 129kcal
Ingredients
- 1 lb extra lean ground beef
- ½ cup Grana Padano cheese grated
- ½ cup onion finely chopped
- 4 teaspoon garlic minced
- 2 tablespoon white wine
- 1 egg
- 1 egg yolk
- ⅓ cup parsley fresh finely chopped
- 1 ½ teaspoon lemon zest grated
- 1 teaspoon salt
- ½ teaspoon pepper
- 1 ciabatta roll cubed
- 1 cup milk
- 2 tablespoon olive oil
- 3-4 sprigs fresh rosemary
Instructions
- Place cubed bread in bowl, add milk (enough to cover bread). Set aside 20-30 minutes until bread is soggy.
- In bowl combine together cheese, onion, garlic, wine, eggs, parsley, lemon zest, salt and pepper.
- Place ground beef in large bowl, add wet ingredients and combine together.
- Squeeze milk from bread, then combine into beef mixture.
- Form into desired size of meatballs.
- Heat olive oil in large skillet, medium high heat.
- Add rosemary sprigs, then meatballs.
- Sear all sides of meatballs cooking until done, do not turn until each side is well seared or meatballs will fall apart.
- Serve with your favourite pasta, rice or mashed potatoes.
Nutrition
Calories: 129kcal | Carbohydrates: 5g | Protein: 12g | Fat: 7g | Saturated Fat: 3g | Cholesterol: 58mg | Sodium: 325mg | Potassium: 189mg | Fiber: 1g | Sugar: 1g | Vitamin A: 247IU | Vitamin C: 3mg | Calcium: 85mg | Iron: 1mg
For another tasty recipe using ground beef how about trying this great meatloaf recipe Sicilian Meatloaf
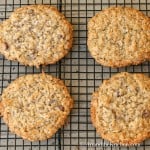
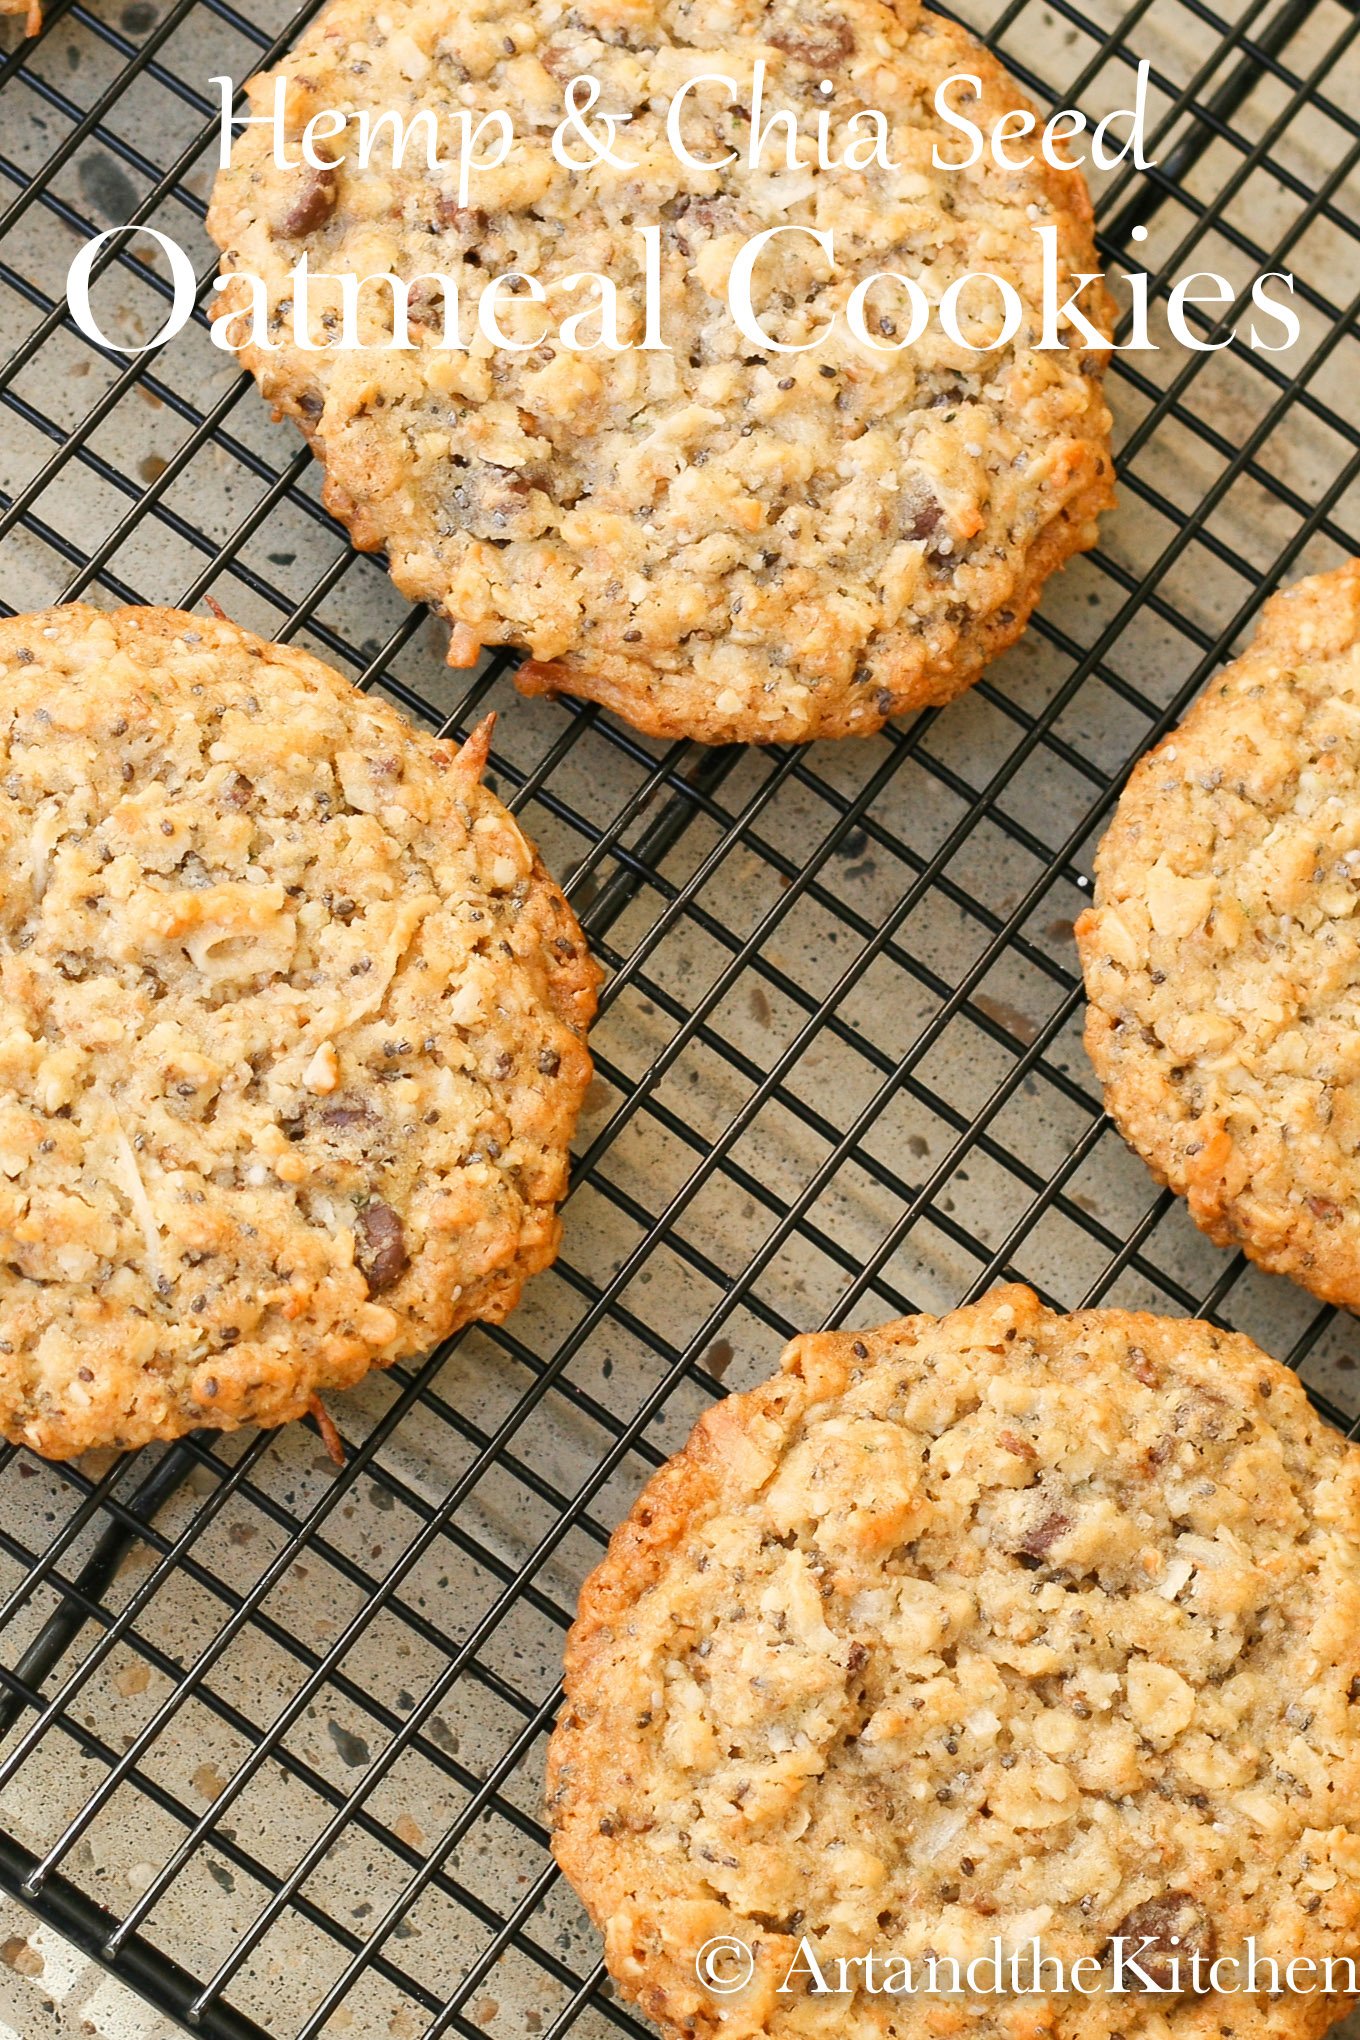
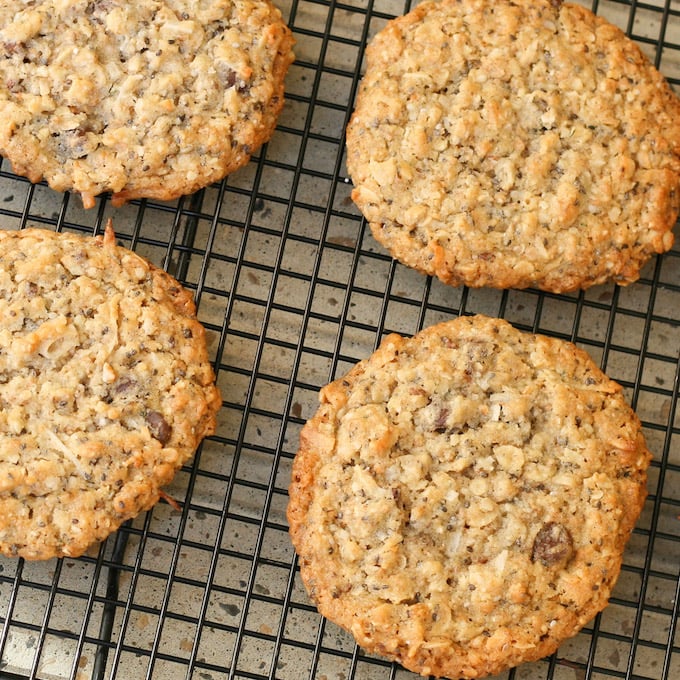
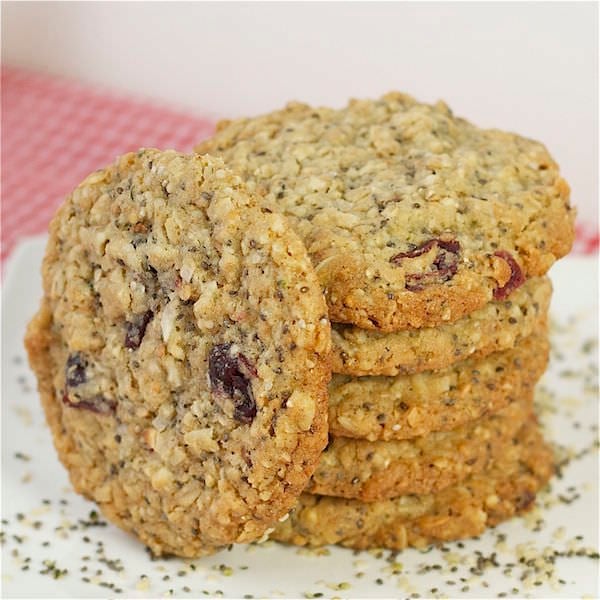
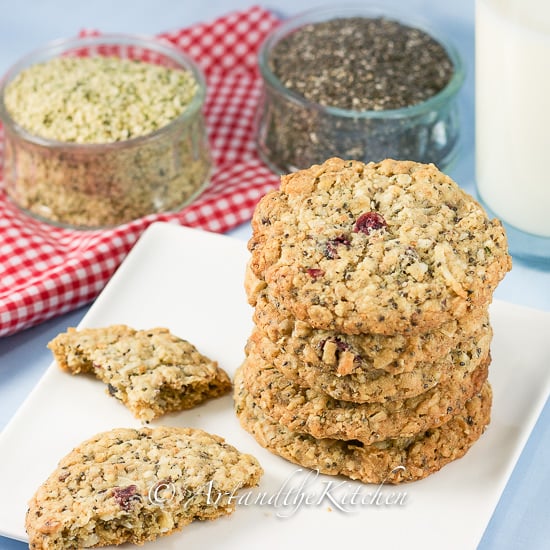
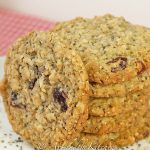
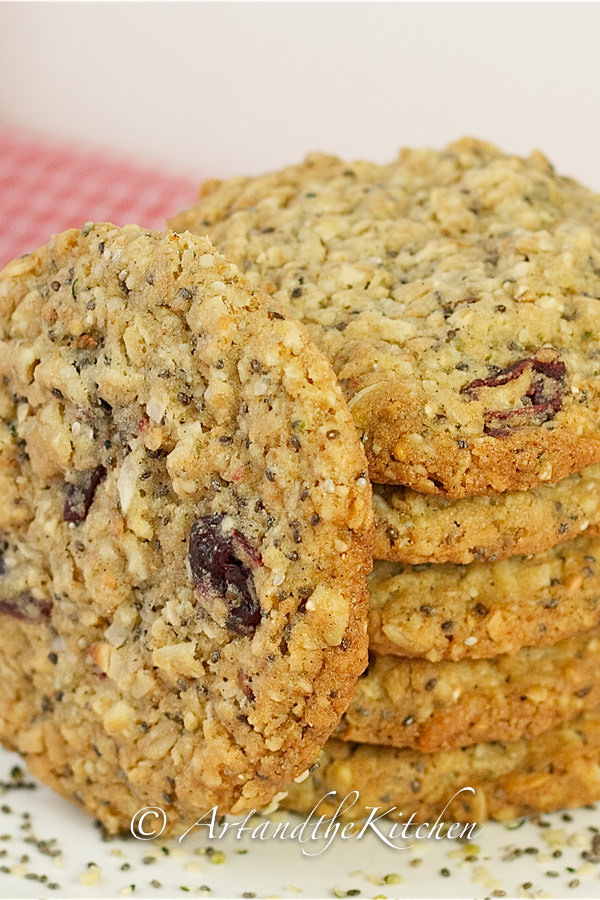
Chia Hemp Seed Oatmeal Cookies

Chia Hemp Seed Oatmeal Cookies have a healthy twist with the addition of chia, hemp seed, and multigrain flour.
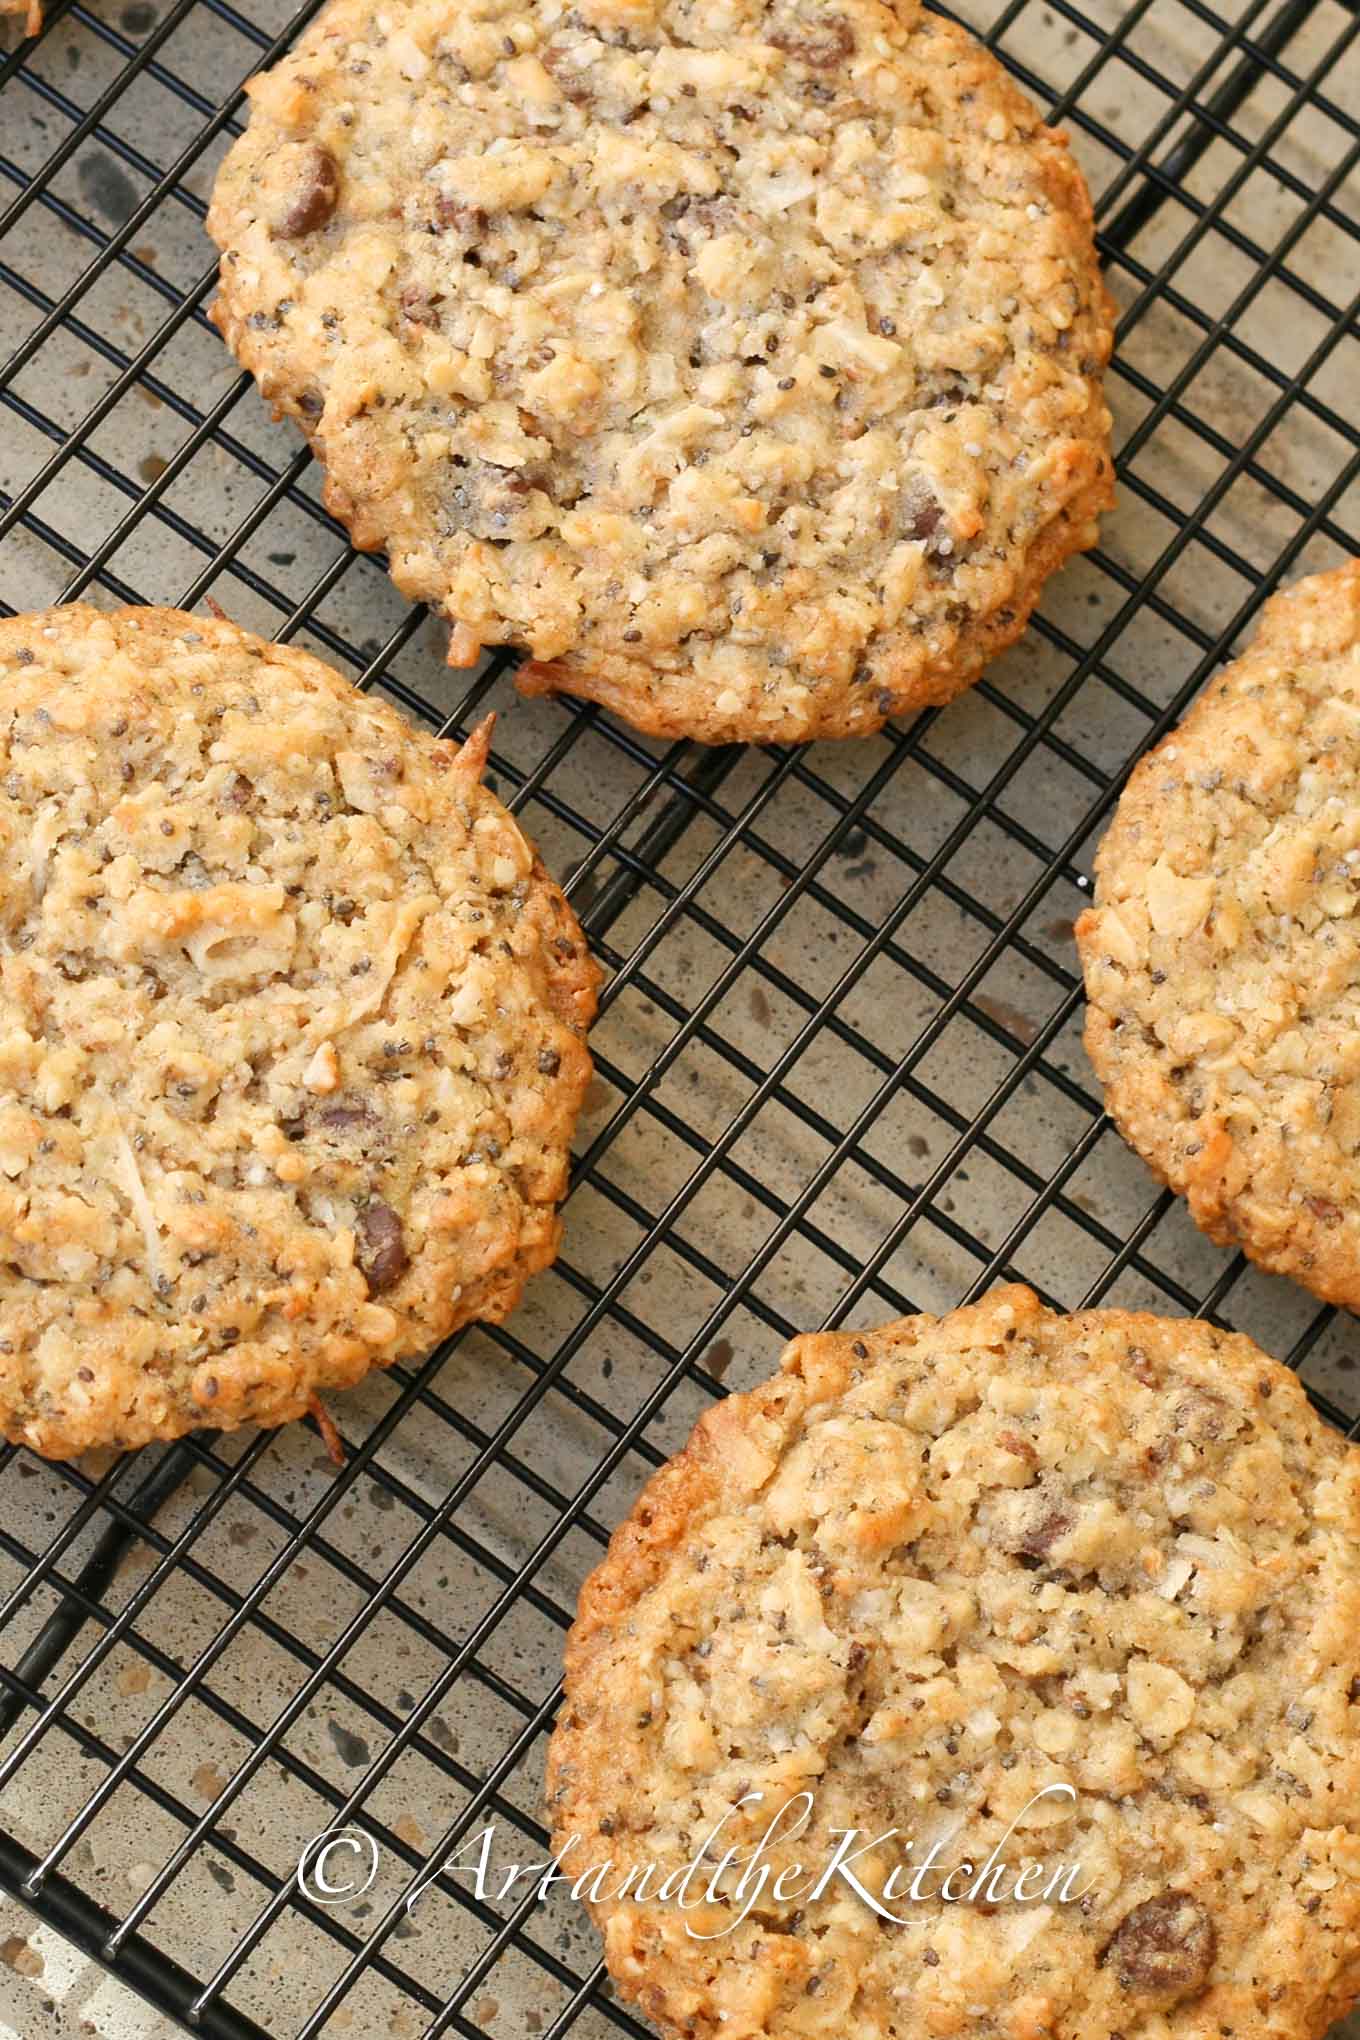
The combination of chia and hemp seeds with multigrain flour add a nice crunch to these oatmeal cookies. These cookies have a great crunch to them, but yet, they are still soft and chewy. I have also made a gluten-free version of these cookies. These cookies were a big hit with my son's University Track and Field team. They loved them as an after competition treat.
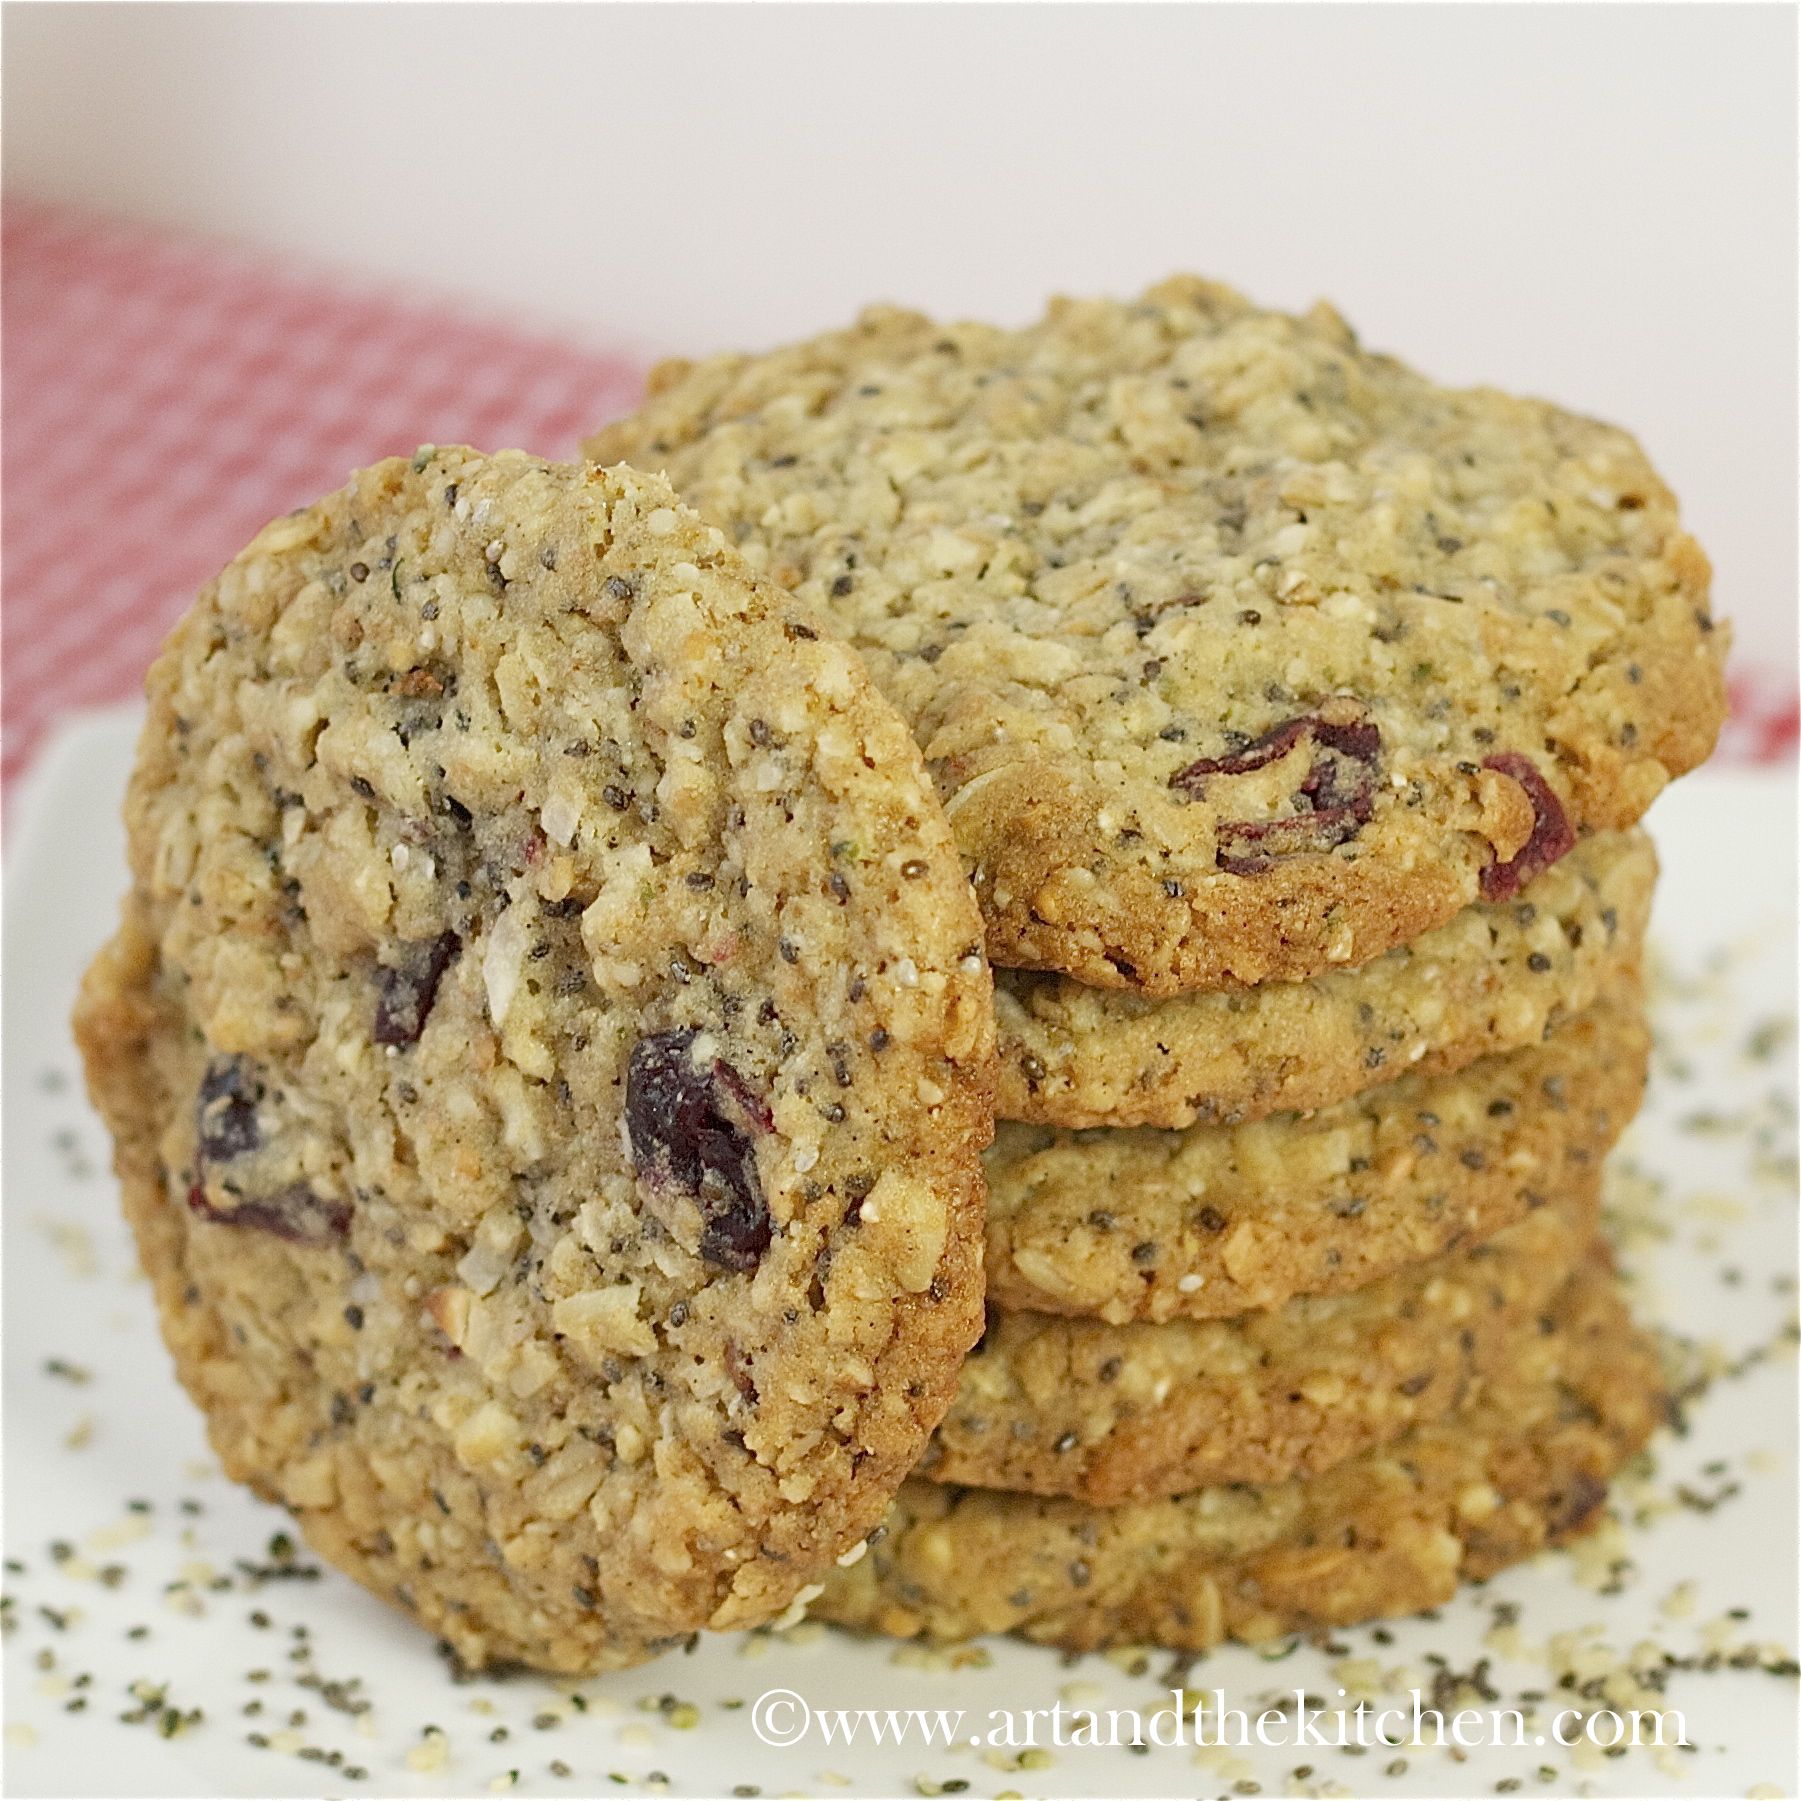
Tips for Perfect Chia Hemp Seed Oatmeal Cookies
- If you can't find multigrain flour, whole grain, whole wheat or even all-purpose flour will work. The cookies just won't have as much crunch to them.
- Some great additions to these cookies are dried cranberries, raisins, chocolate chips, nuts, cinnamon chips or any kind of dried fruit.
- Make sure butter is at room temperature.
- Used old fashioned oatmeal or large flake oatmeal, not the quick cook oats.
- A whisk works great to make sure all the dry ingredients are well combined.
- When combining dry ingredients to wet ingredients don't over mix, mix only until just combined.
- A cookie scoop works great to make evenly sized cookies.
- These cookies freeze great in an air-tight container for up to 2 months.
- If you don't want cookies to spread as much, chill the sheet of prepared cookie dough for 15-30 minutes before baking.
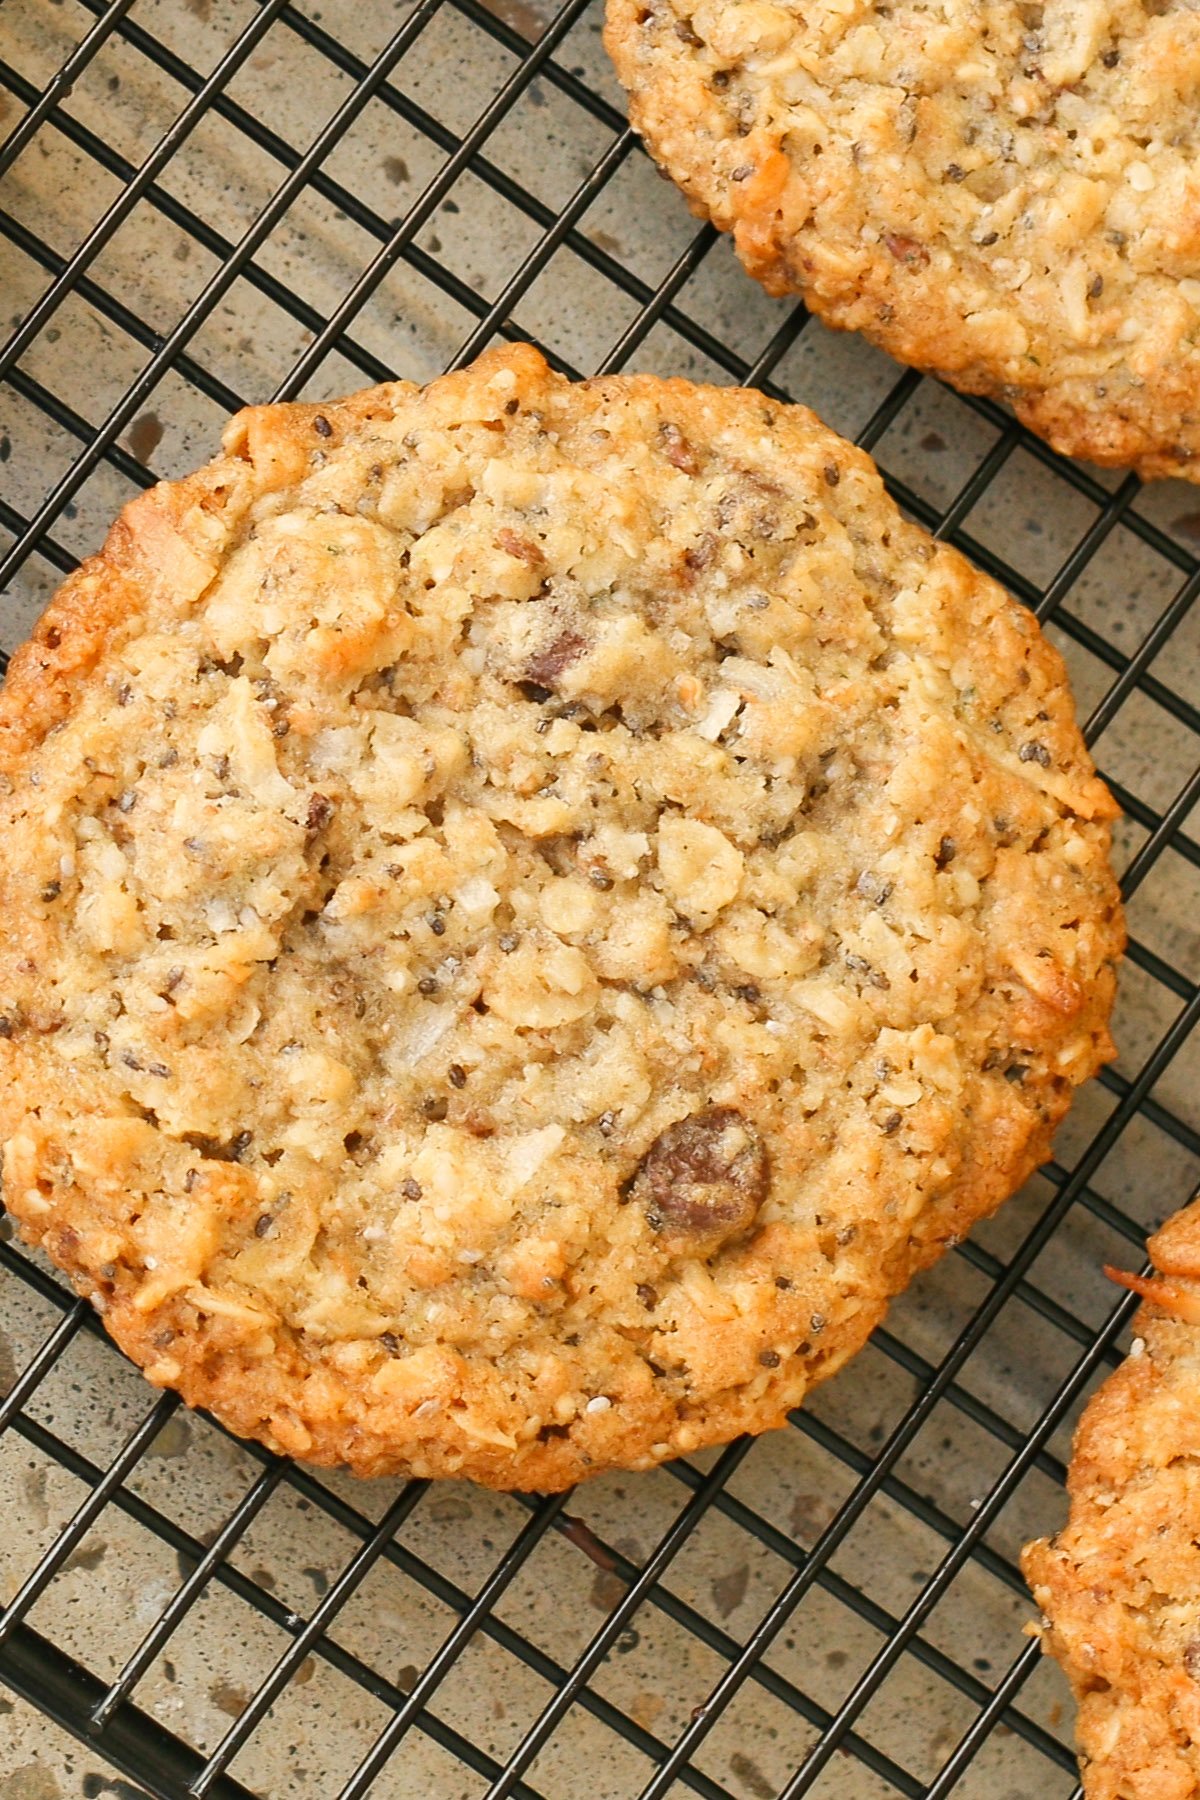
Chia Seeds are known as a superfood and are one of nature's most perfect foods. Chia seeds contain highly concentrated amounts of essential fatty acids, omega-3, and omega-6, a vegetarian source of protein, dietary fiber, vitamins, minerals, and antioxidants.
Hemp Seeds have an ideal balance of omega-3 and omega-6, a complete source of protein, fiber, minerals, and vitamins. Truly one of nature's superfoods.
Chia Hemp Seed Oatmeal Cookies
This oatmeal cookie recipe has a healthy twist and tastes terrific! Hemp & Chia Seed Oatmeal Cookies are made with multigrain flour, oats, chia and hemp seeds.
Servings: 30
Calories: 151kcal
Ingredients
- 1 ⅓ cup multigrain flour
- 1 ½ cup oatmeal
- ¾ cup coconut
- ¼ cup chia seeds
- ¼ cup hemp seeds
- ½ cup dark chocolate chips or raisins, dried cranberries
- ½ teaspoon baking powder
- ½ teaspoon baking soda
- ½ teaspoon salt
- 1 cup butter (room temperature)
- 1 cup brown sugar
- 1 egg
- 1 vanilla bean (seeds scraped out) or 1 teaspoon vanilla extract
Instructions
- Preheat oven to 350ºF and line baking sheets with parchment paper.
- Whisk together flour, oatmeal, coconut, chia and hemp seed, baking powder, baking soda, chocolate chips and salt in bowl.
- In large mixing bowl beat butter and until smooth.
- Add brown sugar and vanilla, beat on medium-high speed until creamy.
- Add egg and combine well.
- Gradually add flour mixture into butter mixture on low speed. Batter will be thick, I usually finish off by hand mixing to ensure ingredients are well combined. Don't over mix.
- Use a cookie scoop to get cookies same size, placing dough about 3 inches apart. Flatten slightly with fork.
- Bake at 350 for 10-12 minutes or until lightly browned on edges.
Nutrition
Calories: 151kcal | Carbohydrates: 15g | Protein: 2g | Fat: 9g | Saturated Fat: 6g | Cholesterol: 22mg | Sodium: 122mg | Potassium: 81mg | Fiber: 2g | Sugar: 8g | Vitamin A: 206IU | Vitamin C: 1mg | Calcium: 36mg | Iron: 1mg
If you love cookies be sure to check out more delicious cookies recipes like my Ultimate Chocolate Chip Cookie recipe.
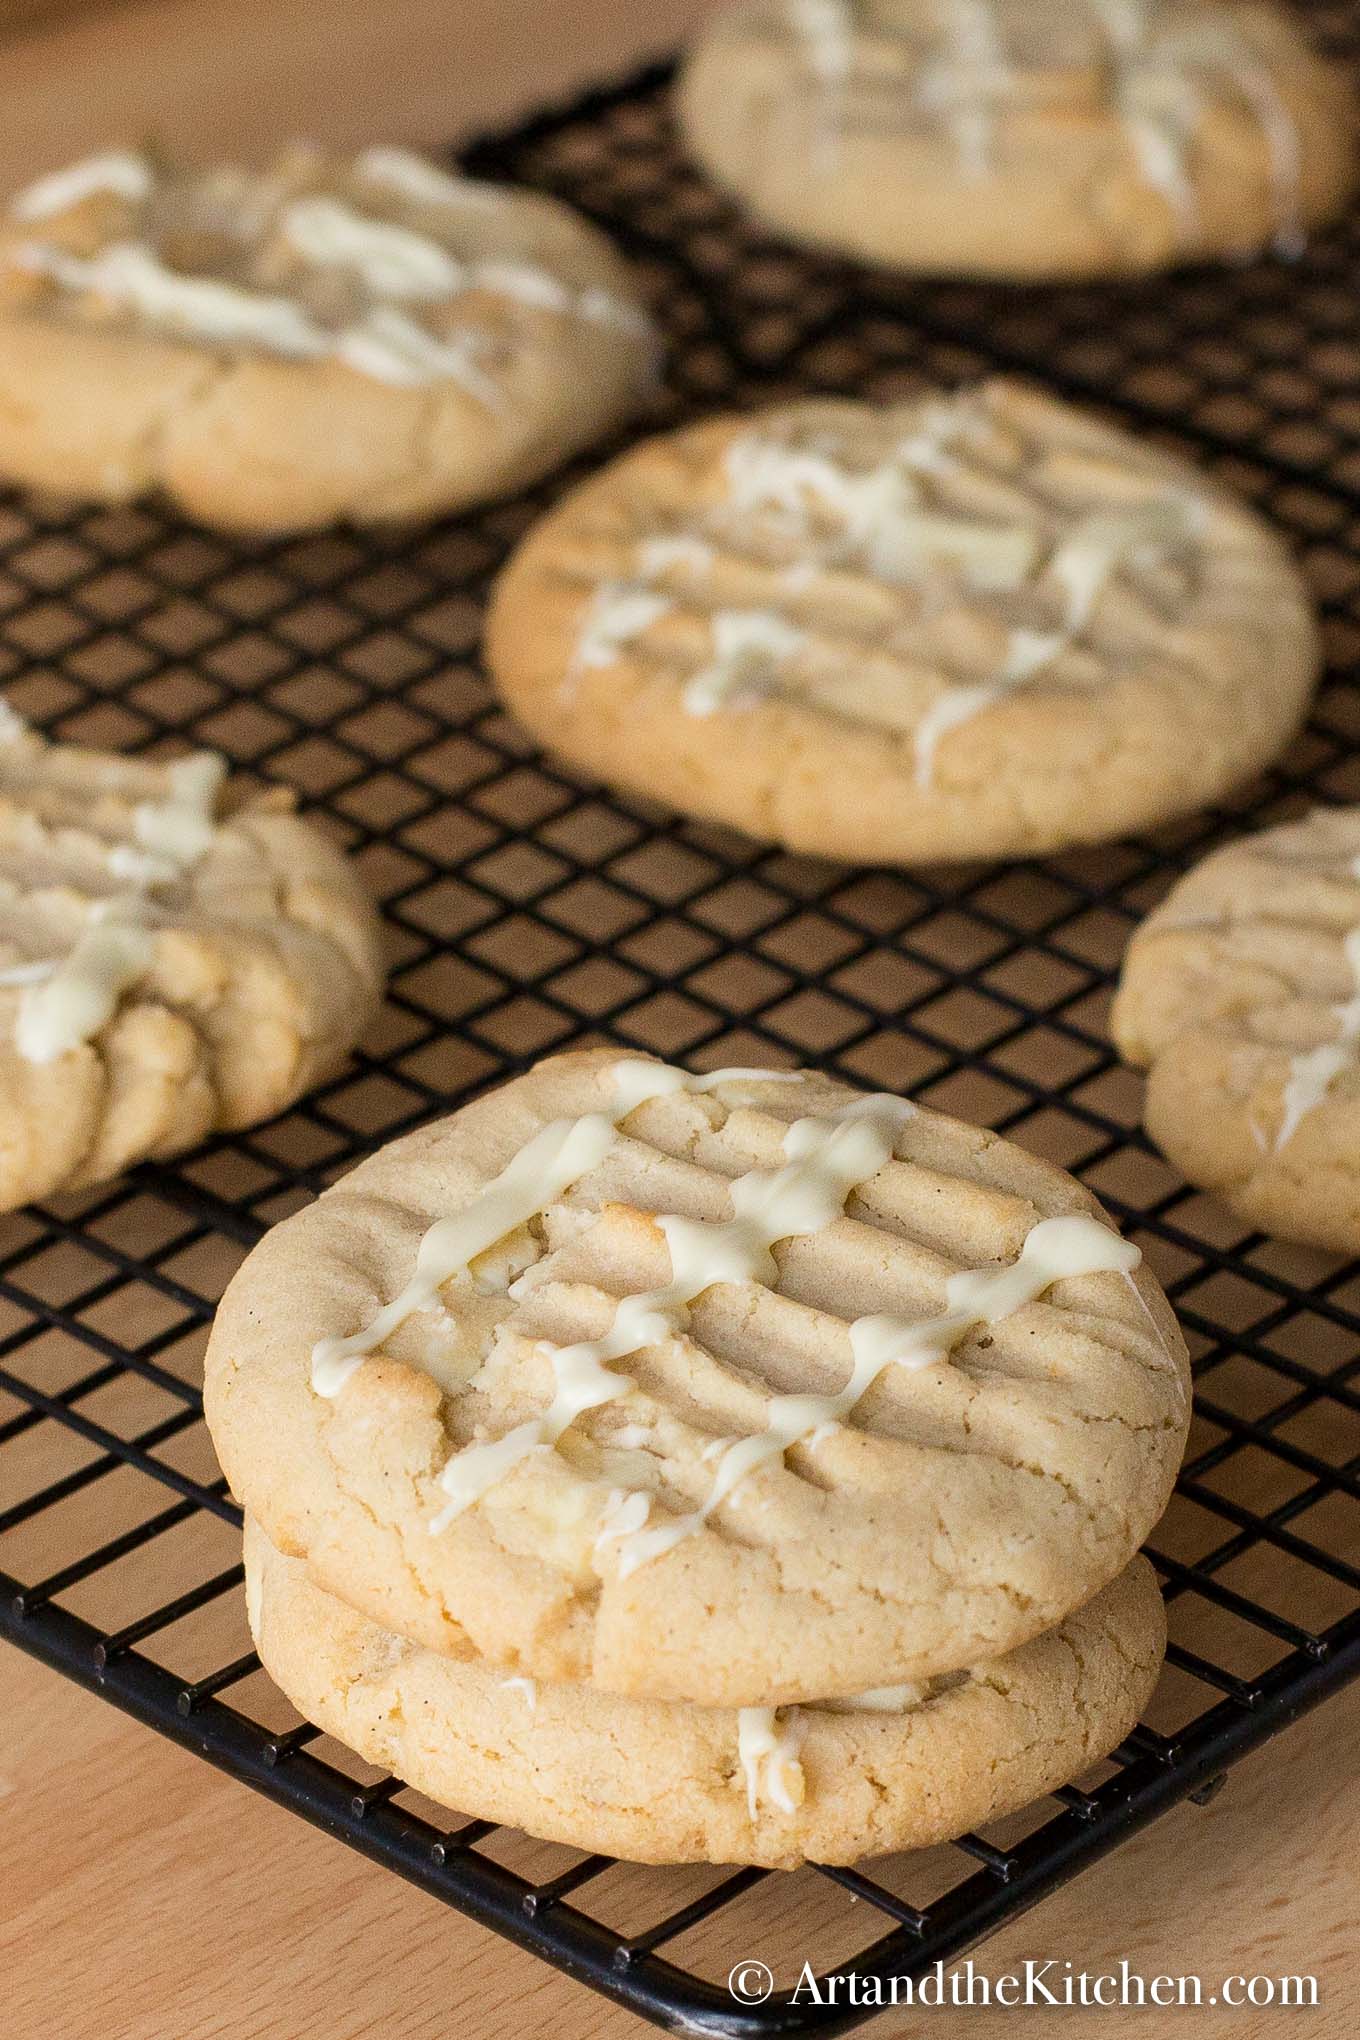
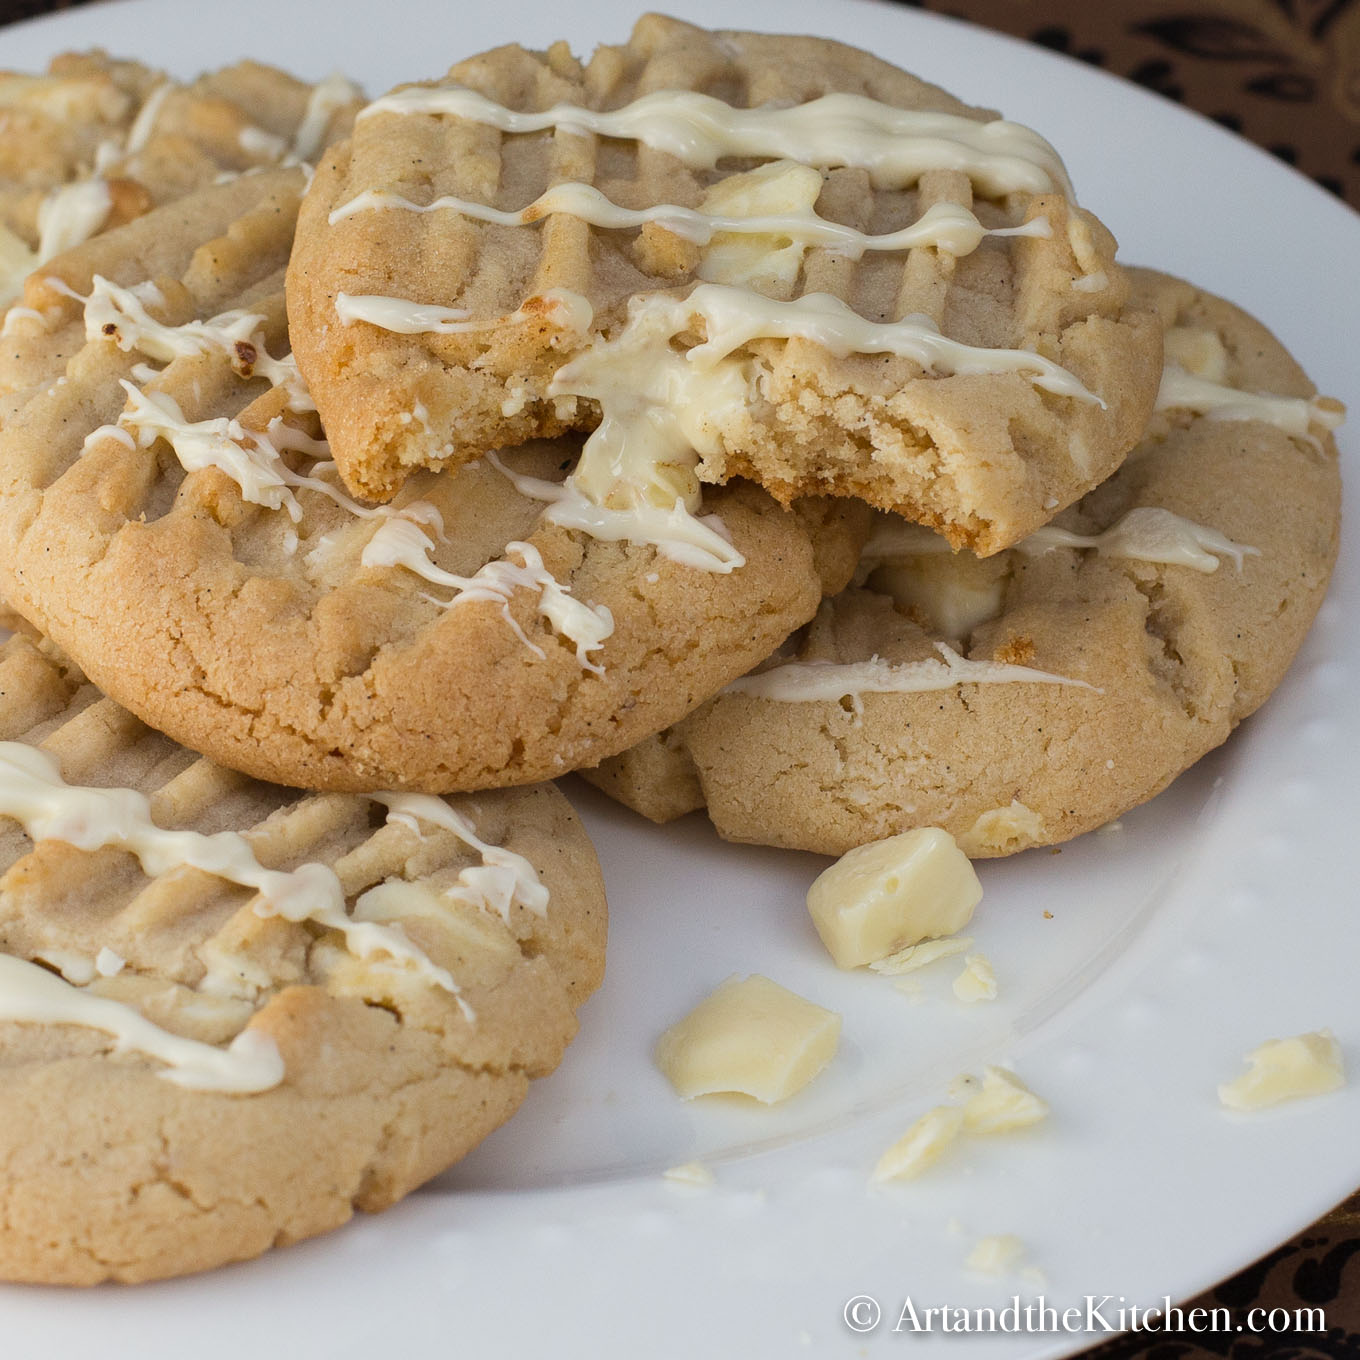
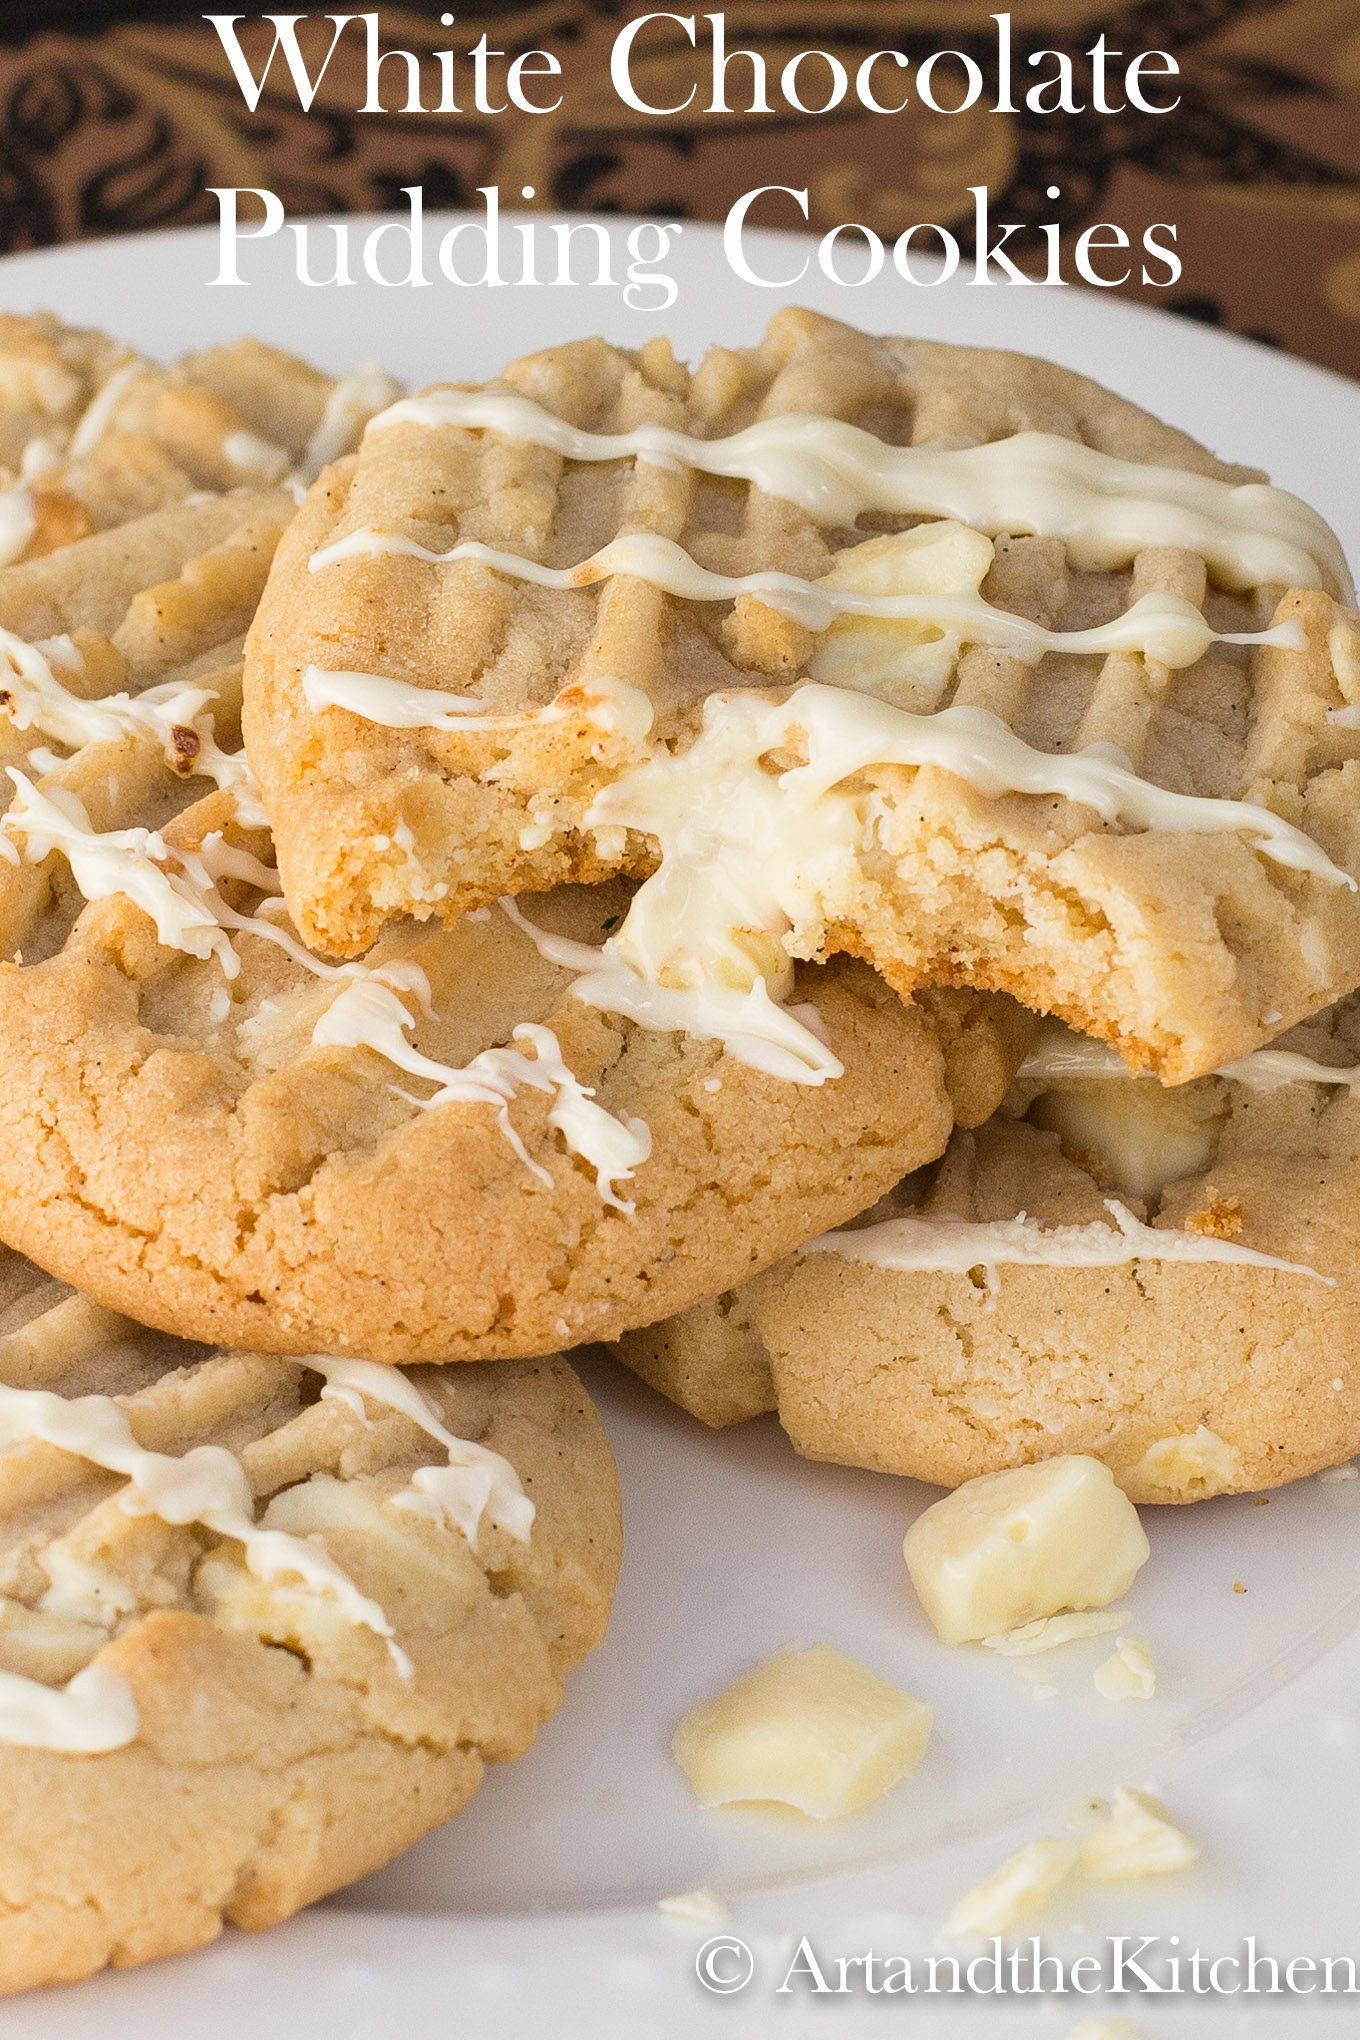
White Chocolate Pudding Cookies

Pudding mix and good quality white chocolate are key to making these fantastic White Chocolate Pudding cookies. This is an exceptional cookie recipe makes cookies that are crisp on the outside and soft on the inside.
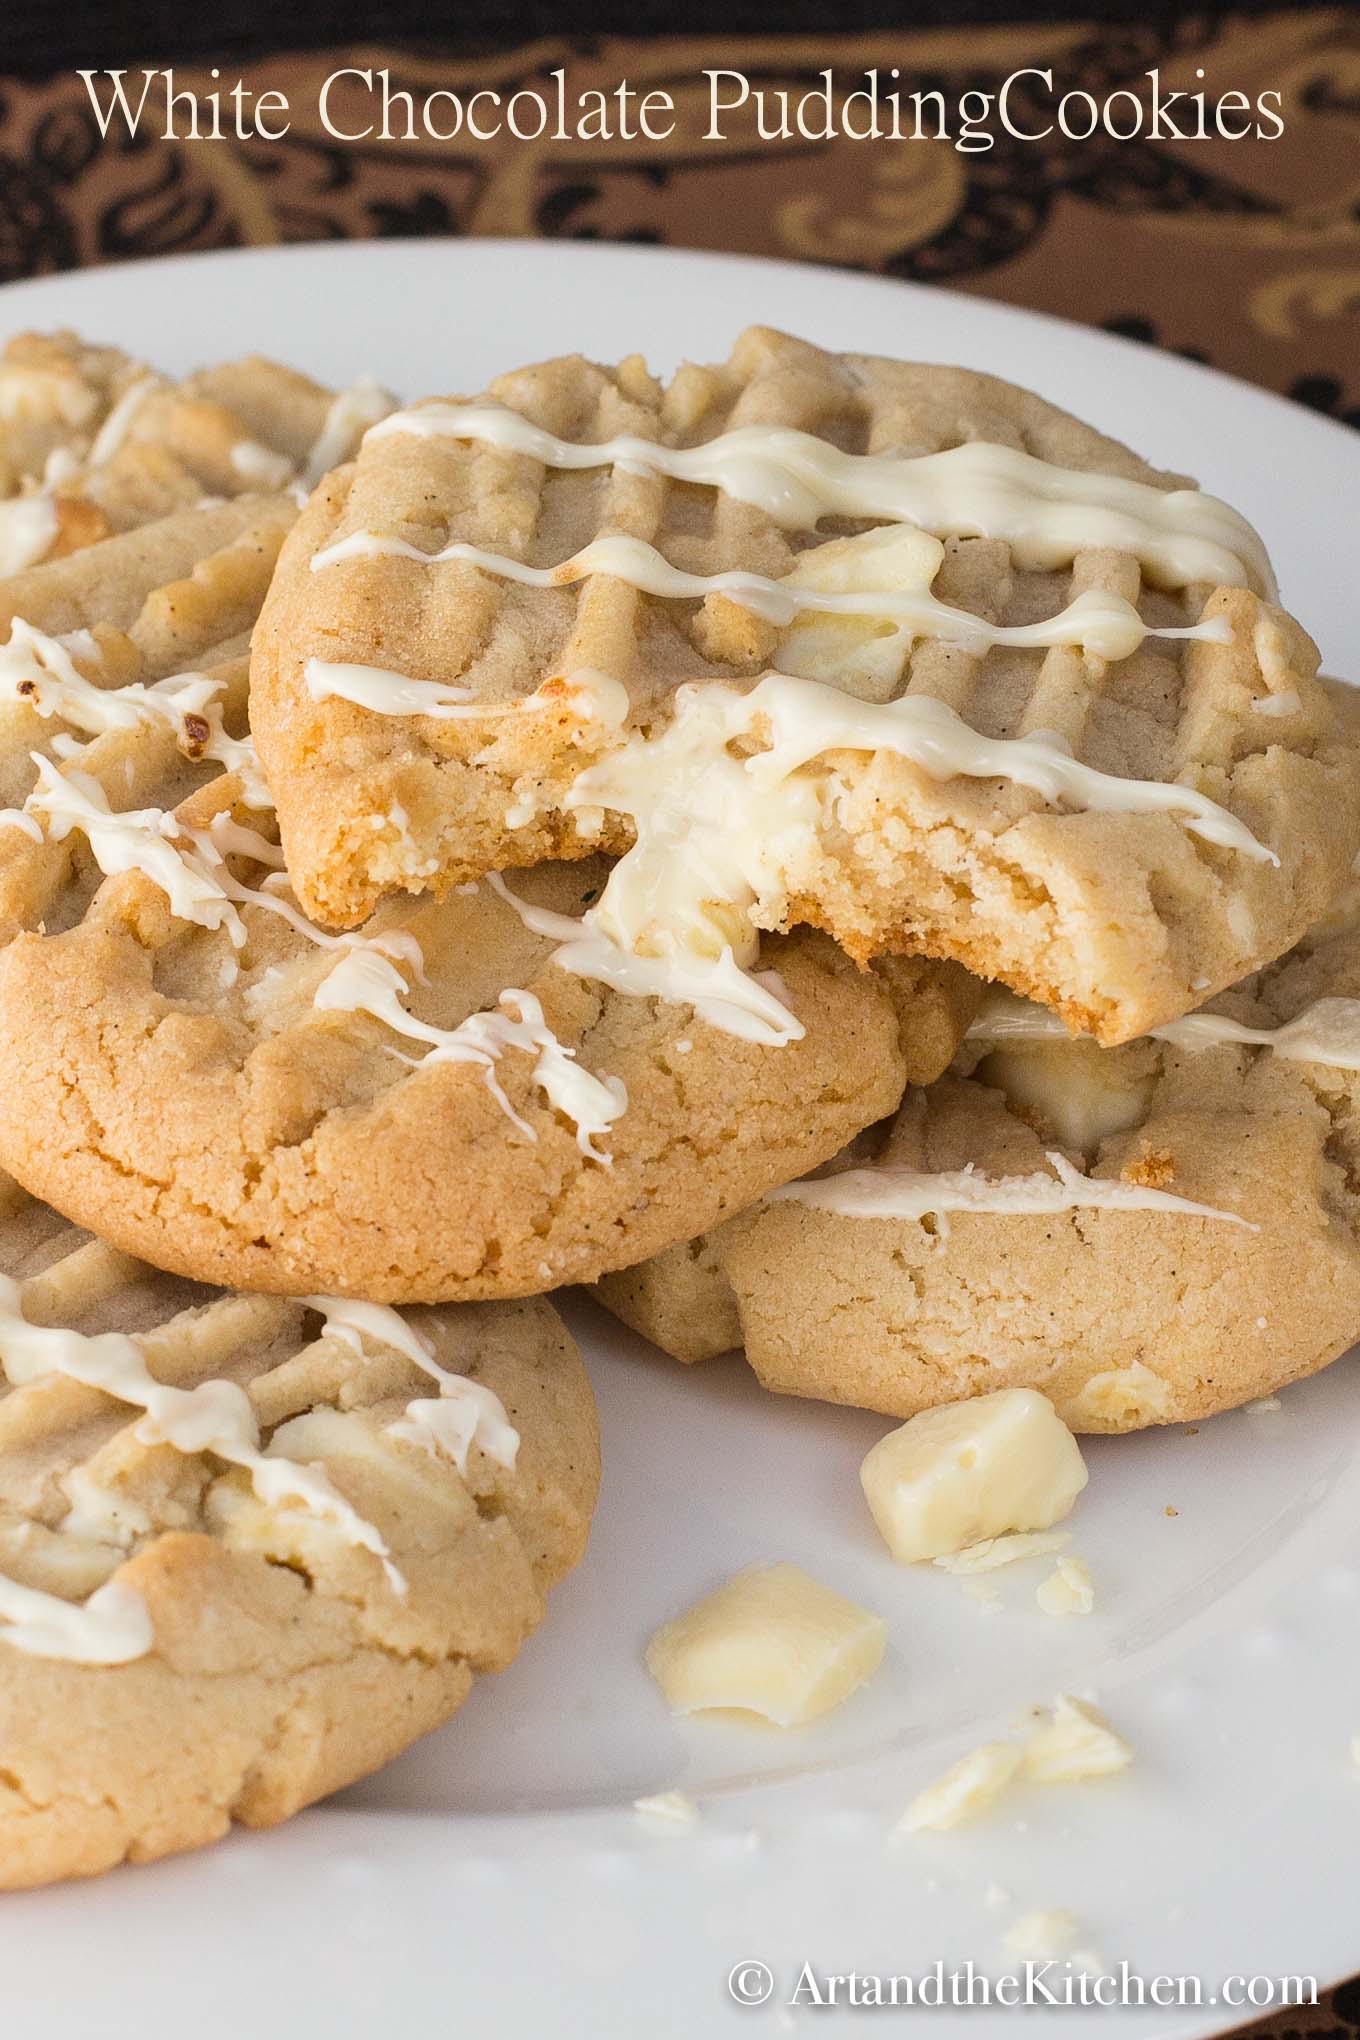
The white chocolate instant pudding mix adds great flavor and texture to these cookies. Loaded with chunks of white chocolate that melts in your mouth with every bite. Bet you won't be able to stop at just one!
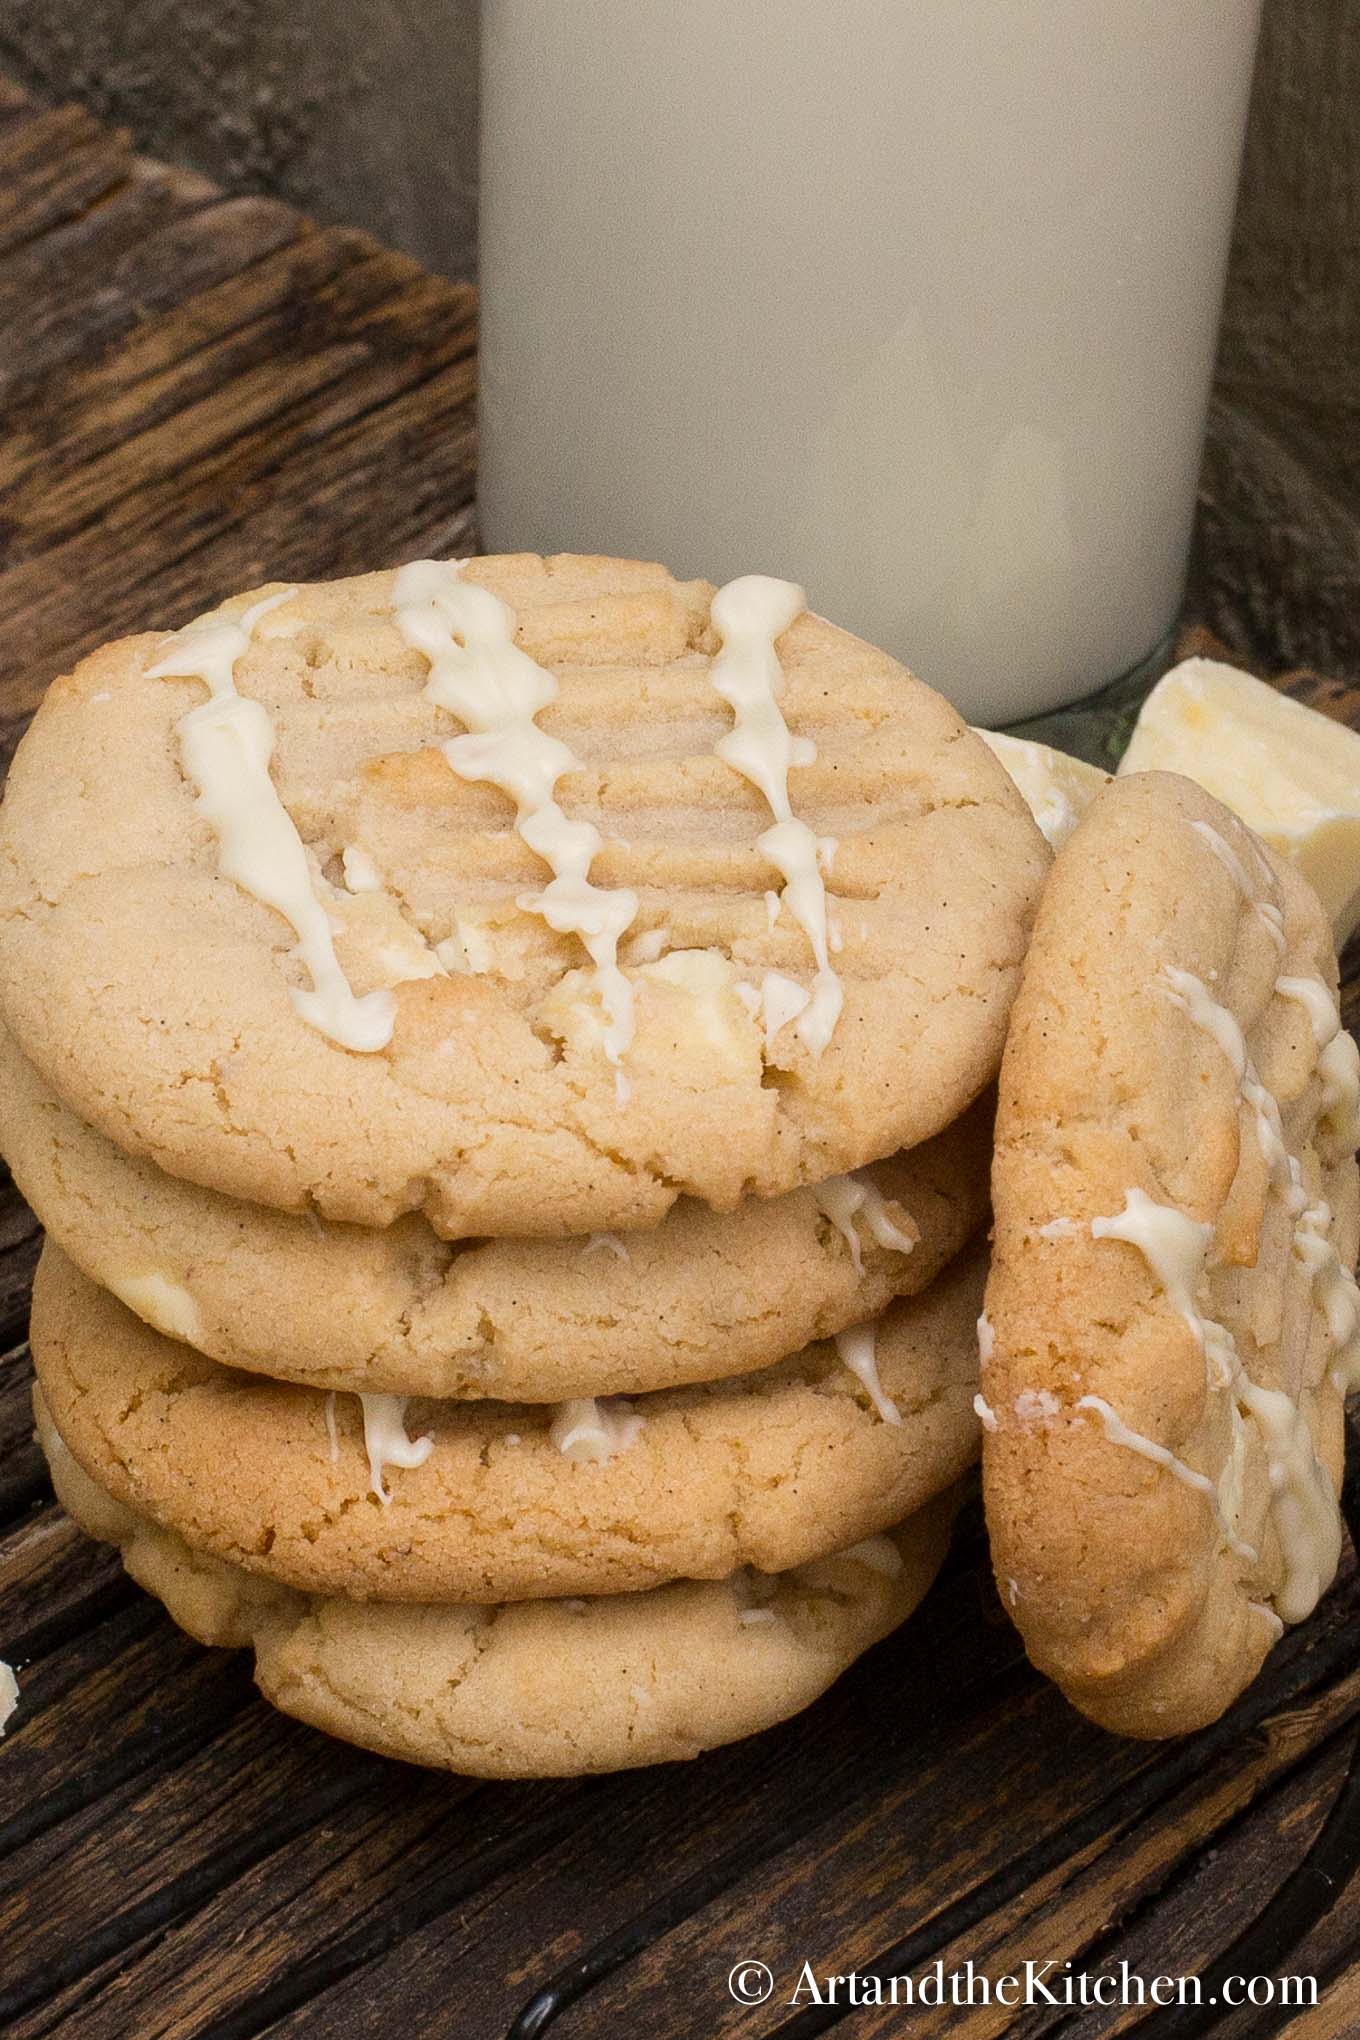
I like to use great quality ingredients when I bake so I used fine quality white chocolate that I chopped into chunks. White chocolate chips will work as well, but definitely won't have the taste of fine quality chocolate. I also like to use vanilla beans in my cookie recipes for superior vanilla taste! Save the left-over vanilla pod to mix into some sugar to make a delicious Vanilla Sugar.
White Chocolate Pudding Cookies
Pudding mix and good quality white chocolate are key to making these fantastic White Chocolate Pudding cookies. This is an exceptional cookie recipe makes cookies that are crisp on the outside and soft on the inside.
Servings: 18
Calories: 242kcal
Ingredients
- ¾ cup butter room temperature
- ¾ cup brown sugar
- ¼ cup granulated sugar
- 1 vanilla bean split and seeds scraped out
- 1 egg
- 2 cups all purpose flour
- 1 teaspoon baking soda
- 1 package white chocolate instant pudding mix
- ¼ teaspoon salt
- 1 cup fine quality white chocolate chunks
Instructions
- Preheat oven to 350 degrees.
- With electric mixer, beat butter until fluffy.
- Add both sugars and beat until well combined.
- Add vanilla beans seeds and beat until well combined.
- Add egg, beat until well combined, making sure to scrap sides as needed.
- In separate bowl stir together flour, baking soda, pudding mix and salt.
- Add flour mixture to butter mixture and mix on low until combined. (dough may look a bit crumbly, but comes together nicely when rolled into a ball)
- Stir in white chocolate chunks.
- Line cookie sheet with parchment paper.
- Using cookie scoop, make 18 large or about 24 smaller cookies.
- Roll into ball to press cookie dough together, then flatten slightly with fork.
- Place in freezer for 15 minutes.
- Bake at 350 degrees for about 11-12 minutes or until slightly browned.
- If desired decorate by drizzling melted chocolate on top.
Nutrition
Calories: 242kcal | Carbohydrates: 33g | Protein: 2g | Fat: 11g | Saturated Fat: 6g | Cholesterol: 31mg | Sodium: 218mg | Potassium: 61mg | Sugar: 21g | Vitamin A: 255IU | Vitamin C: 0.1mg | Calcium: 33mg | Iron: 0.8mg
Be sure to try these other yummy cookie recipes like my Ultimate Chocolate Chip Cookies and Peanut Butter Thumbprint Cookies
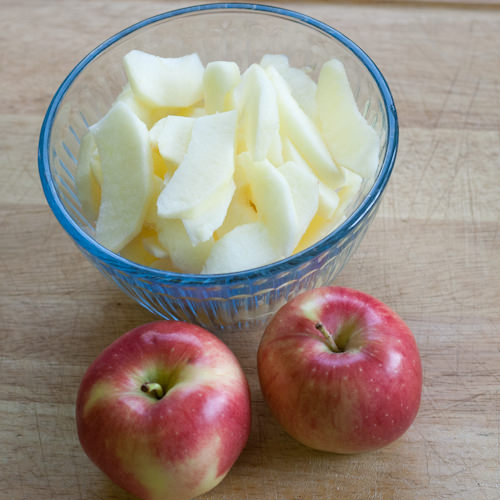
Oven Baked Apple French Toast
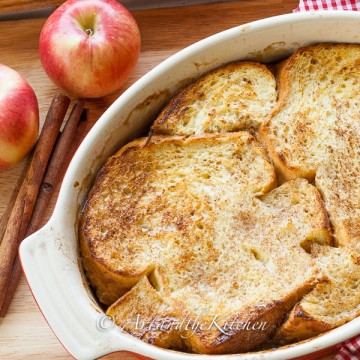
Perfect for Sunday Brunch, this recipe for Oven Baked Apple French Toast is easy to prepare and you can make it the night before!

The smell of apples and cinnamon baking in the oven will have them all rushing to the kitchen to see what you've made. Oven Baked Apple French Toast is the perfect recipe for brunch as you can make it the night before, then pop it into the oven in the morning.
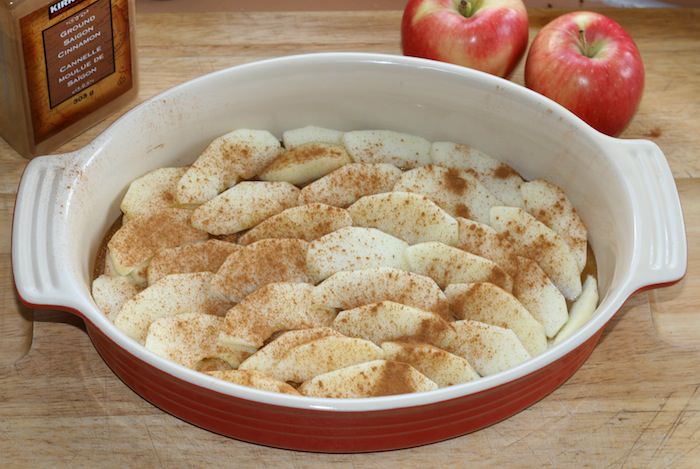
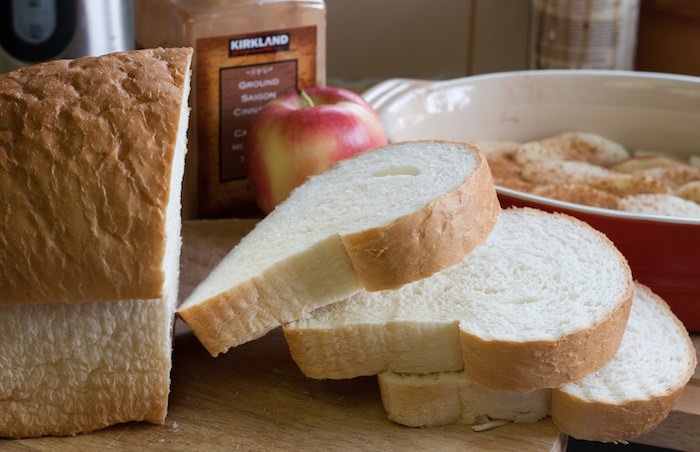
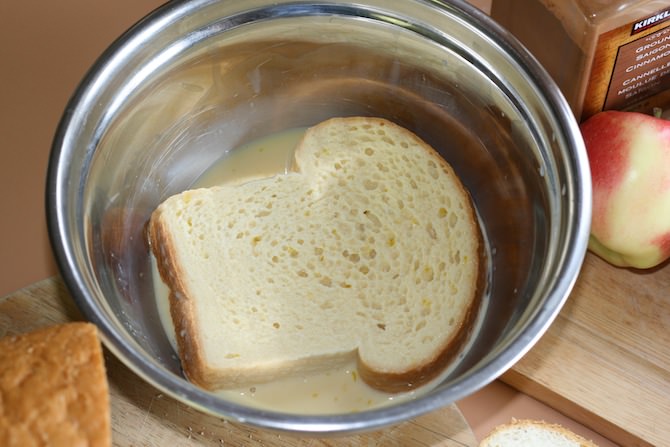
How to make apple French Toast
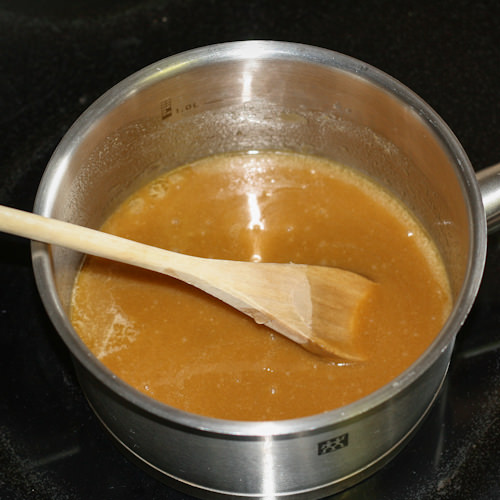
Cook butter, sugar and syrup on stovetop for 5-7 minutes.
Pour syrup mixture into baking pan.
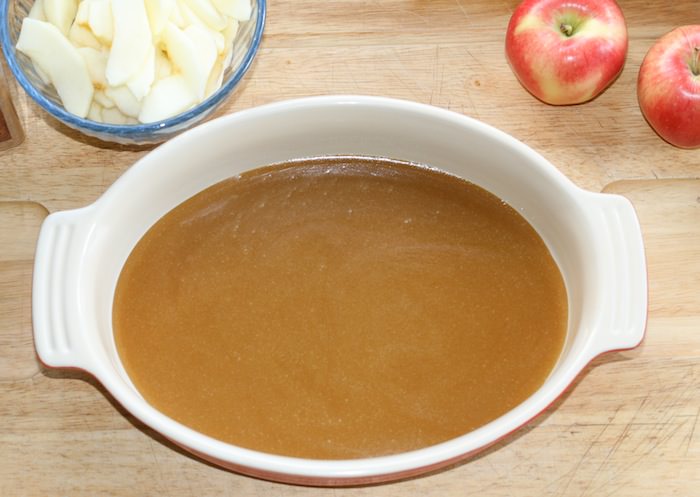
Peel and slice 3-4 apples.
Arrange apple slice on top of caramel sauce, sprinkle with cinnamon.
Slice bread ¾ inch thick.
Beat eggs, milk and vanilla together. Dip bread to cover both sides. Let bread soak up a good amount of egg mixture.
Place bread on top of apples. Sprinkle with cinnamon.
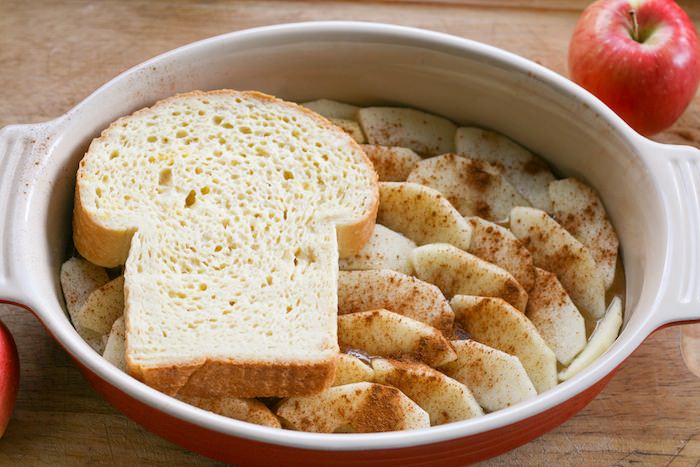
Cover with plastic wrap, refrigerate at least 1 hour or overnight. Bake uncovered in oven at 350 degrees Fahrenheit for 30-40 minutes.


Oven Baked Apple French Toast
Servings: 6
Calories: 577kcal
Ingredients
- 1 cup brown sugar
- ½ cup butter
- 2 tablespoons corn syrup
- 3 apples peeled and sliced
- 2 teaspoon cinnamon
- 3 eggs
- 1 cup milk
- 1 teaspoon vanilla extract
- 6 slices French bread ¾ inch slices
Instructions
- In saucepan, melt butter, add brown sugar and syrup. Cook 5-7 minutes.
- Pour into 9x13 baking pan.
- Arrange slices apples on top, sprinkle with cinnamon.
- In bowl beat eggs, milk and vanilla together.
- Dip slices of bread into egg mixture, then place over apples.
- Cover and refrigerate at least 1 hour or overnight.
- Bake uncovered 350 degrees for 30-40 minutes.
Nutrition
Calories: 577kcal | Carbohydrates: 90g | Protein: 11g | Fat: 20g | Saturated Fat: 12g | Polyunsaturated Fat: 2g | Monounsaturated Fat: 5g | Trans Fat: 1g | Cholesterol: 127mg | Sodium: 569mg | Potassium: 321mg | Fiber: 4g | Sugar: 56g | Vitamin A: 709IU | Vitamin C: 4mg | Calcium: 144mg | Iron: 3mg
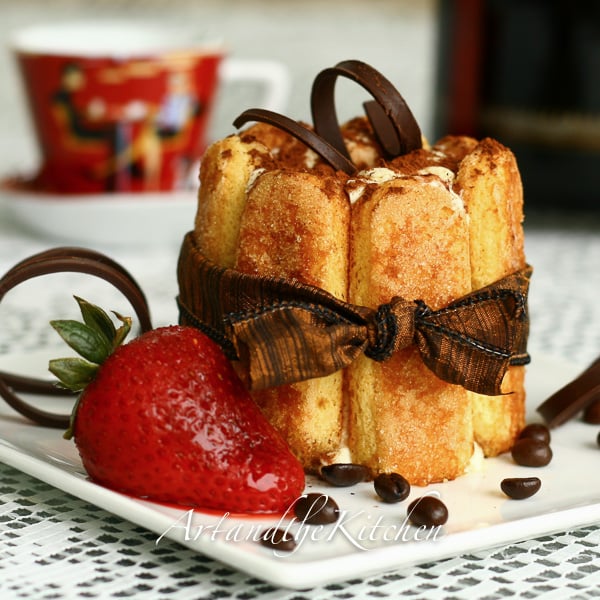
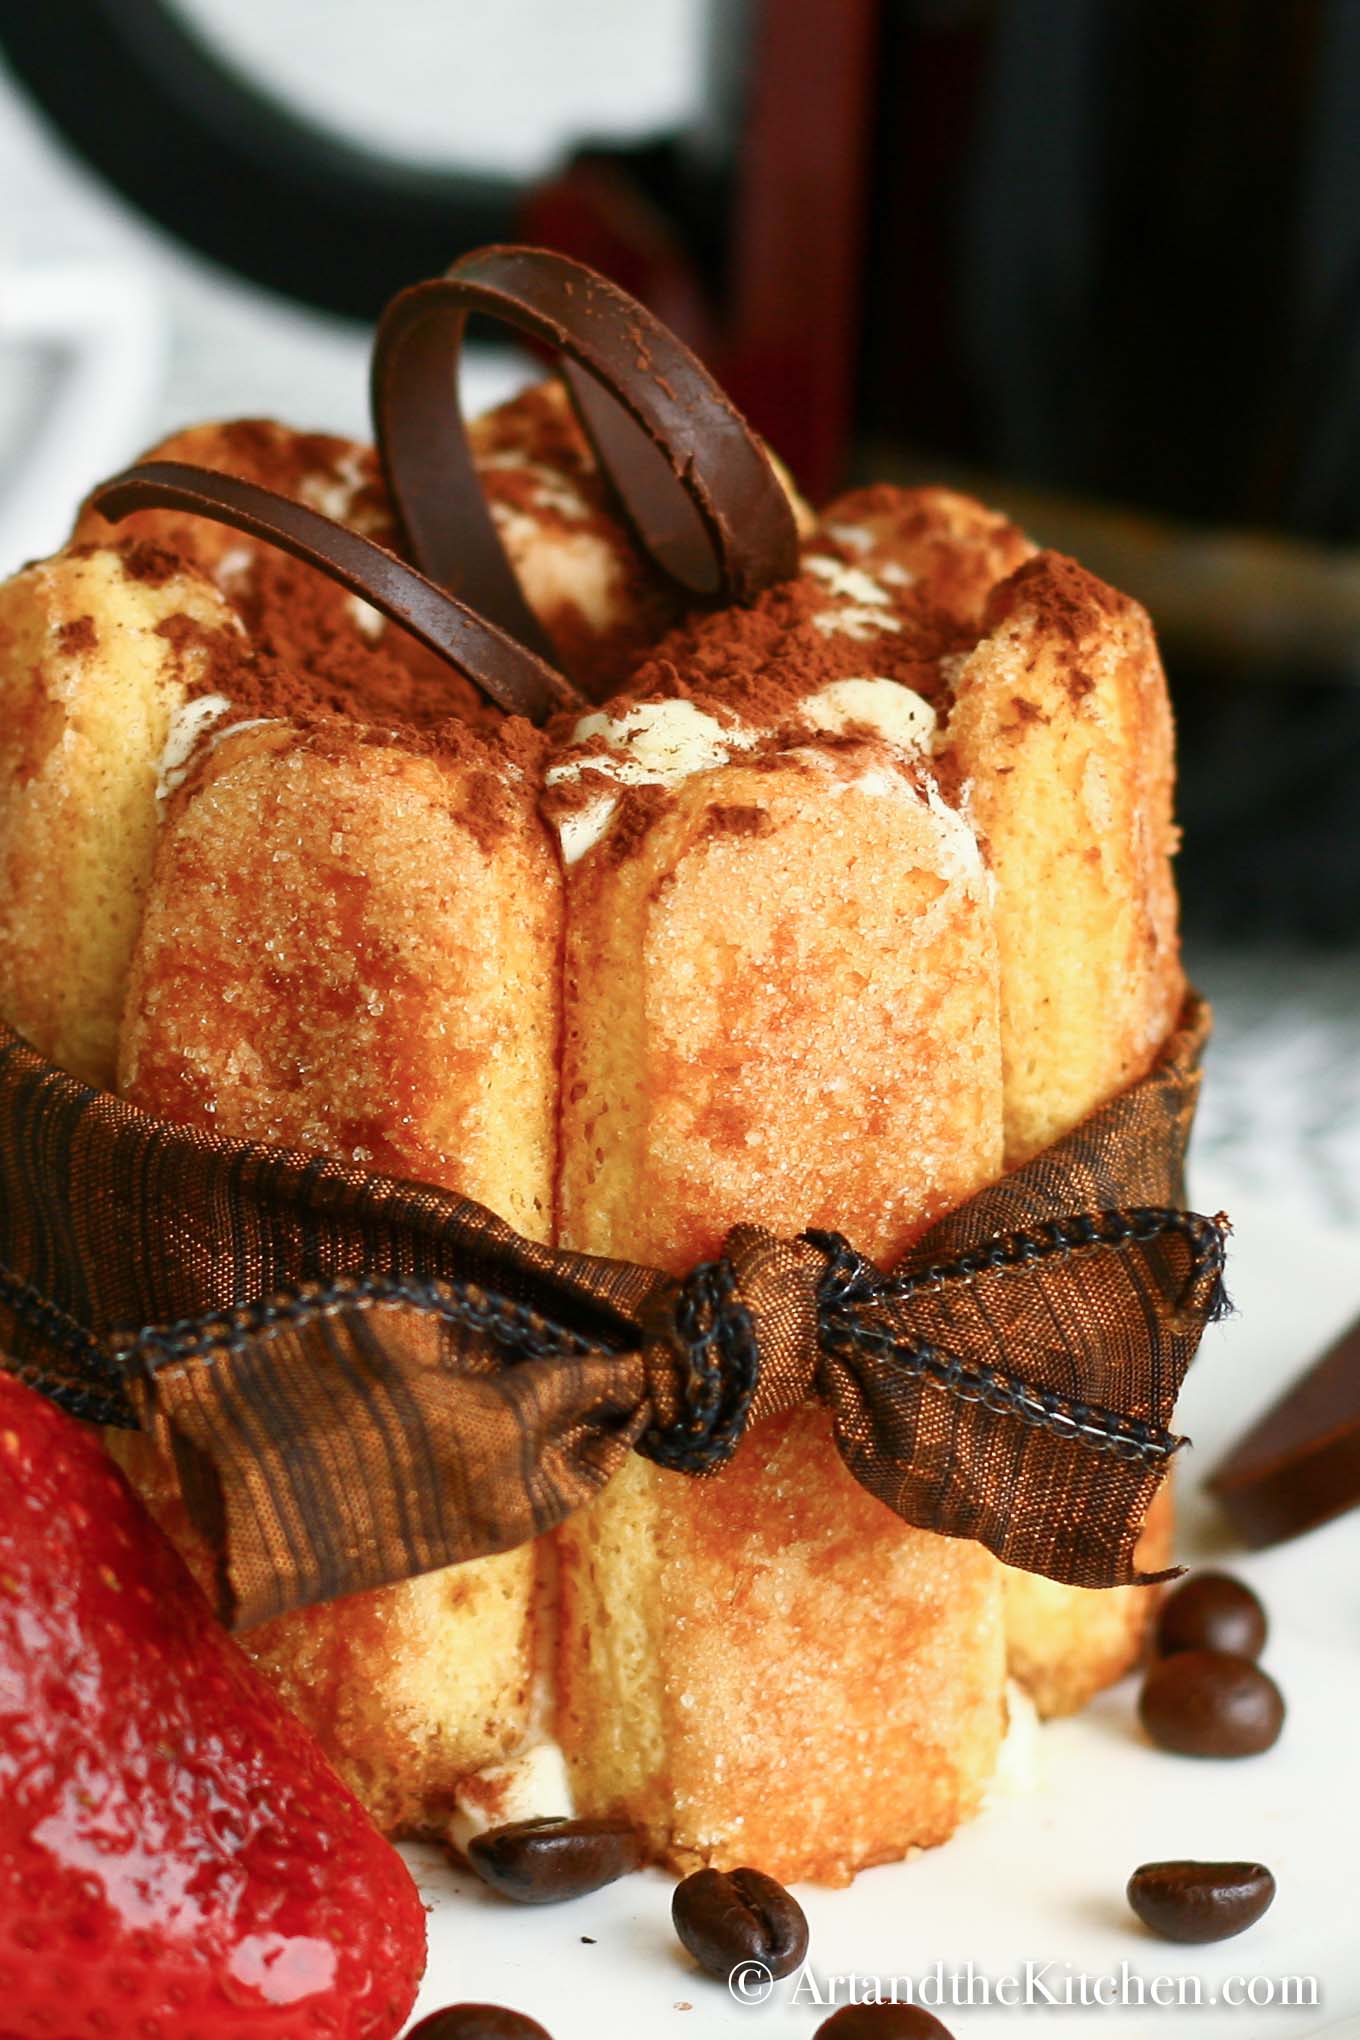
Tiramisu

A classic no-bake Italian dessert, Tiramisu is made with creamy mascarpone cheese, espresso dipped ladyfingers and dark rum!
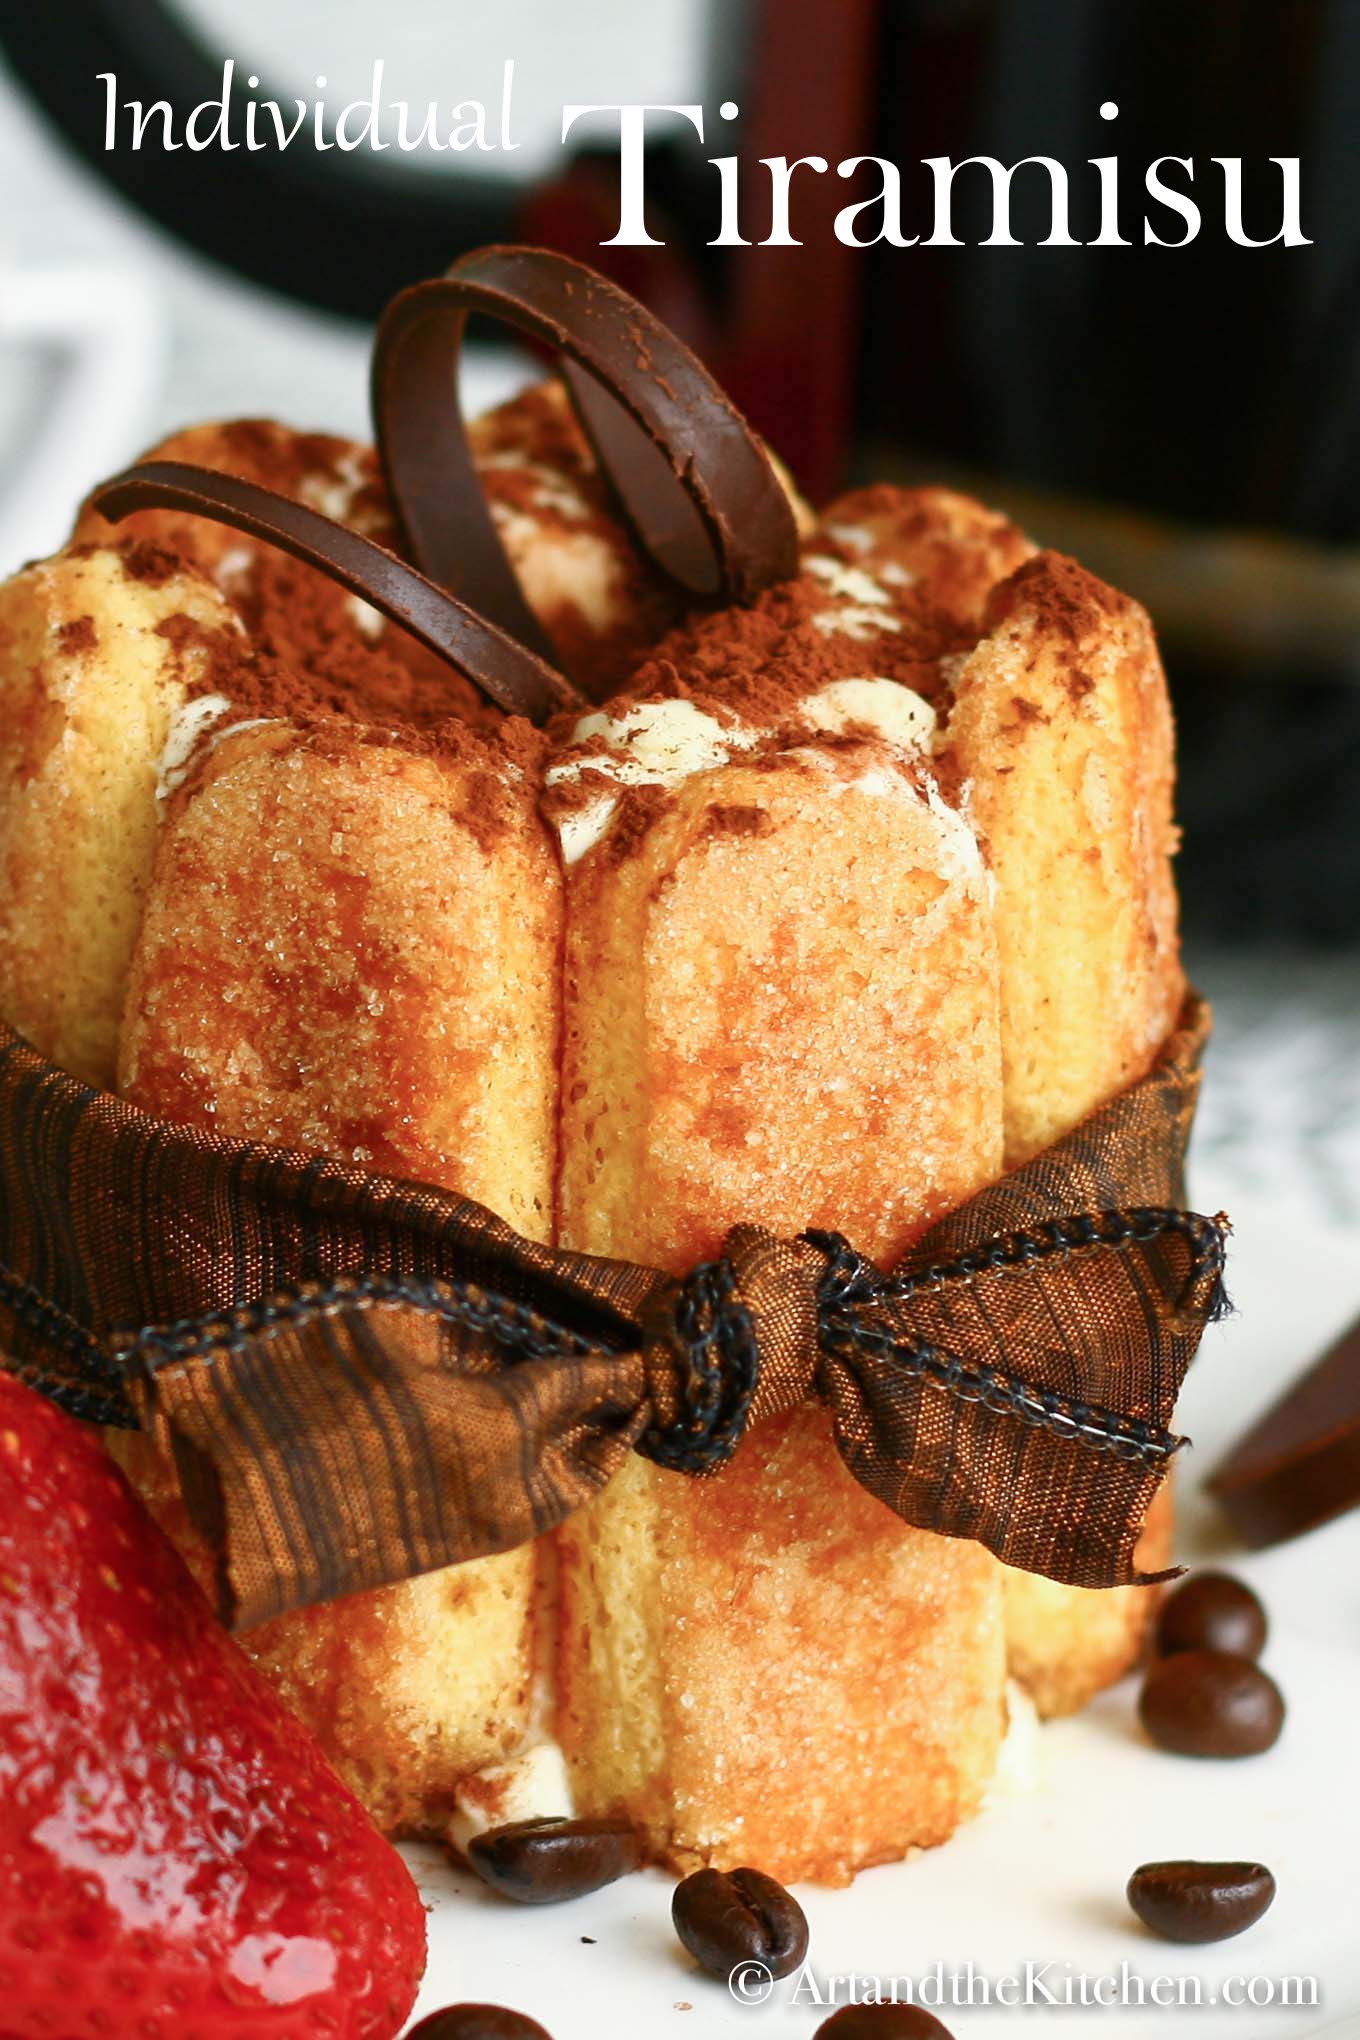
I made my Tiramisu recipe into individual servings, but it can easily be made into one large dessert. This classic no-bake Italian dessert has always been on my "to make" list, so after a recent grocery shop to our local Italian Grocery store and admiring their beautiful cakes I was inspired to give it a try. I gathered up my list of ingredients and set for home determined to create a dessert my husband would love.
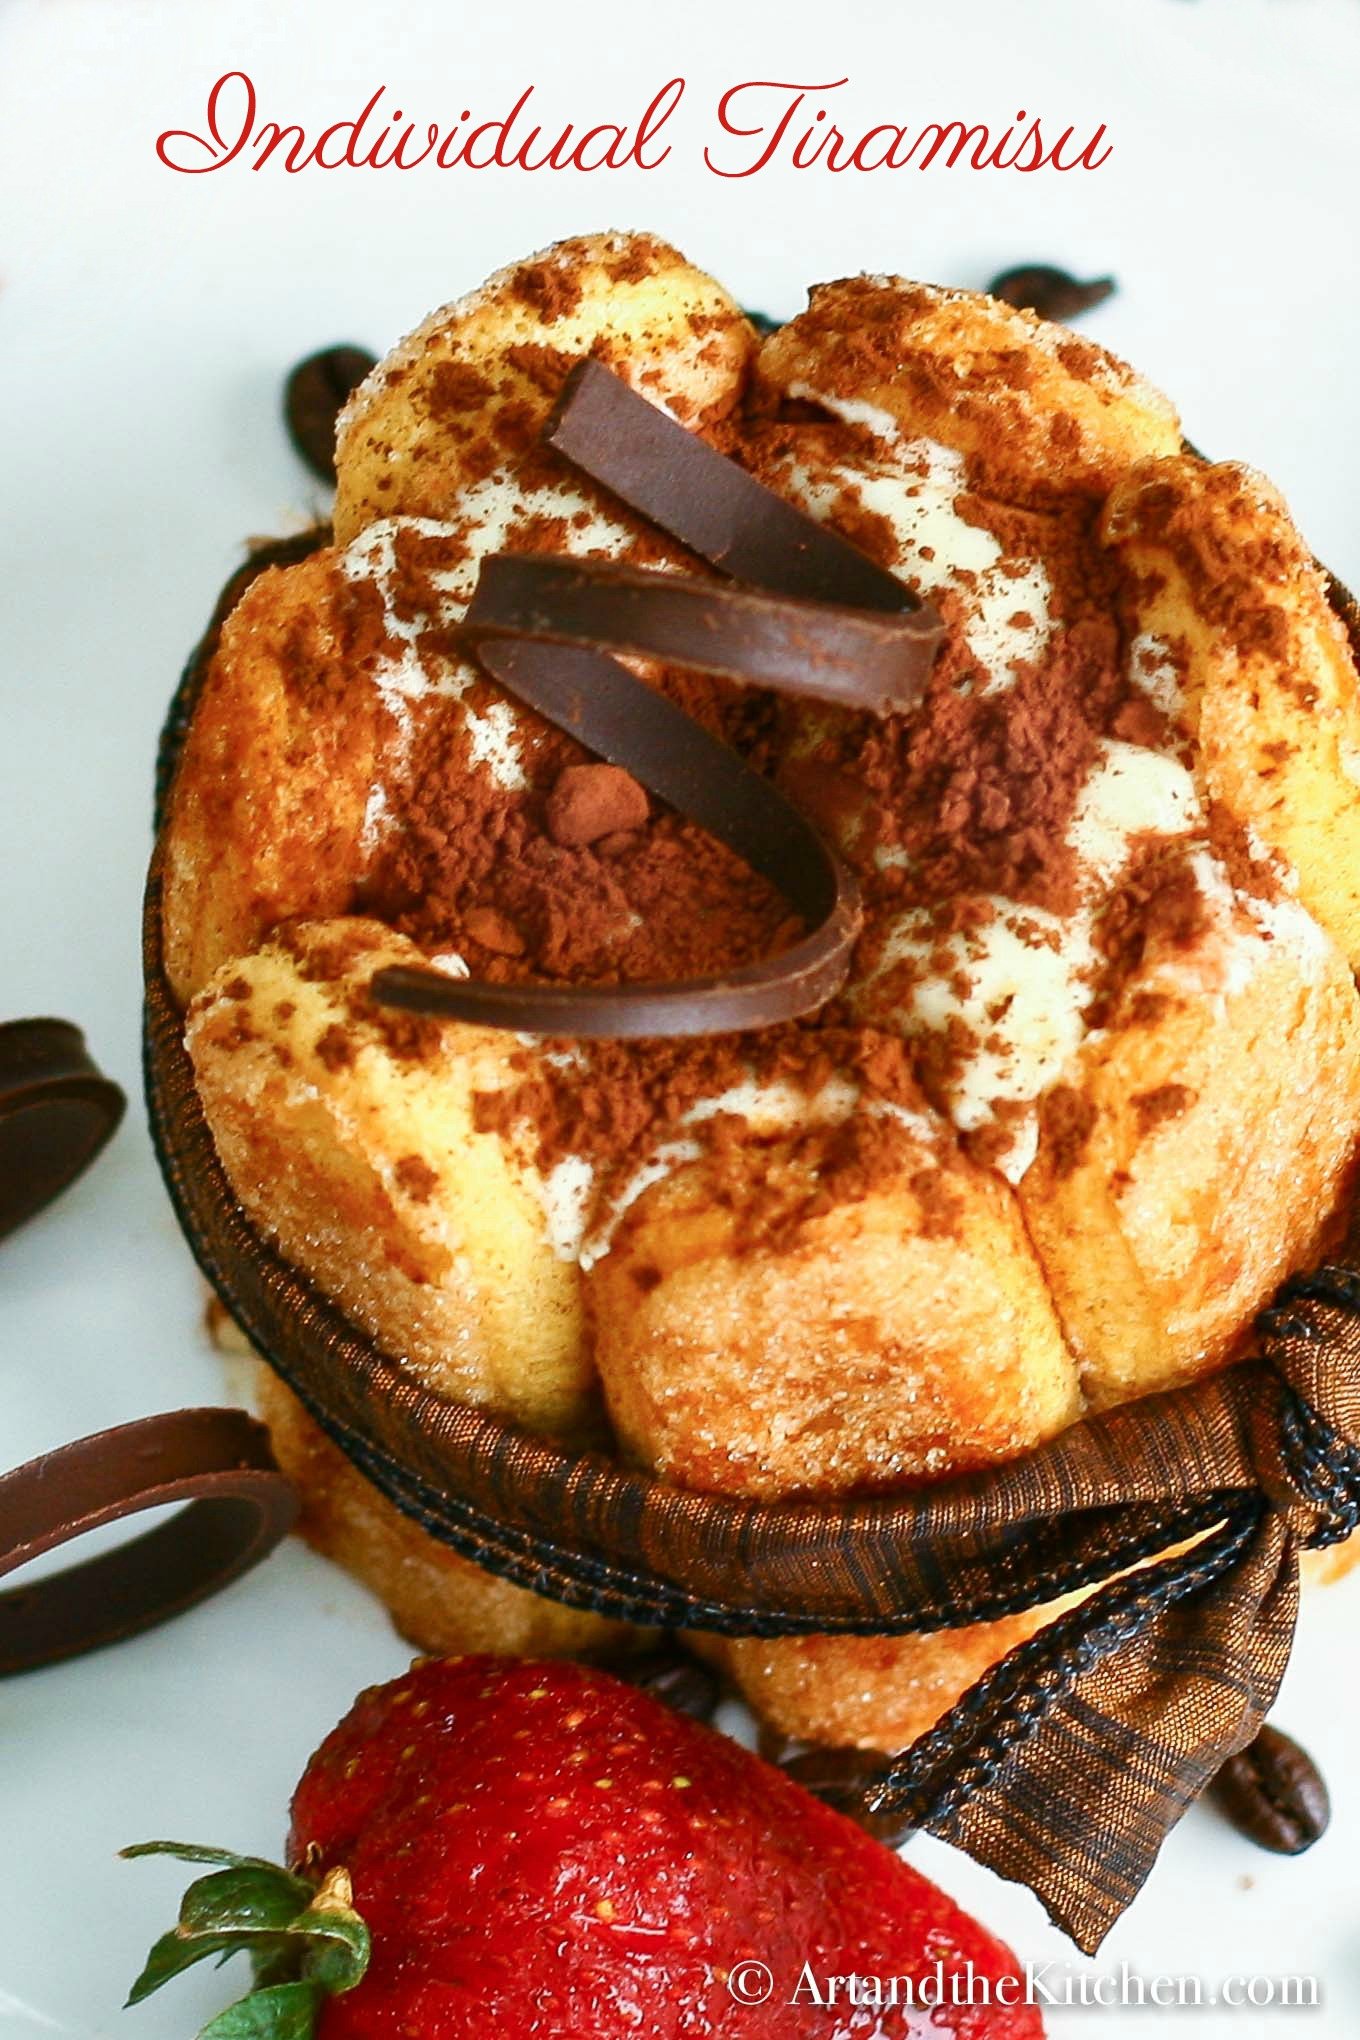
This Tiramisu recipe turned out exceptionally well and tasty amazing! How can you resist Lady fingers flavoured with espresso and rum surrounding a centre of creamy mascarpone filling. The perfect dessert for those special dinners.


Tiramisu
Rich and creamy Tiramisu made into individual servings.
Servings: 4
Calories: 891kcal
Ingredients
- 28 ladyfingers
- ⅓ cup warm espresso
- 2 tablespoon grated chocolate
- 3 egg yolks
- ¼ cup sugar plus 2 tbsp
- 8 oz mascarpone cheese
- 1 cup heavy cream
- 2 tablespoon confectioners' sugar
- ½ tablespoon dark rum or imitation rum
- Garnish: unsweetened cocoa powder chocolate curls
Instructions
- Cut about ¼ off end of each lady finger; brush one side of each ladyfinger with espresso and sprinkle with chopped chocolate.
- Arrange ladyfingers in circle inside of round mould. I used a large round cookie cutter, find any container that will fit ladyfingers tightly into a circle. Set aside.
- In a bowl using an electric mixer at high speed, combine egg yolks and sugar, beat for 6 minutes. Slowly mix in the mascarpone until mixture is uniform.
- In a separate bowl using electric mixer at high speed, whip the cream, confectioners' sugar and rum until stiff peaks form.
- Fold the whipped cream into the mascarpone mixture.
- Fill ladyfinger bowls with custard, tie ribbon around lady finger bowl to hold in place, garnish with cocoa powder and chocolate curls.
- Refrigerate for at least 1 hour before serving.
Nutrition
Calories: 891kcal | Carbohydrates: 70g | Protein: 16g | Fat: 61g | Saturated Fat: 35g | Cholesterol: 455mg | Sodium: 175mg | Potassium: 168mg | Fiber: 1g | Sugar: 20g | Vitamin A: 2290IU | Vitamin C: 0.3mg | Calcium: 172mg | Iron: 3.3mg
Another great no-bake dessert recipe to try is my No Bake Strawberry Cheesecake Pie.

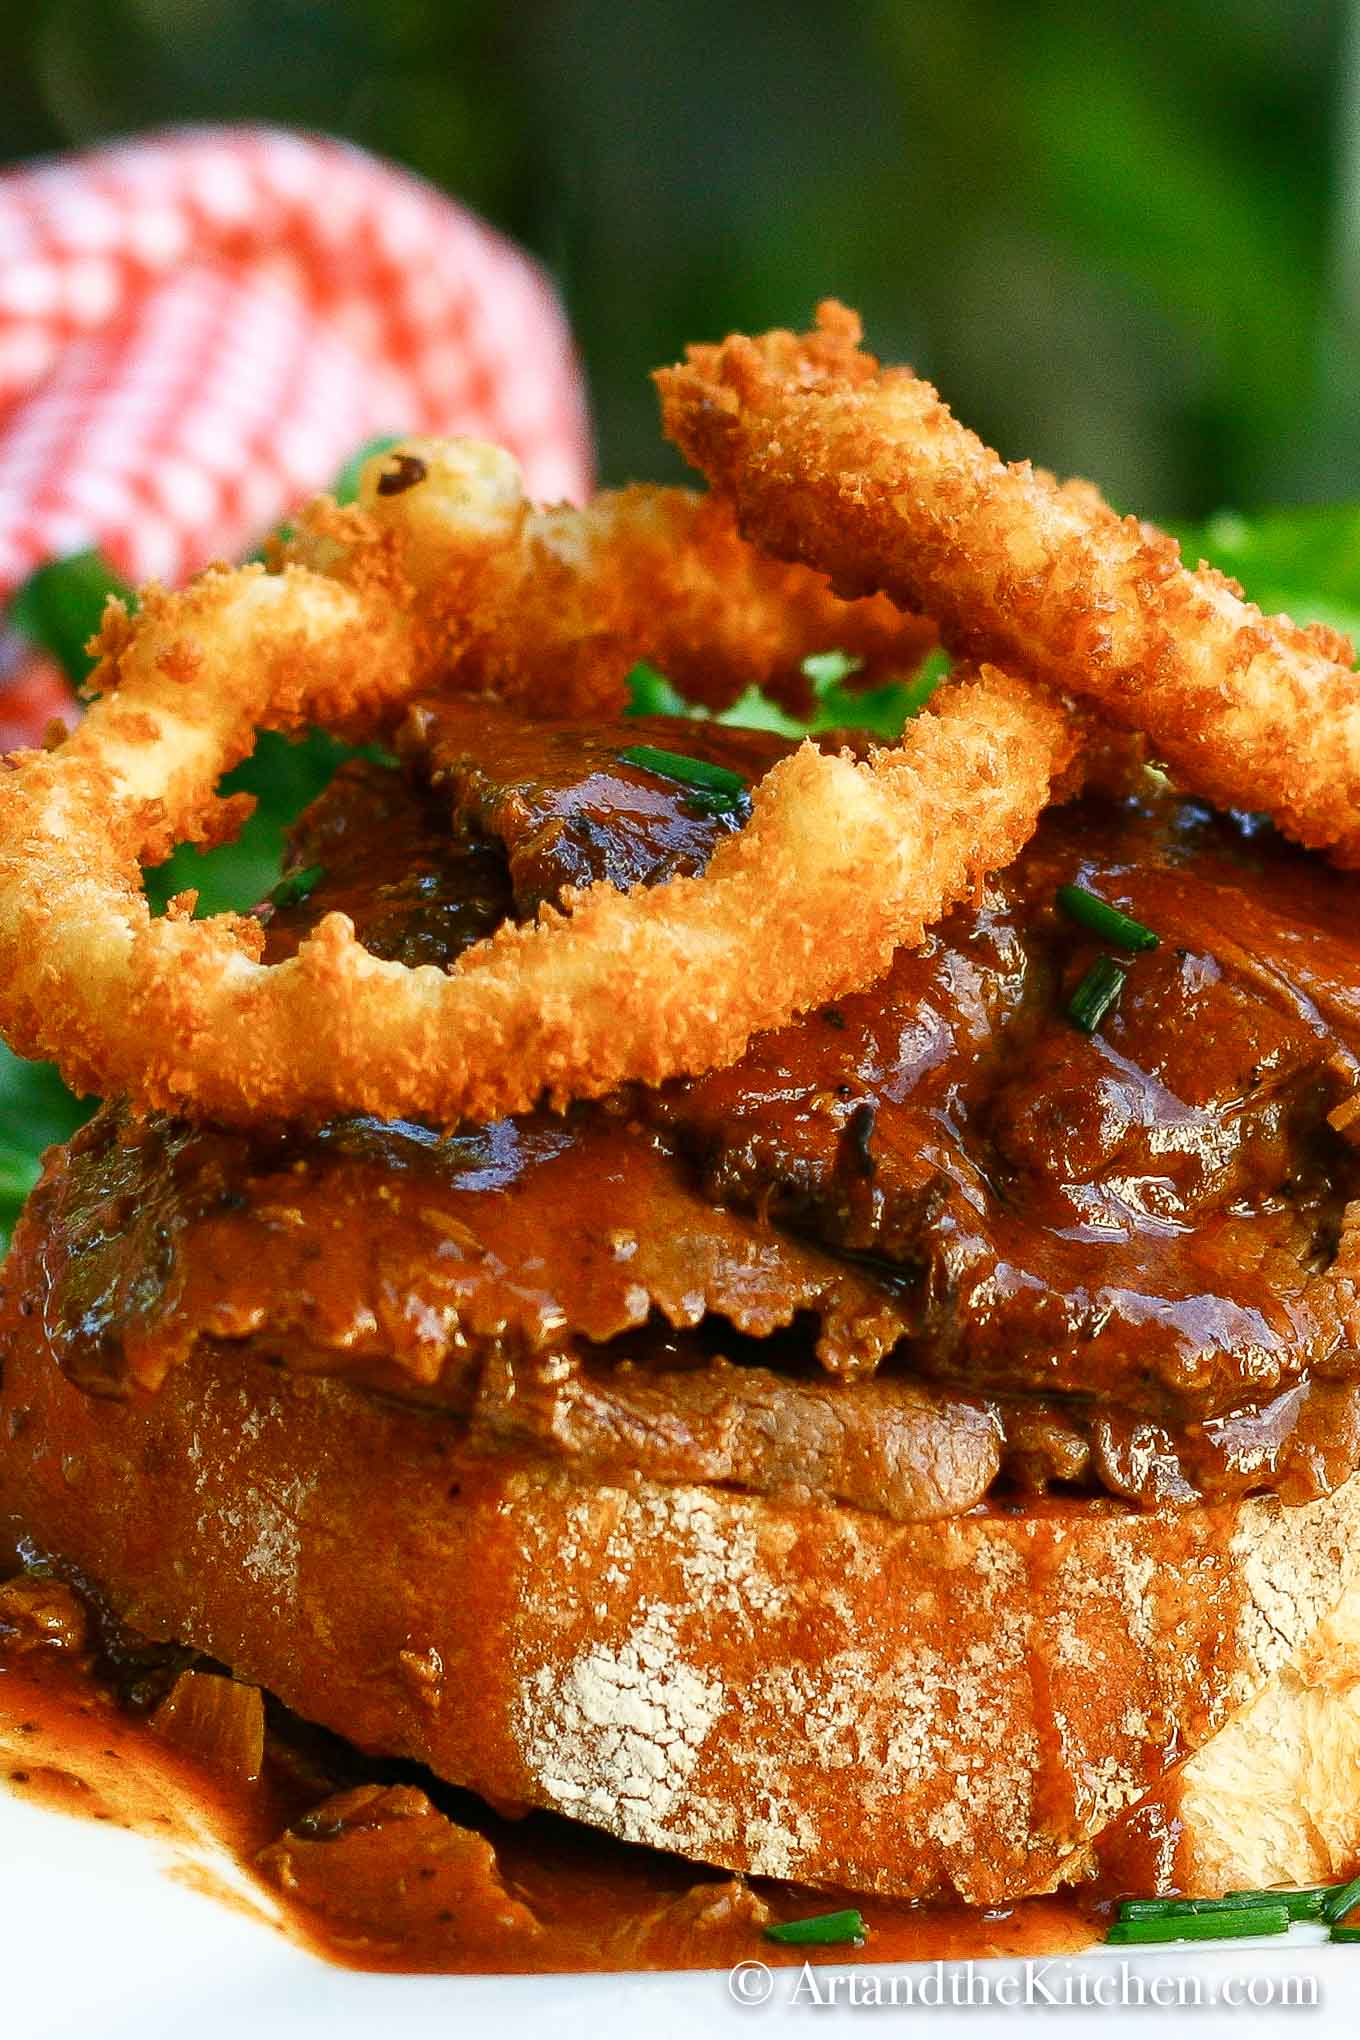
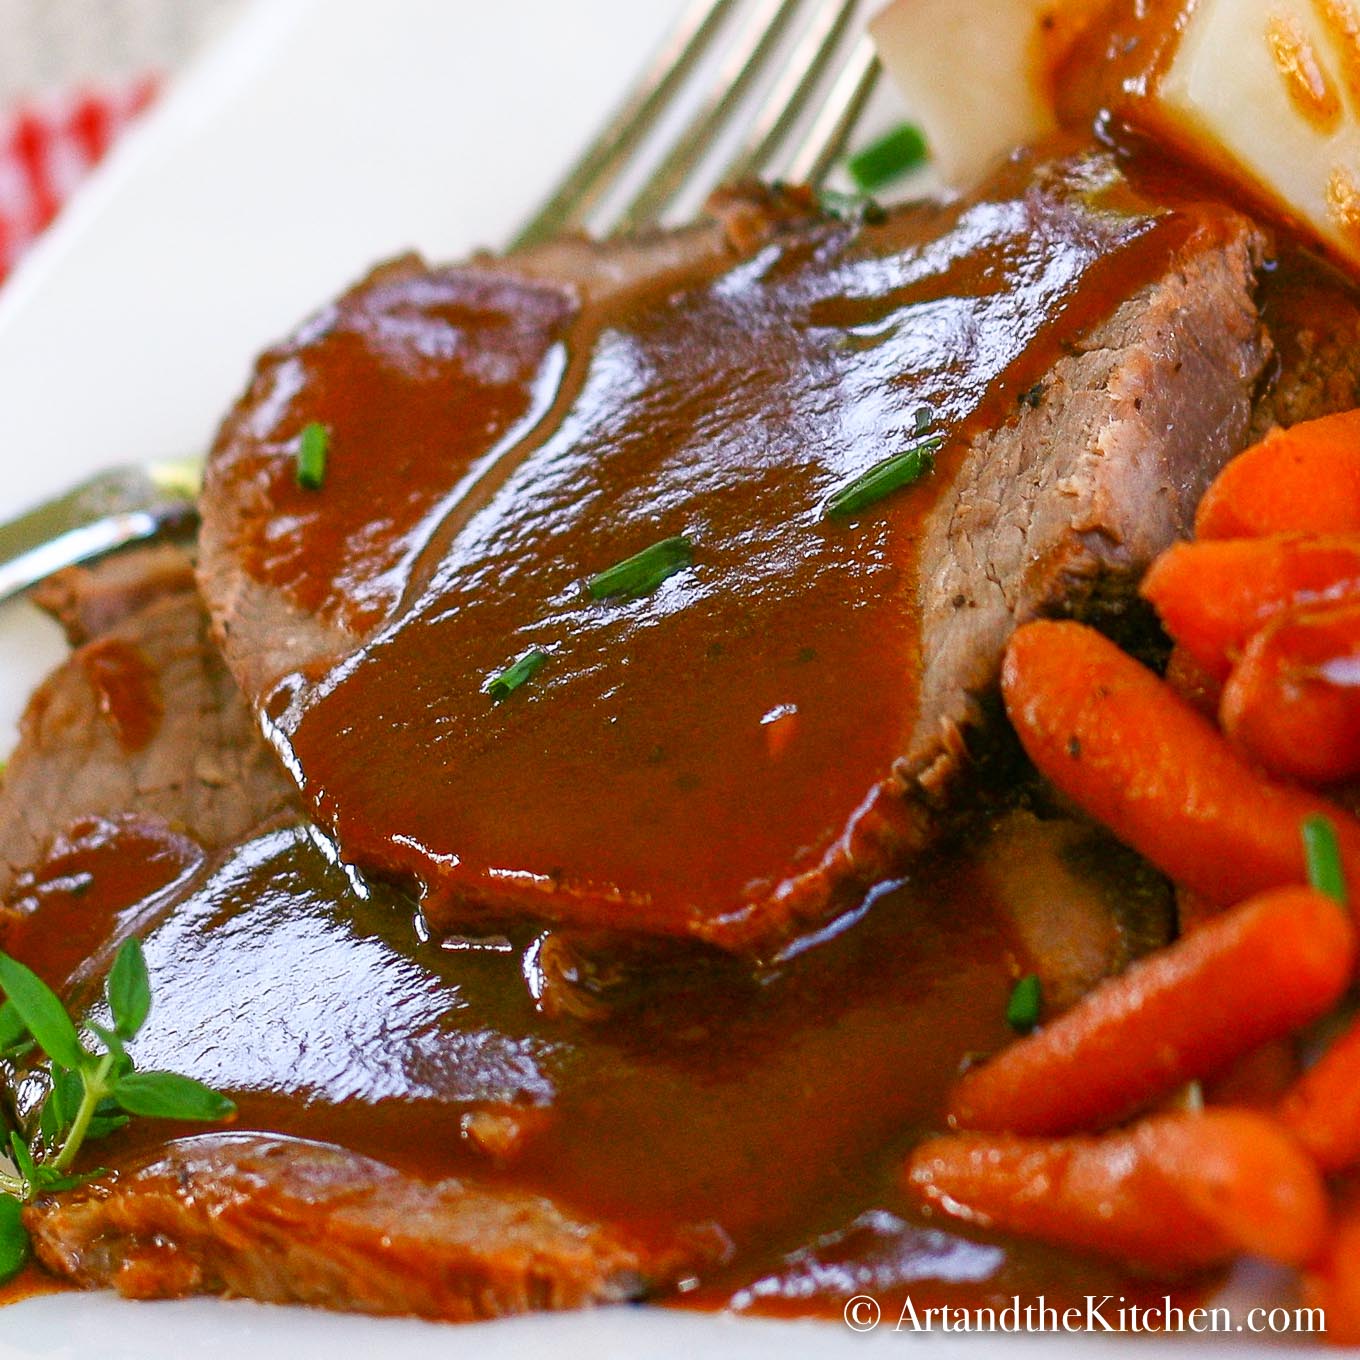
Hot Roast Beef Sandwich
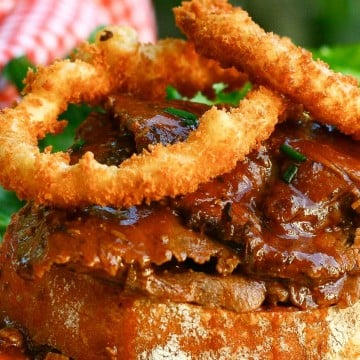
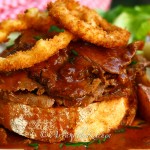
Amazing Hot Roast Beef Sandwich, made with tender roast beef from my leftover roast, topped with homemade onion rings, slathered in a rich gravy.
 This recipe starts with leftovers from my Slow Cooker Roast Beef . My recipe makes the perfect roast beef with an amazing tasting au jus, so I usually make a big roast just to have leftovers for Hot Roast Beef Sandwiches. You can use any leftover roast beef and even packaged au jus or beef gravy mix, but it won't taste as good.
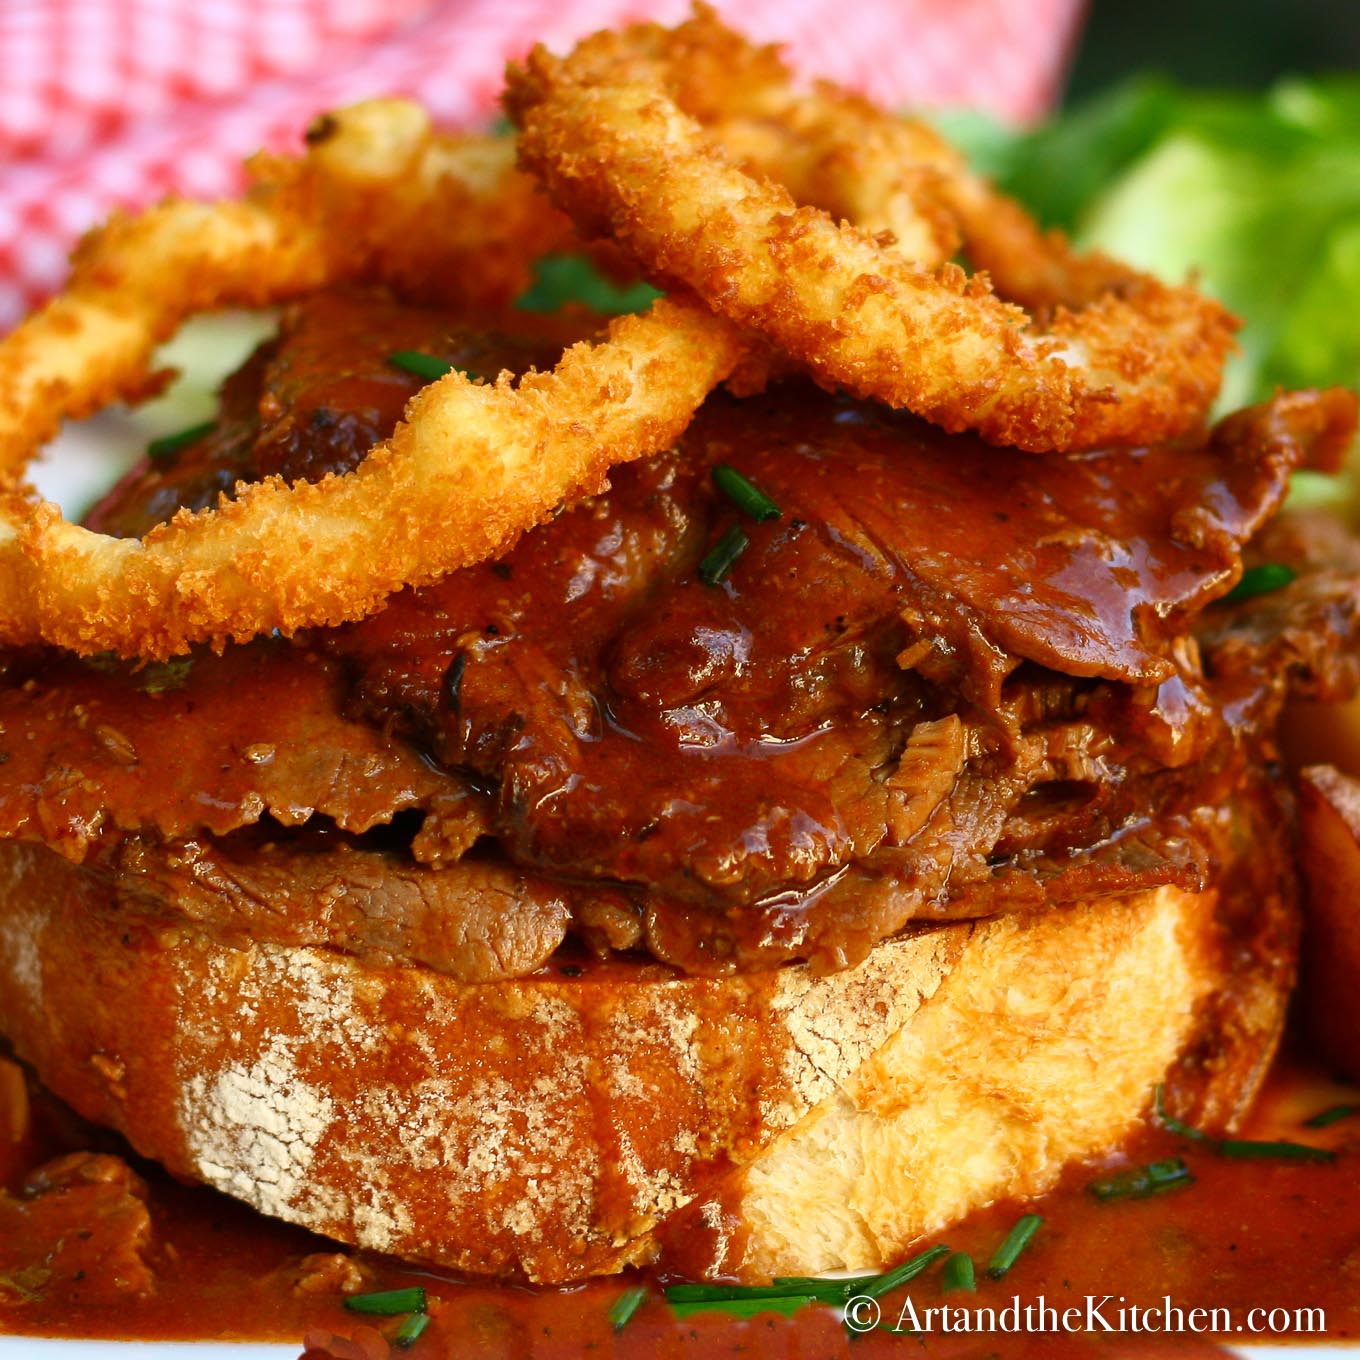
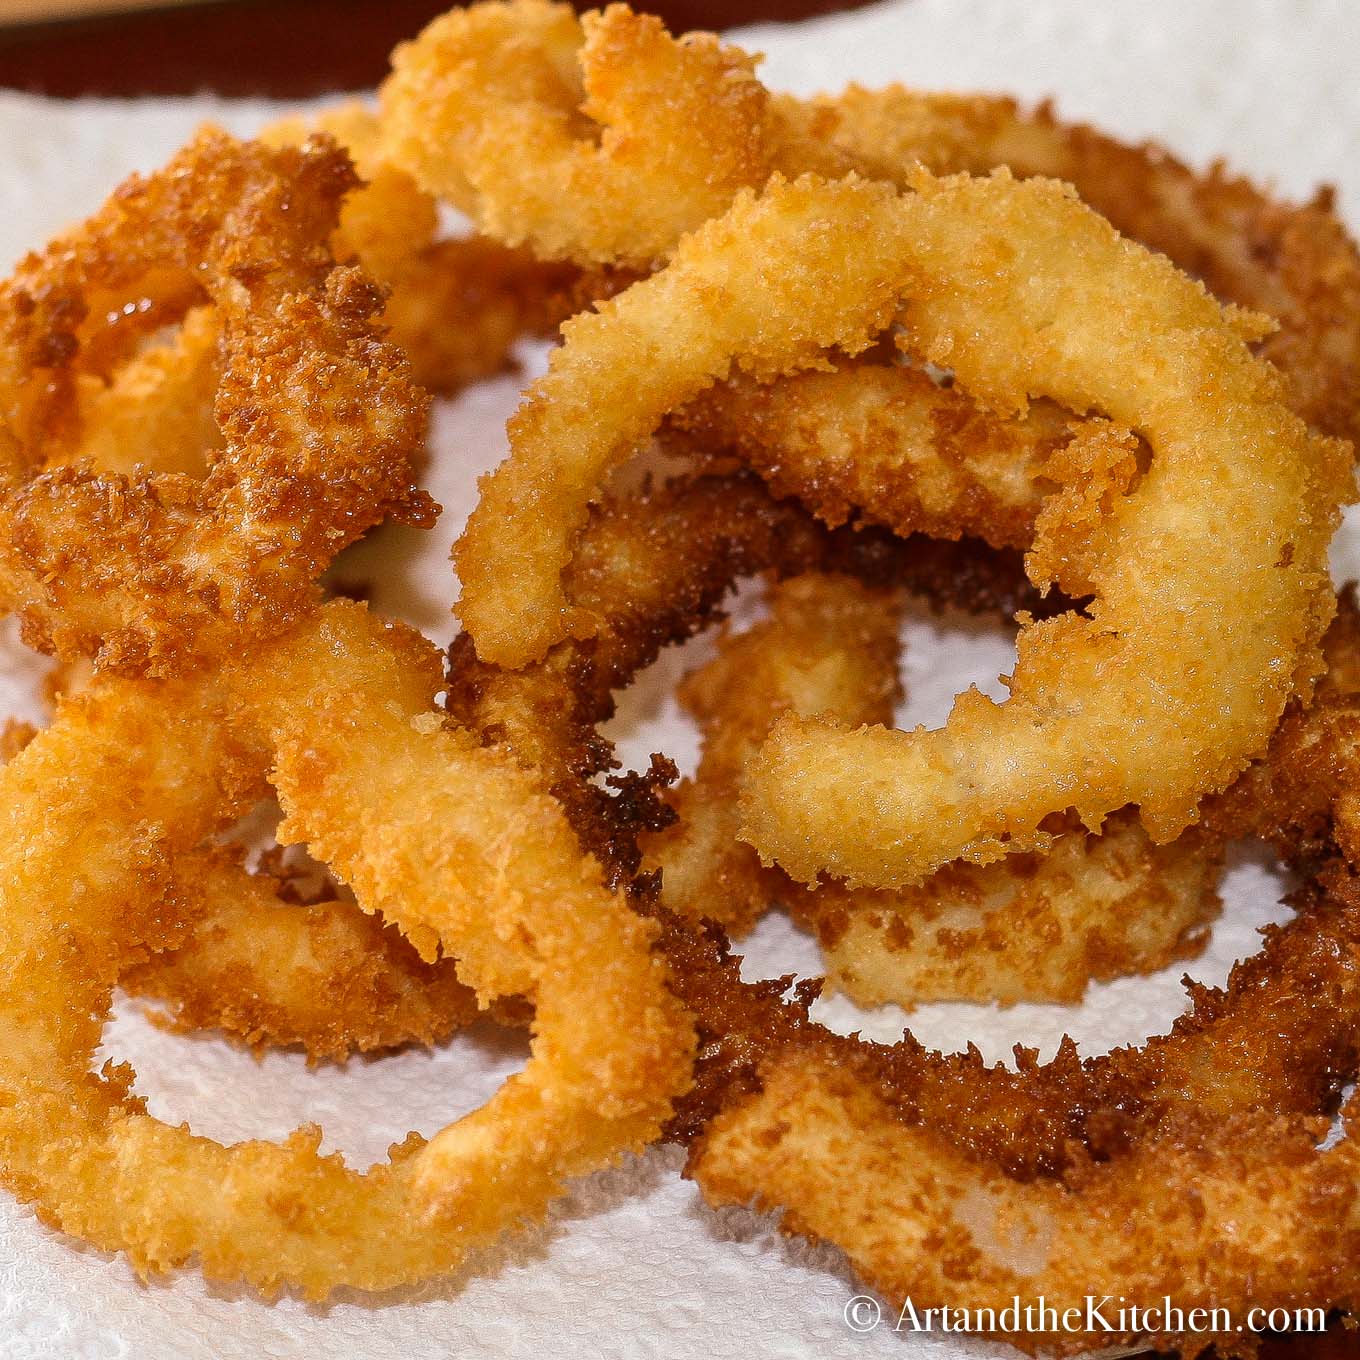
This hearty sandwich comes together with fresh french bread and homemade onion rings. The onion rings are so light and crispy and make the perfect topping for a hot roast beef sandwich.
Hot Roast Beef Sandwich
Hearty hot roast beef sandwich made with homemade onion rings and a savoury gravy.
Servings: 4
Ingredients
- For Onion Rings:
- 1 large onion cut into thin slices
- 1 ¼ cups all-purpose flour
- 1 teaspoon baking powder
- 1 teaspoon salt
- 1 egg
- 1 cup milk or as needed
- ¾ cup panko bread crumbs
- 2 cups canola oil for frying or as needed
- Sandwiches:
- Leftover roast beef from my Slow Cooker Roast Beef recipe
- left-over au jus from slow cooker roast or any packaged au jus or beef gravy you like
- French bread cut into ¾ inch slices
- *gravy thickener if needed
Instructions
- Slice beef into thin pieces, using my electric knife works awesome for this job.
- Place roast beef slices into roasting pot, pour in left-over au jus or prepared gravy, mix together and warm up in oven for 30 mins. at 300 degrees.
- If your au jus is too thin, thicken with a bit of gravy thickener, before adding beef.
- Turn temperature to low and keep warm until ready to use.
- Prepare onion rings while the beef warms up.
- Heat the oil in a deep pot (you can also use a deep fryer)
- Separate the onion slices into rings, and set aside.
- In a small bowl, stir together the flour, baking powder and salt.
- Dip the onion slices into the flour mixture to coat; set aside.
- Whisk the egg and milk into the flour mixture using a fork.
- Dip the floured rings into the batter to coat.Then dip into the bread crumbs
- Fry in oil until golden brown 2-3 minutes
- Remove to paper towels to drain.
- Assemble by cutting thick slice of French bread, top with slices of roast beef, cover with gravy and top with onion rings.
Notes
recipe for Roast Beef
This is the recipe for the roast beef I used in this recipe Slow Cooker Roast Beef.
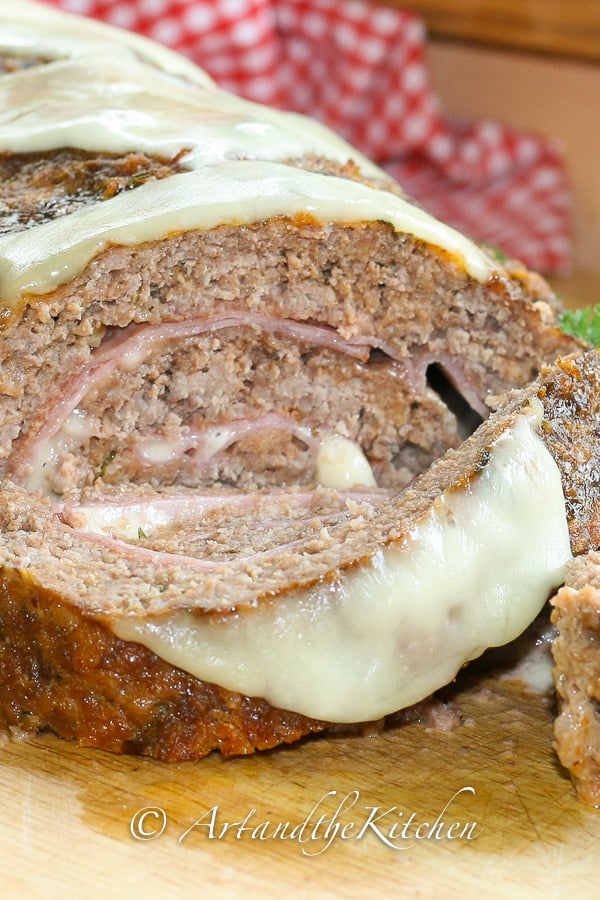
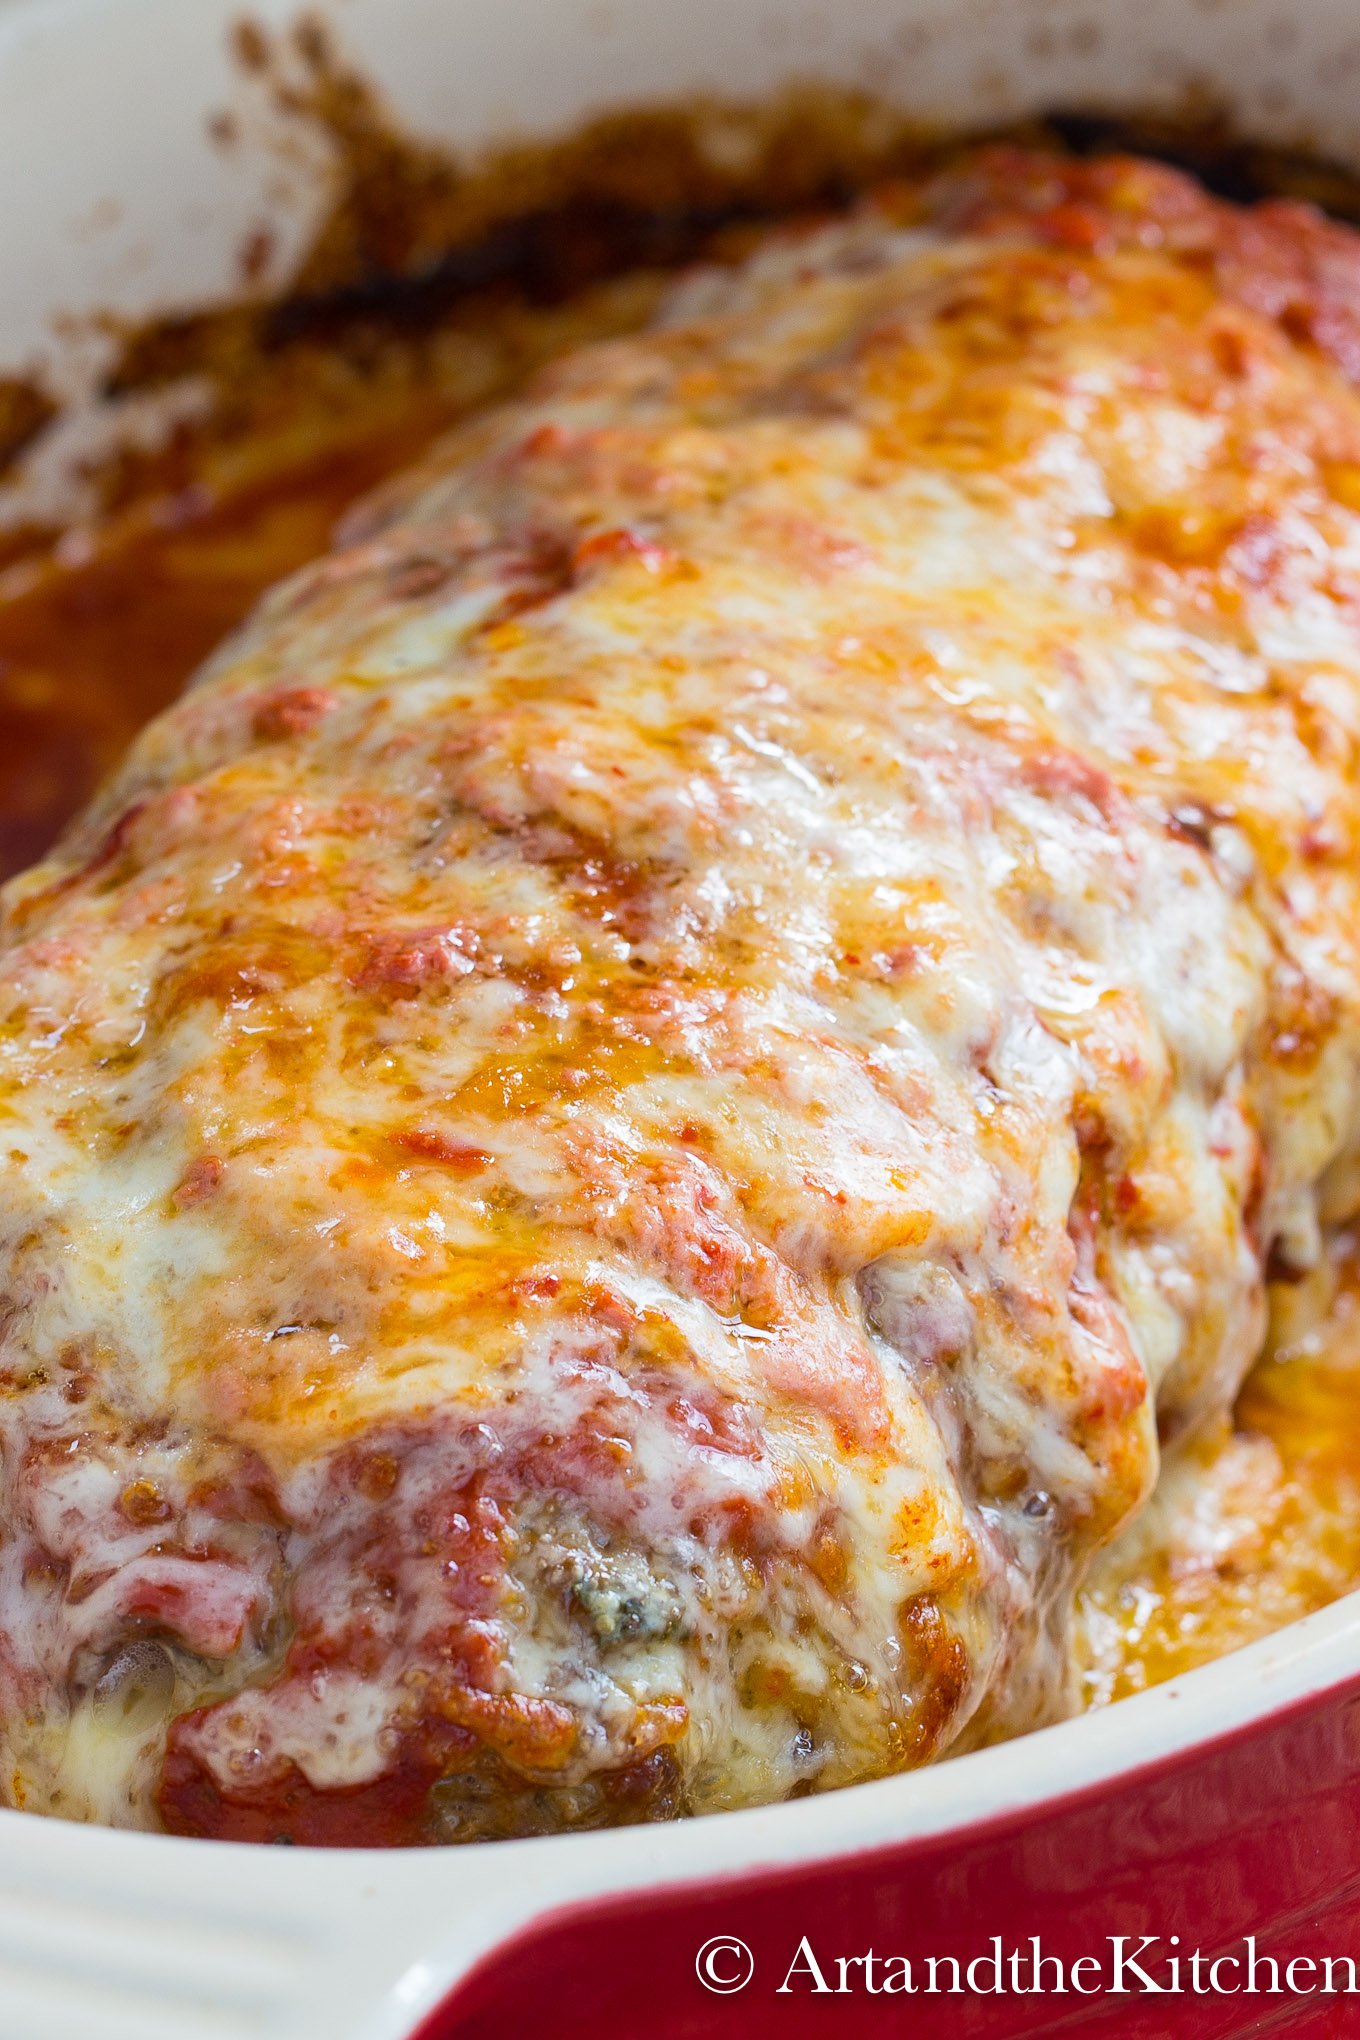
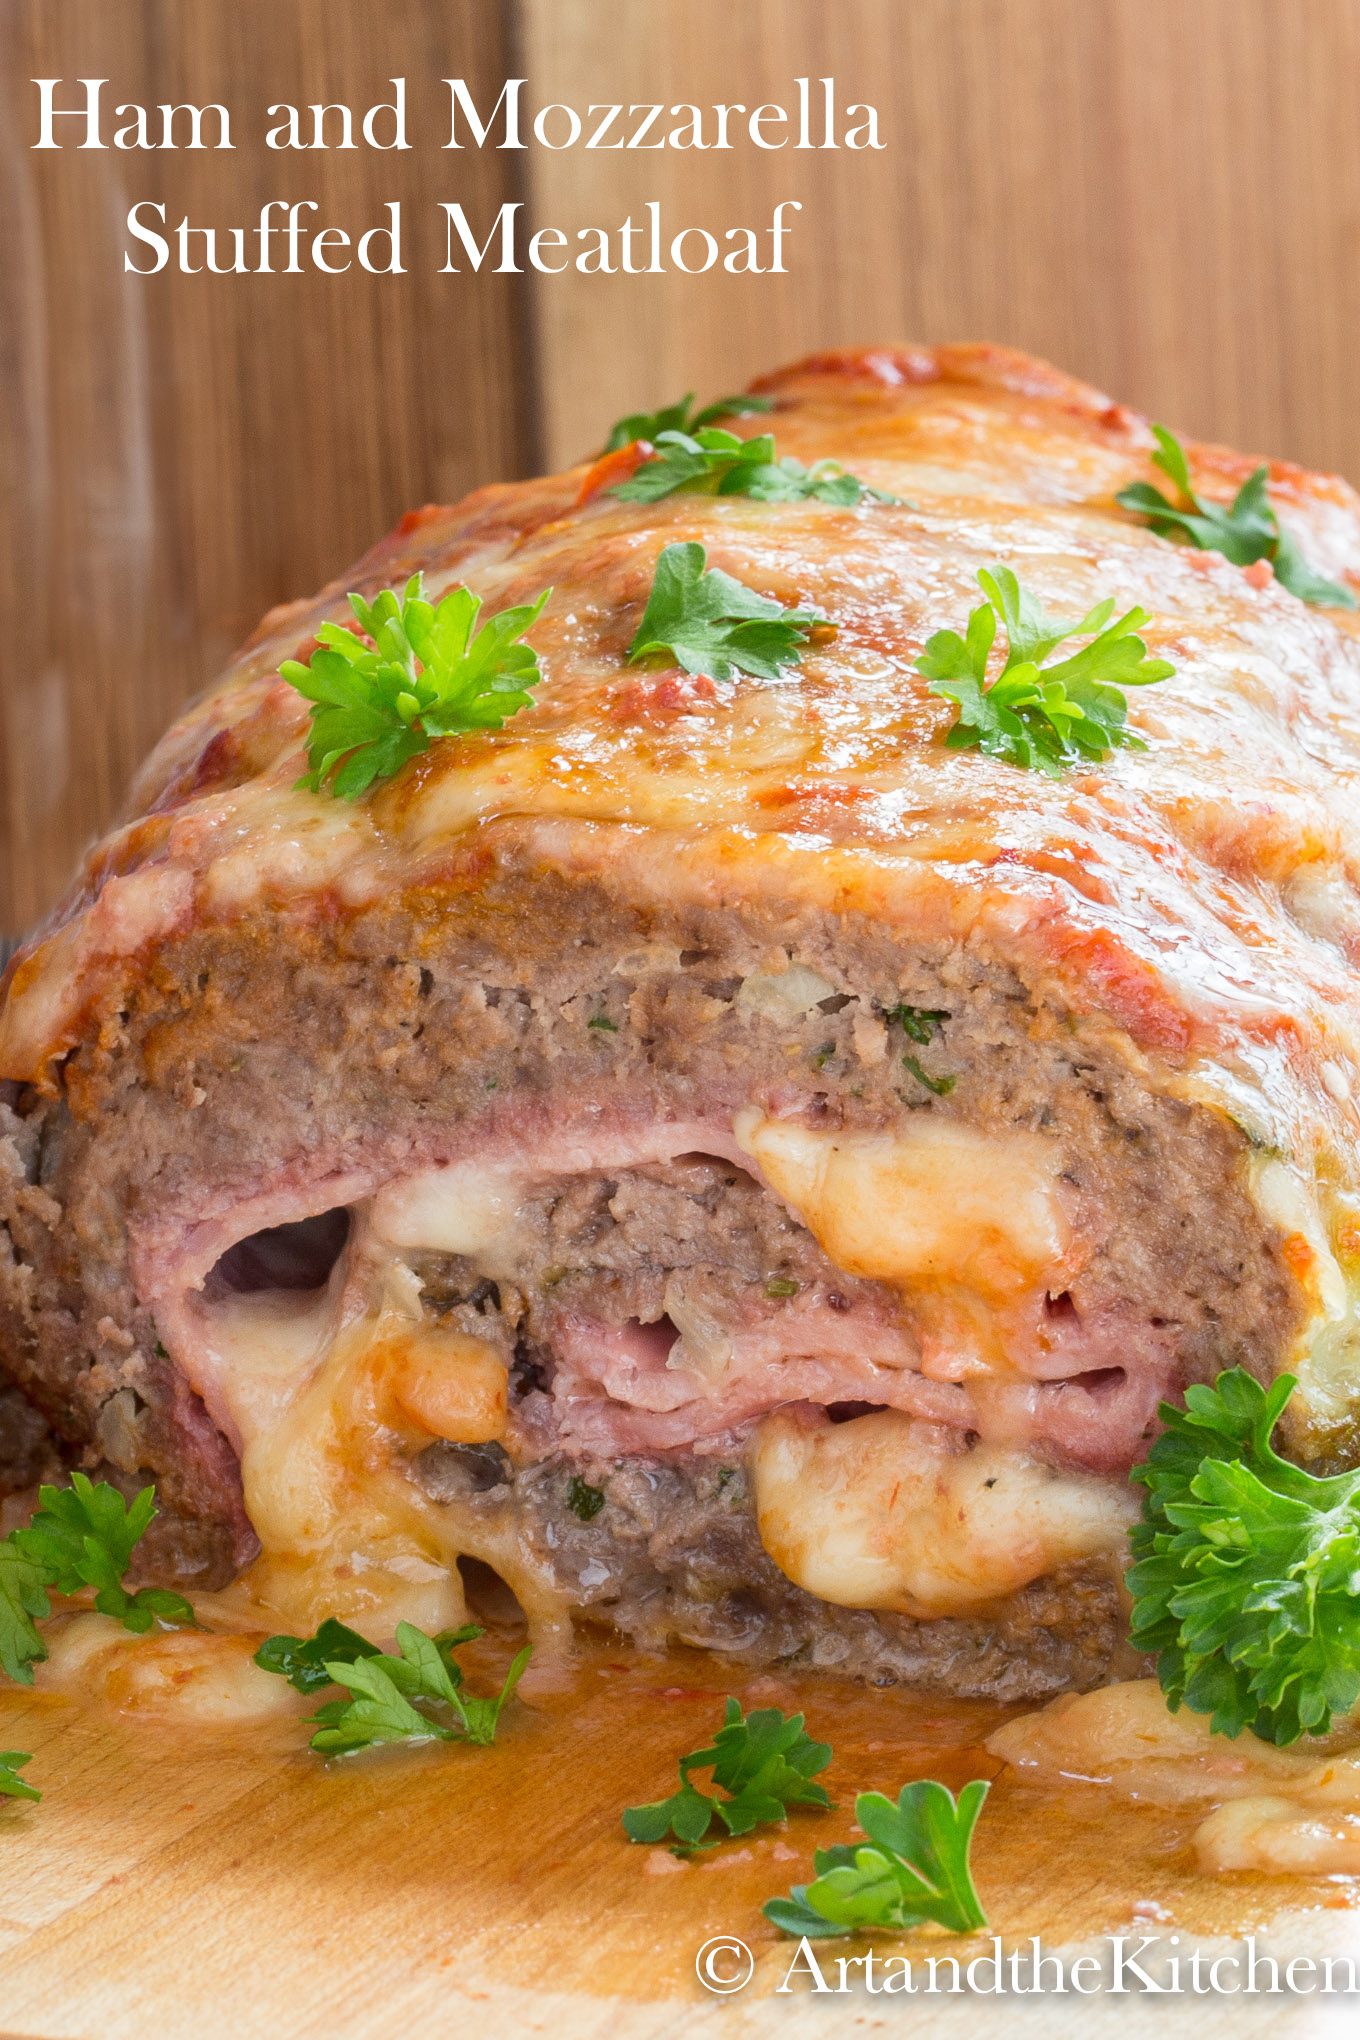
Ham Mozzarella Stuffed Meatloaf
Ham Mozzarella Stuffed Meatloaf is pure comfort food. This best ever meatloaf recipe is loaded with flavor and simple to make.
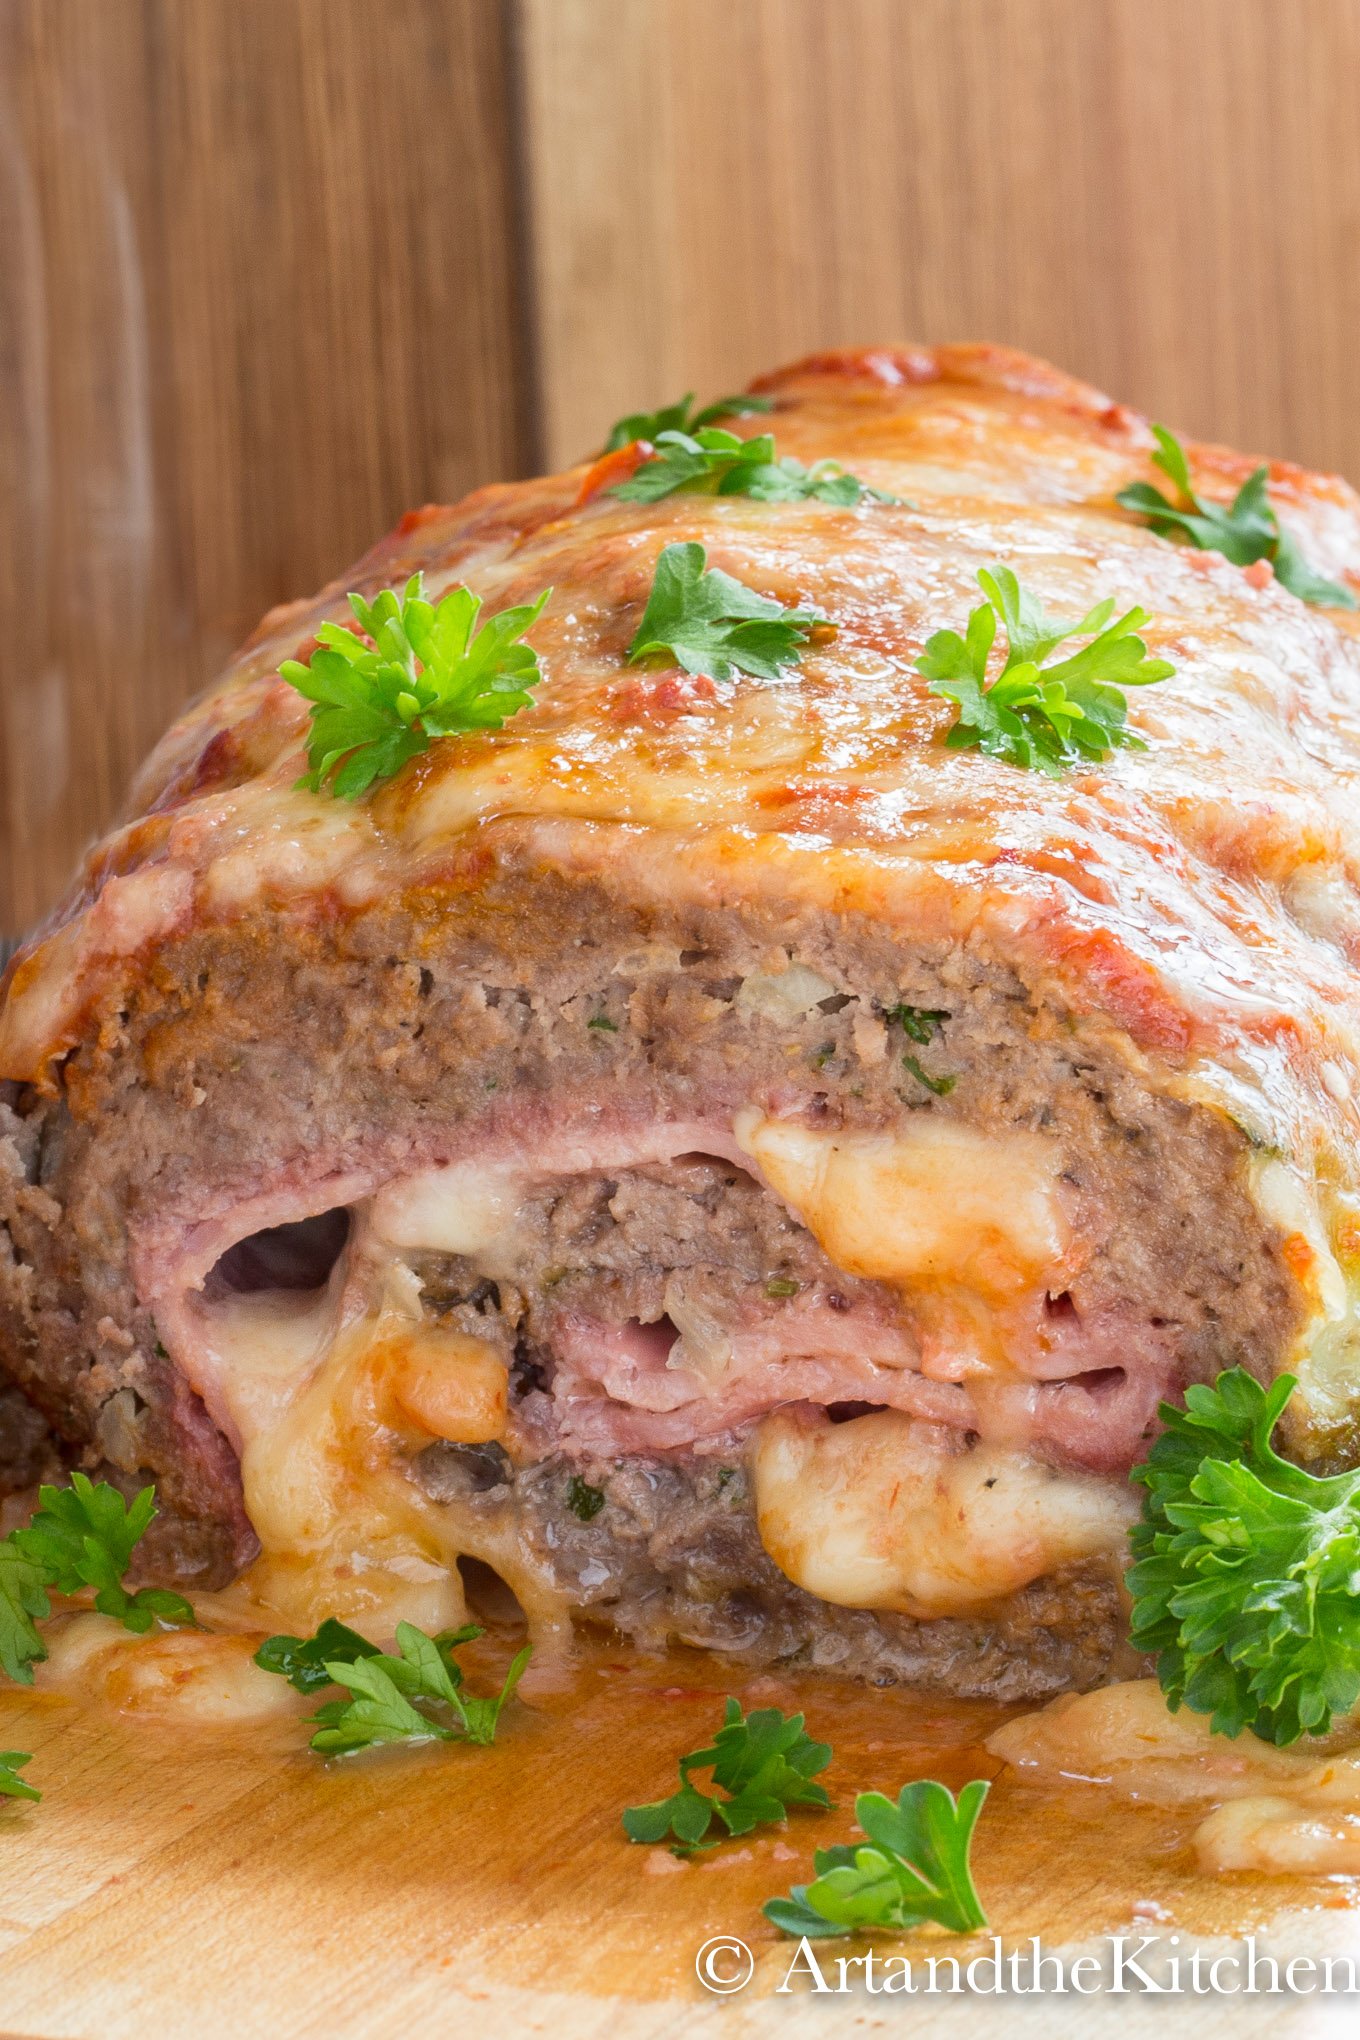
Certainly the layer of ham and mozzarella cheese takes this meatloaf recipe to a whole new level of deliciousness! Ground beef is mixed with bread crumbs and an assortment of spices, then rolled in a layer of ham and cheese. Topping off the meatloaf is rich tomato sauce and melted cheese. I like to serve Ham Mozzarella Stuffed Meatloaf with plain rice or my favorite recipe for Perfect Roasted Garlic Mashed Potatoes.
Tips for Making the Perfect Ham and Mozzarella Meatloaf:
- Use lean ground beef, but not extra lean. The little bit of fat will help avoid a dry meatloaf and add flavor.
- Do not over mix. Mix just until ingredients are combined. Over mixing will make a dense meatloaf. Using your hands to mix works best!
- Be sure to soak the bread crumbs in the milk. Saltine crackers also work well.
- Do not over cook. The best way to ensure this is to use a meat thermometer. Insert into the centre of meatloaf. Done when internal temperature is 160ºF. About 1 hour for a 1 ½ lb meatloaf.
- Once baked let meatloaf rest for 5-10 minutes at room temperature before slicing. This locks in the juices. Tenting with foil will keep it warm.
Enjoy this recipe and be sure to try another favorite ground beef recipe Swedish Meatballs.

Ham Mozzarella Stuffed Meatloaf
Amazing tasting meatloaf recipe
Servings: 6
Calories: 311kcal
Ingredients
- 1 ½ pounds lean ground beef
- ⅓ cup bread crumbs
- ⅓ cup milk
- 1 egg
- 2 tablespoons fresh parsley chopped
- ½ teaspoon dried oregano
- ¼ teaspoon garlic powder
- ¼ teaspoon onion powder
- ¼ teaspoon red pepper flakes
- ½ teaspoon kosher salt
- ½ teaspoon ground pepper
- 4-6 slices ham
- 4-6 slices mozzarella cheese
- 1 cup tomato sauce
Instructions
- In small bowl combine together bread crumbs, milk and egg. Set aside while you prepare the ground beef.
- In large bowl add ground beef, parsley, oregano, garlic powder, onion powder, red pepper flakes, salt and pepper. Mix gently until just combined.
- Add breadcrumb mixture and mix until just combined.
- On waxed paper, pat meat into approximately 8 by 10 rectangle.
- Top with slices of ham, then slices of mozzarella cheese.
- Carefully roll up meat. Seal edges and ends.
- Place meatloaf into baking pan, seam side down.
- Top with tomato sauce.
- Preheat oven to 350º F
- Bake 350º F for approximately 45-60 minutes. Internal temperature of 160º F
- Set oven to broil. Remove meatloaf from oven and top with extra cheese slices. Return to oven and bake just until cheese is melted.
- Remove from oven (cover with foil, tented so foil doesn't touch meat). Allow meatloaf to rest for 5-10 minutes before slicing.
Nutrition
Calories: 311kcal | Carbohydrates: 8g | Protein: 35g | Fat: 14g | Saturated Fat: 6g | Cholesterol: 125mg | Sodium: 885mg | Potassium: 642mg | Sugar: 3g | Vitamin A: 500IU | Vitamin C: 4.5mg | Calcium: 143mg | Iron: 3.9mg
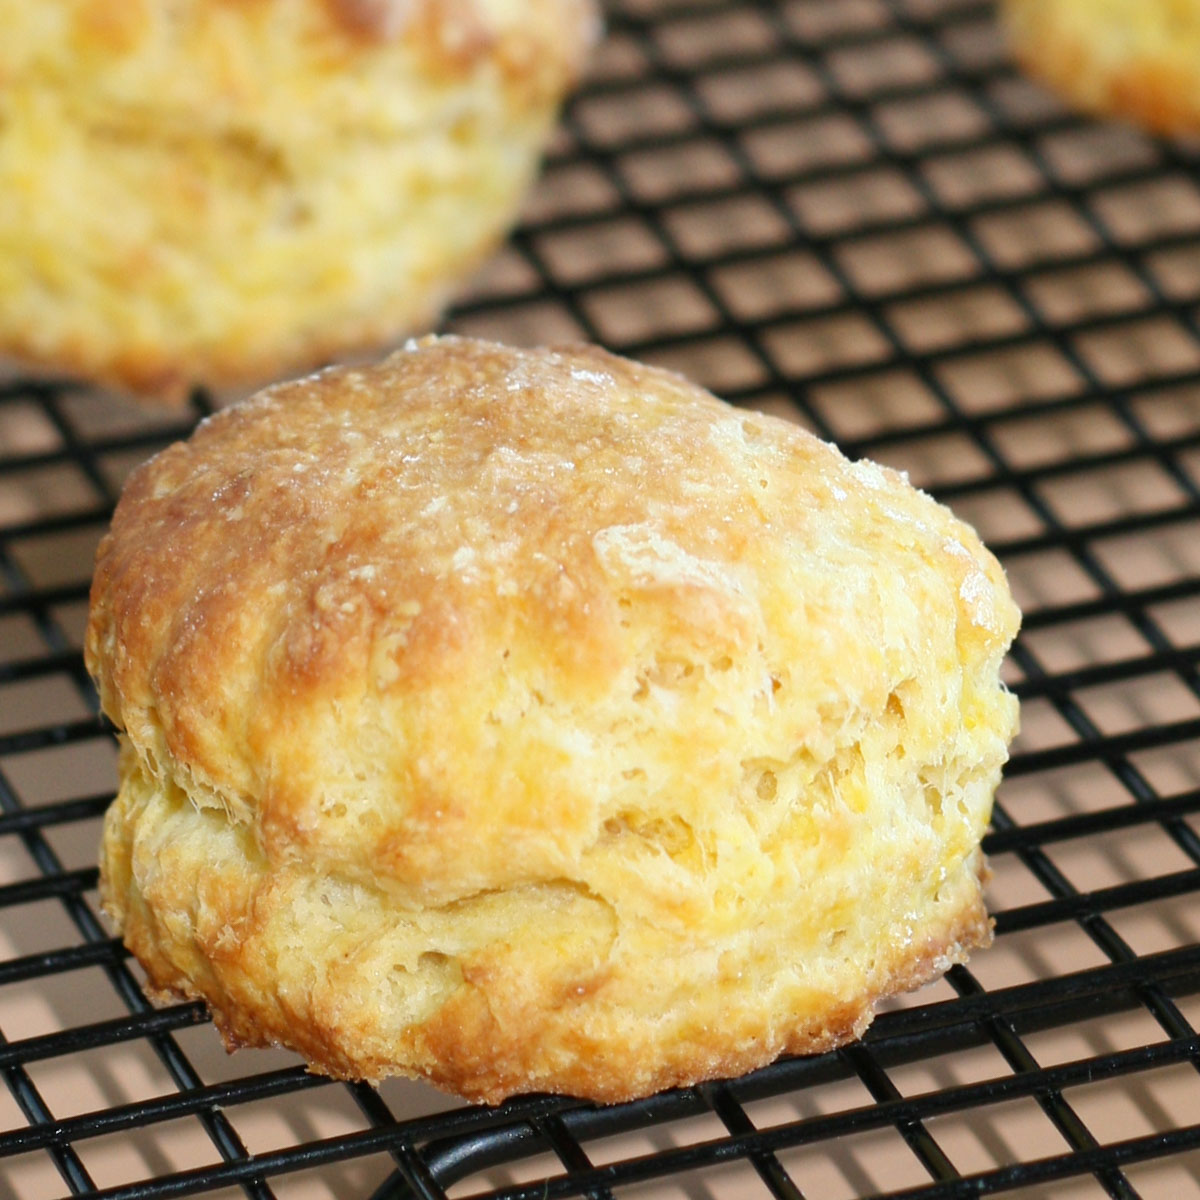
Butternut Squash Scones
These Butternut Squash Scones are crisp on the outside and soft in the center. They make a tasty accompaniment for soups and stews.
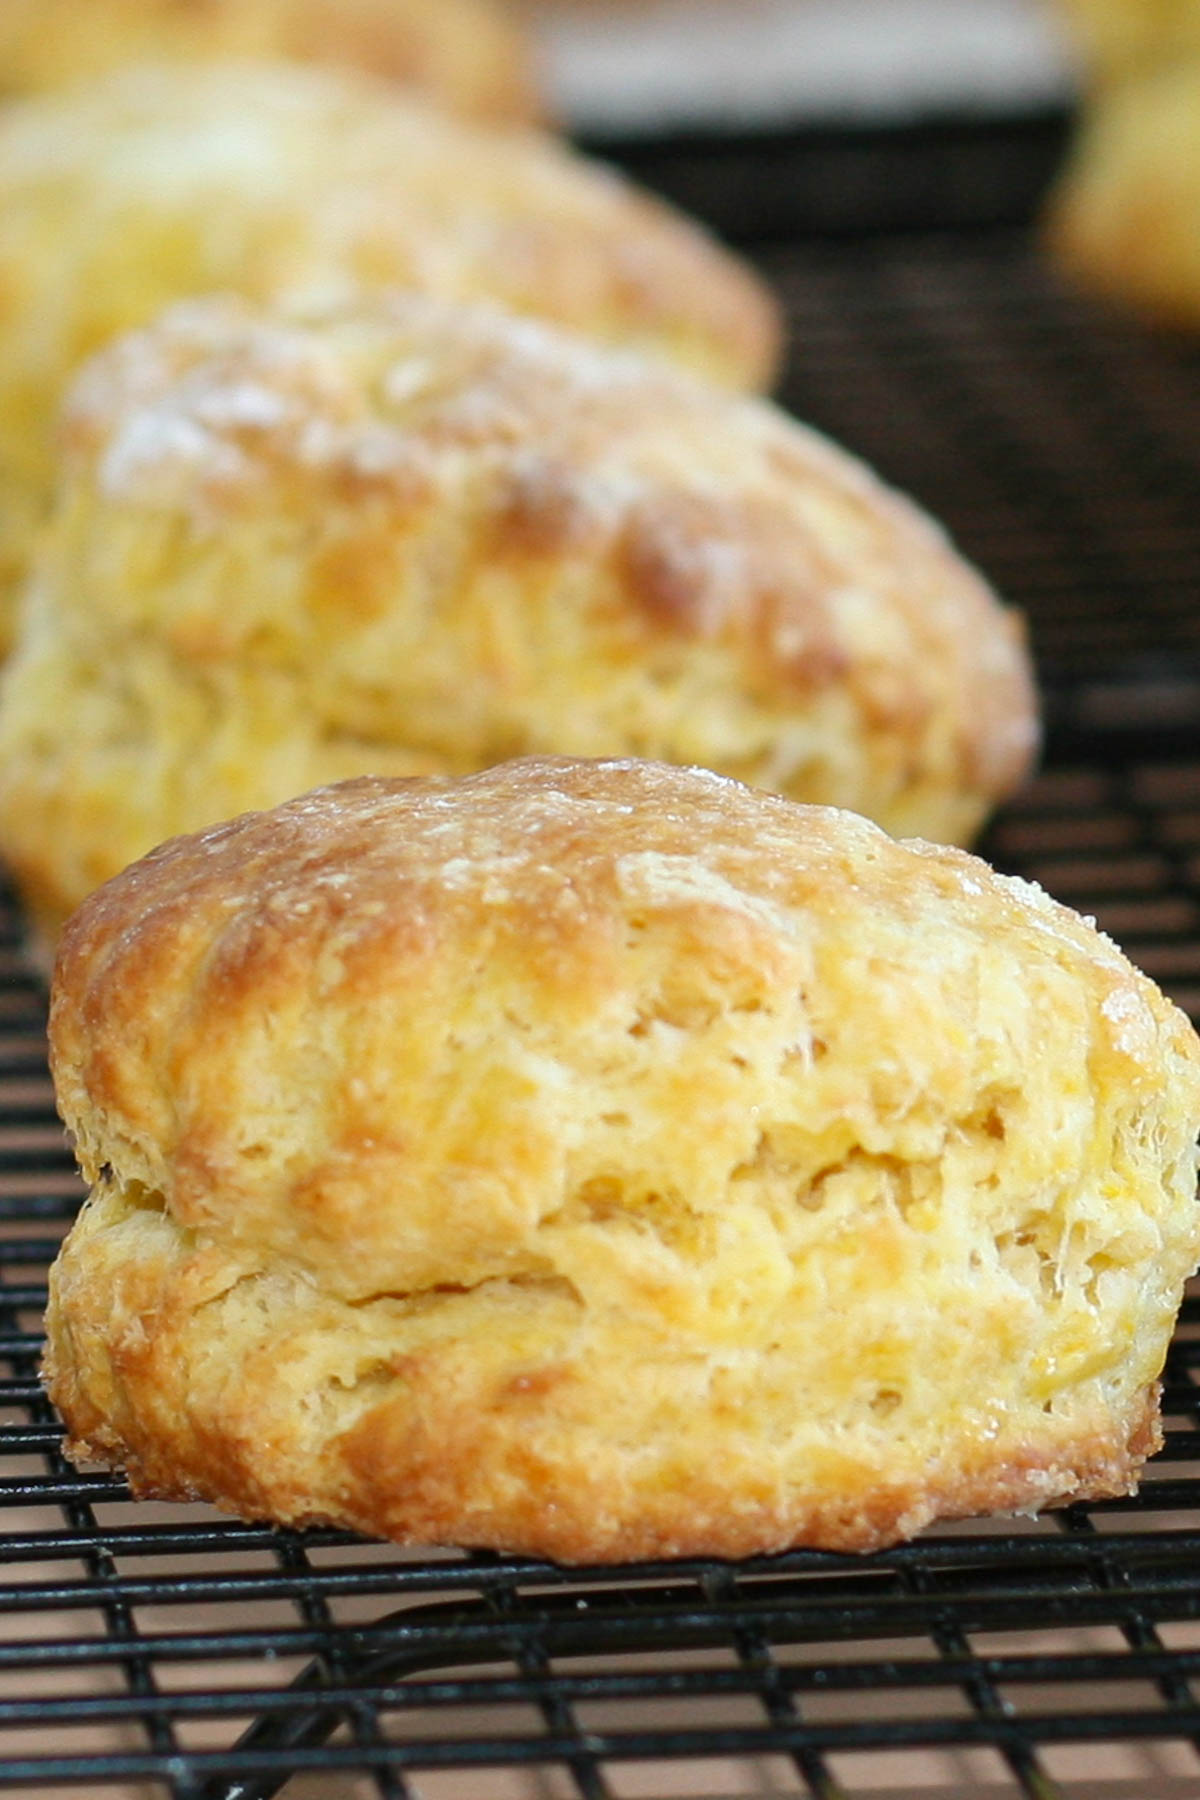
I made a batch of these to serve with my Vanilla Butternut Squash Bisque. This fantastic lunch combo is also is hearty enough for a dinner meal. Scones are a wonderful addition to afternoon tea or coffee. Serve with butter, jelly, cream cheese or clotted cream.
Butternut Squash Puree: The star ingredient of this recipe is the butternut squash puree. It adds moisture and a subtle sweetness to the dough. You can make your own puree by roasting or steaming butternut squash until tender and then blending it until smooth.
How to make butternut squash puree
- Cut a squash in half, and remove seeds. Rub with olive oil.
- Bake at 400° for 25-30 minutes. Cool completely.
- Scoop flesh from shell, discarding shell.
- Using a blender purée the squash until smooth.
- Transfer the purée to strainer. Set strainer over a bowl, and refrigerate until ready to use.
- Discard any strained juices.
More wonderful scone recipes to try:
Butternut Squash Scones
These Butternut Squash Scones are crisp on the outside and soft in the center.
Servings: 12
Calories: 188kcal
Ingredients
- 2 ¾ cups all purpose flour
- ¼ cup light brown sugar firmly packed
- 2 teaspoons baking powder
- 1 teaspoon salt
- ¼ teaspoon baking soda
- ⅓ cup cold unsalted butter diced
- 1 large egg lightly beaten
- ¾ cup butternut squash purée cooked
- ⅔ cup buttermilk
Instructions
- Preheat oven to 400° F
- Line a baking sheet with parchment paper.
- In a large bowl, combine flour, brown sugar, baking powder, salt, and baking soda, stirring well. Using a pastry blender, cut butter into flour mixture until mixture resembles coarse meal.
- In a small bowl, add egg, squash puree, and buttermilk.
- Add squash mixture to flour mixture, stirring just until dry ingredients are moistened.
- Turn mixture out onto a lightly floured surface. Knead dough for 10 turns. Roll dough to 1-inch thickness.
- Using an approximately 3-inch cutter, cut as many scones as possible.
- Place scones 2 inches apart on prepared baking sheet.
- Bake until golden brown, 15 to 20 minutes. Cool for 5 minutes.
Notes
For squash purée, cut a squash in half, and remove seeds. Rub with olive oil. Bake at 400° for 25-30 minutes. Cool completely. Scoop flesh from shell, discarding shell. Purée squash until smooth. Transfer purée to strainer. Set strainer over a bowl, and refrigerate until ready to use. Discard any strained juices.
Nutrition
Calories: 188kcal | Carbohydrates: 29g | Protein: 4g | Fat: 6g | Saturated Fat: 4g | Cholesterol: 33mg | Sodium: 289mg | Potassium: 187mg | Fiber: 1g | Sugar: 5g | Vitamin A: 1445IU | Vitamin C: 2mg | Calcium: 69mg | Iron: 2mg
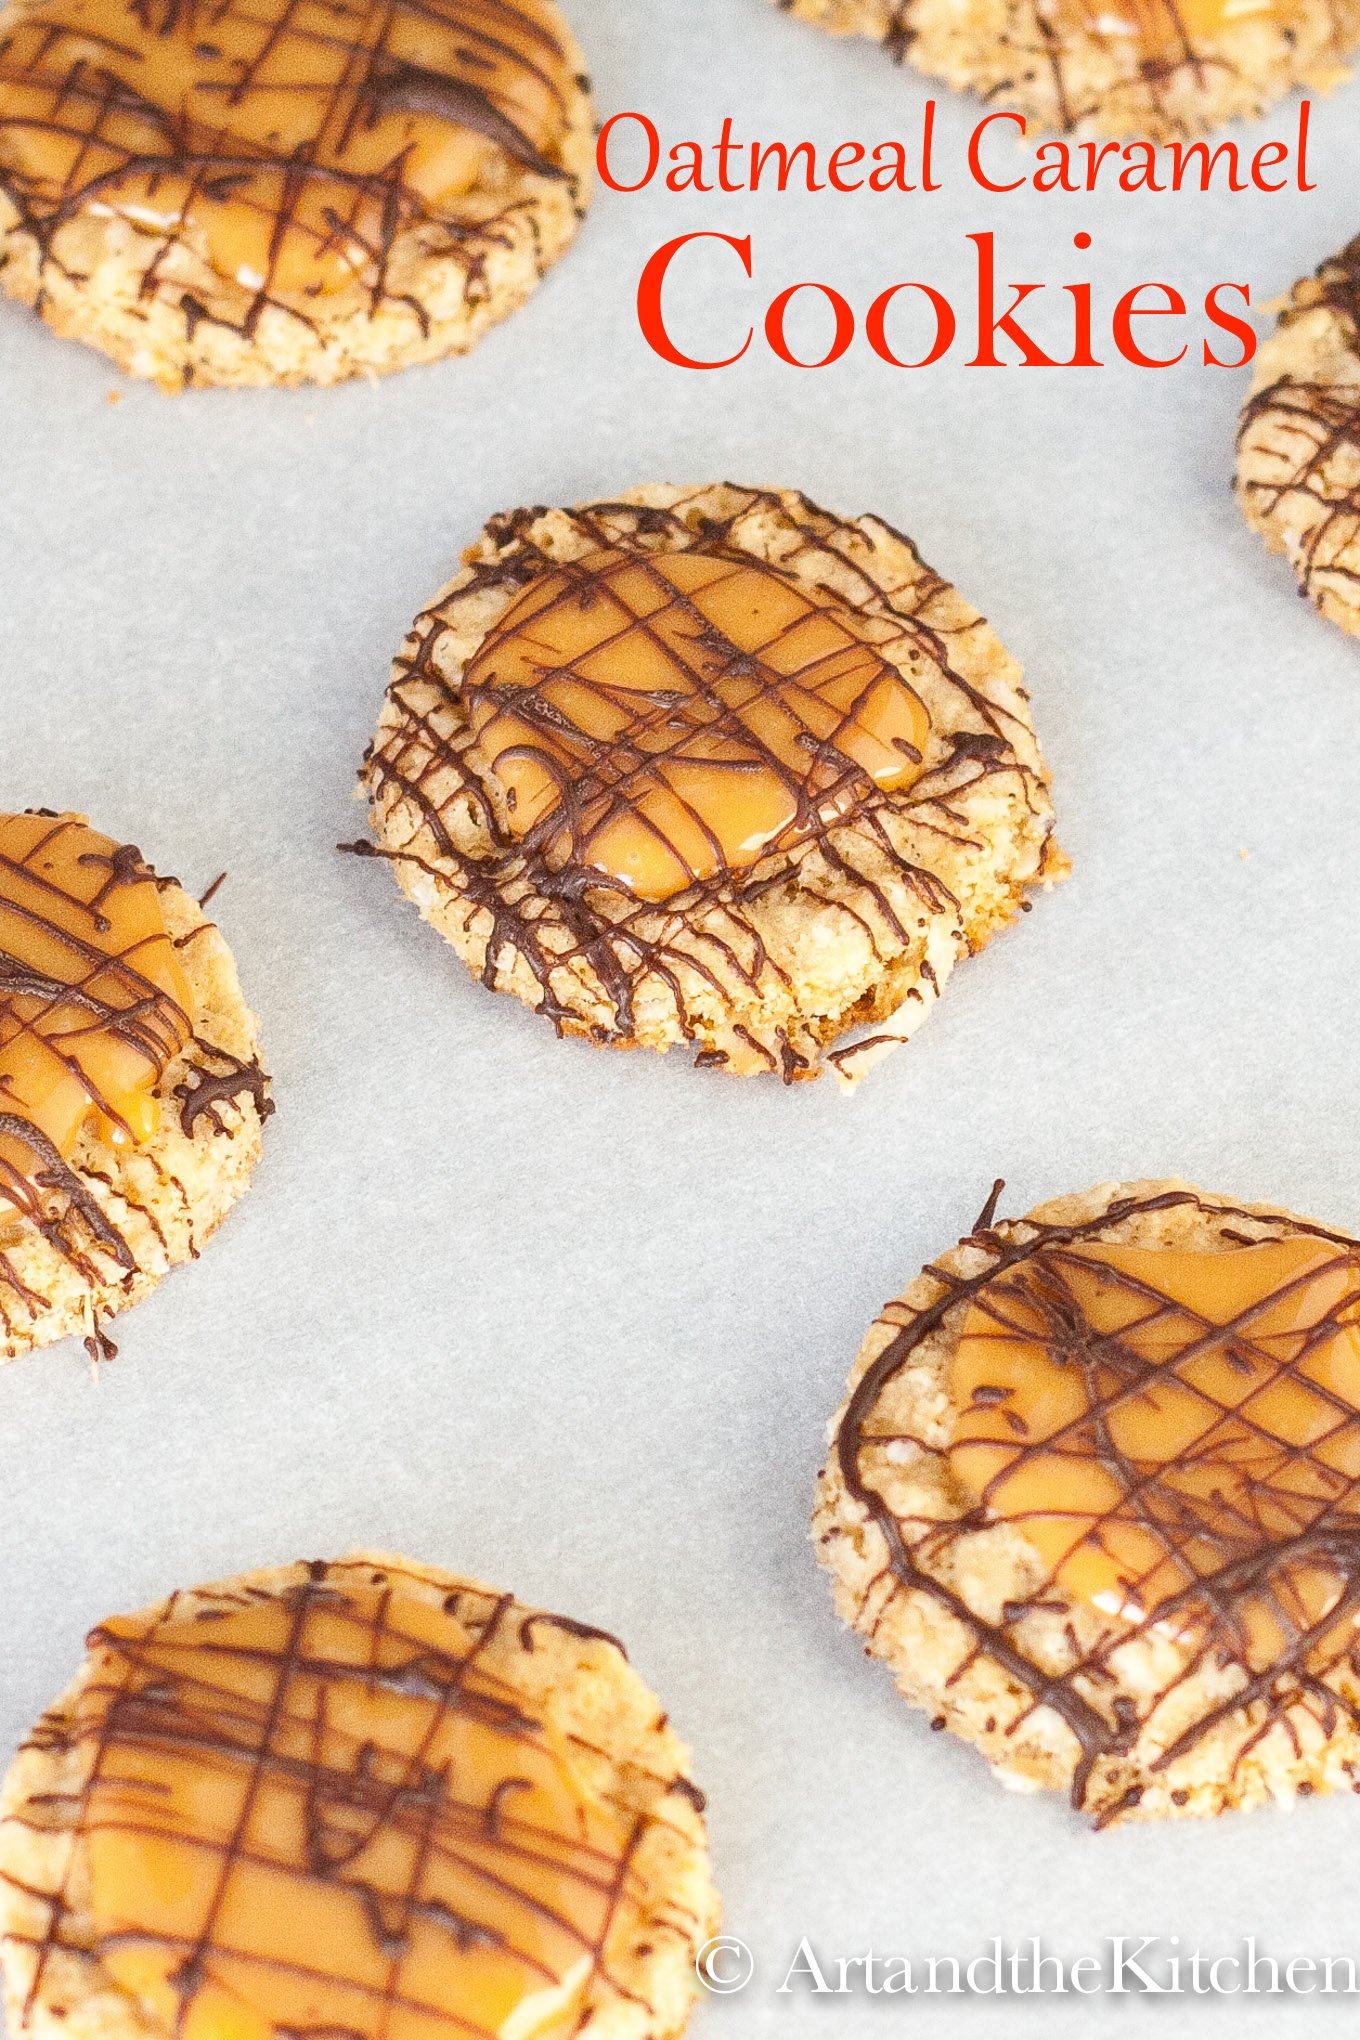
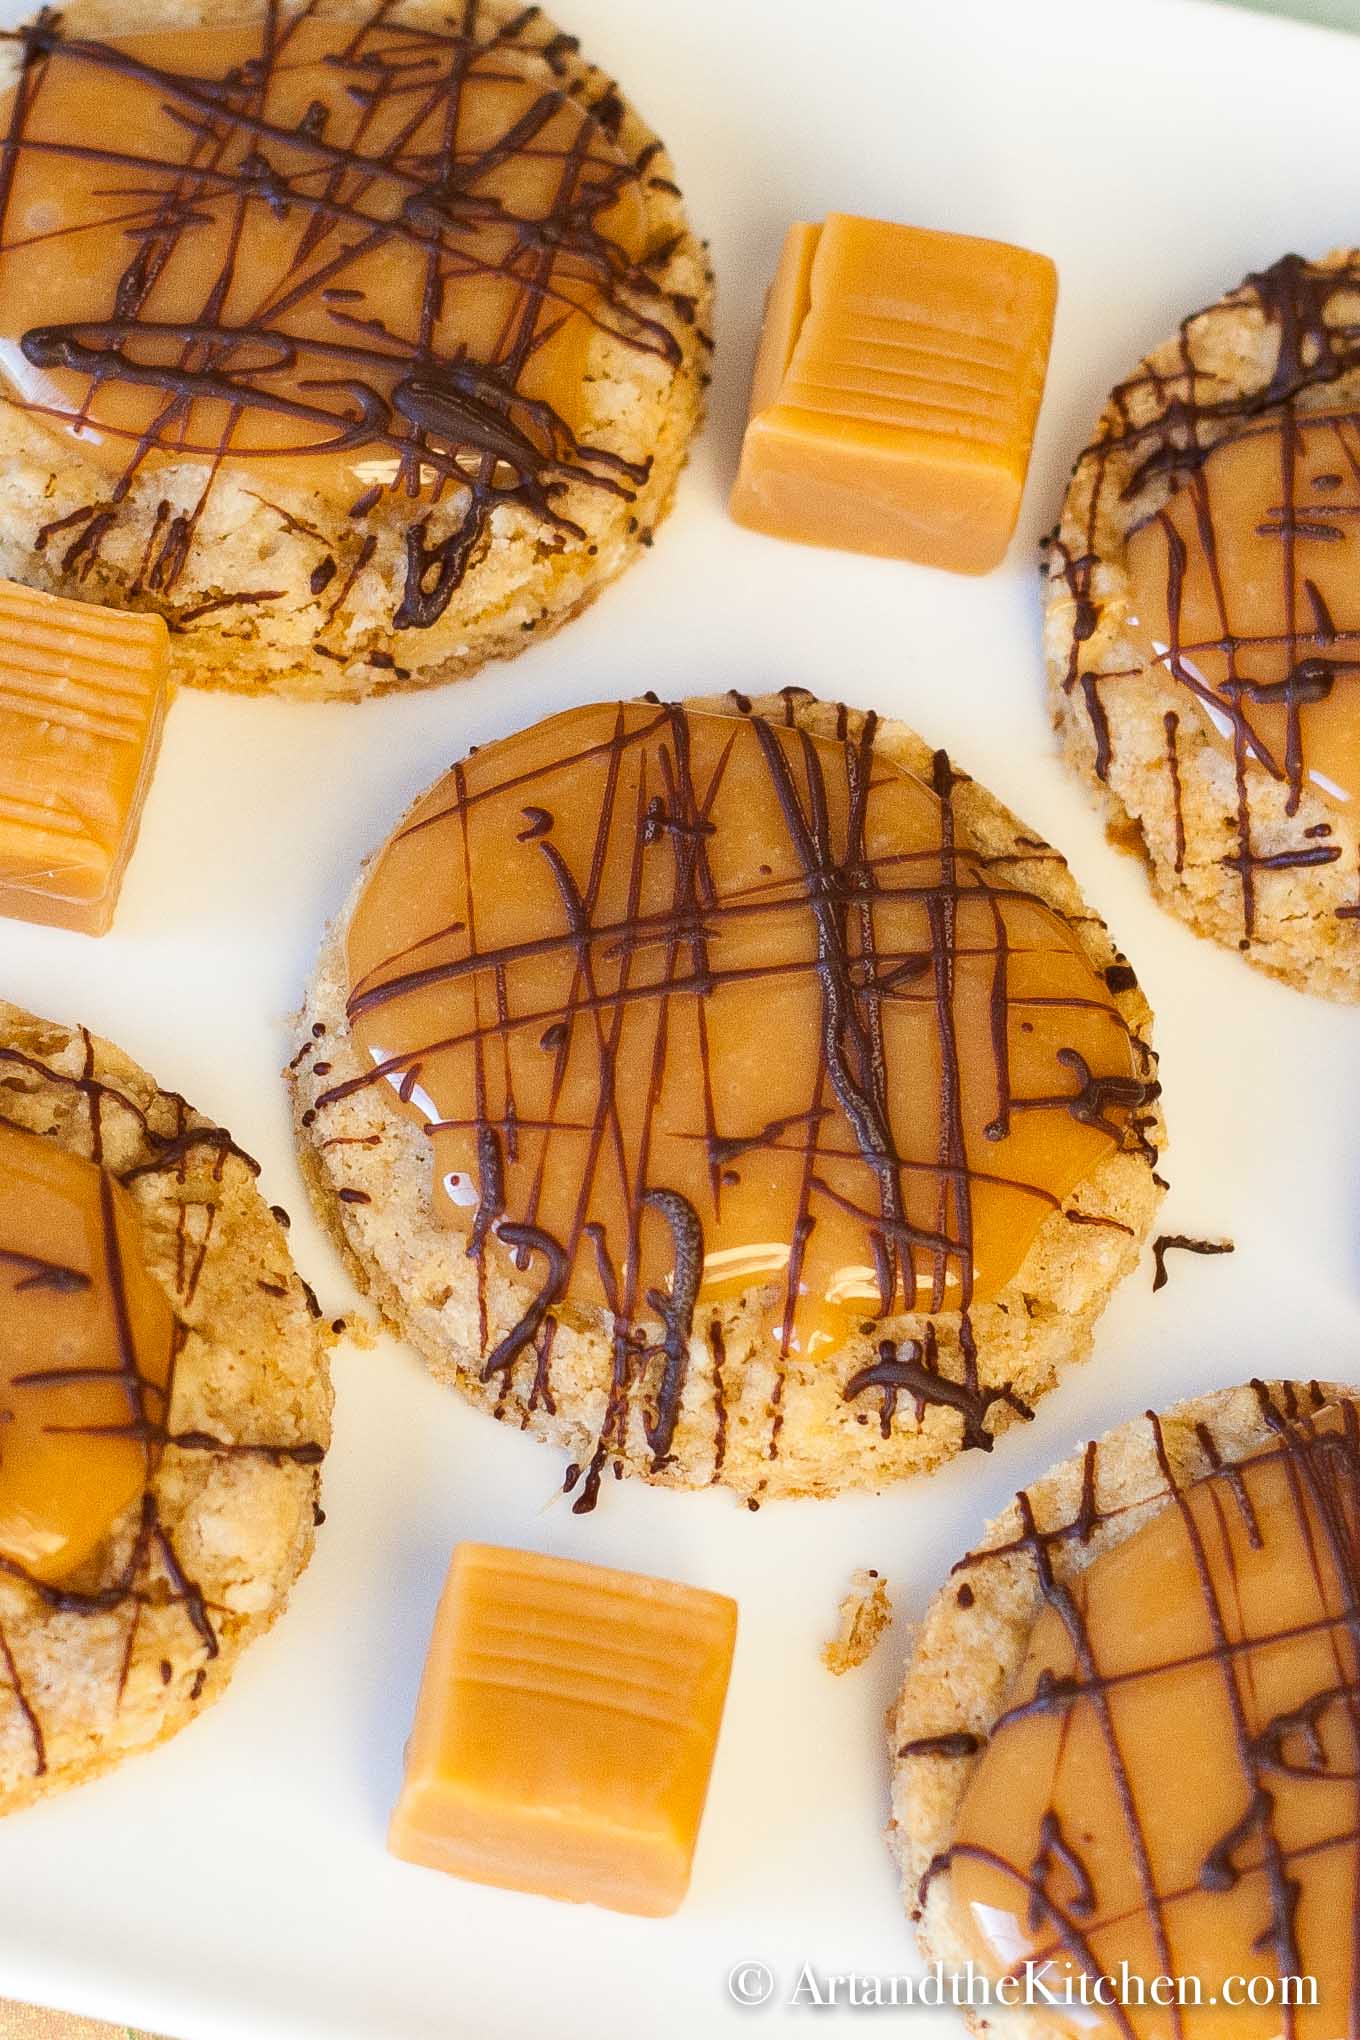
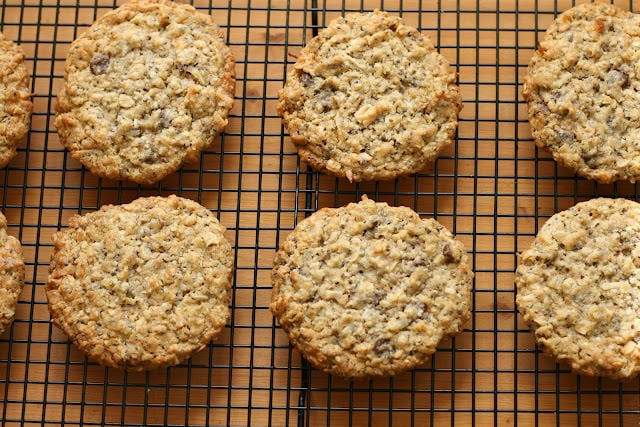
Oatmeal Caramel Cookies
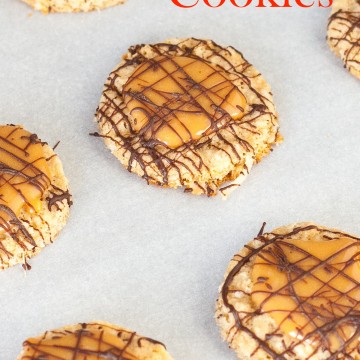
Amazing tasting Oatmeal Caramel Cookies start with an exceptional oatmeal cookie that is topped with chewy caramel then drizzled with chocolate!
Oatmeal Caramel Cookies will fly off the plate. The oatmeal cookie is one of my favourite cookie recipes, but topping it with chewy caramel and chocolate take these cookies to a whole new level! There is nothing better than a batch of homemade oatmeal cookies or my other favorite Chocolate Chip cookies.

Oatmeal Caramel Cookies
Homemade Oatmeal Caramel Cookies start with an exceptional oatmeal cookie that is topped with gooey caramel and drizzled with chocolate!
Servings: 24
Calories: 226kcal
Ingredients
- 1 ⅓ cup flour
- 1 ½ cup oatmeal
- ¾ cup coconut
- 1 teaspoon baking powder
- ½ teaspoon baking soda
- ½ teaspoon salt
- 1 cup butter
- 1 cup brown sugar
- 1 egg
- 1 vanilla bean or 1 teaspoon vanilla
- 28 caramels
- 6 tablespoon heavy cream
- 3 oz chocolate
Instructions
- In a large mixing bowl beat together butter and sugar until creamy.
- Add vanilla and egg. Mix until well combined.
- In separate bowl mix together flour, oatmeal, coconut, baking powder, baking soda, salt.
- Add flour mix a bit a time to butter mix until combined.
- Using scooper make 24 even cookies, press, refrigerate for 15 minutes.
- Bake 350 degrees for 10-12 minutes.
- In medium saucepan heat cream and caramels until caramels are melted.
- Top each oatmeal cookie with a dollop of caramel.
- Melt 3 oz chocolate in microwave at 50% power.
- Drizzle over cookies.
Nutrition
Calories: 226kcal | Carbohydrates: 28g | Protein: 2g | Fat: 13g | Saturated Fat: 8g | Cholesterol: 33mg | Sodium: 179mg | Potassium: 103mg | Fiber: 1g | Sugar: 19g | Vitamin A: 305IU | Vitamin C: 0.2mg | Calcium: 42mg | Iron: 0.7mg
More great cookie recipes Ultimate Chocolate Chip Cookies
Peanut Butter Thumbprint Cookies

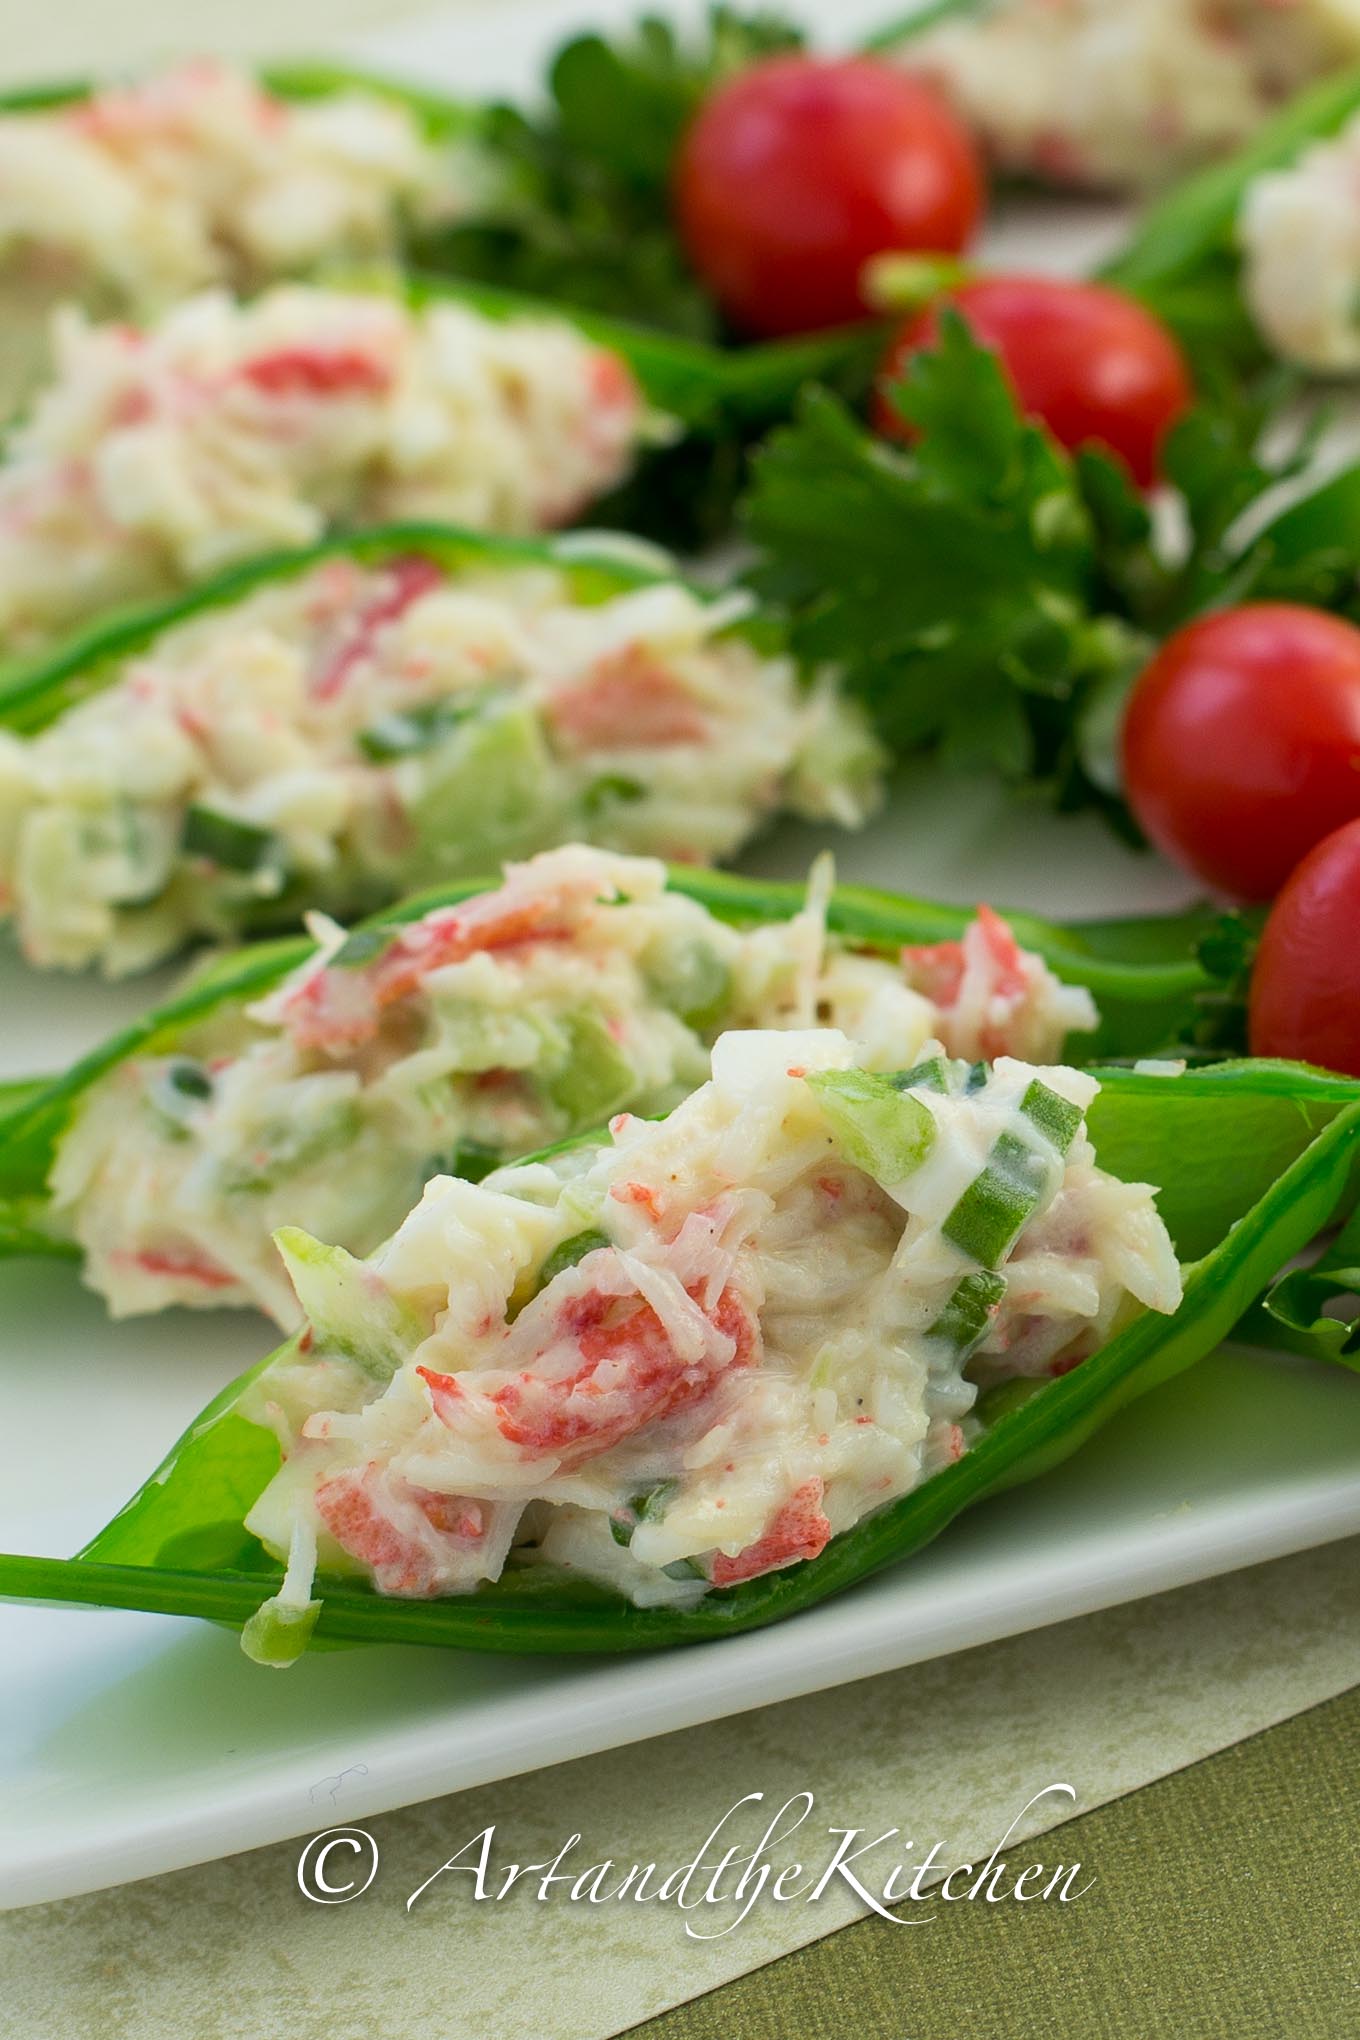
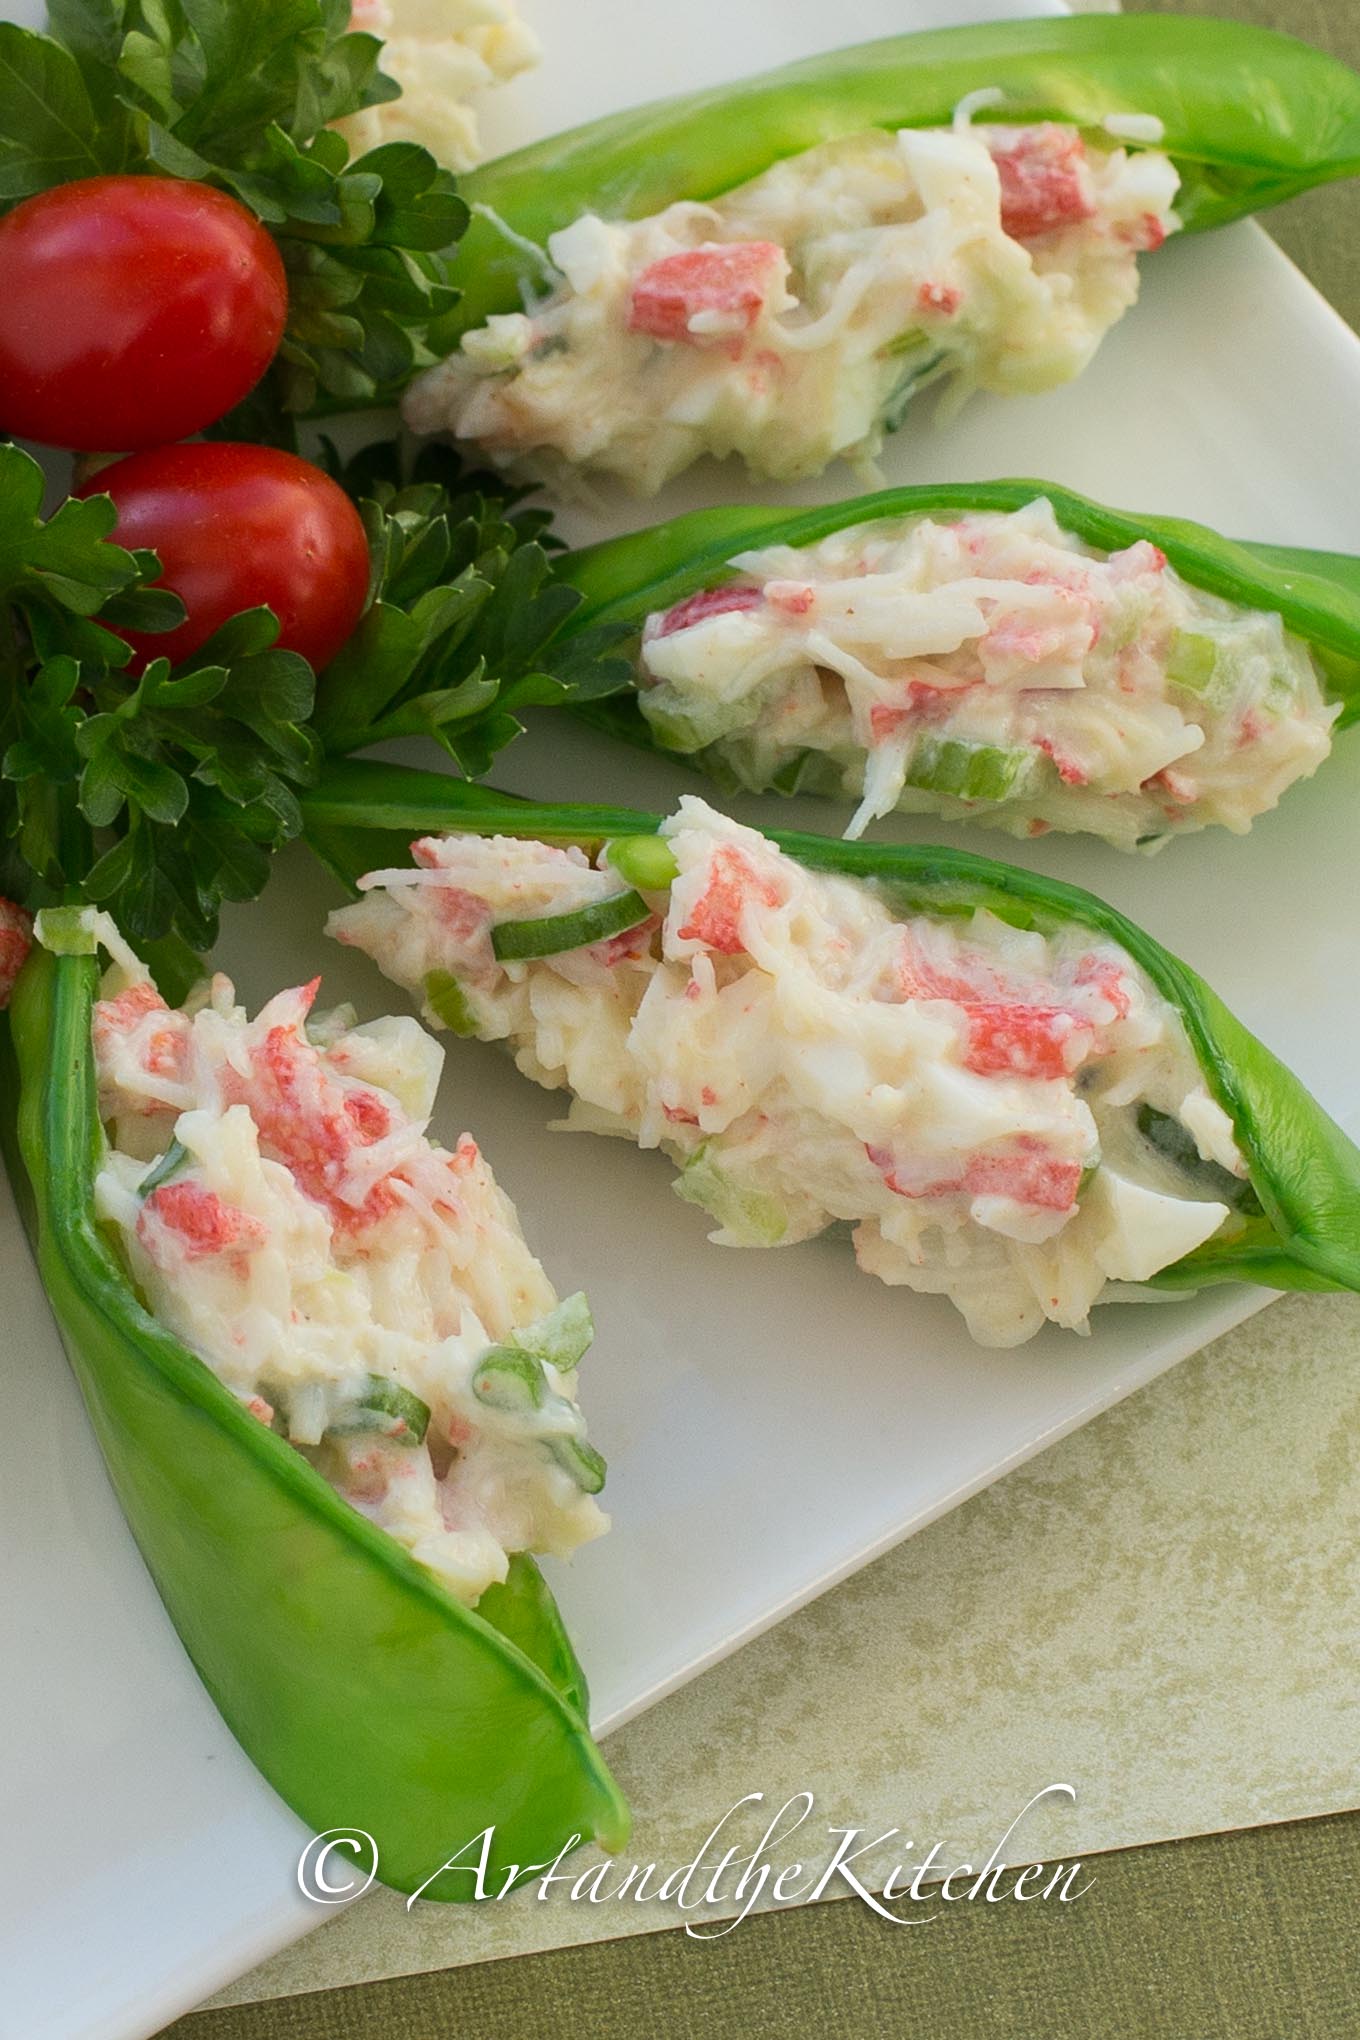
Crab Stuffed Snow Peas
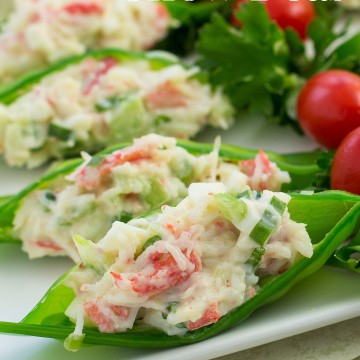
Crisp and light, these Crab Stuffed Snow Peas are a great appetizer you can make ahead. They will be a hit appetizer at your next party!
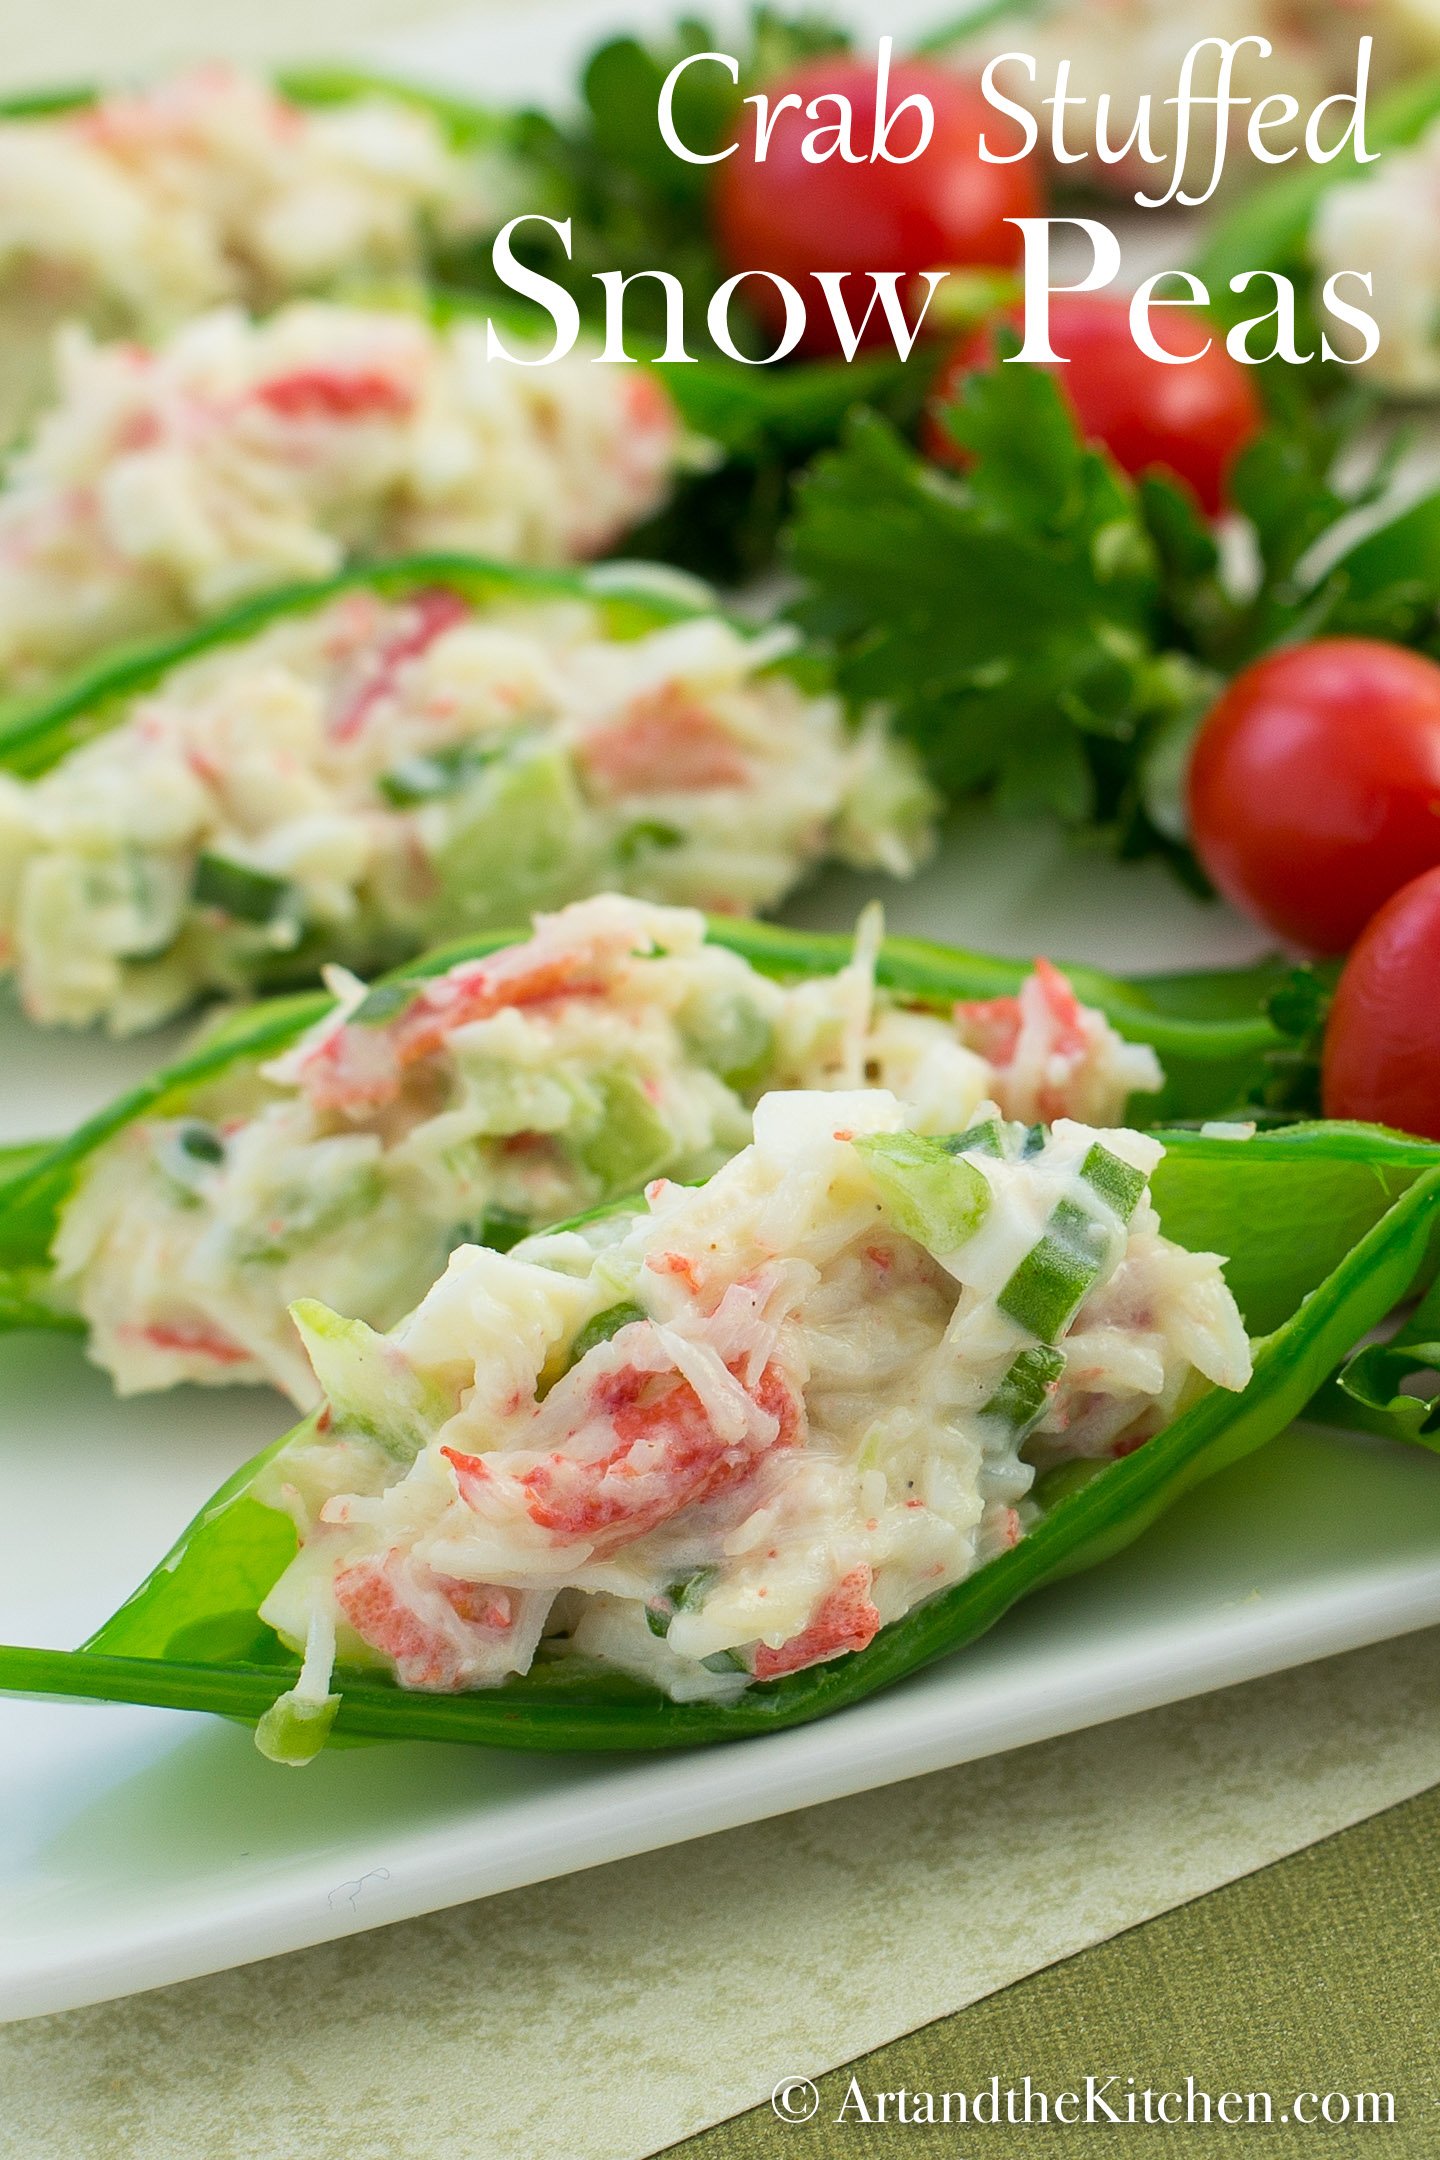
Crab Stuffed Snow Peas make a refreshing appetizer or anytime light snack. One key tip is to only slightly blanch the pea pods to keep them nice and crisp. Do not over cook the pea pods or you will have soggy pods instead of a nice crisp bite. For the crab mixture, the better quality of crab you use the better the flavour will be. You can use canned or fresh cooked crab in this recipe.
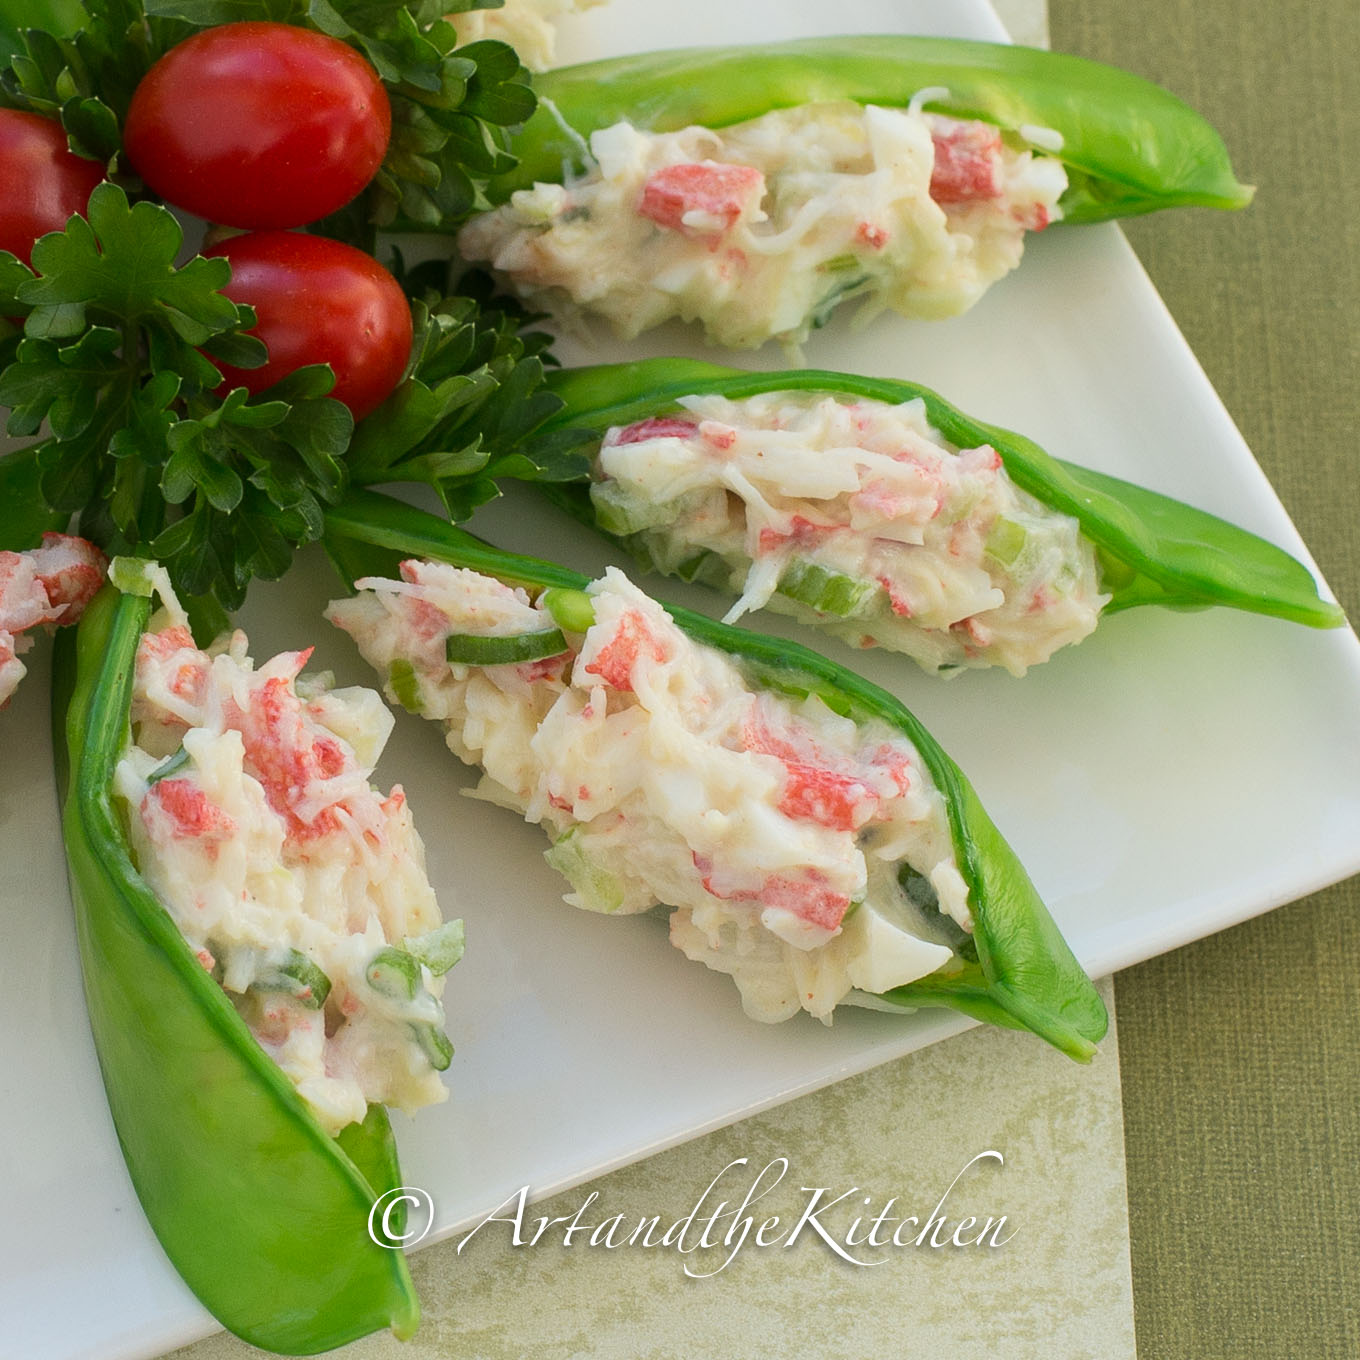

Crab Stuffed Snow Peas
Crisp and light, these Crab Stuffed Snow Peas will be a hit appetizer at your next party!
Servings: 24
Calories: 19kcal
Ingredients
- 2 dozen Snow Peas
- 8 oz Crab meat
- 1 hard boiled egg chopped
- 2 tablespoon mayonnaise
- 2 tablespoon celery finely chopped
- 2 tablespoon green onion finely chopped
- ½ teaspoon Dijon mustard
Instructions
- Blanch pea pods by pouring boiling water over them, let stand about 20 seconds.
- Drain and immediately rinse with ice cold water.
- Slit peas open on top side, keep chilled while you prepare filling.
- Combine together crab, egg, mayonnaise, celery, green onion and mustard.
- Stuff each pea pod with filling.
- Cover and refrigerate until ready to eat.
Notes
adapted from Company's Coming cookbook, Appetizers.
Nutrition
Calories: 19kcal | Carbohydrates: 1g | Protein: 2g | Fat: 1g | Saturated Fat: 1g | Cholesterol: 12mg | Sodium: 91mg | Potassium: 24mg | Fiber: 1g | Sugar: 1g | Vitamin A: 21IU | Vitamin C: 1mg | Calcium: 5mg | Iron: 1mg
More Great Appetizer Recipes
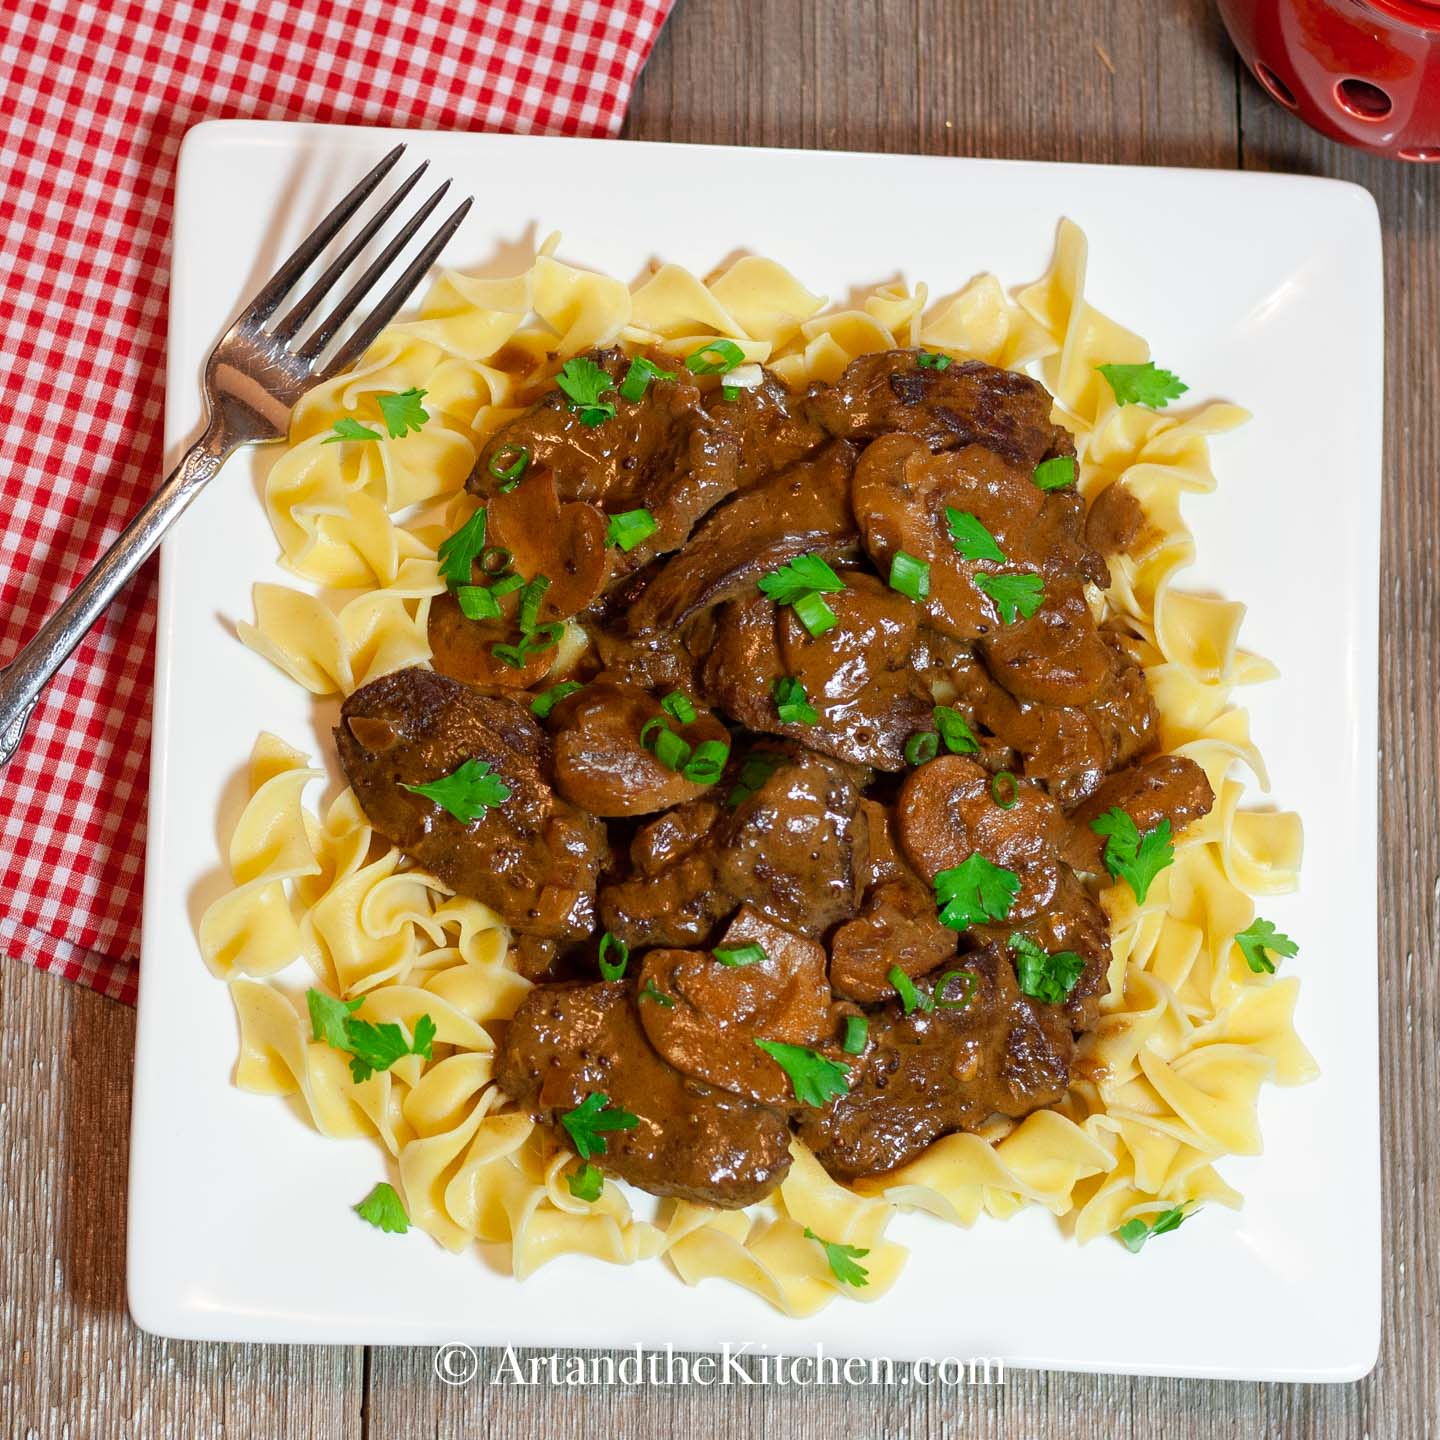
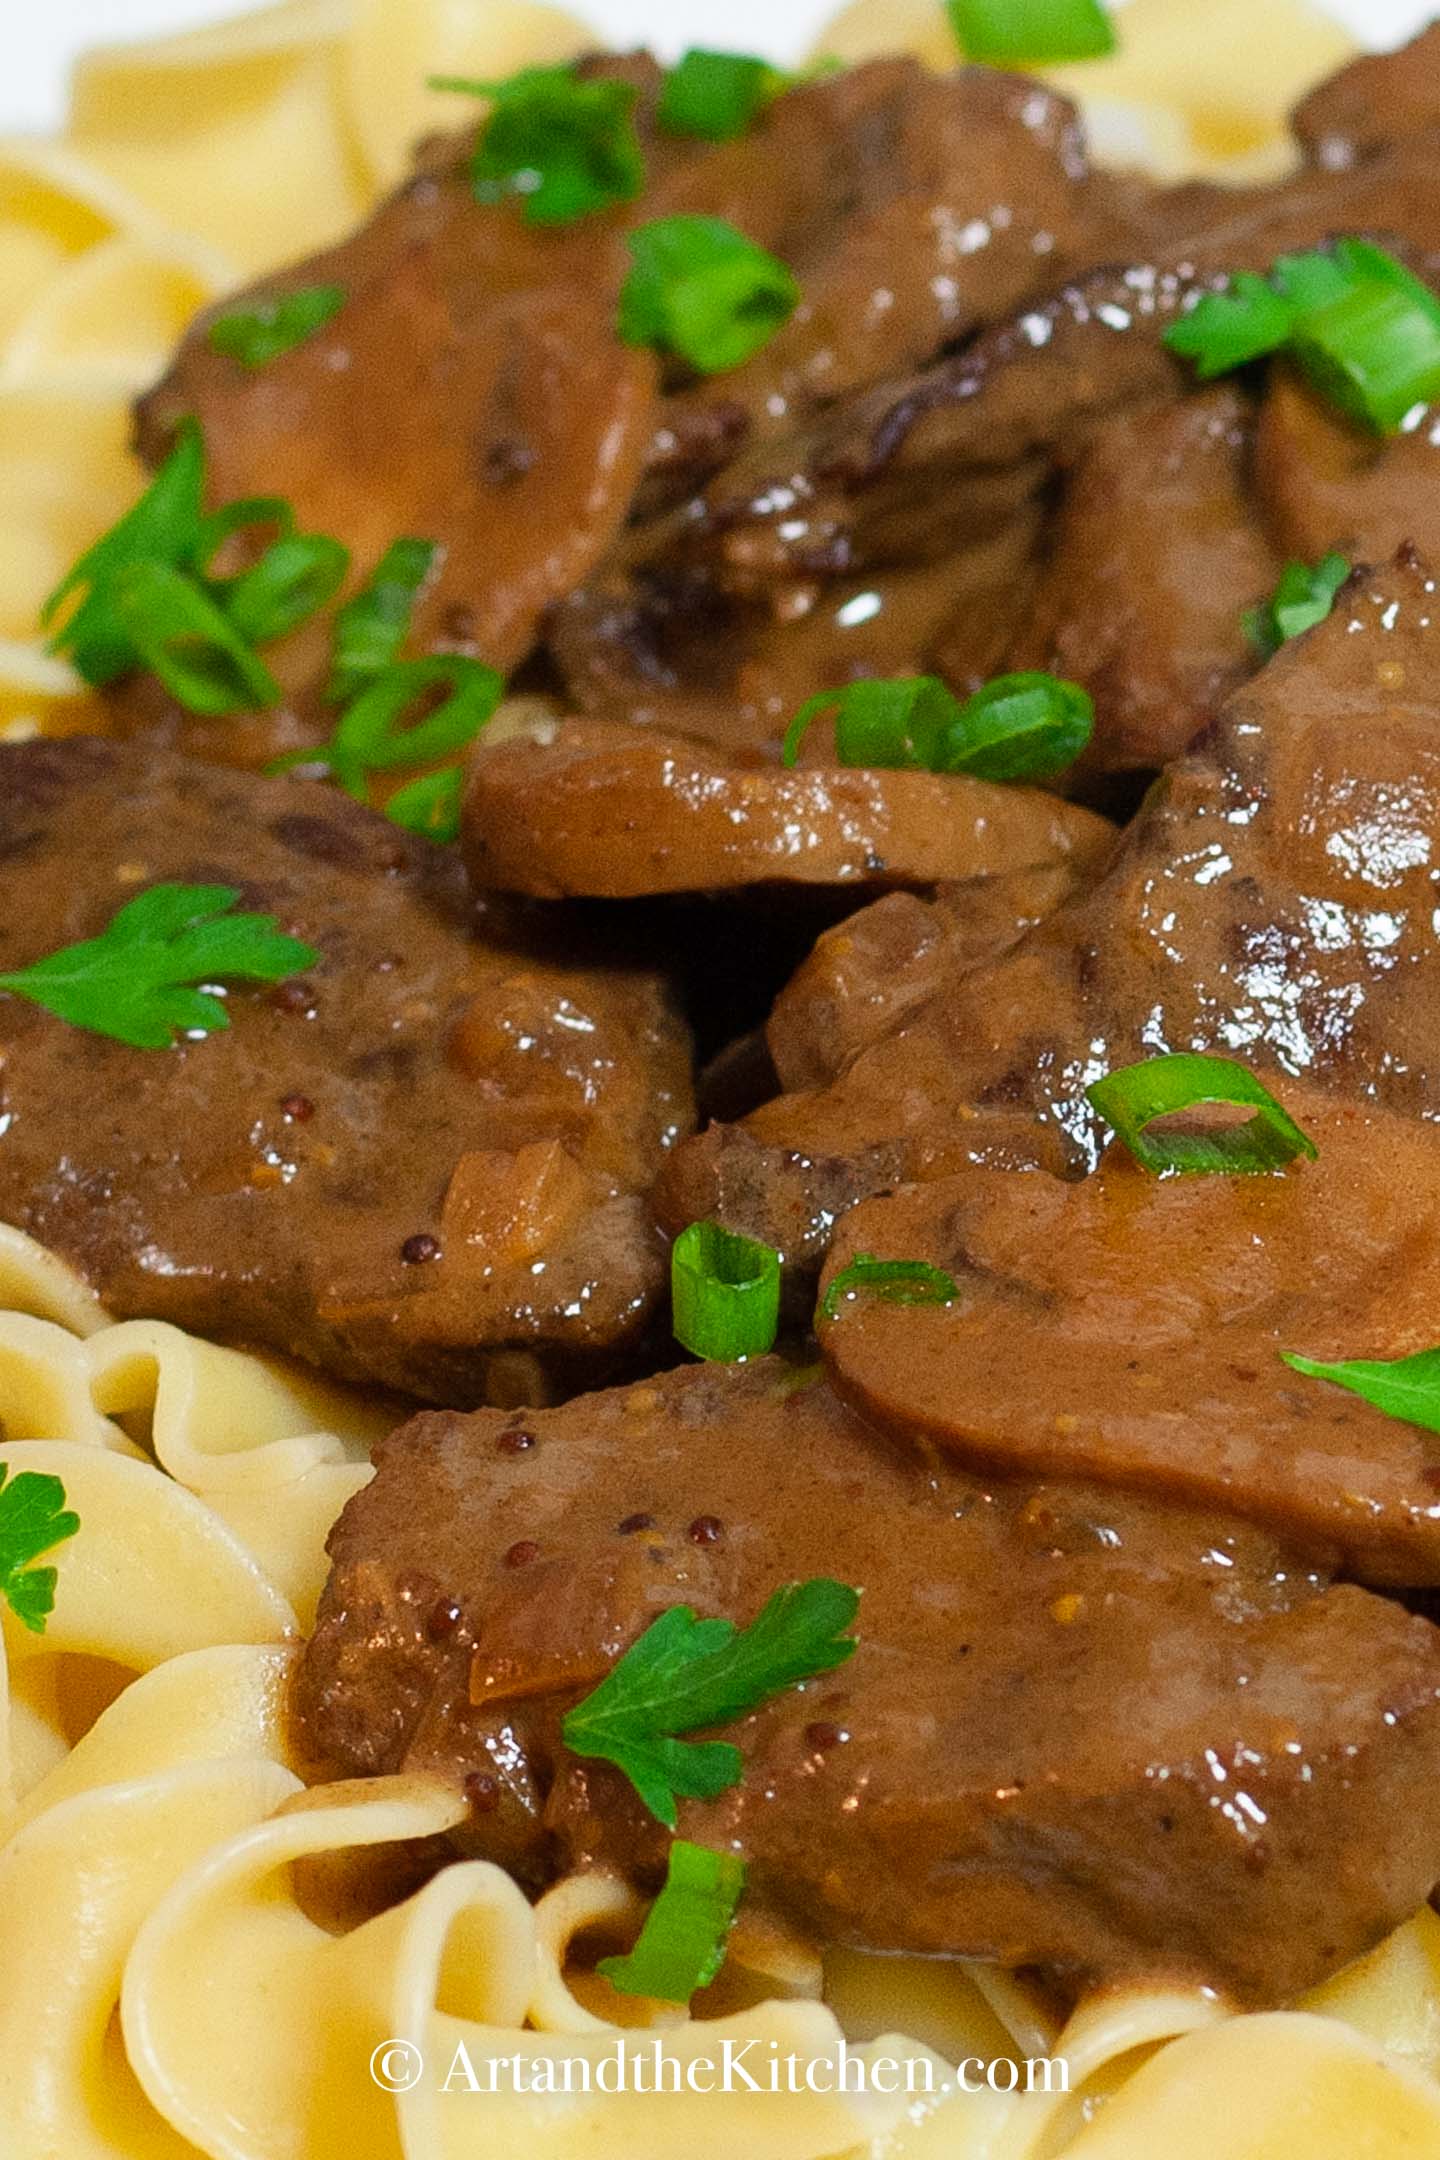
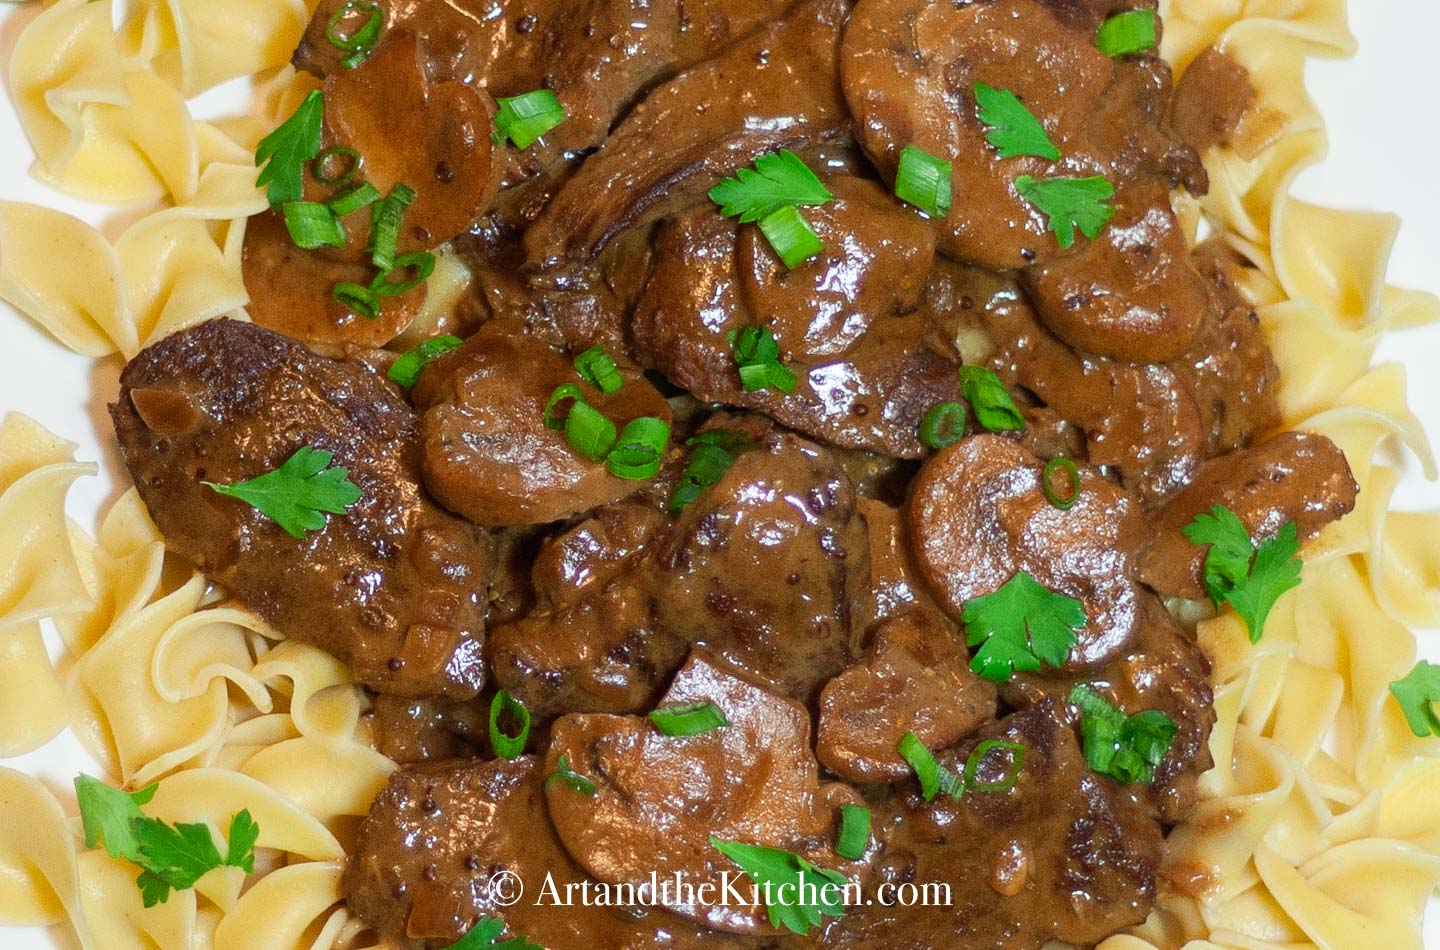
Slow Cooker Beef Stroganoff

Tender beef smothering a creamy mushroom gravy sauce. This slow cooker beef stroganoff is the ultimate comfort food!
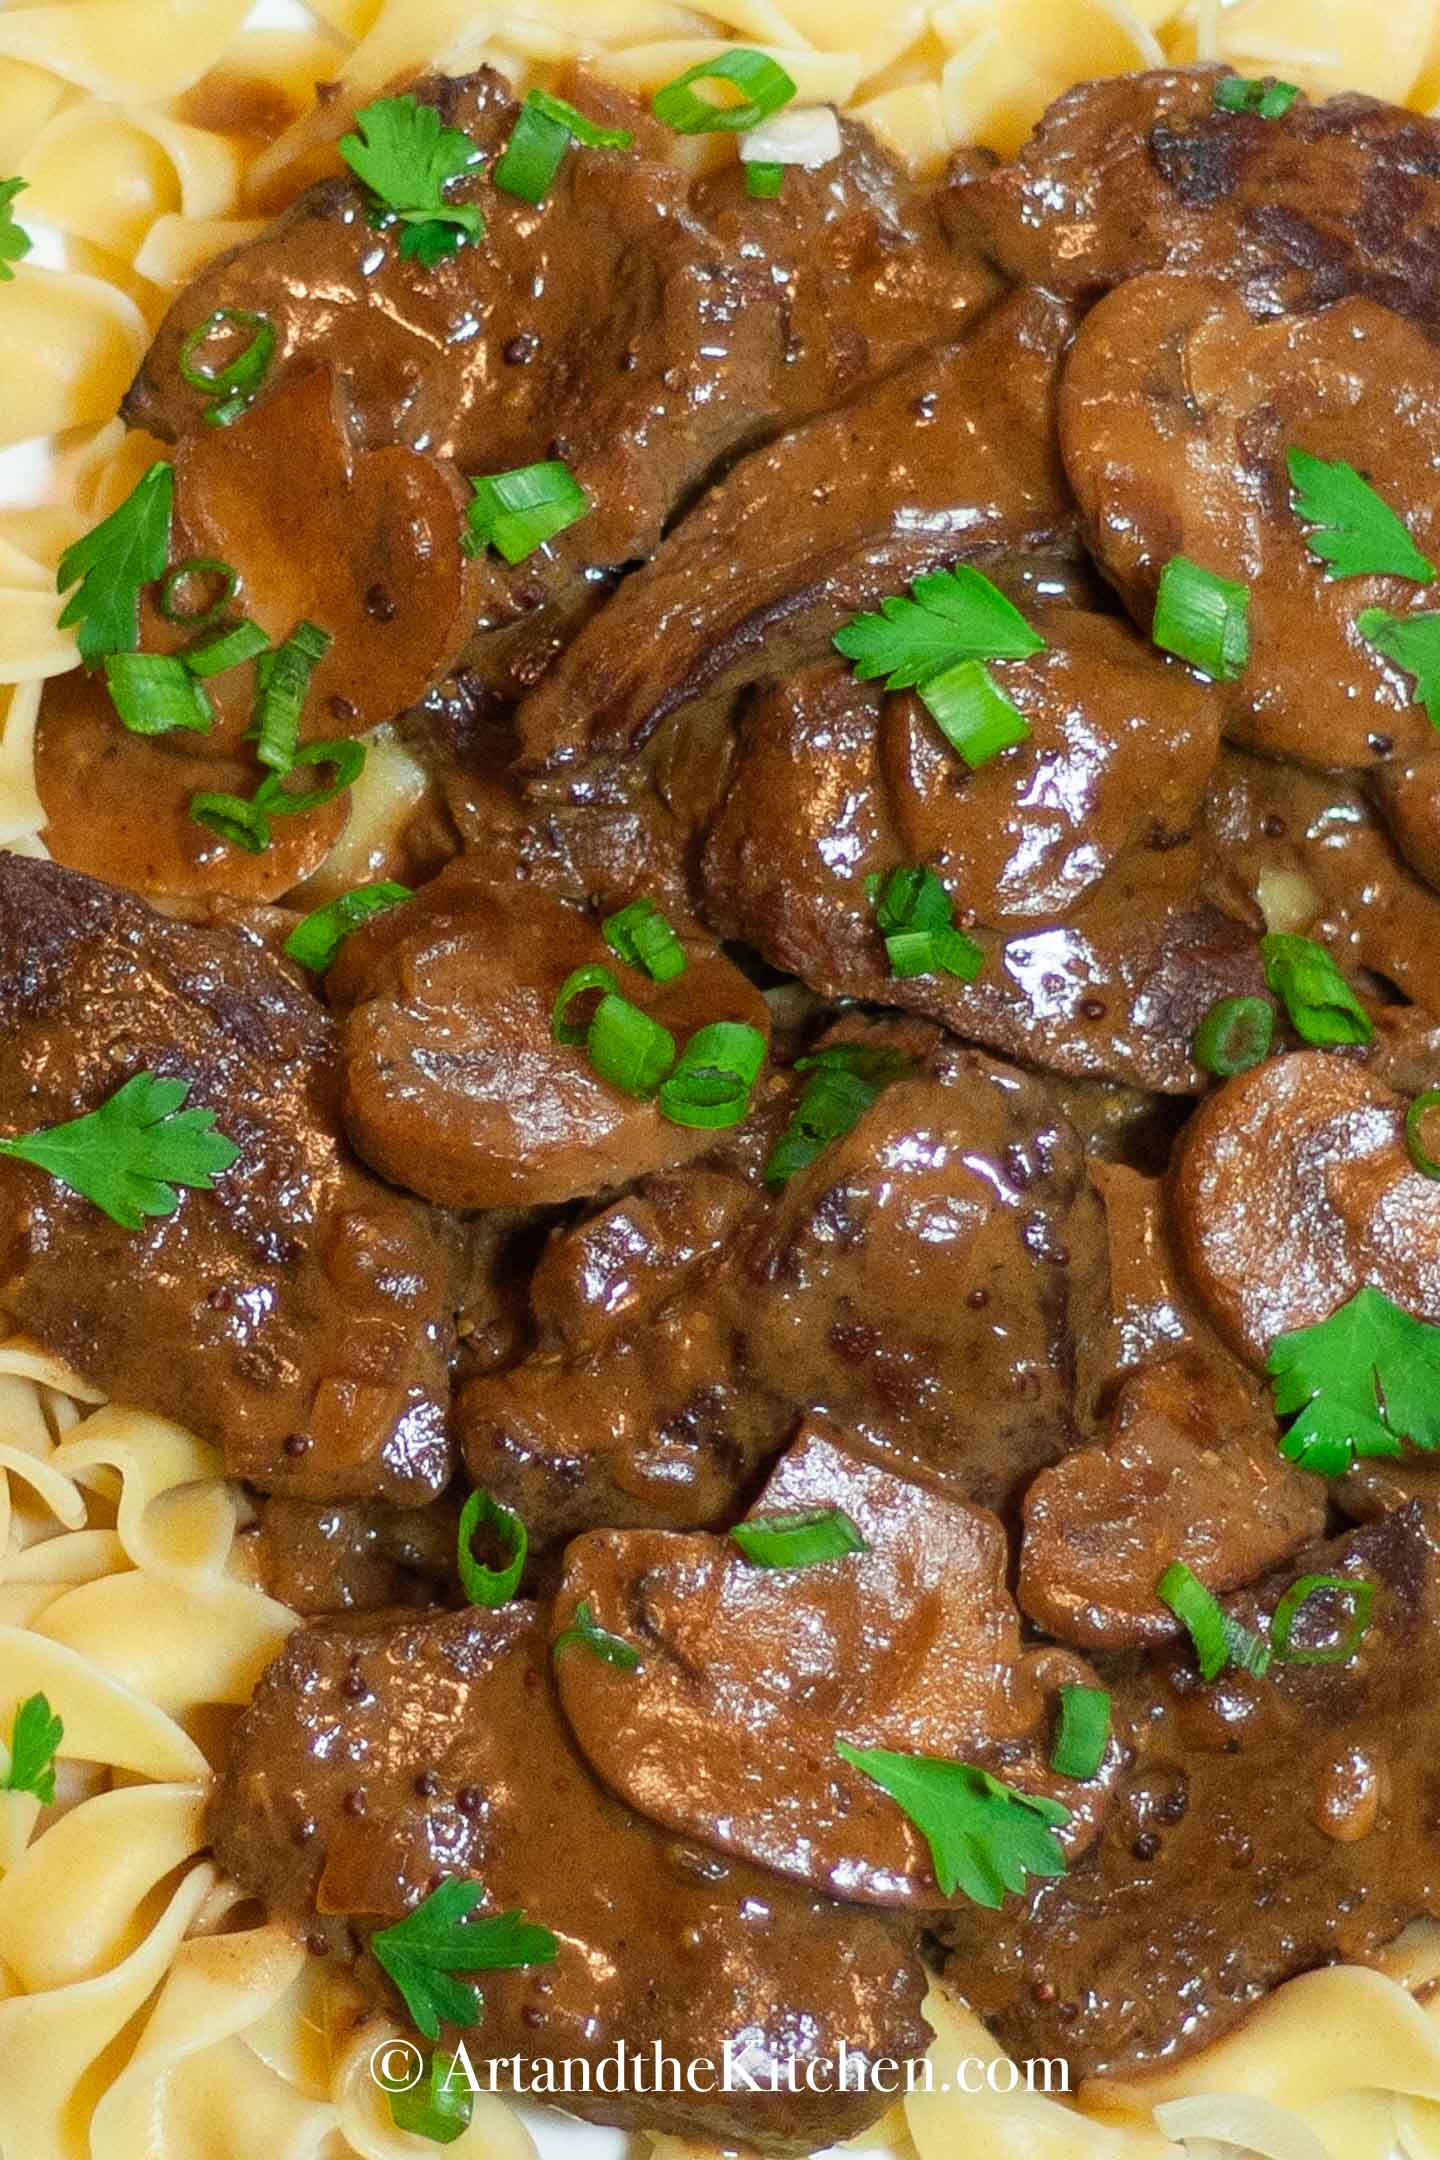
This crockpot recipe is great because you can use less expensive cuts of beef, yet have beef that is fork-tender. I use a sirloin roast that I cut into thin strips. This stroganoff recipe can be made even more budget-friendly by using ground beef.
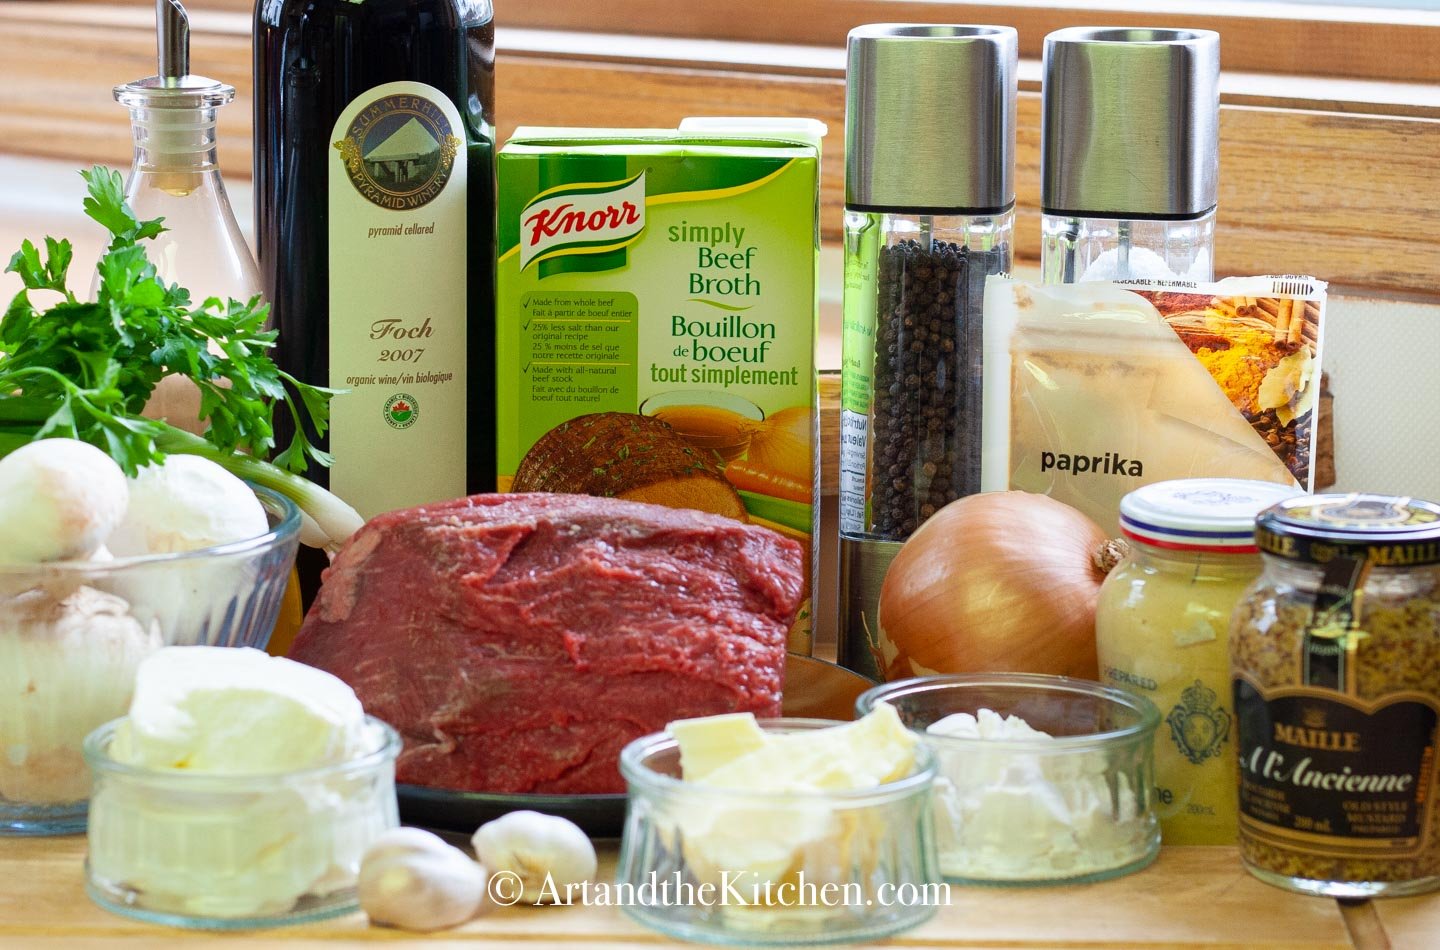
Ingredients for making beef stroganoff.
- Beef: I used a sirloin tip roast, but if you choose to do this recipe on the stovetop instead of the slow cooker go for a better cut of beef like ribeye.
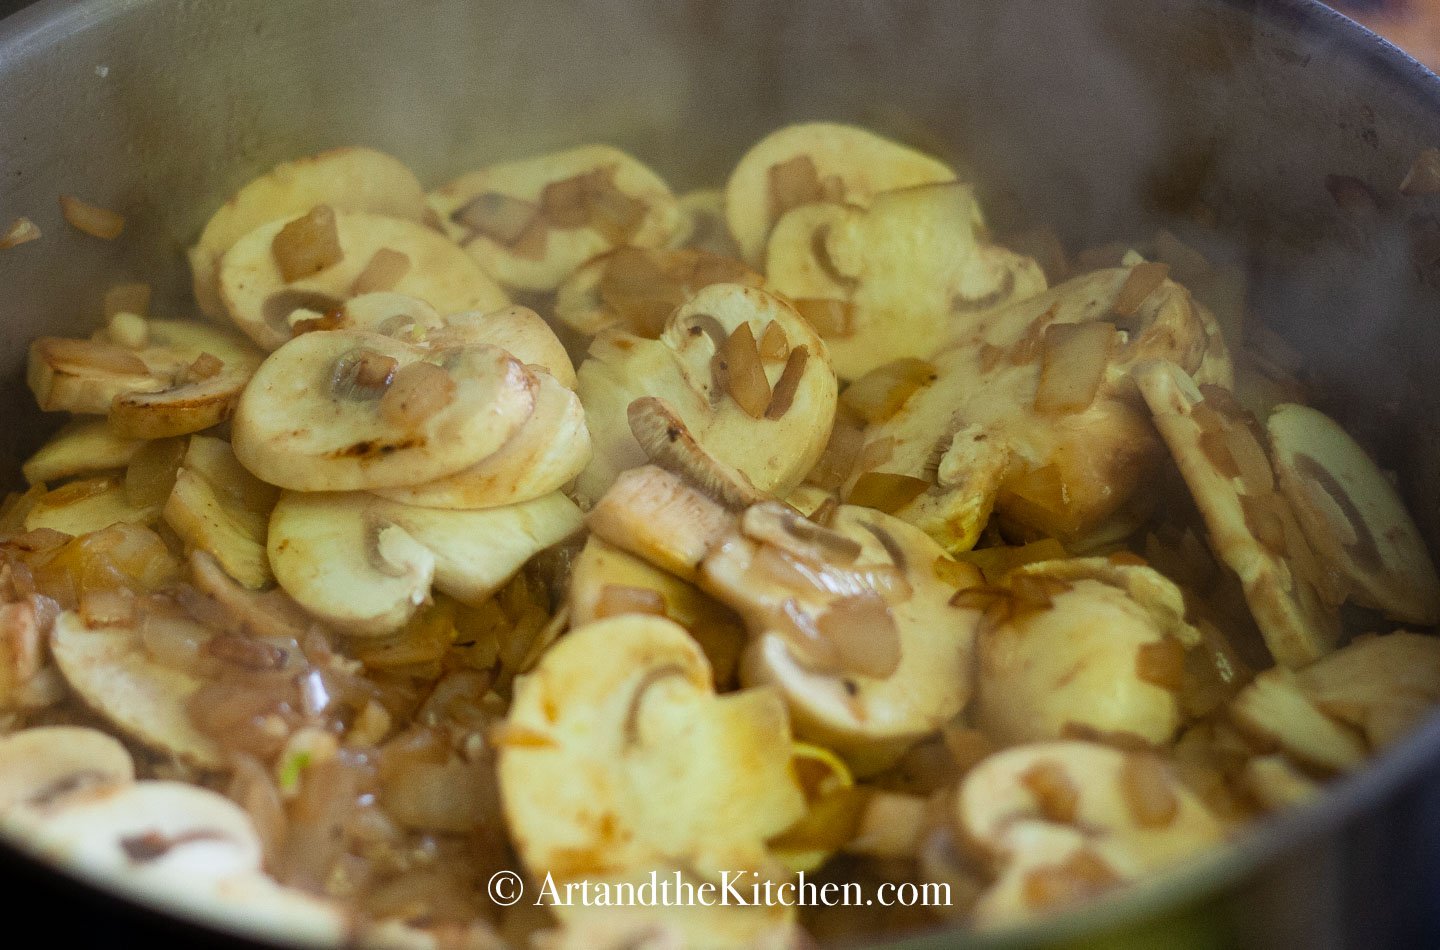
- Mushrooms: White mushrooms are what I used in this recipe. Cremini or portobello mushrooms also work well.
- Red wine: Use a hearty red wine like cabernet or merlot. The red wine adds sensational flavor to this recipe. Can you skip the red wine? Yes, but the stroganoff will be missing that extra rich taste.
- Beef Broth: A low-sodium variety works the best. This allows you to adjust the seasoning to taste.
- Mustard: This recipe calls for two types of mustard, Dijon and whole-grain mustard. Using both mustards adds a robust flavor to the stroganoff.
- Sour Cream: Either full fat or reduced-fat sour cream will work. You can also substitute the sour cream with Greek yogurt.
How to make this recipe in the slow cooker.
Make this recipe easy to prepare by having all the ingredients pre-measured and ready to go .
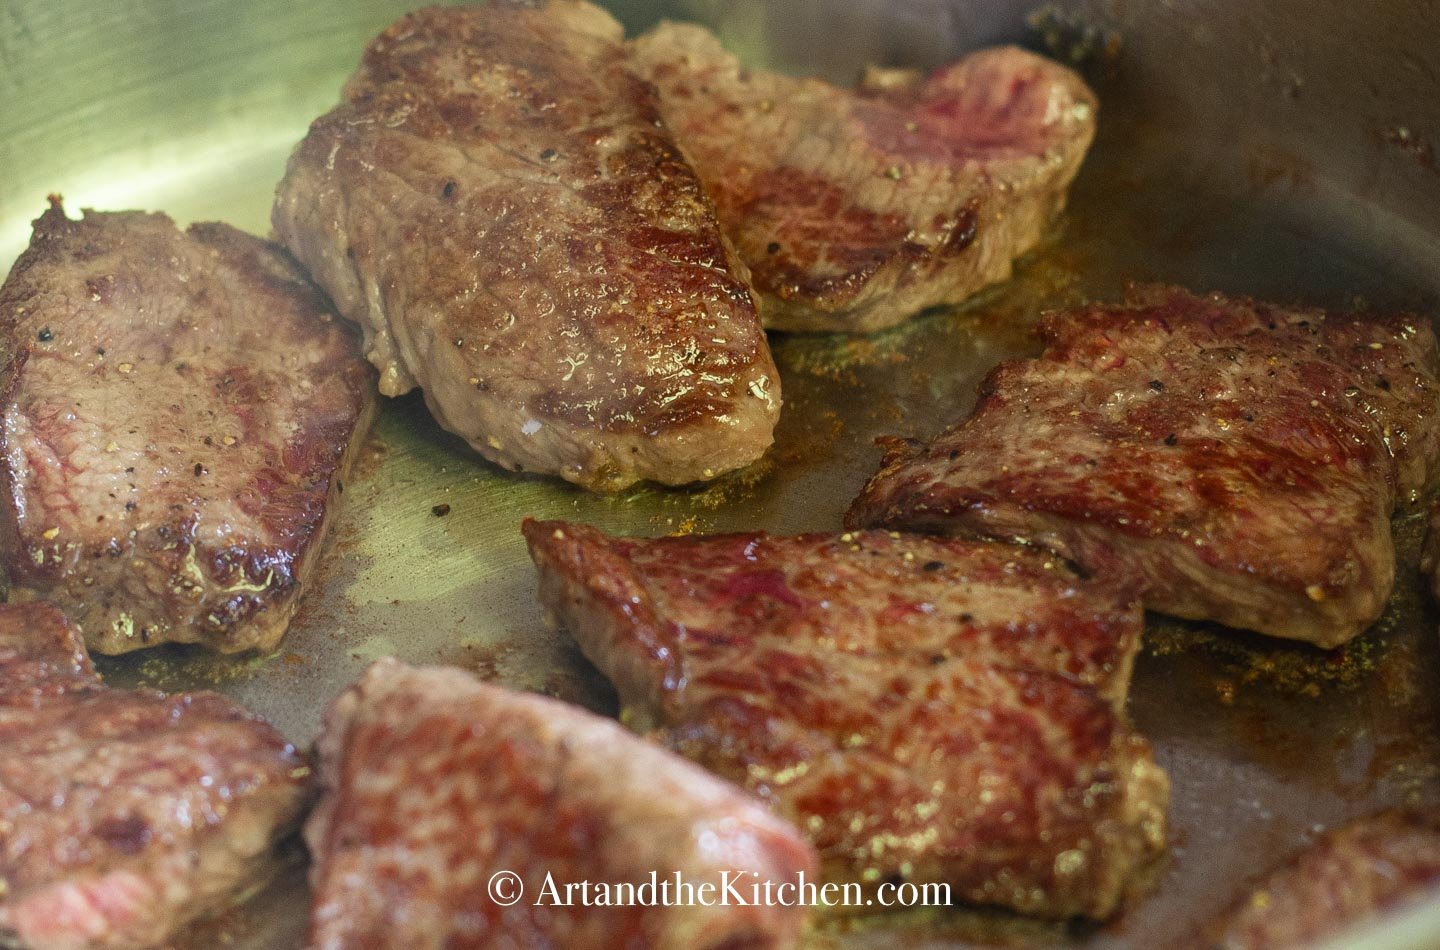
Slice the beef into thin strips, season with salt and pepper. Dust lightly with flour.
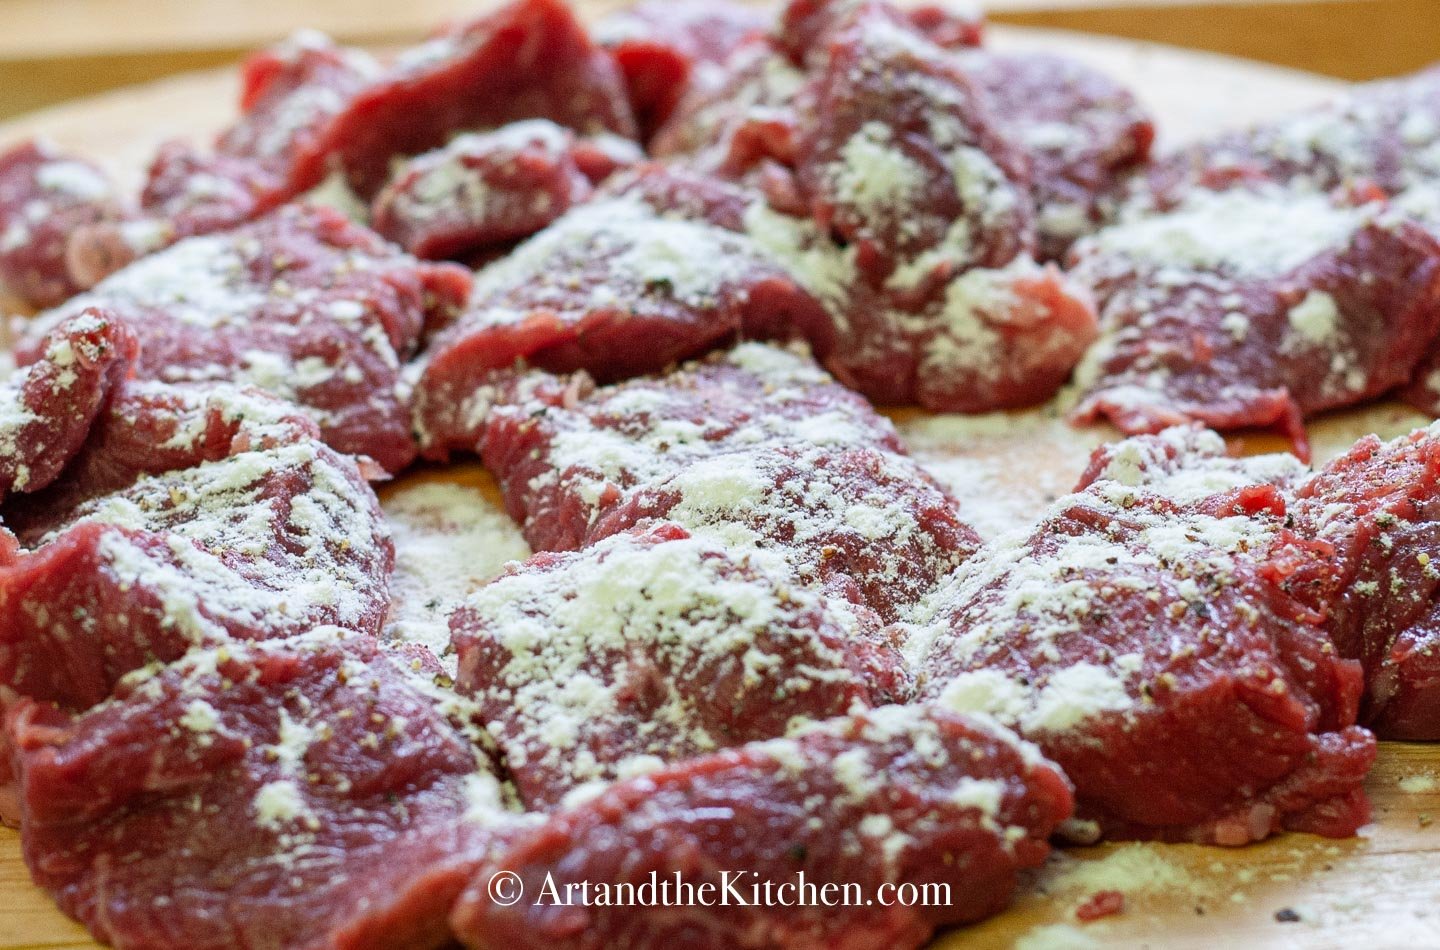
Heat olive oil in heavy skillet and sear beef on both sides. Work in batches. Do not over-crowd the skillet or the meat will steam rather than get a nice sear. Transfer to the slow cooker.
Using the same skillet, add the butter, onions, mushroom and garlic. Sauté until tender. Transfer to the slow cooker.
Deglaze the skillet with red wine. Stir in the beef broth, paprika, and mustards.
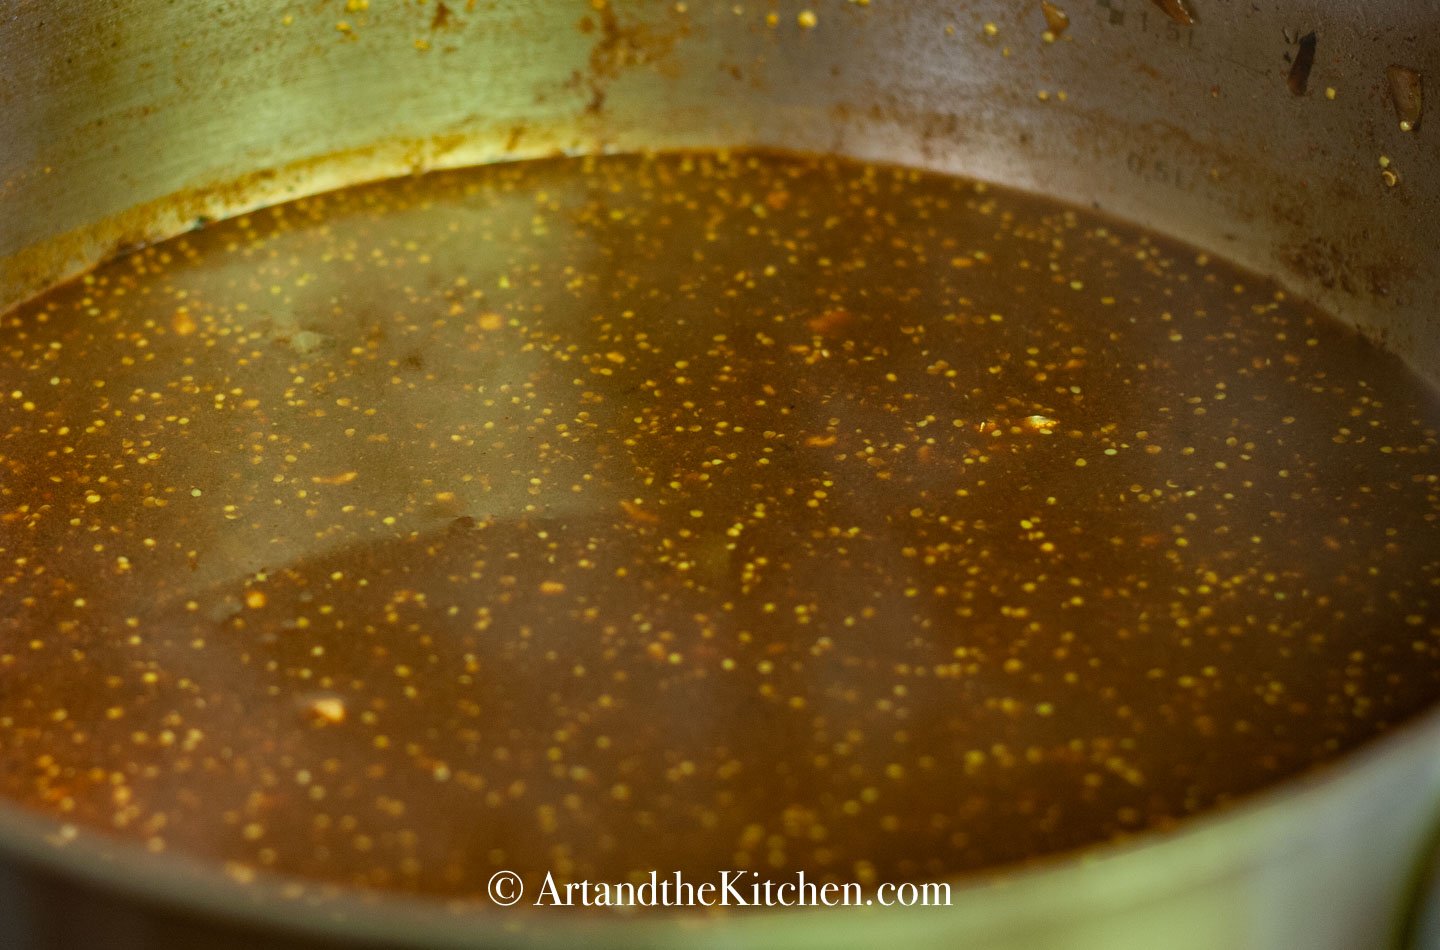
Pour the broth over the beef. Combine and cook in the slow cooker for 4 hours on low setting or 2 hours on high setting.
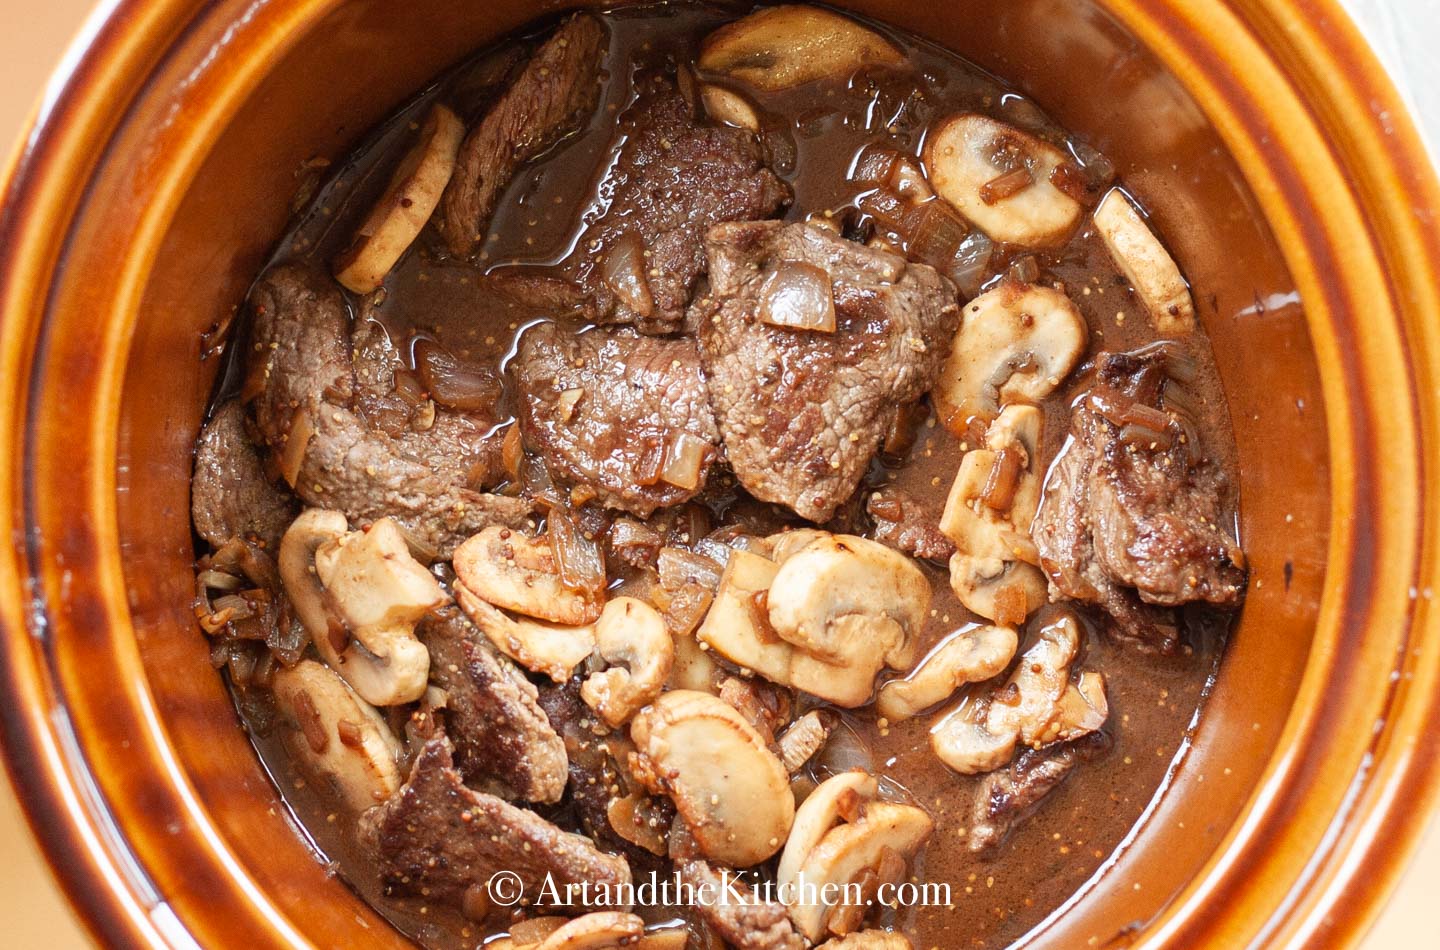
If the broth does not thicken enough, ladle out ½ cup of broth. Whisk the broth together with 2 tablespoons of cornstarch. Stir into the beef stroganoff and cook on high for an additional 20 minutes or until sauce thickens.
Before serving stir in the sour cream. Serve over egg noodles, broad noodles, polenta or rice. I love this beef stroganoff recipe served with my garlic mashed potatoes.
More great slow cooker recipes to try.

This post was originally published January 10, 2013. Occasionally I update with fresh tips, content and photos. Current update February 18, 2021.

Slow Cooker Beef Stroganoff
This recipe for Slow Cooker Beef Stroganoff is by far one of the best beef stroganoff recipes I've ever made. Fork tender beef in a rich savoury gravy!
Servings: 6
Calories: 382kcal
Ingredients
- 1 ½ pound beef I used sirloin.
- ¼ cup flour
- 3 tablespoons olive oil
- 2 tablespoons butter
- 3 cups mushrooms sliced
- 1 medium onion chopped
- 2 cloves garlic finely chopped
- ½ cup red wine
- 1 cup beef broth
- salt and pepper
- ½ teaspoon paprika
- 1 tablespoon Dijon mustard
- 1 tablespoon whole-grain mustard
- ¾ cup sour cream
- Fresh parsley, chives or green onions chopped
- 2 tablespoons cornstarch optional
Instructions
- Cut beef into slices, season with salt and pepper.
- Dust the slices of beef with flour.
- Heat olive oil in skillet, and sear meat on both sides.
- Transfer to the slow cooker.
- In the same skillet add the butter. Sauté onions, garlic and mushrooms until tender. Transfer to the slow cooker.
- Deglaze the skillet with red wine.
- Stir in the beef broth, paprika and both mustards.
- Pour over the beef and stir together.
- Cook on low setting for 4-5 hours or high setting for approximately 2 hours.
- Before serving, stir in the sour cream.
- Garnish with fresh parley, chives or green onions.
- Serve with egg noodles, broad noodles, polenta or mashed potatoes.
Notes
If you find the broth is not thick enough, ladle out ½ cup of broth. Whisk the broth together with 2 tablespoons of cornstarch. Stir into the beef and cook on high for an additional 20 minutes or until sauce thickens.
Nutrition
Calories: 382kcal | Carbohydrates: 12g | Protein: 29g | Fat: 23g | Saturated Fat: 9g | Trans Fat: 1g | Cholesterol: 95mg | Sodium: 330mg | Potassium: 675mg | Fiber: 1g | Sugar: 3g | Vitamin A: 382IU | Vitamin C: 3mg | Calcium: 70mg | Iron: 3mg
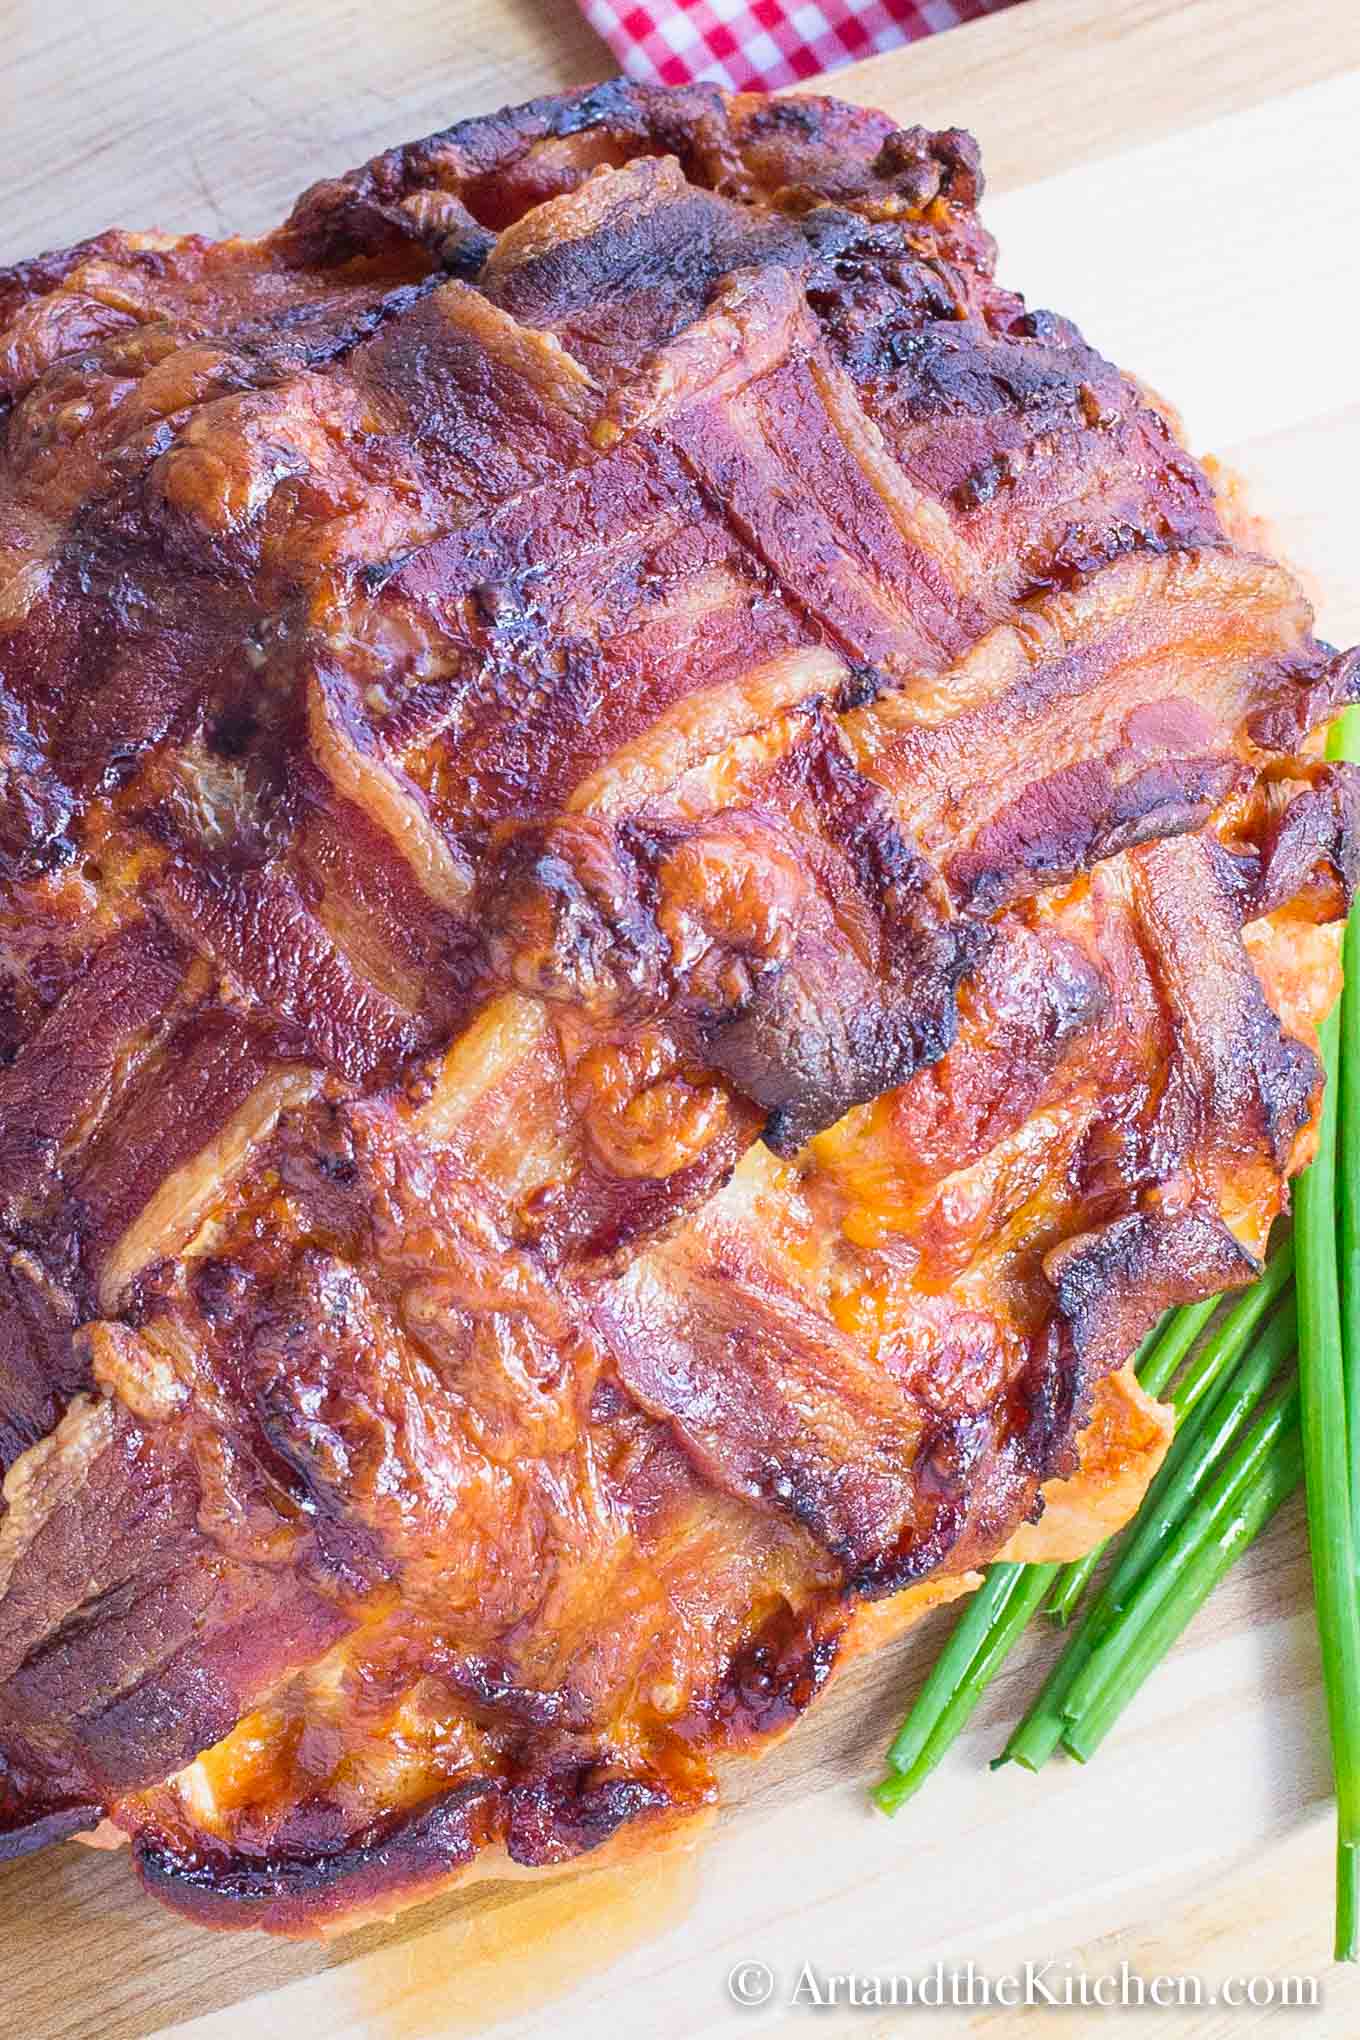
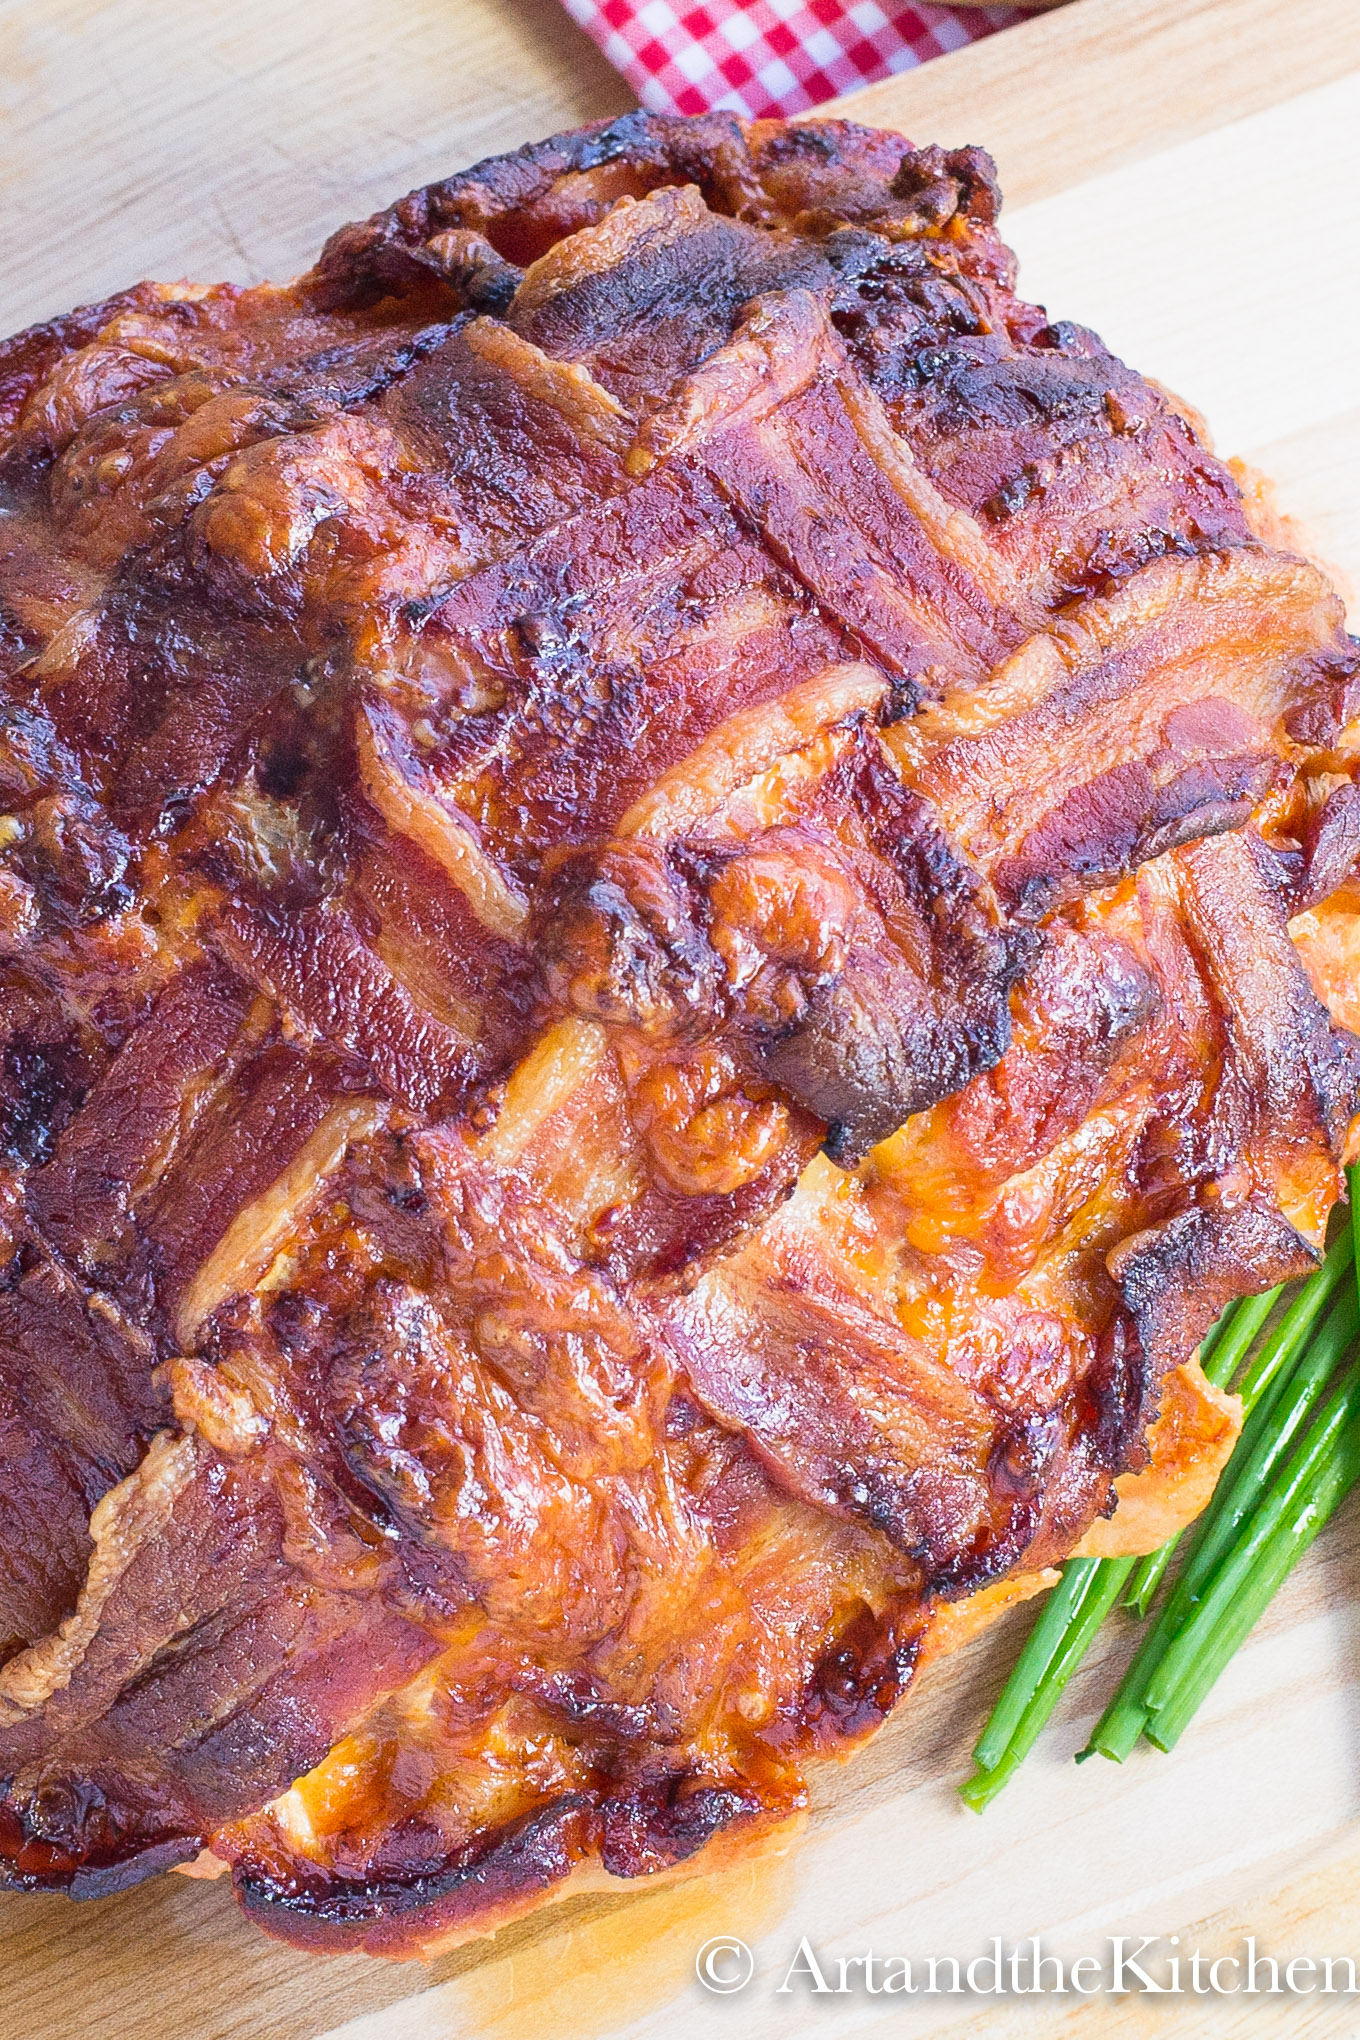
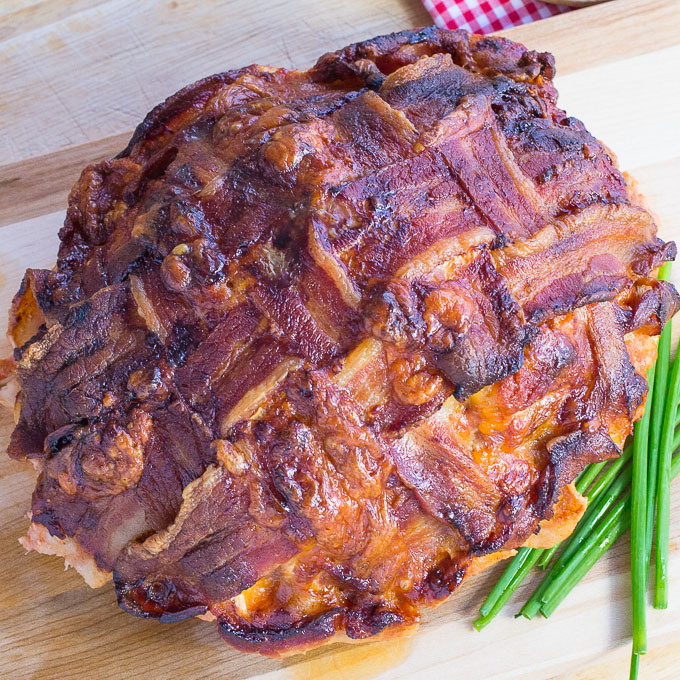
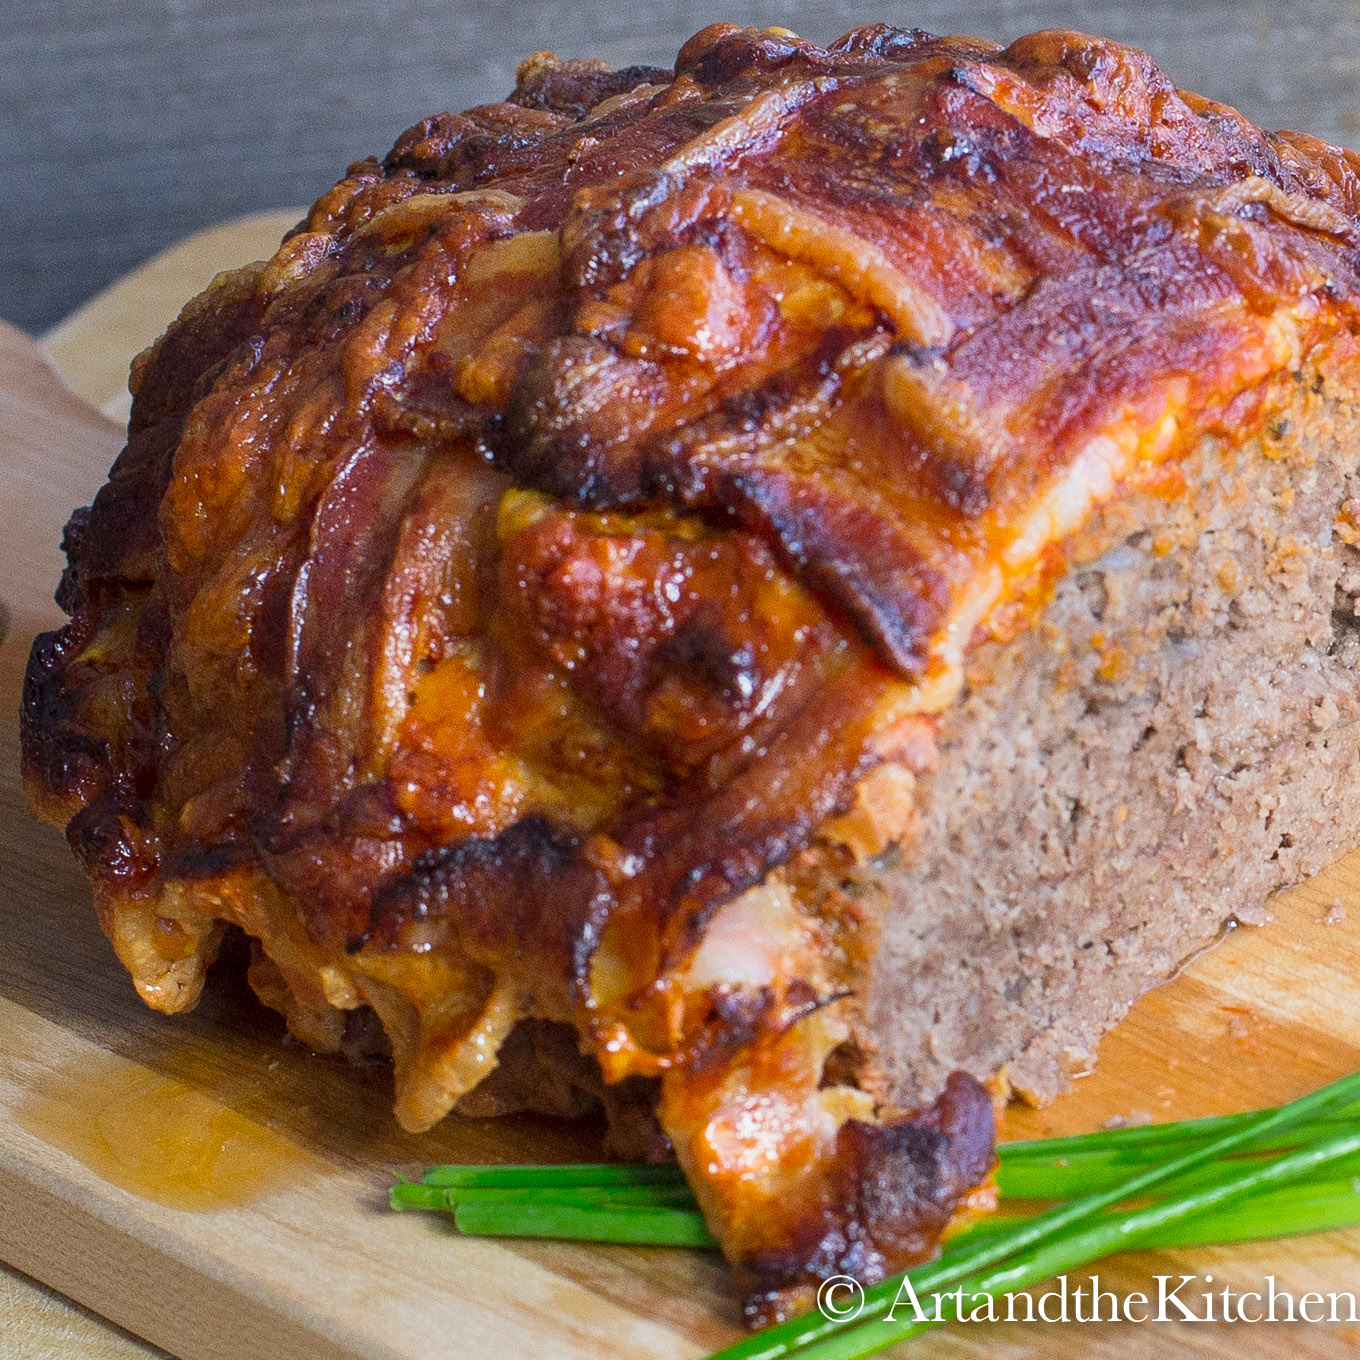
Basket Weaved Bacon Meatloaf
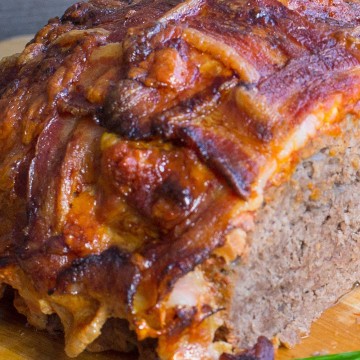
Amazing tasting Basket Weaved Bacon Meatloaf starts with a fabulous meatloaf recipe. Topped with a layer of cheddar cheese and wrapped in a bacon weave!
Meatloaf is pure comfort food and this recipe that adds a layer of bacon takes meatloaf to a whole new level. Weaving bacon is a simple process of alternating strips of bacon into a decorative, delicious "basket weave" design. This Basket Weaved Bacon Meatloaf is moist and incredibly flavourful! A super side dish to serve with it is my recipe for Garlic Mashed Potatoes.
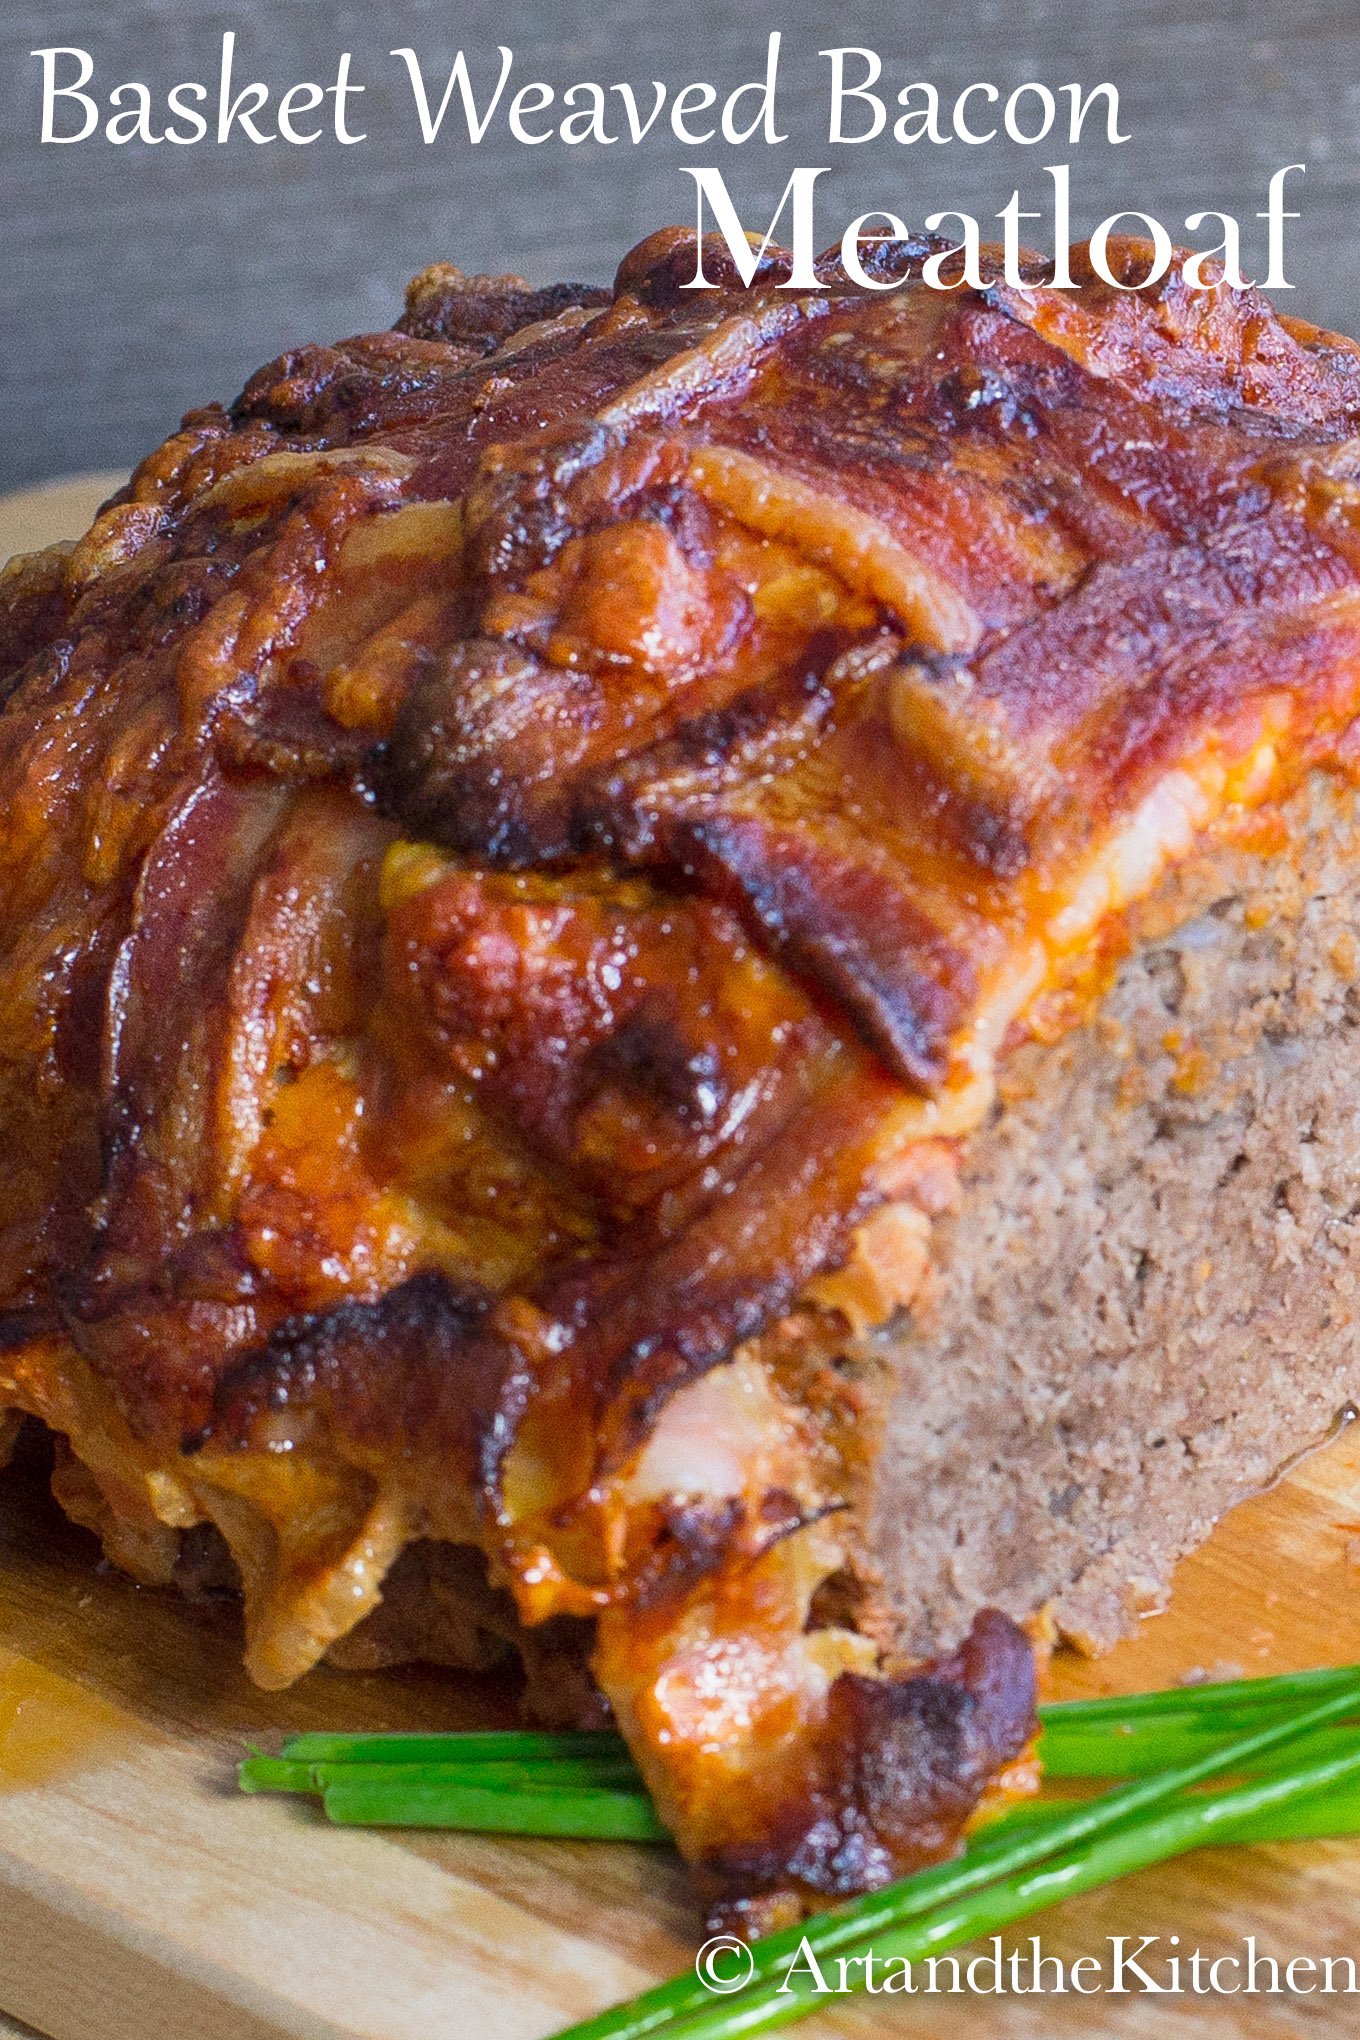
This recipe is very easy to prepare and one your family will love. Doesn't everything taste better with bacon and a layer of cheese!

Basket Weave Bacon Meatloaf
A fantastic tasting meatloaf wrapped in a weaved layer of bacon.
Servings: 8
Calories: 540kcal
Ingredients
- 2 lbs extra lean ground beef
- ¾ cup Italian bread crumbs
- 1 egg
- ½ teaspoon pepper
- ½ teaspoon salt
- 1 tablespoon olive oil
- 1 cup onions chopped
- 1 lb thick cut bacon 10-12 slices
- 4-5 slices aged cheddar cheese
- 1 can tomato paste small size
Instructions
- Heat olive oil in skillet and sauté onions until golden.
- In large mixing bowl, combine together ground beef, sautéd onions, Italian bread crumbs.
- Add slightly beaten egg, mix together.
- Season with salt and pepper.
- Form into log and place in shallow baking pan.
- Spread thick layer of tomato paste over meatloaf.
- Add layer of cheddar cheese onto of tomato paste
- Top with basket woven bacon. Tuck edges under meatloaf.
- Bake uncovered 350 degrees for about 1 ½ hours internal temperature 160º
Nutrition
Calories: 540kcal | Carbohydrates: 15g | Protein: 38g | Fat: 36g | Saturated Fat: 14g | Cholesterol: 143mg | Sodium: 1009mg | Potassium: 797mg | Fiber: 2g | Sugar: 4g | Vitamin A: 537IU | Vitamin C: 6mg | Calcium: 150mg | Iron: 4mg
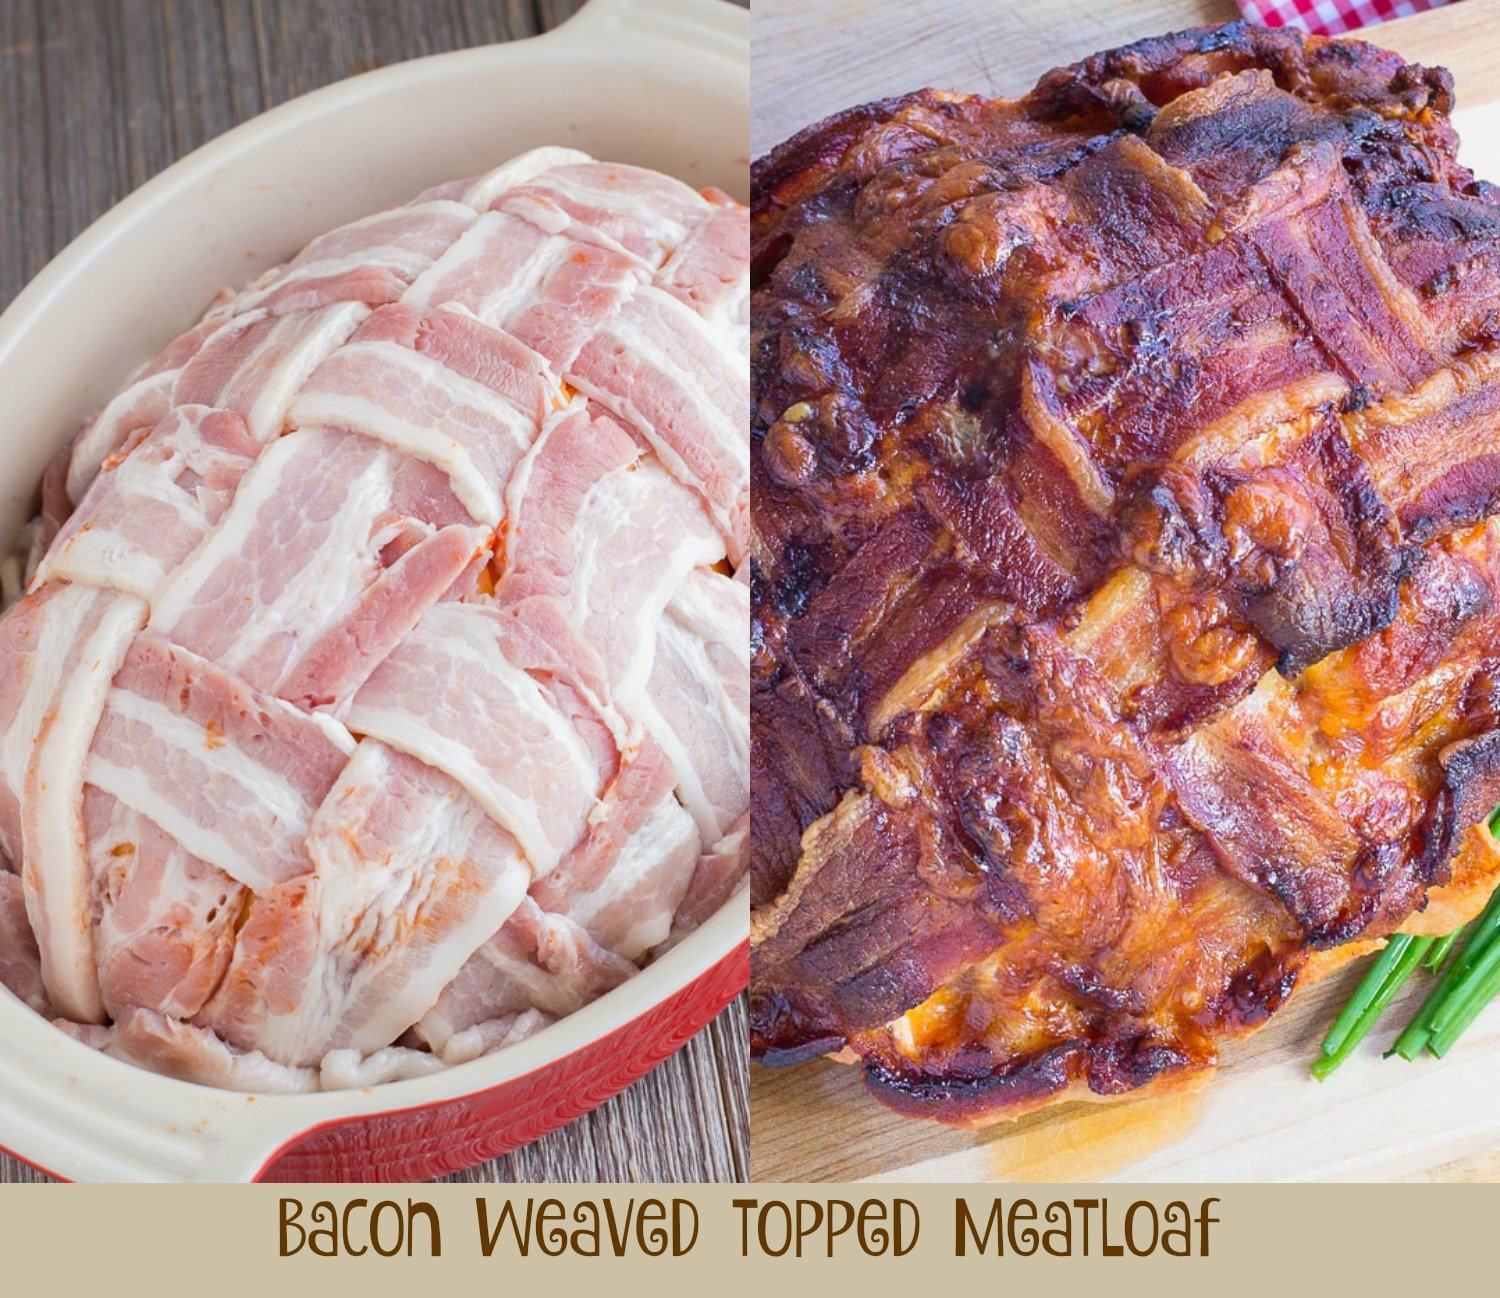
Step by step instructions for basket weaved covered meatloaf.

assemble large enough layer of weaved bacon to cover meatloaf.
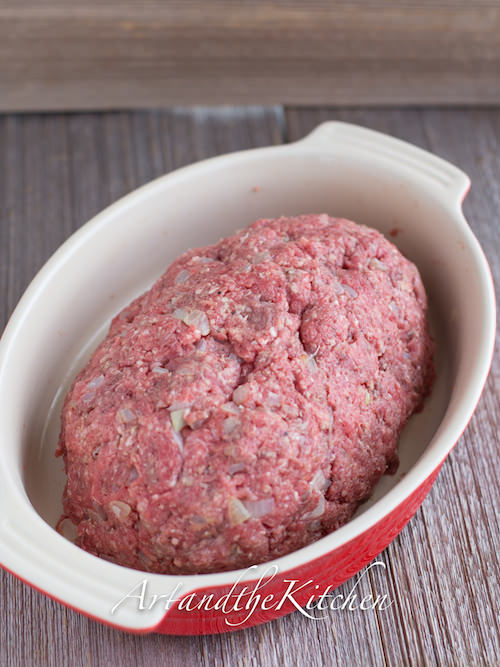
Place meatloaf into baking pan.
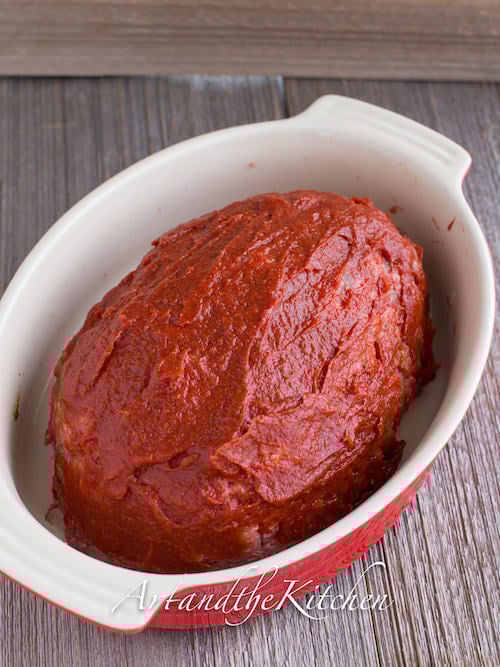
Cover meatloaf with thick layer of tomato paste.
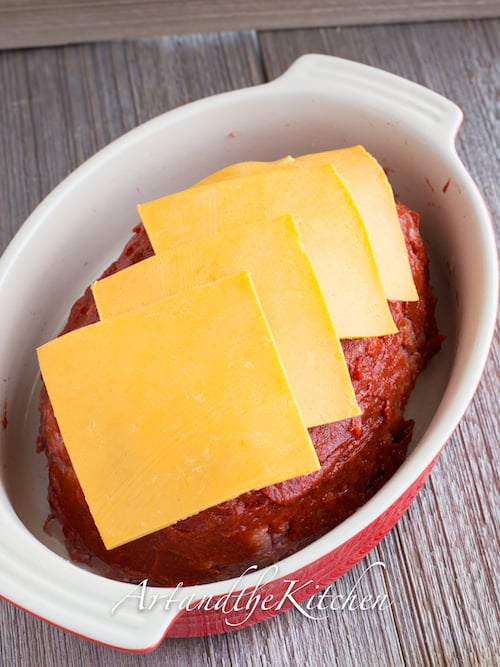
Add layer of cheddar cheese slices.
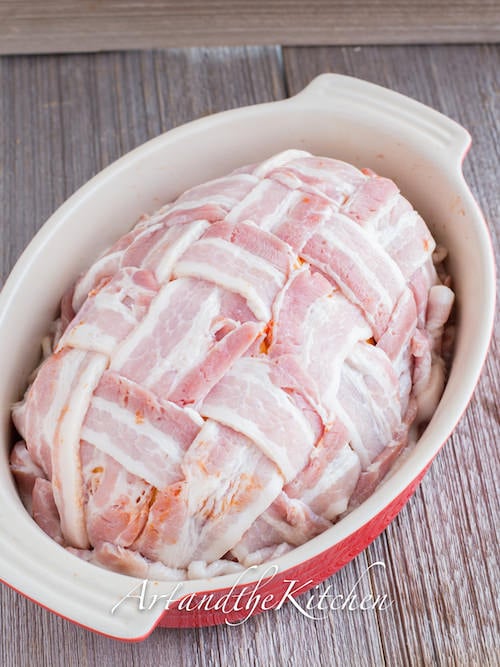
Cover with layer of basket weaved bacon.
Another great meatloaf recipe to try Ham Mozzarella Stuffed Meatloaf
Gluten Free Hemp Chia Seed Oatmeal Cookies
I entered my very first baking contest with this recipe for Gluten Free Hemp Chia Seed Oatmeal Cookies and WON!
This is a terrific gluten free version of one of my favourite oatmeal cookie recipes. I used special ground gluten free flour I bought at a whole foods market.
The hemp and chia seed add sensational flavour and a nice crunch to these Gluten Free Oatmeal Cookies.
Gluten Free Hemp Chia Seed Oatmeal Cookies
A best ever recipe for Gluten Free Oatmeal Cookies
Servings: 2 dozen
Ingredients
- 1 ⅓ cups gluten free flour
- 1 ½ cups gluten free oatmeal
- ¾ cup organic coconut
- ¼ cup hemp seed
- ¼ cup chia seed
- ½ cup dried cranberries raisins or chocolate chips
- ½ teaspoon baking powder
- ½ teaspoon baking soda
- ½ teaspoon salt
- ¼ teaspoon xanthan gum
- 1 cup butter softened
- 1 cup brown sugar
- 1 egg
- 1 vanilla bean scraped
Instructions
- Combine flour, oatmeal, coconut, chia seed, hemp seed, cranberries, baking powder, baking soda, salt and xanthan gum together.
- In large mixing bowl beat together butter and sugar until fluffy.
- Add vanilla and egg, combine well.
- Gradually add flour mixture into butter mixture, combine well.
- Use a ice cream scoop to get cookies same size, flatten slightly with fork.
- Refrigerate for about 15 minutes.
- Bake at 350 degrees for 8-10 minutes.
SaveSave
About

Welcome I'm Laureen creator of Art and the Kitchen. Here you will find tried and true recipes for the everyday cook from homestyle comfort food to exquisite gourmet meals!
Delicious recipes that include family favorites and treasured recipes that have been handed down from my Mom, Grandma and friends.

My son encouraged me to start a food blog when he left home to go to University, so in 2012 I created Art and the Kitchen. He loved the idea of having an online recipe book of his favorite meals! He has become a great cook and can even make a fantastic cheesecake!
My Grandmother was an incredible inspiration to me. She was a lady of simple means who lived on the farm, grew an enormous garden and baked the most delicious bread. My Mom also had great influence in my life. She was an amazing baker and on my blog you will find many of her sweet recipes.
I came up with the name for my blog "Art and the Kitchen" from my love of cooking and my interest in painting and photography. Another passion of mine is gardening. I have a huge vegetable garden and many flower gardens. My collection of lilies, roses and tulips are impressive.
After living in Alberta most of my adult life, and three years in Jacksonville Florida, we moved to my old home town, Humboldt, Saskatchewan. Our home is on a beautiful half acre property. I finally have my huge vegetable garden and ever increasing flower gardens.
My husband, Wayne and I have been married for 34 years. We met while both working for CN Rail. Since I began blogging his question is always "are we eating now or do I have to wait until you take photos".
I hope you enjoy trying my recipes and following my journey at Art and the Kitchen.
You can contact me, Laureen King by email: laureen@artandthekitchen.com
My Top Ten Recipes
Year after year these top ten recipes continue to get rave reviews!


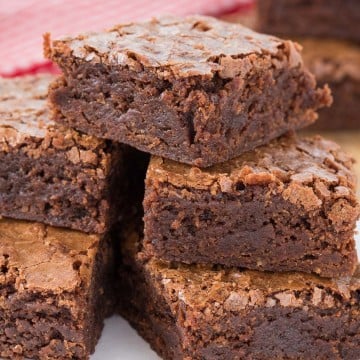
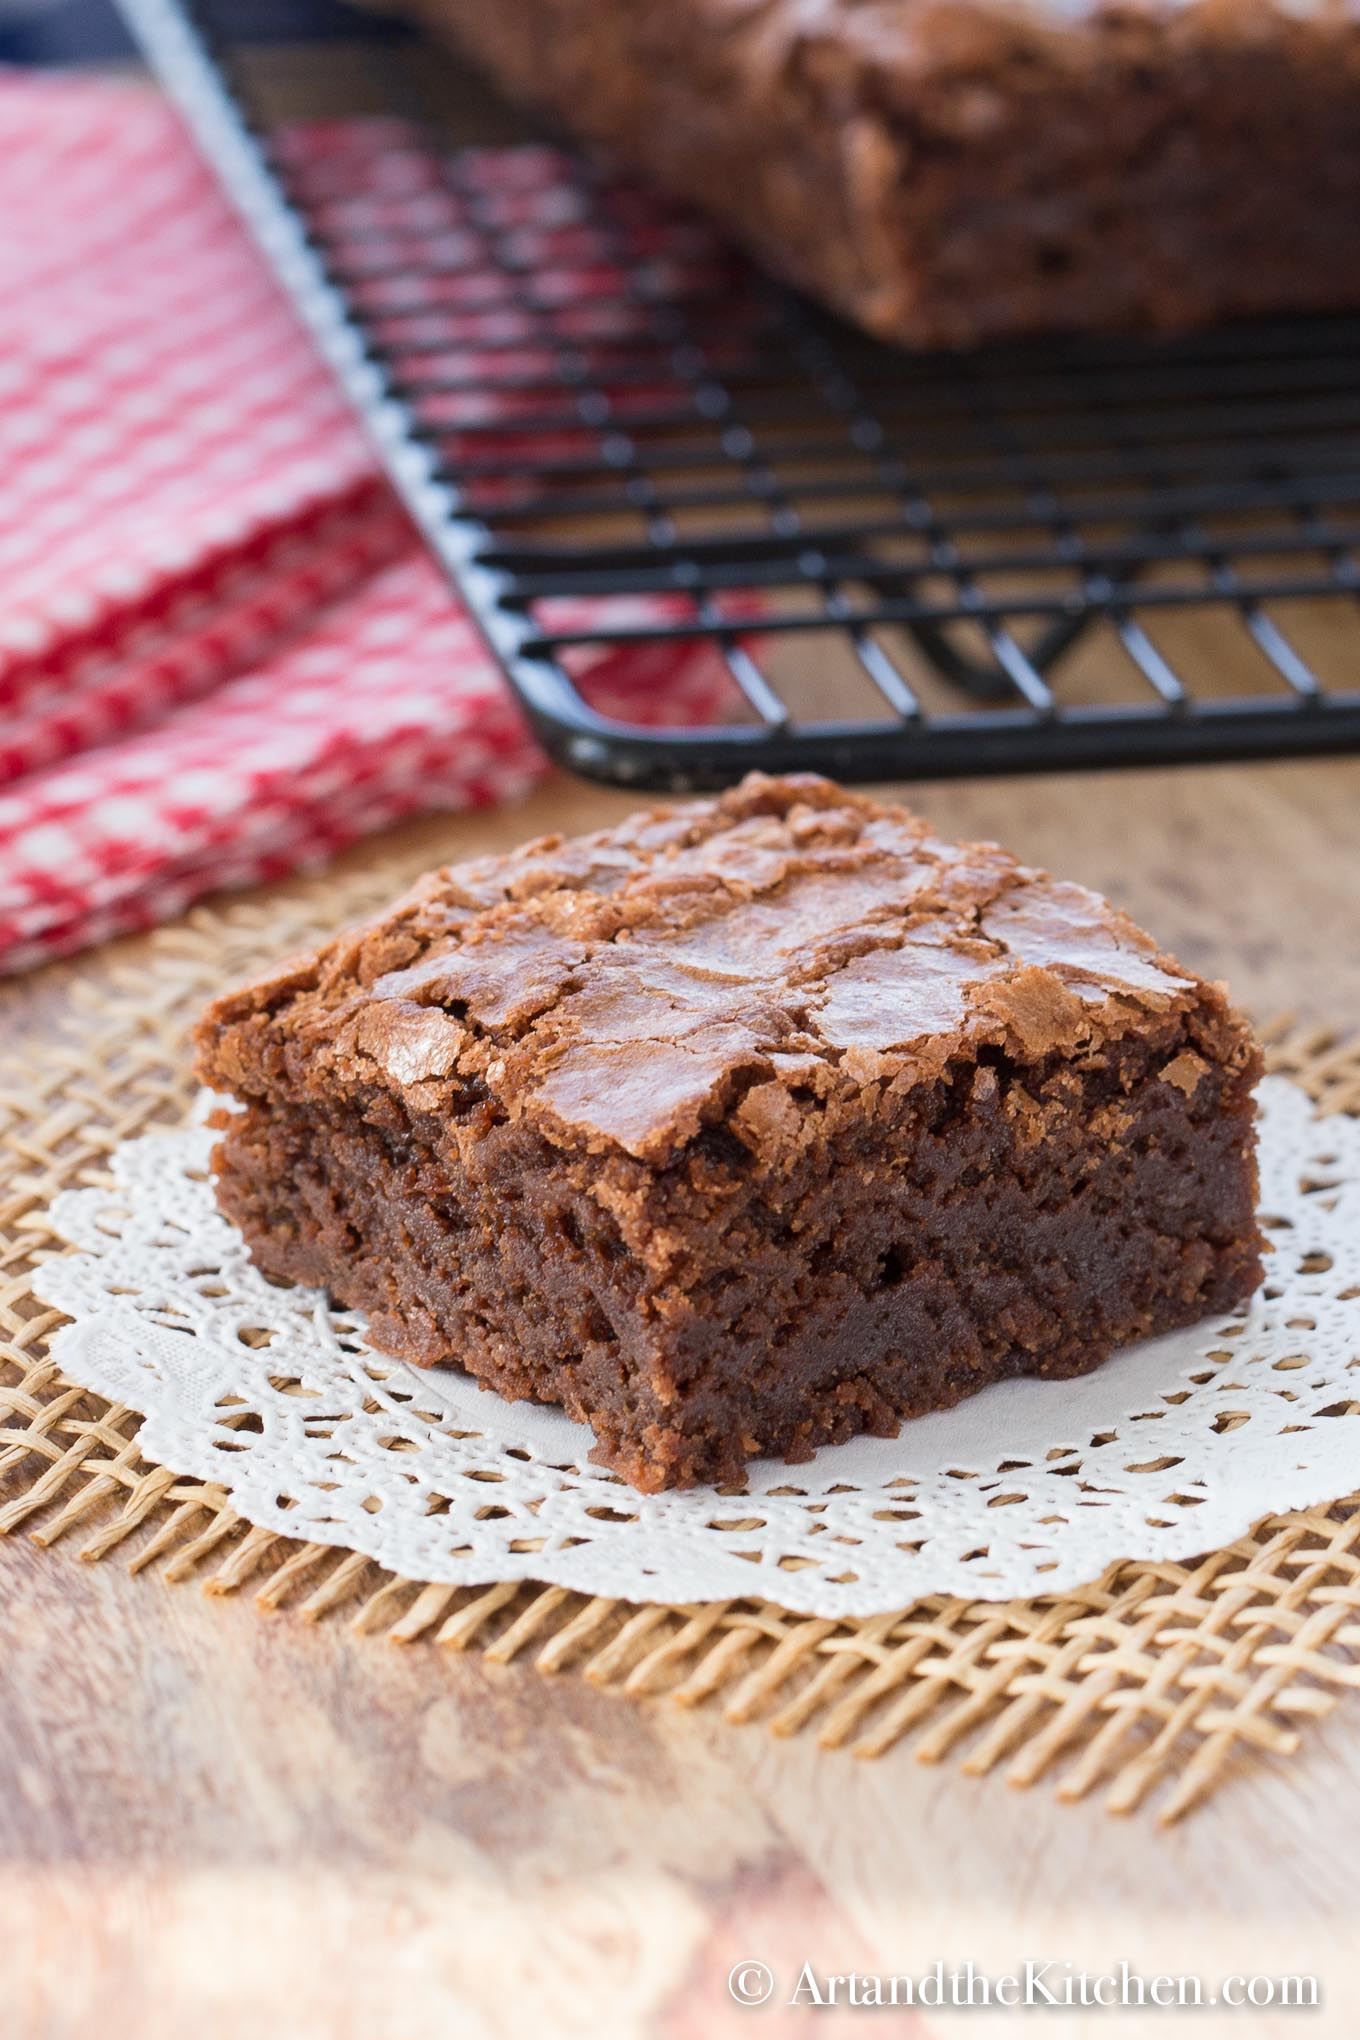
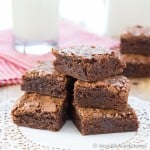
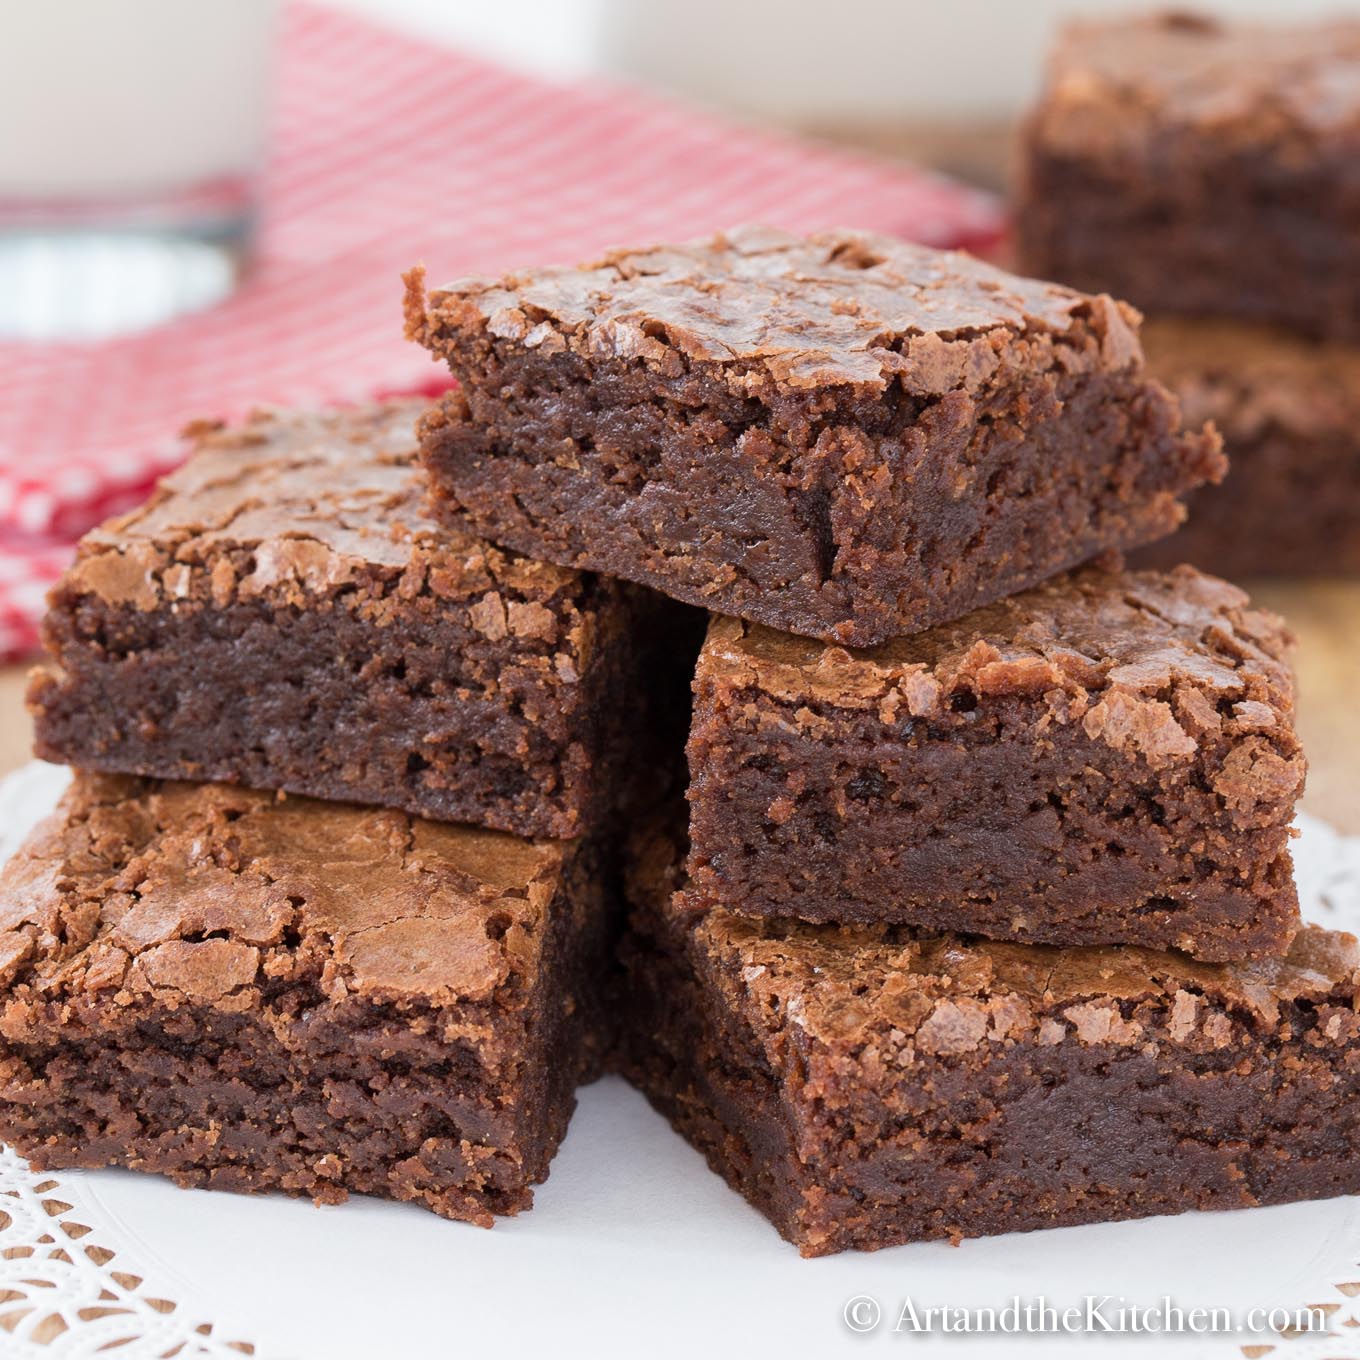
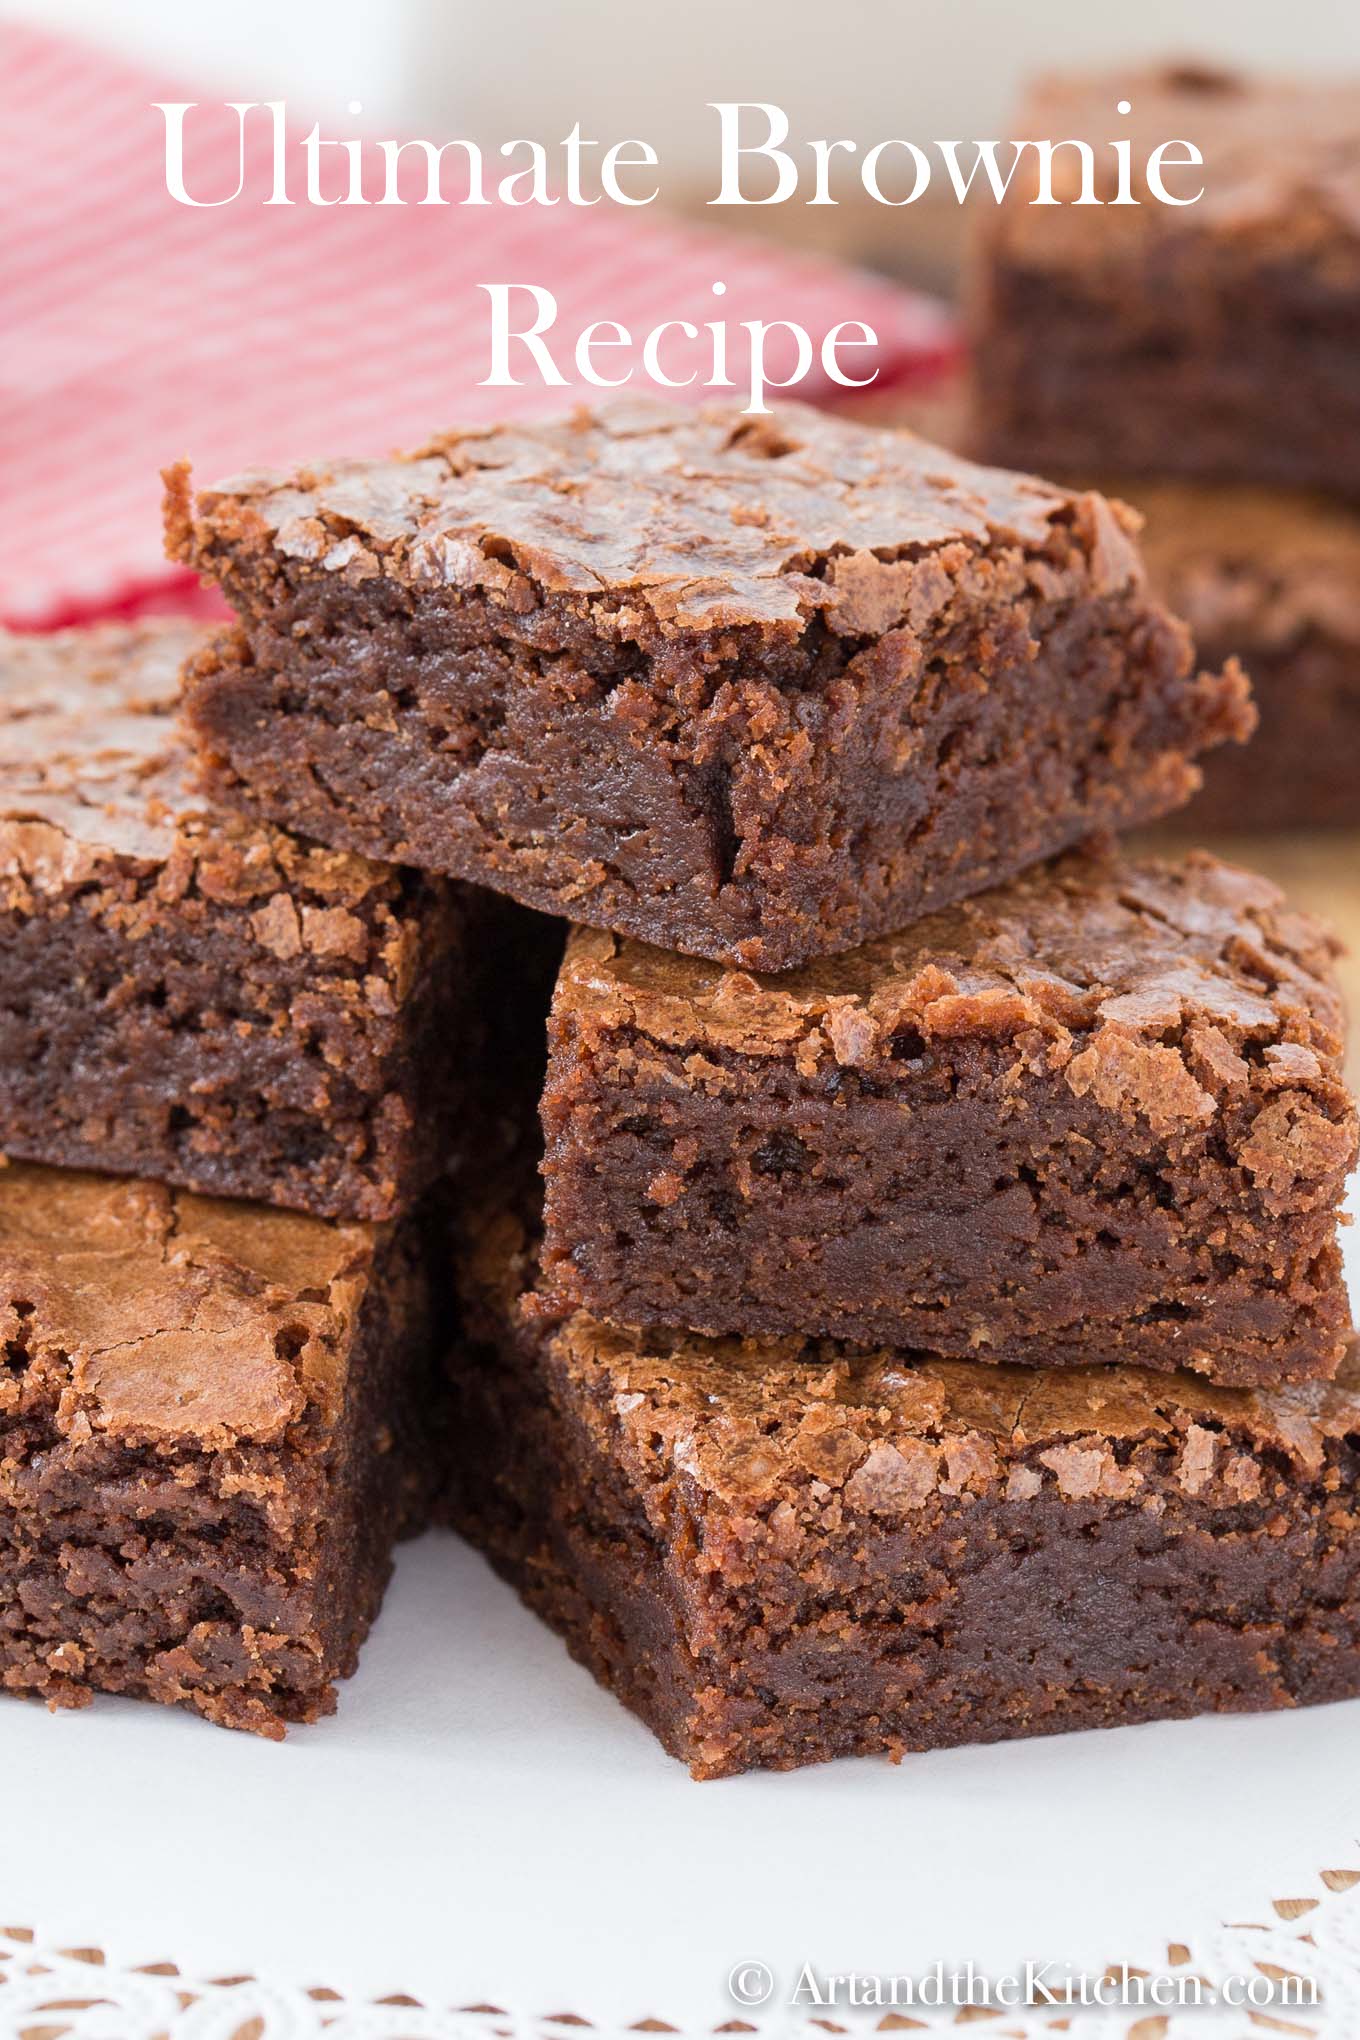
Ultimate Brownie Recipe
Rich and chocolatey this Ultimate Brownie Recipe that makes a super chewy centre and a perfect crackled top.
This perfect, chewy chocolatey brownie tastes great plain or topped with buttercream frosting. Try my recipe for Baileys Irish Cream frosting. The half tablespoon of instant coffee granules I added to this recipe made it taste even better! Not a coffee person, no problem, simply leave the coffee out.
Enjoy these brownies with a large glass of cold milk or top with some vanilla ice-cream, YUM! A decadent dessert for the true chocolate lover with combination of dark chocolate and cocoa powder.
Ultimate Brownie Recipe
This Ultimate Brownie Recipe makes a rich, chewy brownie with a yummy crackled top.
Servings: 24
Calories: 195kcal
Ingredients
- ⅓ cup cocoa powder
- ½ tablespoon instant coffee granules
- ½ cup plus 2 tablespoons boiling water
- 2 ounces dark chocolate chopped
- ¼ cup unsalted butter
- ½ cup plus 2 tablespoons vegetable oil
- 3 large eggs plus 1 large egg yolk
- 2 teaspoons vanilla extract
- 2 ½ cup granulated sugar
- 1 ¾ cup all purpose flour
- ½ teaspoon salt
Instructions
- Preheat to 350º F
- Grease 13x9 inch cake pan with butter.
- Whisk together cocoa powder, instant coffee and boiling water in a large bowl until smooth.
- Add the dark chocolate and butter whisking until chocolate and butter are melted .
- Add oil, vanilla and eggs. Continue to whisk until smooth.
- Whisk in sugar until fully combined.
- Using a spatula stir in flour and salt mixing until combined. Don’t over mix.
- Pour batter into prepared pan and bake 30 to 35 minutes.
- Brownies are done when toothpick inserted halfway come out with just a few crumbs sticking to toothpick.
- Cool on wire rack for 1 hour before removing from pan.
Nutrition
Calories: 195kcal | Carbohydrates: 29g | Protein: 2g | Fat: 8g | Saturated Fat: 5g | Cholesterol: 25mg | Sodium: 57mg | Potassium: 56mg | Sugar: 21g | Vitamin A: 90IU | Calcium: 8mg | Iron: 1mg
Thanks for dropping by Art and the Kitchen. Be sure to check out more great dessert recipes like my Brownie Cheesecake Bites
Love if you would take the time to follow me on Pinterest Facebook Instagram and Twitter where I post all my latest recipes.
Here's a great image for Pinterest!
How to Decorate Cookies with Royal Icing

Easy to follow step by step instructions for How to Decorate Cookies with Royal Icing.
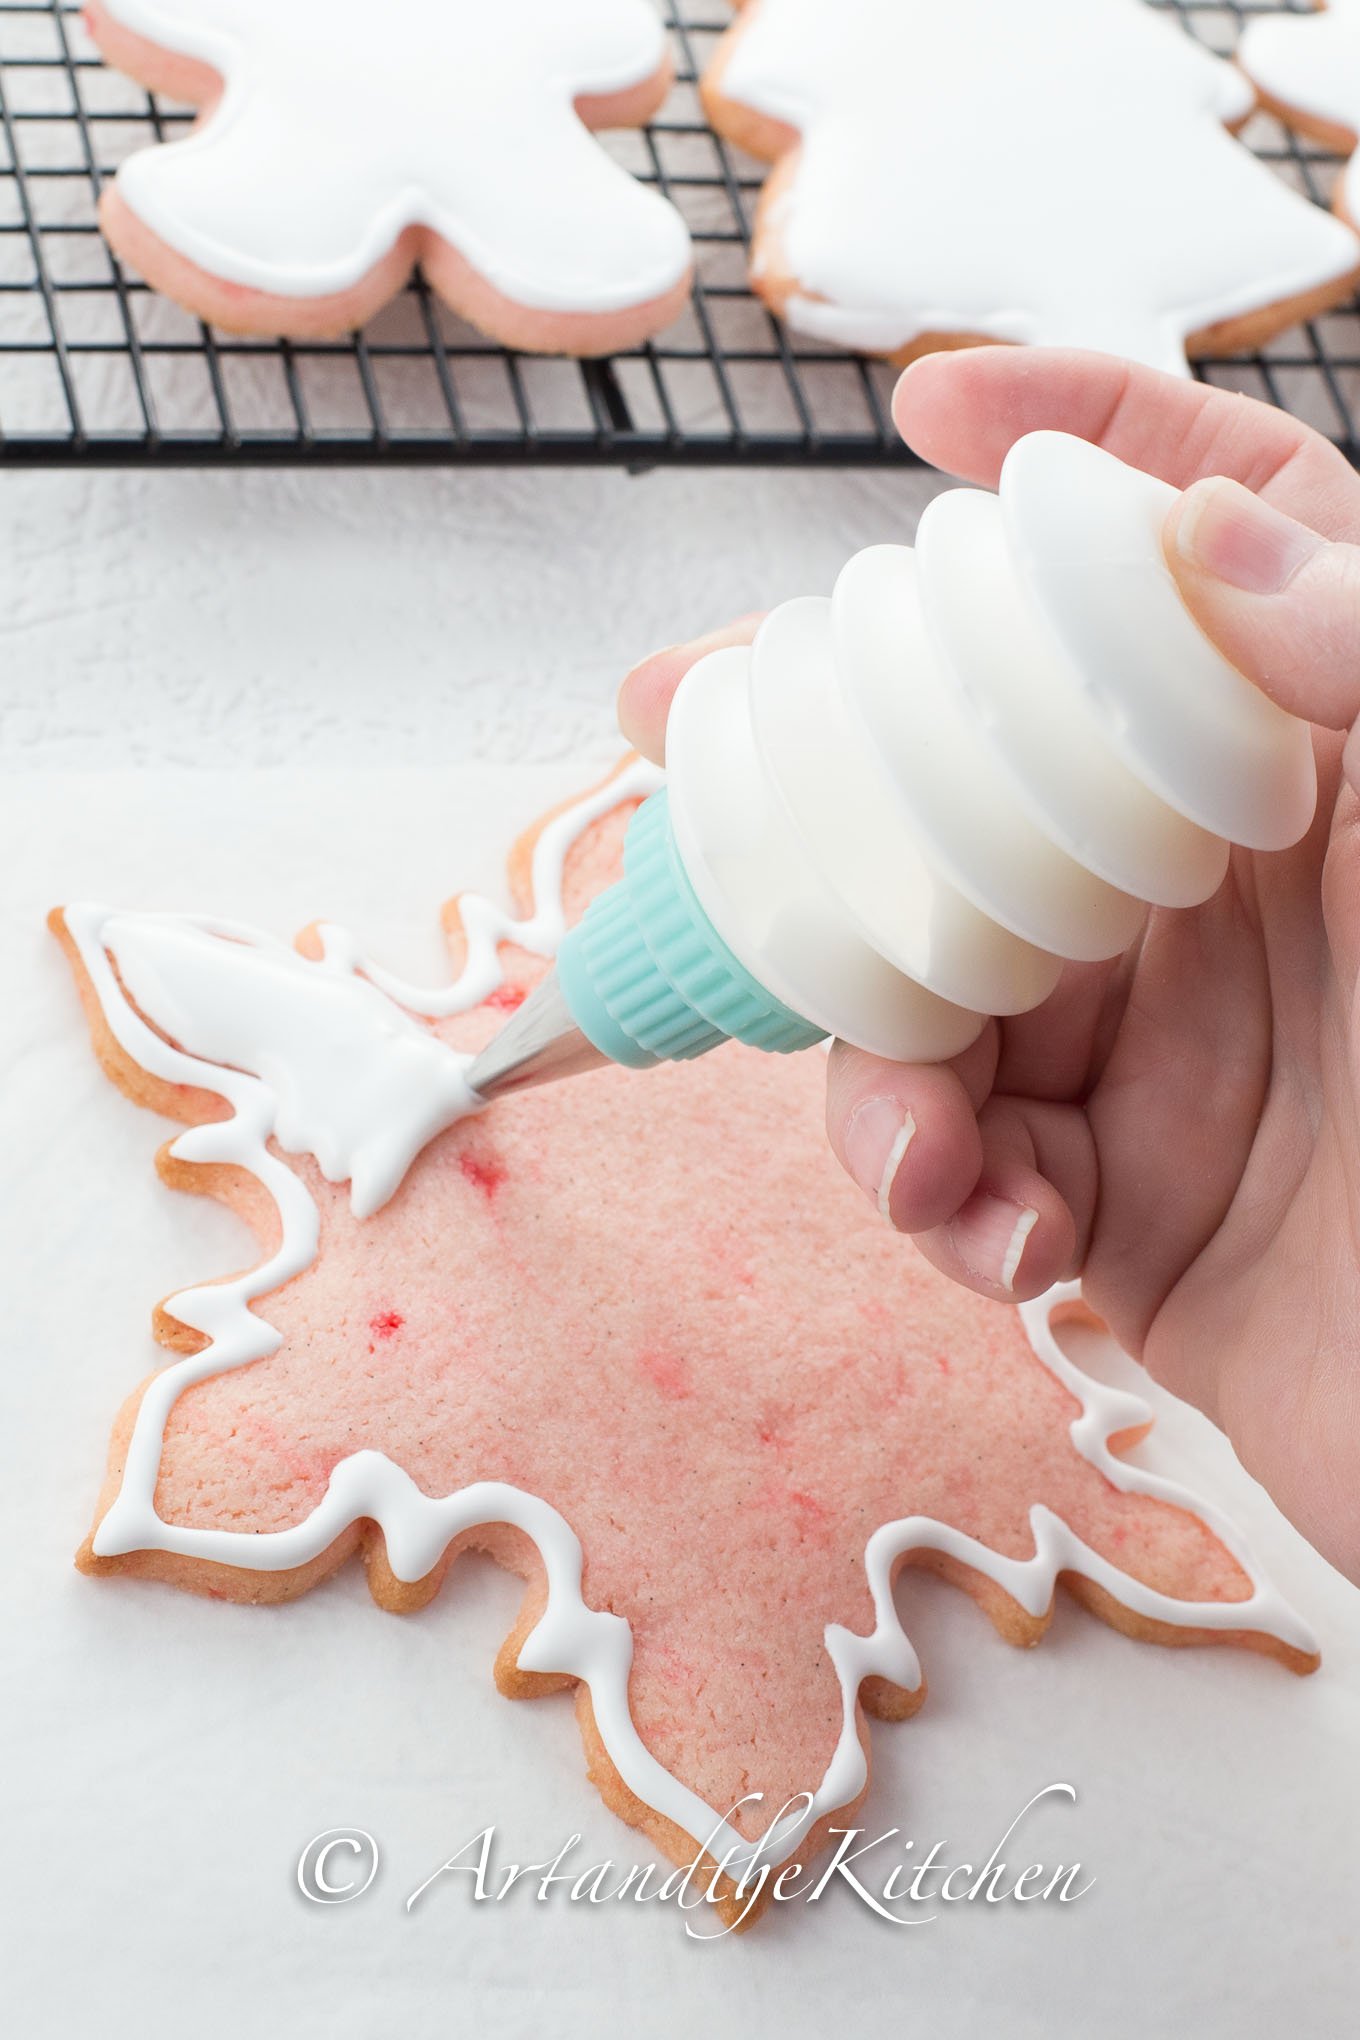
Making beautiful decorative cookies is easy using Royal Icing. I use meringue powder to make my royal icing. I find it so much easier to use and to attain the desired consistency instead of using an egg white version. Royal icing made with meringue powder will keep up to a week in an airtight container at room temperature.
Sugar cookie recipes for making decorative cookies.

Step by Step instructions for decorating cookies.
Preparing icing
Sift together confectioner's sugar and meringue powder. Then using electric mixer, beat the confectioner's sugar, meringue powder and water for 7 minutes. At this stage the icing will be very thick.

Outlining cookies with royal icing
Place a cup of the icing into a separate bowl to prepare the icing for doing the outline. Adjust the amount you need depending on how many cookies you are decorating. Cover remaining icing immediately with plastic wrap to prevent drying out.
Add a small amount of water (¼ teaspoon at a time) to the icing. Stir well after each addition of water. This step is to thin the icing to a slightly stiff consistency, yet will hold together when a spoon is lifted from the icing. Pour into a piping bag or squeeze bottle. Use a round #2 tip to outline the cookies.
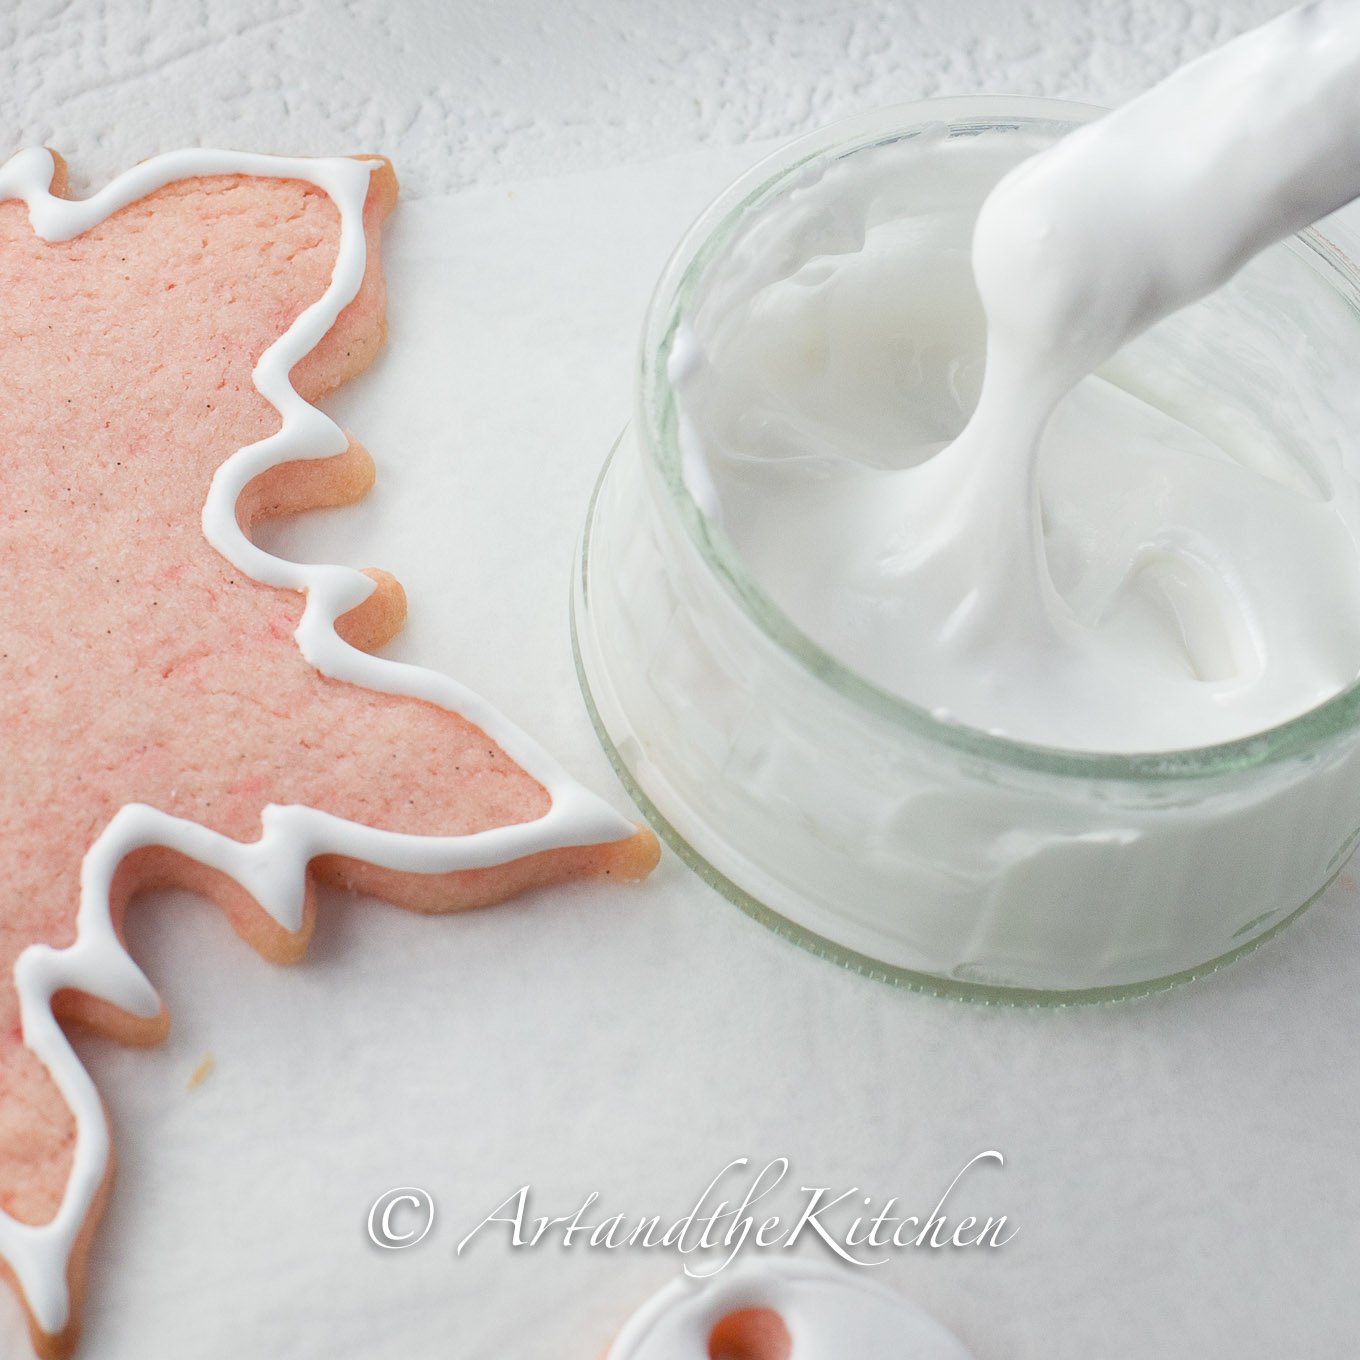
Flooding cookies with royal icing
Using about 2 cups of icing add water a very small amount at a time (droplets at a time) to thin to the icing to a consistency that would be similar to table syrup. When you run a knife through the icing the line disappears in about 10 seconds. Pour into a piping bag or squeeze bottle and using a round #4 tip cover cookies completely with icing.
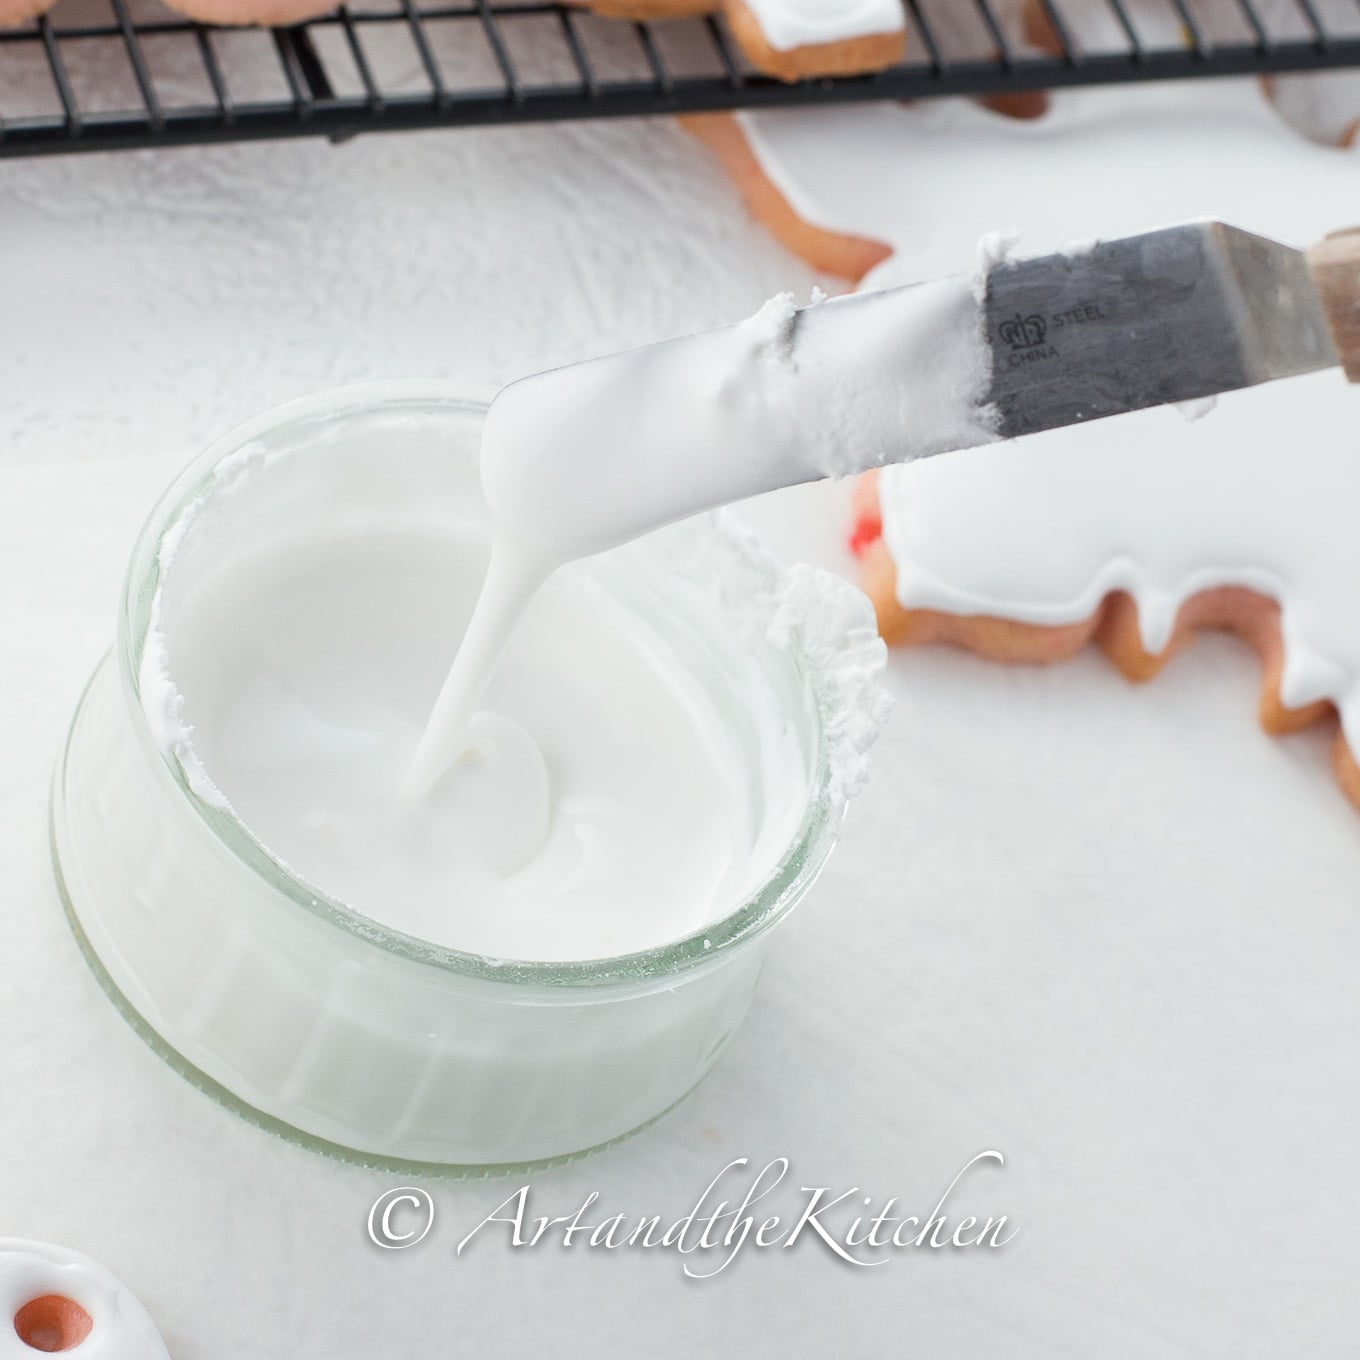
I use a toothpick to spread the icing to the edges.
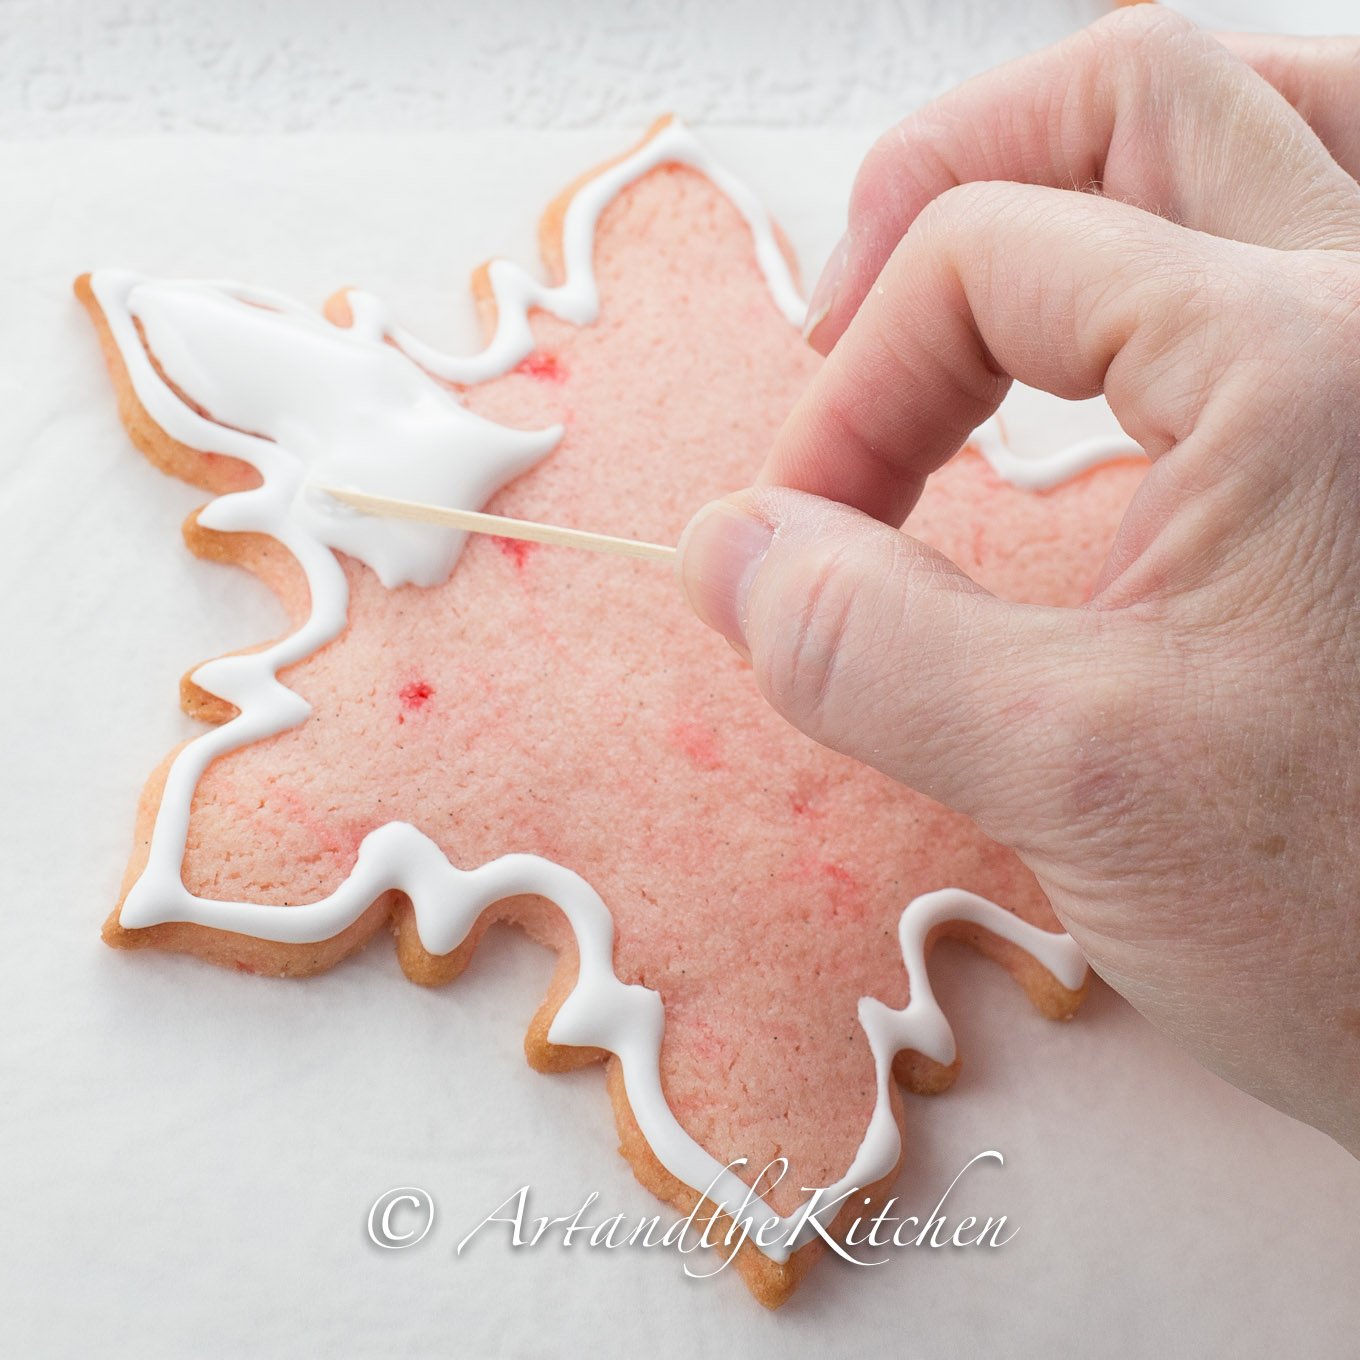
Use the pointed side of a toothpick to prick any air bubbles. Do this IMMEDIATELY, as it can't be done if the icing starts to harden.
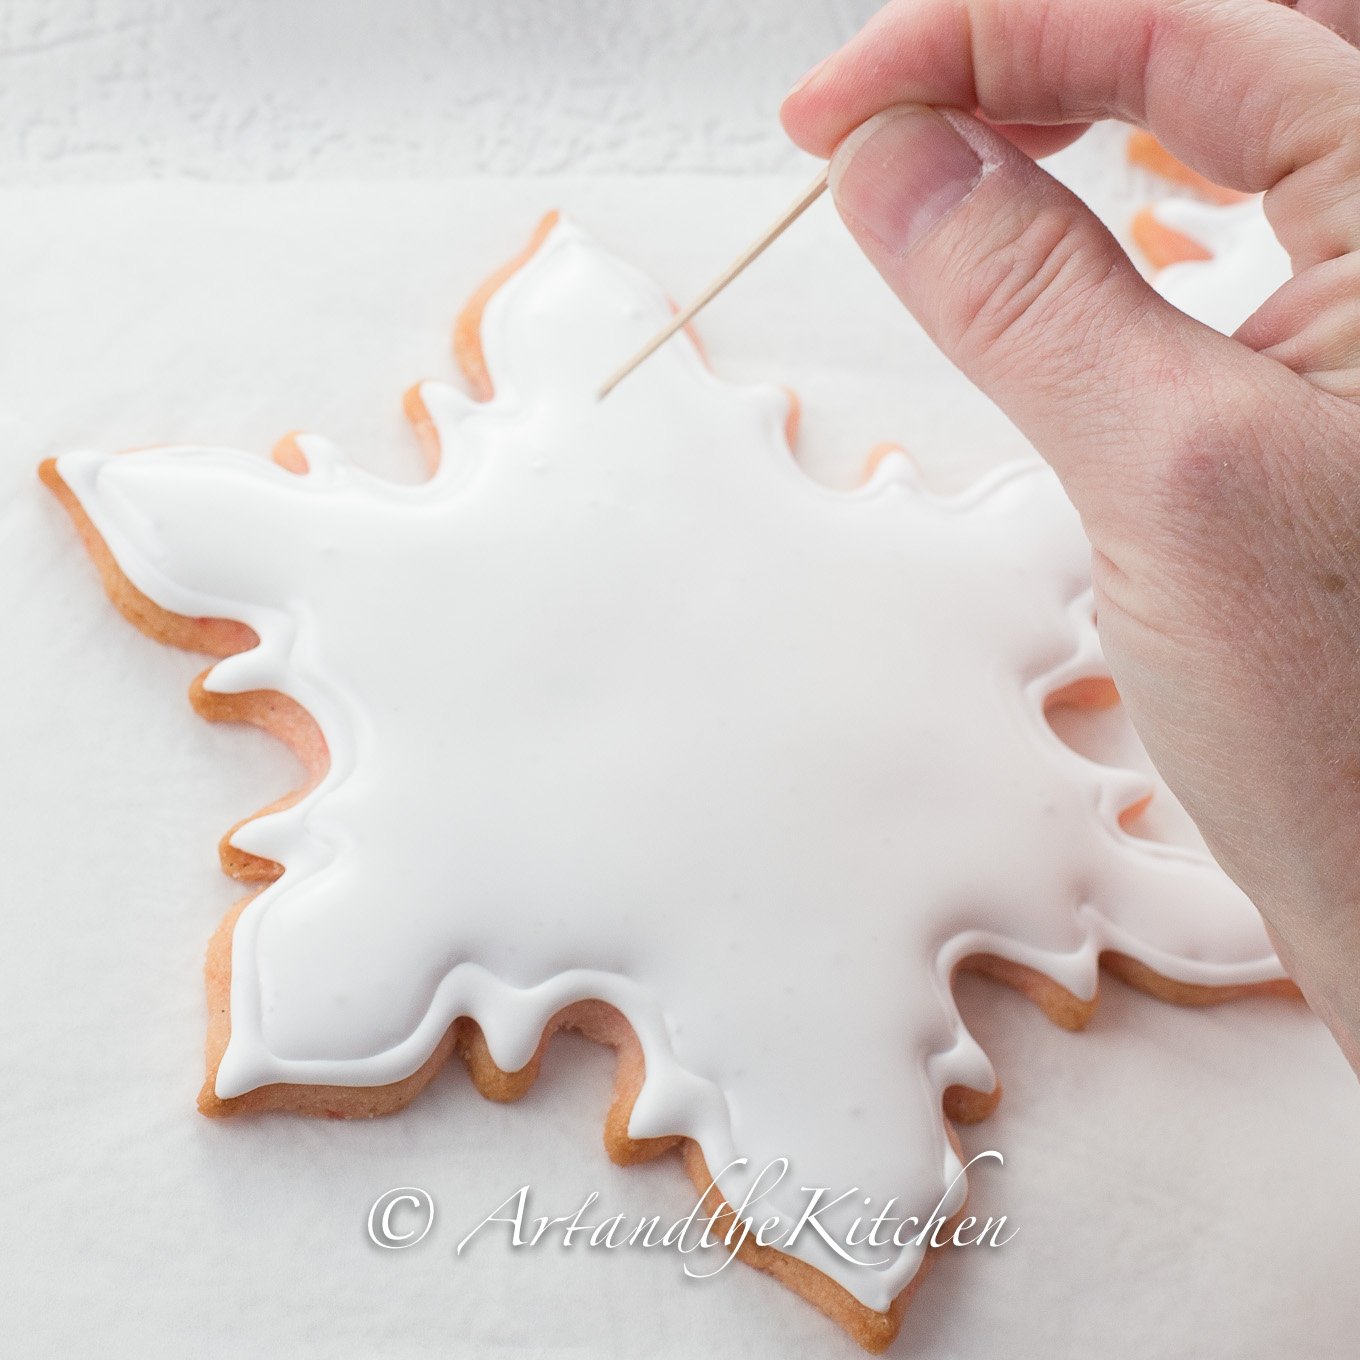
Let dry completely, at least 8 hours or overnight. Do not cover cookies.
Decorate as desired by adding a tad of gel food colouring to icing that is the same consistency as outlining icing.

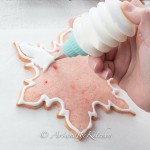
How to Decorate Cookies with Royal Icing
Easy to follow instructions for decorating cookies with royal icing
Servings: 3 dozen
Ingredients
- 1 lb confectioner's sugar also called powdered or icing sugar
- 5 tablespoons meringue powder
- 1/ 2 cup cold water
- gel food colouring
Instructions
- Sift together confectioner's sugar and meringue powder. Be sure to sift or you will have lumps!
- Using an electric mixer on medium speed beat together sugar, meringue powder and water for 7 minutes. Icing will be very thick
- Thin to desired consistency by mixing very small amounts (¼ tsp. at a time) to icing for outlining, covering and decorating cookies. see detailed instructions above.
Sour Cherry and Fig Whole Wheat Muffins
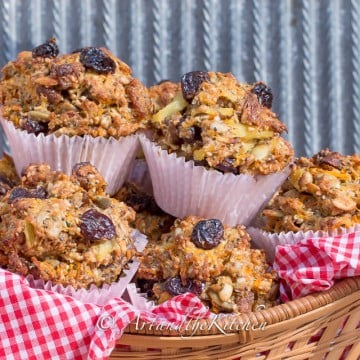
This tasty recipe for Sour Cherry and Fig Whole Wheat Muffins is excellent as a breakfast muffin or anytime snack.
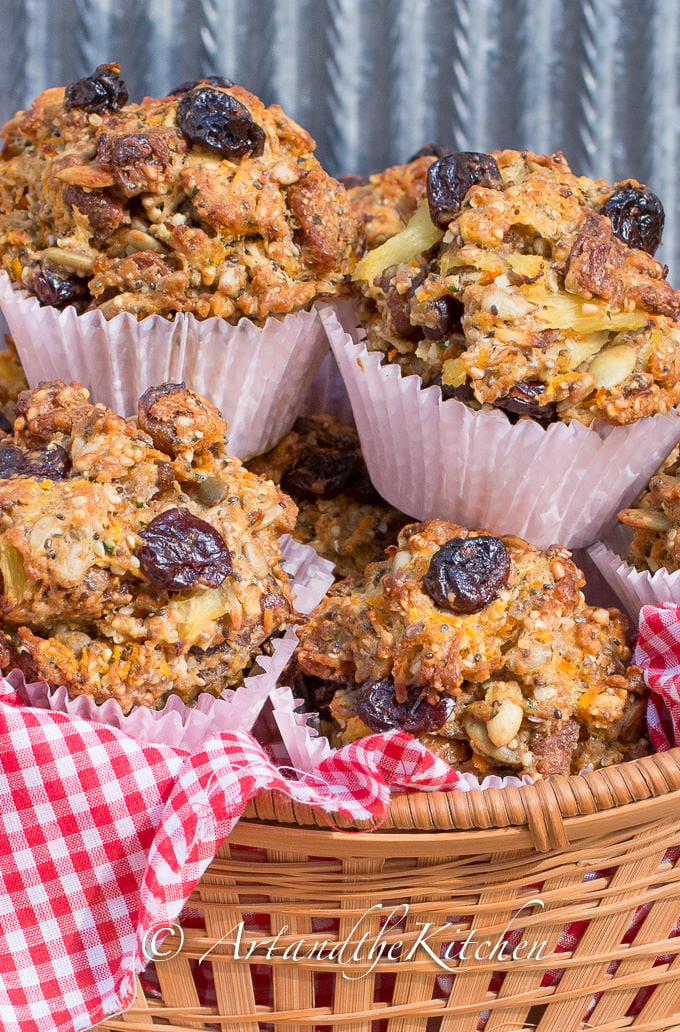
A very filling, dense muffin, not the kind that almost taste like a cupcake. Sour Cherry and Fig Whole Wheat Muffins are packed with nutrition. Ingredients include an assortment of seeds, carrots, apple, pineapple and whole wheat. This recipe adapts my Fuel to Go Muffins which uses multigrain flour.
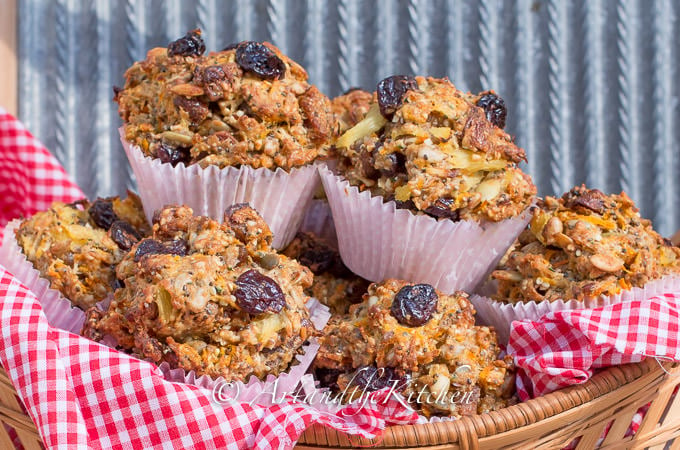

Sour Cherry and Fig Whole Wheat Muffins
This tasty recipe for Sour Cherry and Fig Whole Wheat Muffins is excellent as a breakfast muffin or anytime snack.
Servings: 1 dozen
Ingredients
- 2 cups whole wheat flour
- 1 cup sugar
- 1 tablespoon cinnamon
- 2 teaspoon baking powder
- ½ teaspoon salt
- ¾ cups shredded coconut
- ½ cup sunflower seeds
- ½ cup pumpkin seeds
- ¼ cup chia seeds
- ¼ cup hemp seeds
- 1 cup dried sour cherries
- 1 cup dried figs chopped
- 2 cups grated carrots
- 1 apple shredded
- 1 can crushed pineapple 8oz, drained
- 3 eggs
- ⅔ cup sunflower oil any vegetable oil will work
- 1 teaspoon vanilla
Instructions
- In large bowl mix together flour, sugar, cinnamon, baking powder and salt.
- Add all the seeds, coconut, figs and sour cherries.
- Stir in carrots, apple and pineapple, combine well.
- In separate bowl stir together eggs, oil and vanilla.
- Add egg mixture to other ingredients, combine just until incorporated (do not over mix).
- Batter will be very thick.
- Line muffin pans with paper baking cups.
- Divide batter into baking cups. (will be piled high)
- Bake 350 degrees for 30-40 minutes until tops are golden brown.
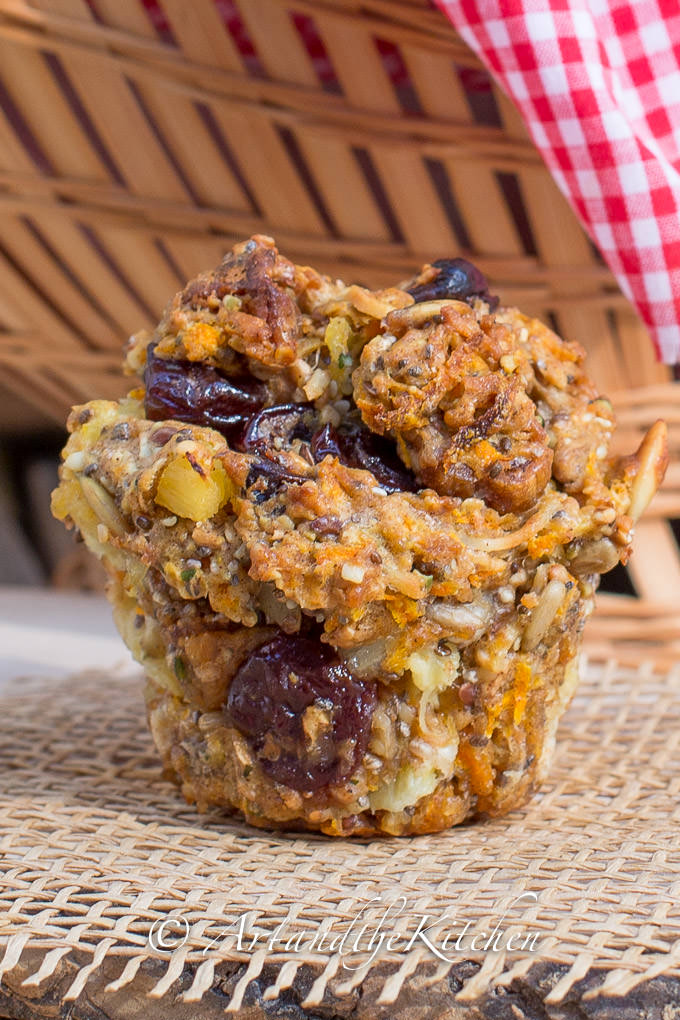

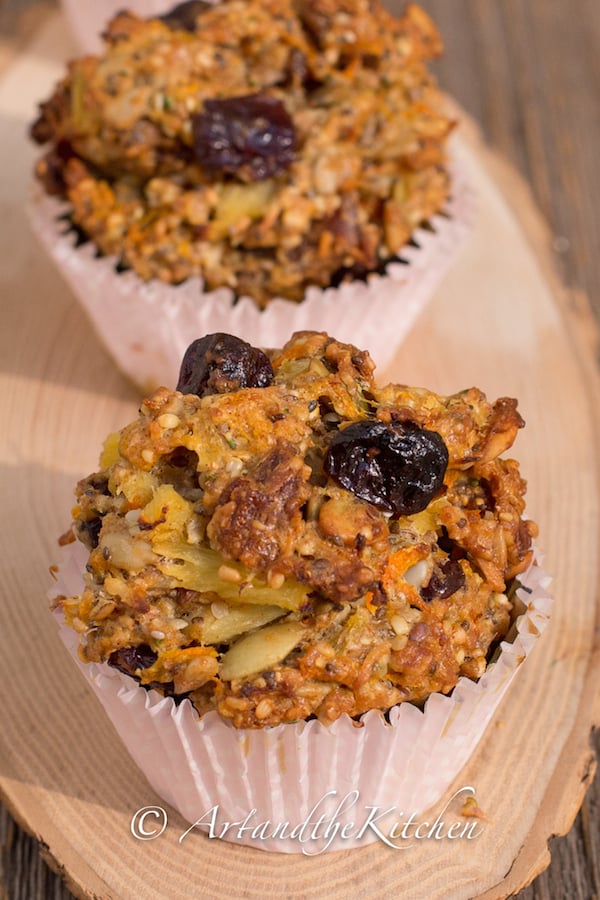
Pumpkin Cheesecake Pie

Pumpkin Cheesecake Pie is the perfect fall dessert. This recipe combines layers of creamy cheesecake with pumpkin pie. Top with fresh whipped cream and you have a Holiday dessert everyone will love!
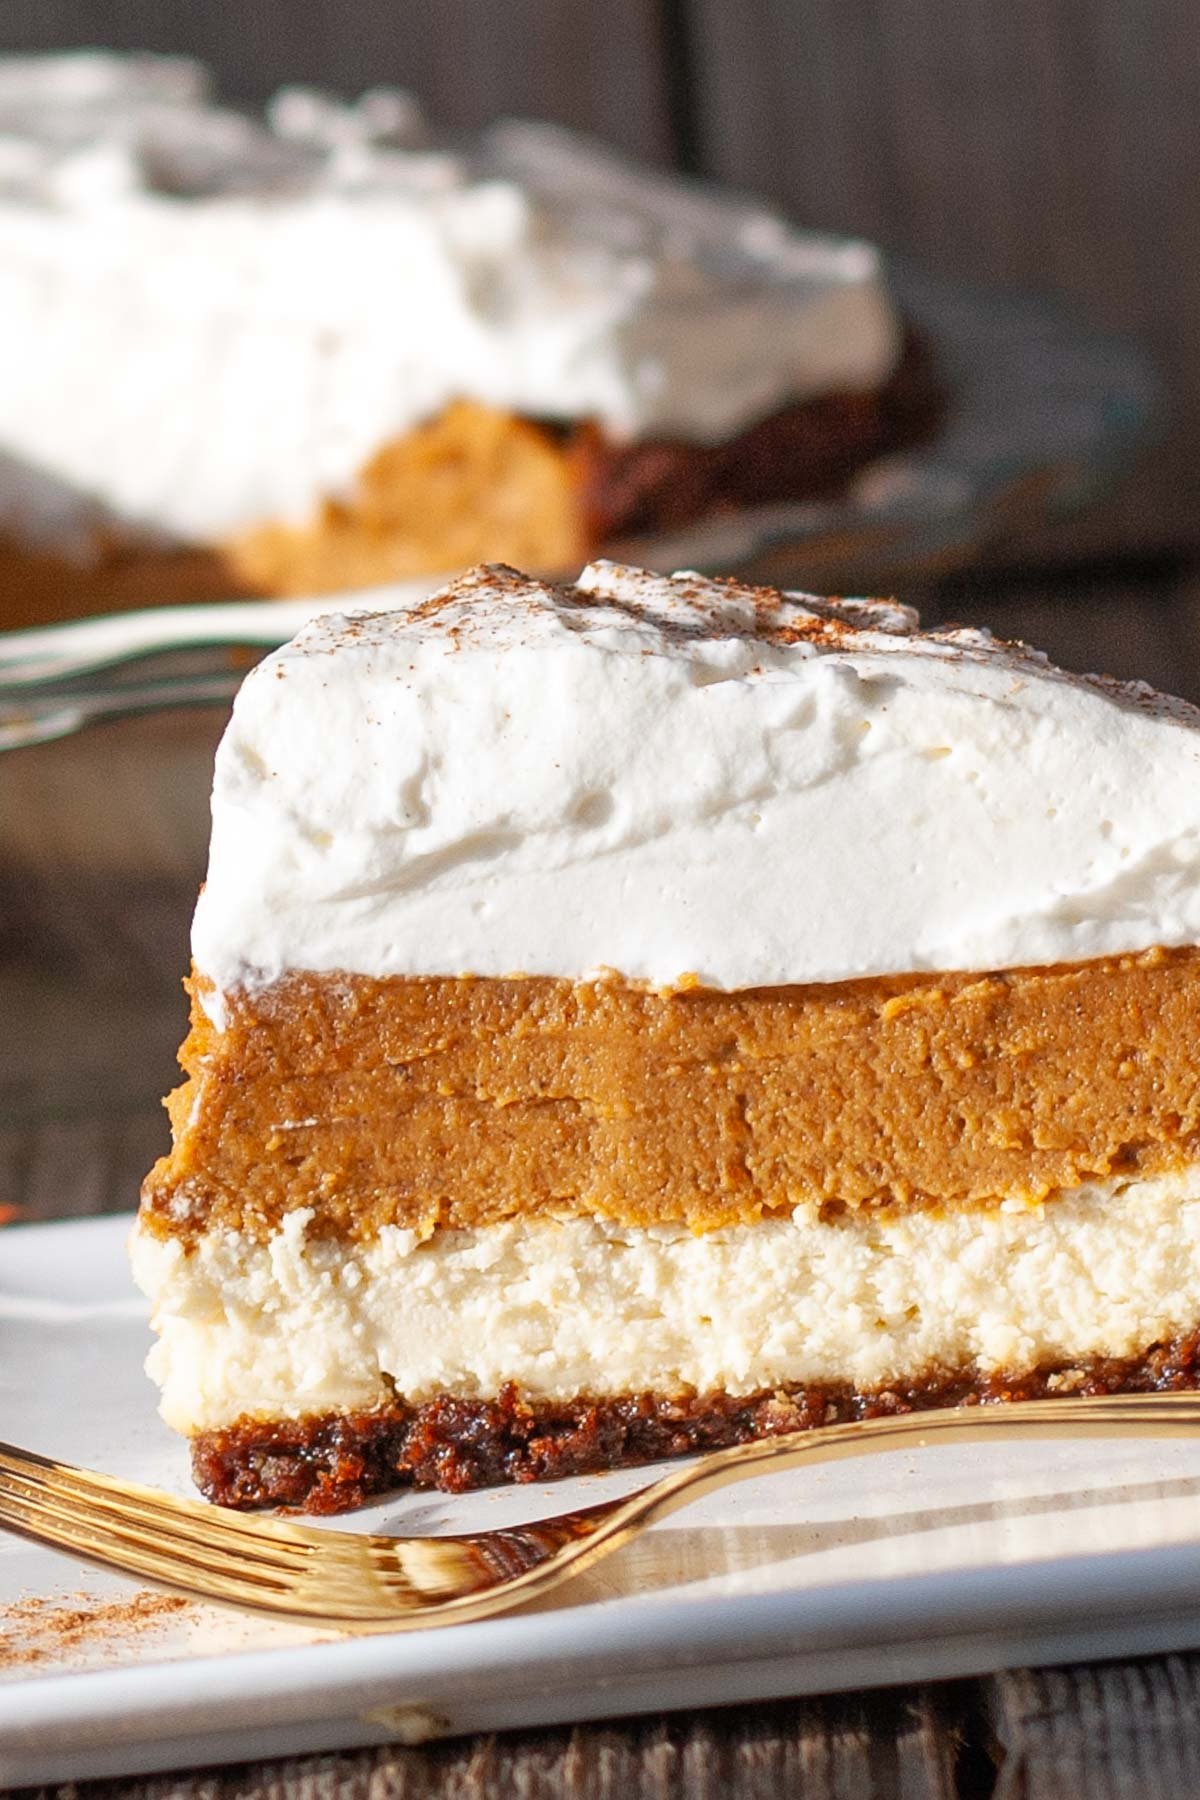
My family's Thanksgiving meal always concludes with both a pumpkin pie and an Apple Pie. In fact, I usually have to make two of each because my son has always ate pie for breakfast after a big Holiday.
Options for the piecrust
My favorite is making my Homemade Gingersnap crust. It is made with gingersnap cookie crumbs and has the perfect combination of flavors for pumpkin pie.
A plain graham cracker crust works well. You can either use a homemade graham crust or store-bought.
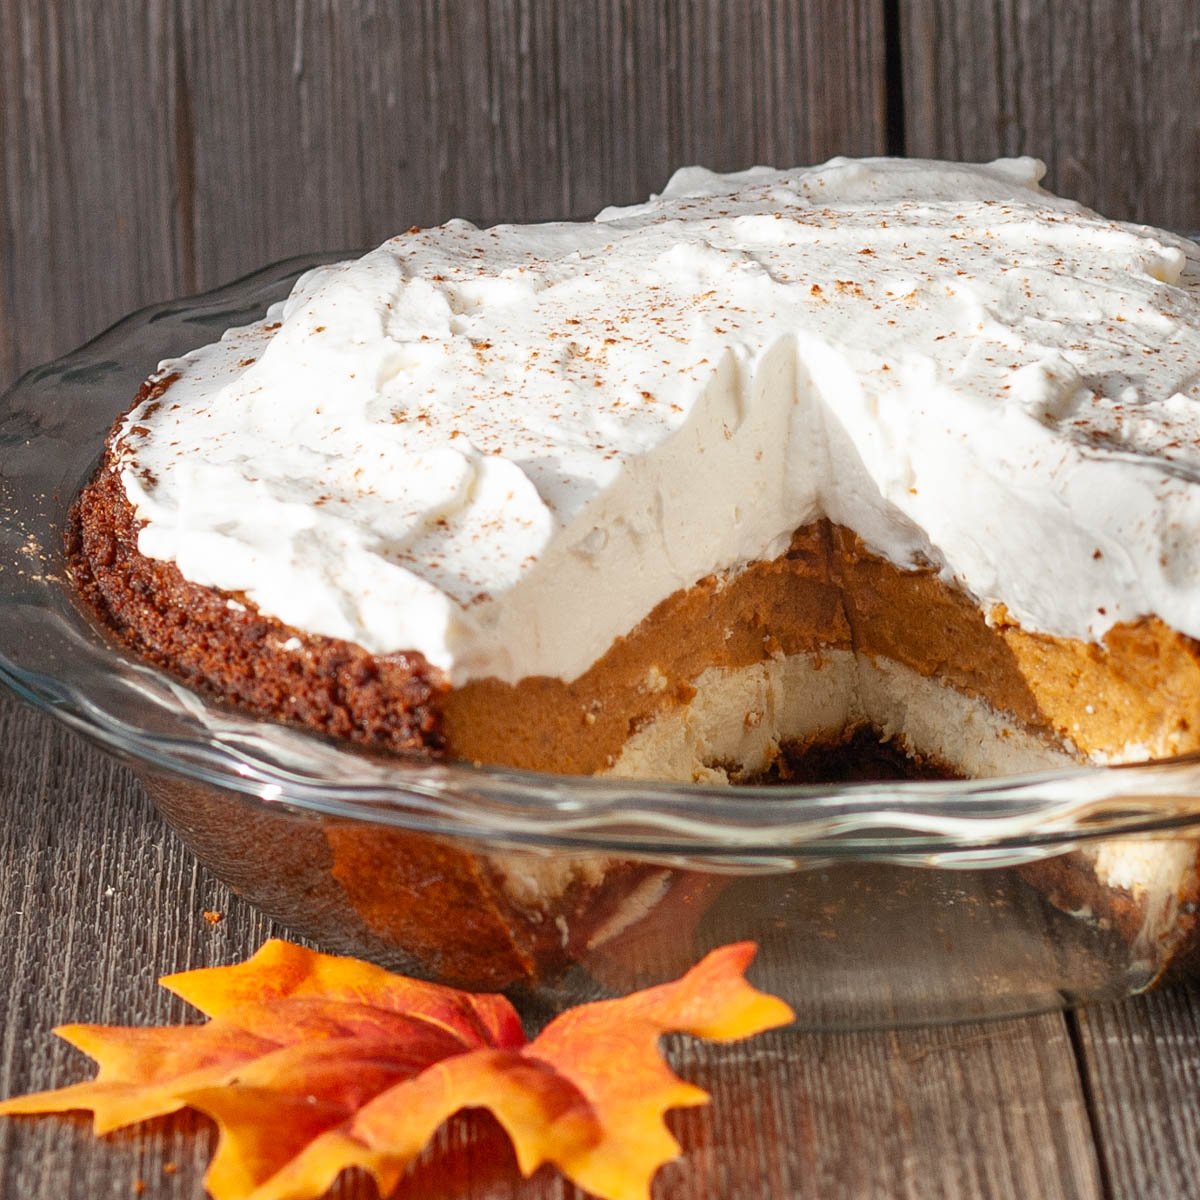
Ingredients
- Pumpkin - I use 1 can (15 ounce size) of pure pumpkin, not the pumpkin pie filling which contains sugar and spices.
- Cream Cheese - the full fat regular cream cheese will give you creamy, rich flavor. TIP: make sure the cream cheese is at room temperature so it blends well without lumps.
- Half and Half cream - this is cream that contains 10% milk fat.
- Whipping cream - also referred to as heavy cream that contains 35% or more milk fat. The whipping cream is used to top the pie before serving.
- Pumpkin Pie Spice - this is usually a combination of cinnamon, nutmeg, ginger, cloves, and allspice.
- Sugar - this recipe uses both granulated sugar and brown sugar.
- Eggs - whole large sized eggs.
- Graham pie crust - make a homemade version or use a store-bought. You may also want to try my Gingersnap Pie Crust recipe.
More Pumpkin desserts to try
I get rave reviews for my No Bake Pumpkin Pie. A super popular no-bake dessert.
Pumpkin Bread Pudding is a festive twist on a classic bread pudding recipe.
Soft Pumpkin Pecan Cookies are soft and fluffy, packed with pumpkin pie spice flavor.
Pumpkin Cheesecake Tarts are made of layers of fluffy cream cheese, pumpkin and whipped cream, in perfect bite-sized servings.
This post was originally published November 18, 2012. Occasionally I update with fresh tips, content, and photos. Current update October 18, 2023.
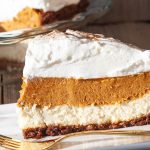
Pumpkin Cheesecake Pie
Pumpkin Cheesecake Pie is the perfect fall dessert. This recipe combines layers of creamy cheesecake with pumpkin pie.
Servings: 8
Calories: 646kcal
Ingredients
- 12 oz cream cheese room temperature
- ¼ cup sugar
- 5 large eggs
- 1 can pure pumpkin 15 ounces
- ⅔ cup brown sugar packed
- 2 teaspoons pumpkin spice
- ¾ cup half and half or light cream 10% milk fat
- 2 cups whipping cream (heavy cream) for topping
- 1 graham pie crust
Instructions
- Prepare your favorite graham pie crust or use store-bought crust.
- Preheat the oven to 350º Fahrenheit.
- Using an electric mixer, in a large bowl combine the cream cheese, ¼ cup granulated sugar, and 1 egg. Beat on medium-low speed until smooth.
- Spread the cream cheese mixture on top of the graham pie crust.
- In a mixing bowl, combine the pure pumpkin, brown sugar and pumpkin spice.
- Beat in 4 eggs, one at a time.
- Gradually mix in the half and half cream. Blend until smooth and combined.
- Slowly pour the pumpkin mixture over the cheesecake layer.
- Cover the pie with a pie crust shield, or foil to prevent the edges from over cooking.
- Bake about 1 hour or until knife inserted near center comes out clean.
- Cool on a wire rack. Cover and refrigerate.
- Top with whipped cream prior to serving.
Notes
Substitute my Gingersnap pie crust in this recipe.
Nutrition
Calories: 646kcal | Carbohydrates: 48g | Protein: 11g | Fat: 47g | Saturated Fat: 26g | Polyunsaturated Fat: 3g | Monounsaturated Fat: 15g | Trans Fat: 0.01g | Cholesterol: 234mg | Sodium: 316mg | Potassium: 347mg | Fiber: 2g | Sugar: 34g | Vitamin A: 9964IU | Vitamin C: 3mg | Calcium: 161mg | Iron: 2mg
Stained Glass Valentine Cookies

Beautifully decorated Valentine Cookies that are decorated with royal icing and a stained glass technique for the center. These cookies make a very tasty Valentine's Day treat.
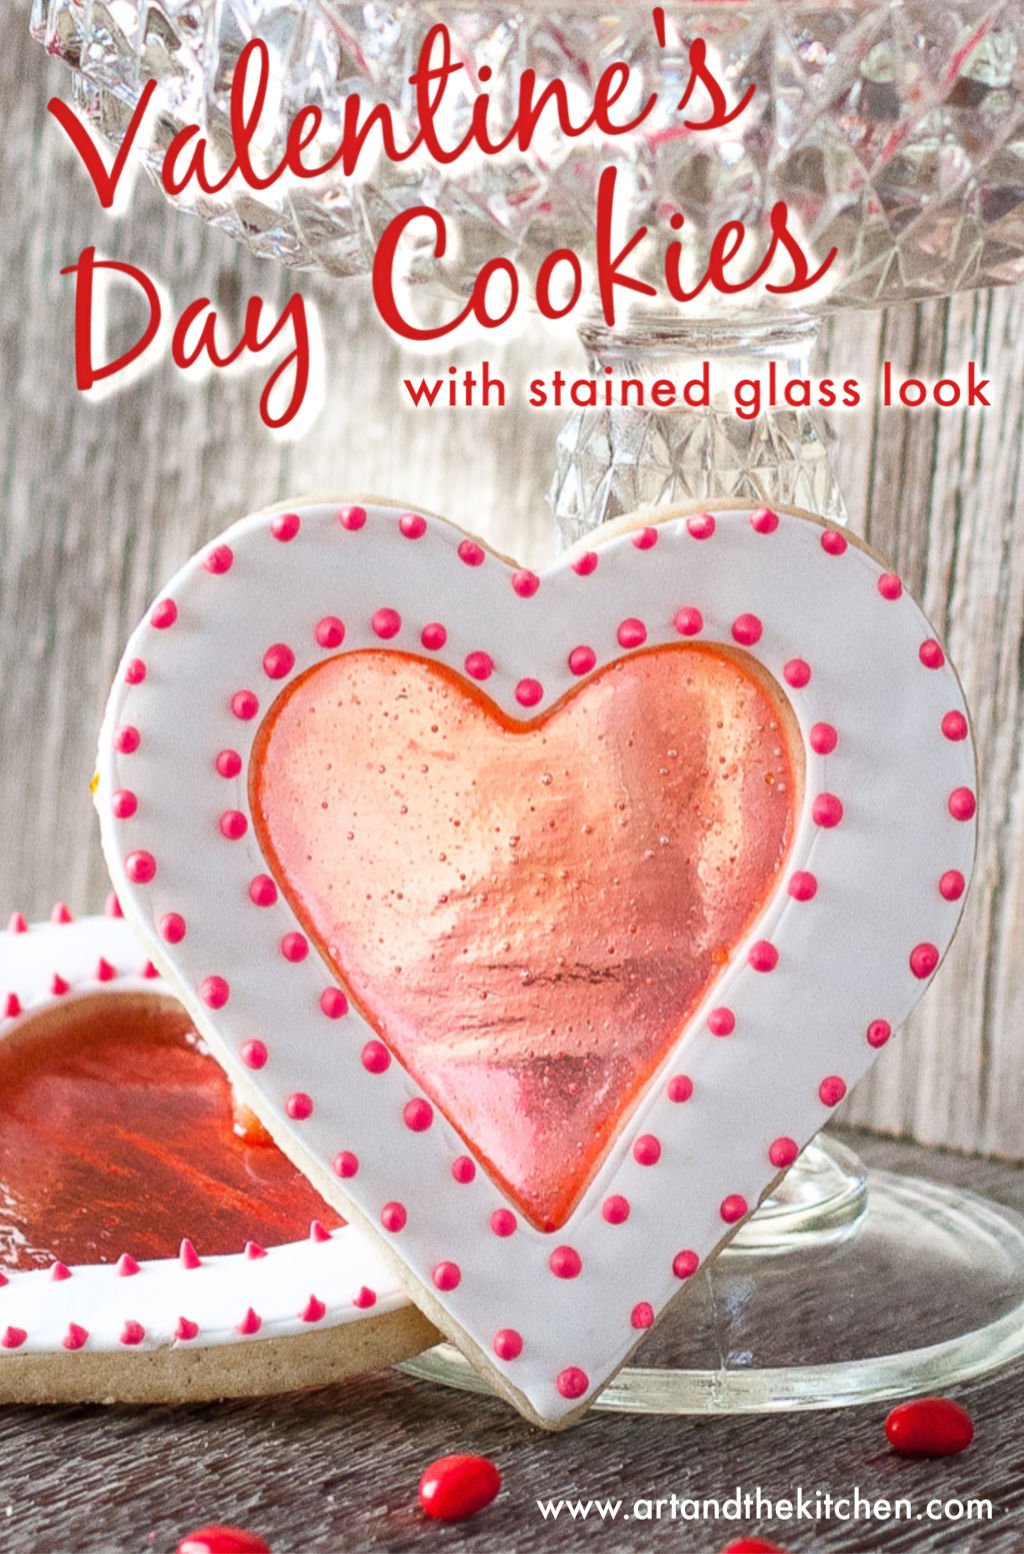
Stained Glass Valentine Cookies start with my scrumptious Best Ever Sugar Cookie Recipe. This sugar cookie recipe is excellent, as it the cookies bake up with nice sharp edges which work perfect for decorating with royal icing. I have detailed easy to follow instructions on How to Decorate Cookies with Royal Icing.
In addition to decorating these Valentine Cookies with royal icing the center has a stained glass looking appearance. This easy cookie decorating technique is simply melting hard candies such as Jolly Ranchers when baking. My video for How to Decorate Cookies with Stained Glass Effect has easy Step by Step instructions.
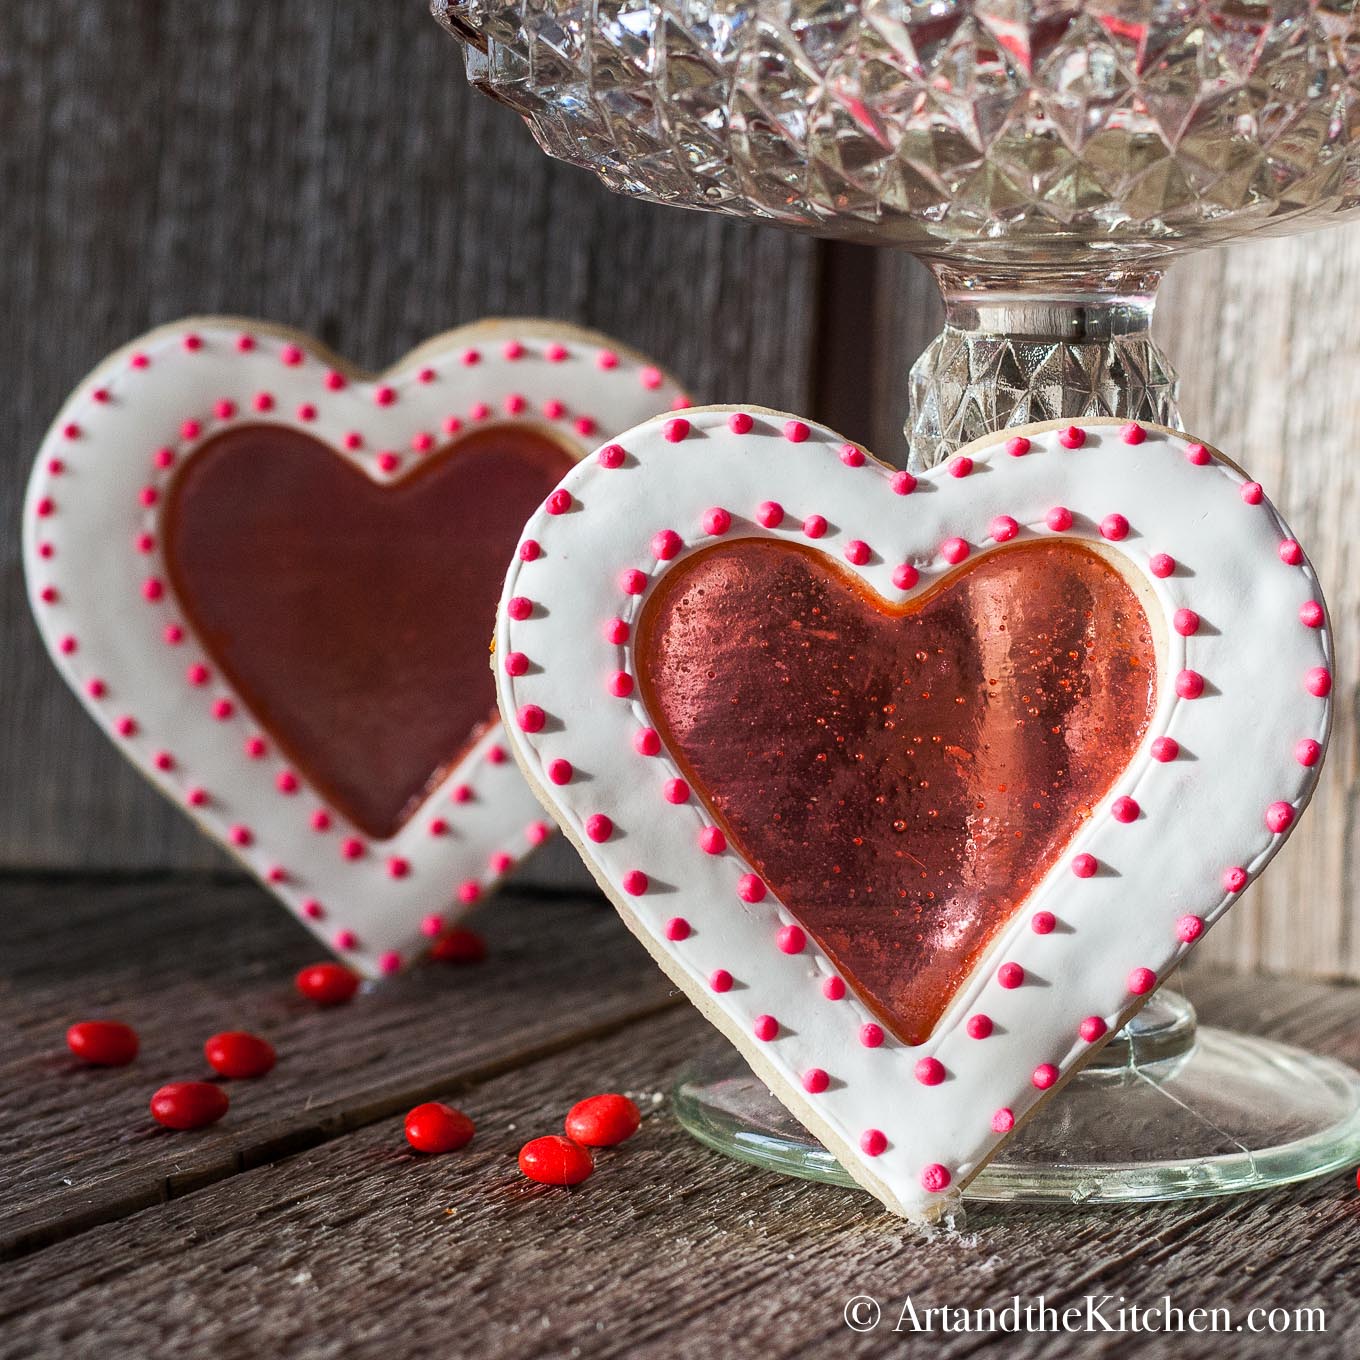
I love to give these gorgeous cookies out a an edible Valentine's Day gift. Package them in a decorative tin or individually in a cellophane bag tied with a pretty ribbon.
Tips for making these cookies
- Make sure the butter is soft and eggs are at room temperature.
- Do not over-mix the cookie dough or it will result in tougher, drier cookies.
- Be sure to chill the dough at least 30 minutes. Longer if it is still soft.
- Roll the dough out on a well-floured surface.
- Line a baking sheet with parchment paper! This is a must or the candy centre will melt and stick to the pan.
- Do not over bake or candy centre will burn.

Stained Glass Valentine Cookies
Beatiful, tasty stained glass looking cookies
Servings: 24
Calories: 261kcal
Ingredients
- 1 ½ cups butter softened
- 1 ½ cups granulated sugar
- 1 vanilla bean opened and seeds scraped out
- 2 eggs + 1 egg yolk
- 1 ½ teaspoon cardamom
- 1 tablespoon orange zest
- 3 ¾ cups all purpose flour
- 1 teaspoon salt
- 40-50 red hard candies such as lifesavers or Jolly Ranchers
Instructions
- Sift together flour, salt and cardamom spice.
- Using electric mixer beat the butter and sugar together until fluffy, about 5 minutes.
- Add vanilla bean, mix well, then add eggs and orange zest.
- Add flour mix a bit at a time, blend together until combined.
- Cut dough into 3 disks, wrap with plastic wrap and refrigerate for at least 30 minutes.
- When ready to bake preheat oven to 350º F.
- Crush hard candies ( I put candies in heavy duty ziploc bag and pound with meat hammer)
- Line cookie sheet with parchment paper ( must use parchment paper or cookies with stick)
- On floured surface roll dough to ¼ inch thickness.
- Cut out large hearts, then with smaller heart cookie cutter cut smaller heart inside of large heart
- Place cookies on cookie sheet.
- Fill centre of heart with crushed candies being careful not to spill candies onto cookie dough.
- Bake for 8-10 minutes. Just until edges start to brown.
- Cool completely before removing from parchment paper.
Video
Notes
Step by step instructions for decorating cookies with Royal Icing.
https://www.artandthekitchen.com/how-to-decorate-cookies-with-royal-icing/
Nutrition
Calories: 261kcal | Carbohydrates: 36g | Protein: 3g | Fat: 12g | Saturated Fat: 7g | Cholesterol: 44mg | Sodium: 204mg | Potassium: 29mg | Fiber: 1g | Sugar: 18g | Vitamin A: 374IU | Vitamin C: 1mg | Calcium: 9mg | Iron: 1mg
Enjoy this other great decorative cookie recipe for Valentine Day Cookies

Chocolate Covered Coconut Bars
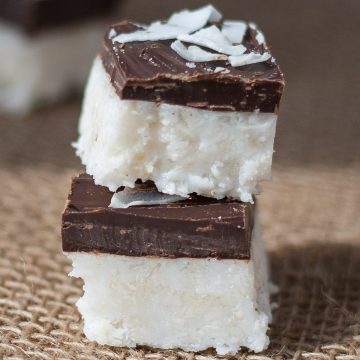
Homemade Chocolate Covered Coconut Bars are made with healthy ingredients of organic coconut oil, unsweetened shredded coconut, honey and dark chocolate.

Coconut treats are my favorite, but with so much sugar added I wanted a healthy version of a coconut bar. This recipe for Chocolate Covered Coconut Bars satisfies your sweet tooth and your coconut cravings. The bars are a simple combination of ingredients and so easy to make!
Ingredients
- Coconut oil: organic, cold pressed coconut oil that is additive free.
- Shredded coconut: look for unsweetened, organic coconut.
- Honey: once again, choose a high quality organic honey.
- Dark Chocolate: chocolate that is 70% or higher total cocoa content.
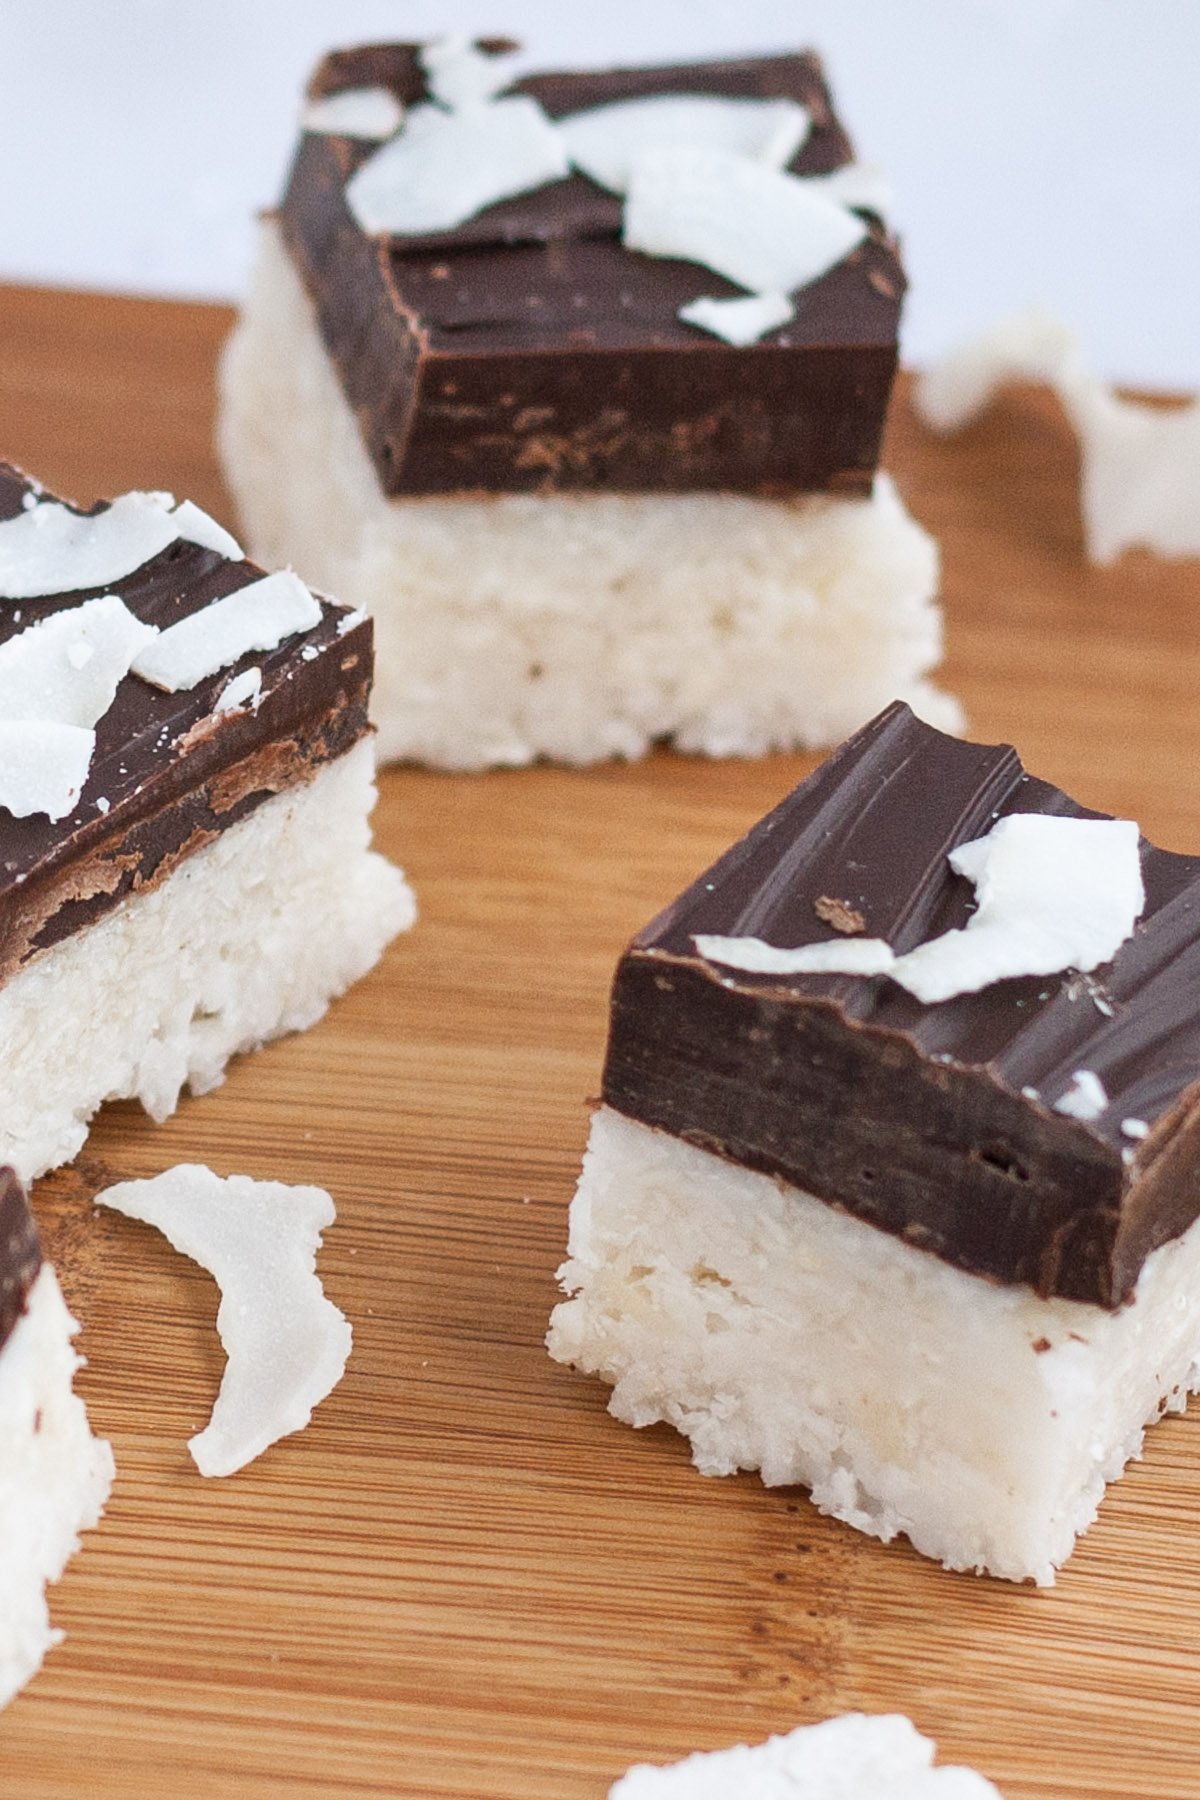
Although not considered healthy, but if you love coconut you may also want to try my Coconut Scones or Coconut Sugar Cookies.
For healthy snack and treat recipes try:
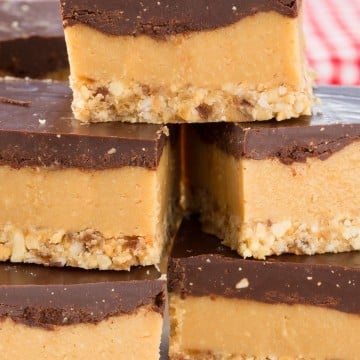
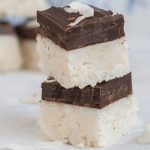
Chocolate Covered Coconut Bars
Healthy coconut bars made with organic coconut oil, shredded coconut, honey, and dark chocolate.
Servings: 16 squares
Calories: 231kcal
Ingredients
- 1 cup organic coconut oil
- 2 cups unsweetened shredded coconut
- ¼ cup organic honey
- 12 ounces organic dark chocolate
Instructions
- Line an 8x8-inch baking pan with parchment paper.
- In a large bowl warm the coconut oil just until it is liquified.
- Add the shredded coconut, and honey. Combine well.
- Press the coconut mixture into the prepared baking pan. Refrigerate until solid.
- In a small saucepan melt the chocolate, just until melted (not hot)
- Spread evenly over the coconut layer.
- Cut into squares and keep refrigerated until ready to serve.
Nutrition
Calories: 231kcal | Carbohydrates: 16g | Protein: 2g | Fat: 17g | Saturated Fat: 13g | Sodium: 8mg | Potassium: 217mg | Fiber: 4g | Sugar: 10g | Vitamin A: 10IU | Vitamin C: 0.2mg | Calcium: 19mg | Iron: 2.9mg
Baked Spaghetti Pie
This Baked Spaghetti Pie is made with a gruyere cheese and spaghetti layer, a rich homemade meat sauce layer, cottage cheese, then topped with melted mozzarella cheese. You can make it ahead of time, which is perfect for those busy weeknight dinners.

I you are looking for a ground beef recipe the whole family will love, this is the recipe to try! This baked spaghetti pie recipe is one the kids will be asking you to make all the time. Double the recipe as it freezes very well. I like to serve this dish with a simple tossed salad with my fresh Italian Herb Dressing.
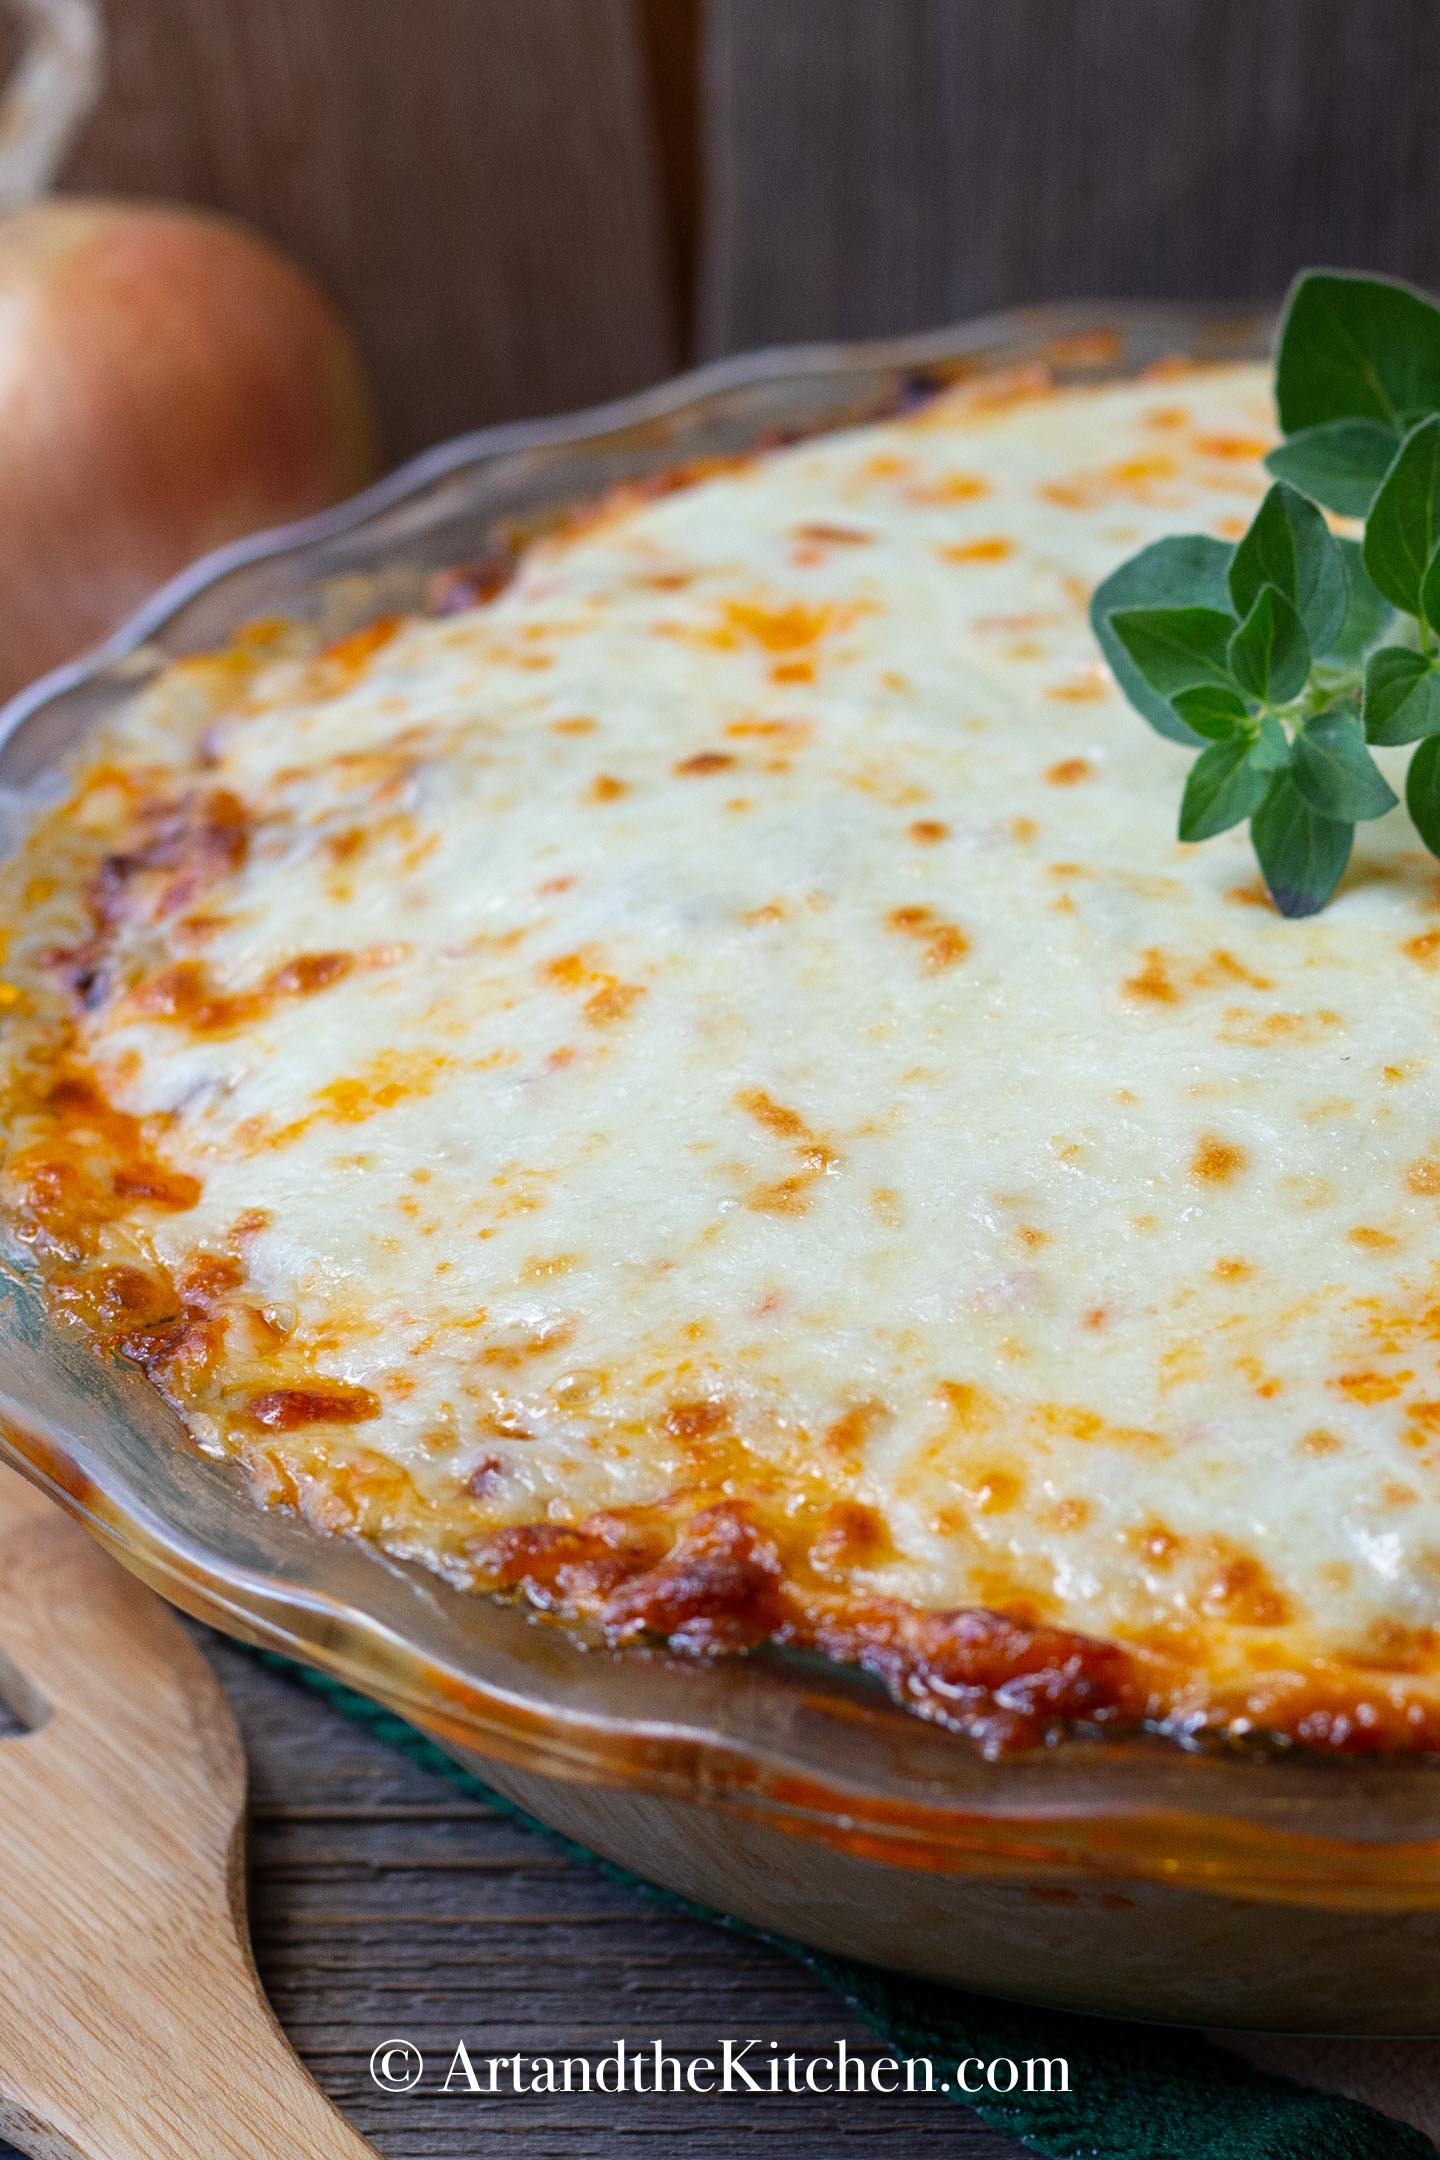
How to make Spaghetti Pie
Prepare the meat sauce.
- In a large skillet cook the ground beef with onions, garlic, and peppers. Stir in the tomato paste, diced tomatoes, oregano, sugar, salt and pepper.
- Continue to cook while you prepare the pasta.
- Why the sugar? A tad of sugar helps to cut down the acidity of the tomatoes.
- Can you use store-bought meat sauce.? Yes, but it certainly will not be as tasty
Prepare the crust layer
- Cook the spaghetti until al dente (soft but still chewy and firm)
- Toss the spaghetti with butter, egg, and Gruyere cheese.
- Can another cheese be substituted for Gruyere? I love the flavor of Gruyere cheese and how it blends with the pasta. If you must, Jarlsberg, Emmentaler or, fresh grated Parmesan will work.
Putting the pie together
- Place the spaghetti mixture in the bottom of a large pie plate that has been generous greased with butter.
- Spread the cottage cheese over the pasta. I do this by placing dollops and then spreading evenly.
- Next, add the meat sauce over the cottage cheese. Again, do this by scooping dollops and then spreading evenly.
- Bake uncovered in a 350 degree oven for 20 minutes. Top with mozzarella cheese, then bake for additional 10-12 minutes until the cheese has melted.

Try these family favorite recipes made with ground beef.
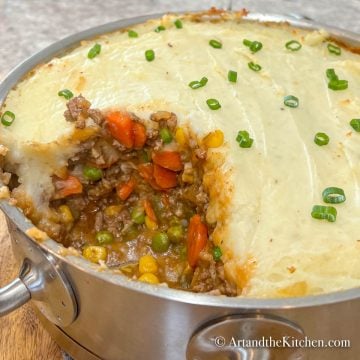
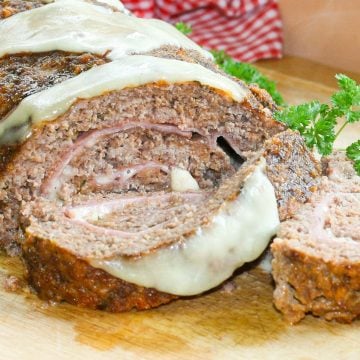
This post was originally published on August 3, 2013. Occasionally I update with fresh tips, content, and photos. Current update February 24, 2021.
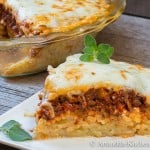
Baked Spaghetti Pie
Baked Spaghetti Pie made with cheesy spaghetti crust topped with layers of meat sauce and cottage cheese, topped with melted cheese.
Servings: 6
Calories: 685kcal
Ingredients
- ½ box spaghetti about 9 oz
- 2 tablespoon butter
- 2 eggs beaten
- ½ cup gruyere cheese grated
- 1 ½ cups cottage cheese
- 1 ½ pound ground beef
- 1 medium onion chopped
- 2 cloves garlic finely chopped
- ½ red pepper chopped
- ½ yellow pepper chopped
- 1 can (28oz) diced tomatoes drained
- 1 can (6oz) tomato paste
- 1 teaspoon sugar
- 2 tablespoon fresh oregano or 1 teaspoon dried
- ½ teaspoon salt
- 1 teaspoon pepper
- 1 ½ cups mozzarella cheese shredded
Instructions
- Preheat oven to 350 degrees fahreheit.
- Brown the ground beef with onions, garlic and peppers.
- Stir in the tomato paste and diced tomatoes.
- Add the sugar and oregano. Season with salt and pepper.
- Keep heated while you prepare the spaghetti.
- Cook spaghetti until al dente. Soft, yet chewy and firm.
- Drain and return to pot.
- Mix in the butter, eggs and gruyere cheese.
- Grease 10 inch pie plate. Spread the spaghetti mix evenly in the pie plate. This is your crust.
- Spread the cottage cheese on top of the spaghetti crust. Do this by placing dollops over the spaghetti and then spread evenly.
- Spoon the ground beef mixture on top of cottage cheese layer. Spread evenly.
- Bake uncovered for 20 minutes at 350 degrees. Then top with mozzarella cheese and continue to bake for an additional 10 minutes until the cheese is melted and bubbly.
Nutrition
Calories: 685kcal | Carbohydrates: 36g | Protein: 42g | Fat: 41g | Saturated Fat: 18g | Trans Fat: 2g | Cholesterol: 188mg | Sodium: 733mg | Potassium: 596mg | Fiber: 3g | Sugar: 5g | Vitamin A: 927IU | Vitamin C: 33mg | Calcium: 370mg | Iron: 4mg
Best Ever Sugar Cookies
This best ever recipe for sugar cookies is perfect for decorating with icing. Cookies that are soft inside, yet bake up with crisp edges that do not spread.
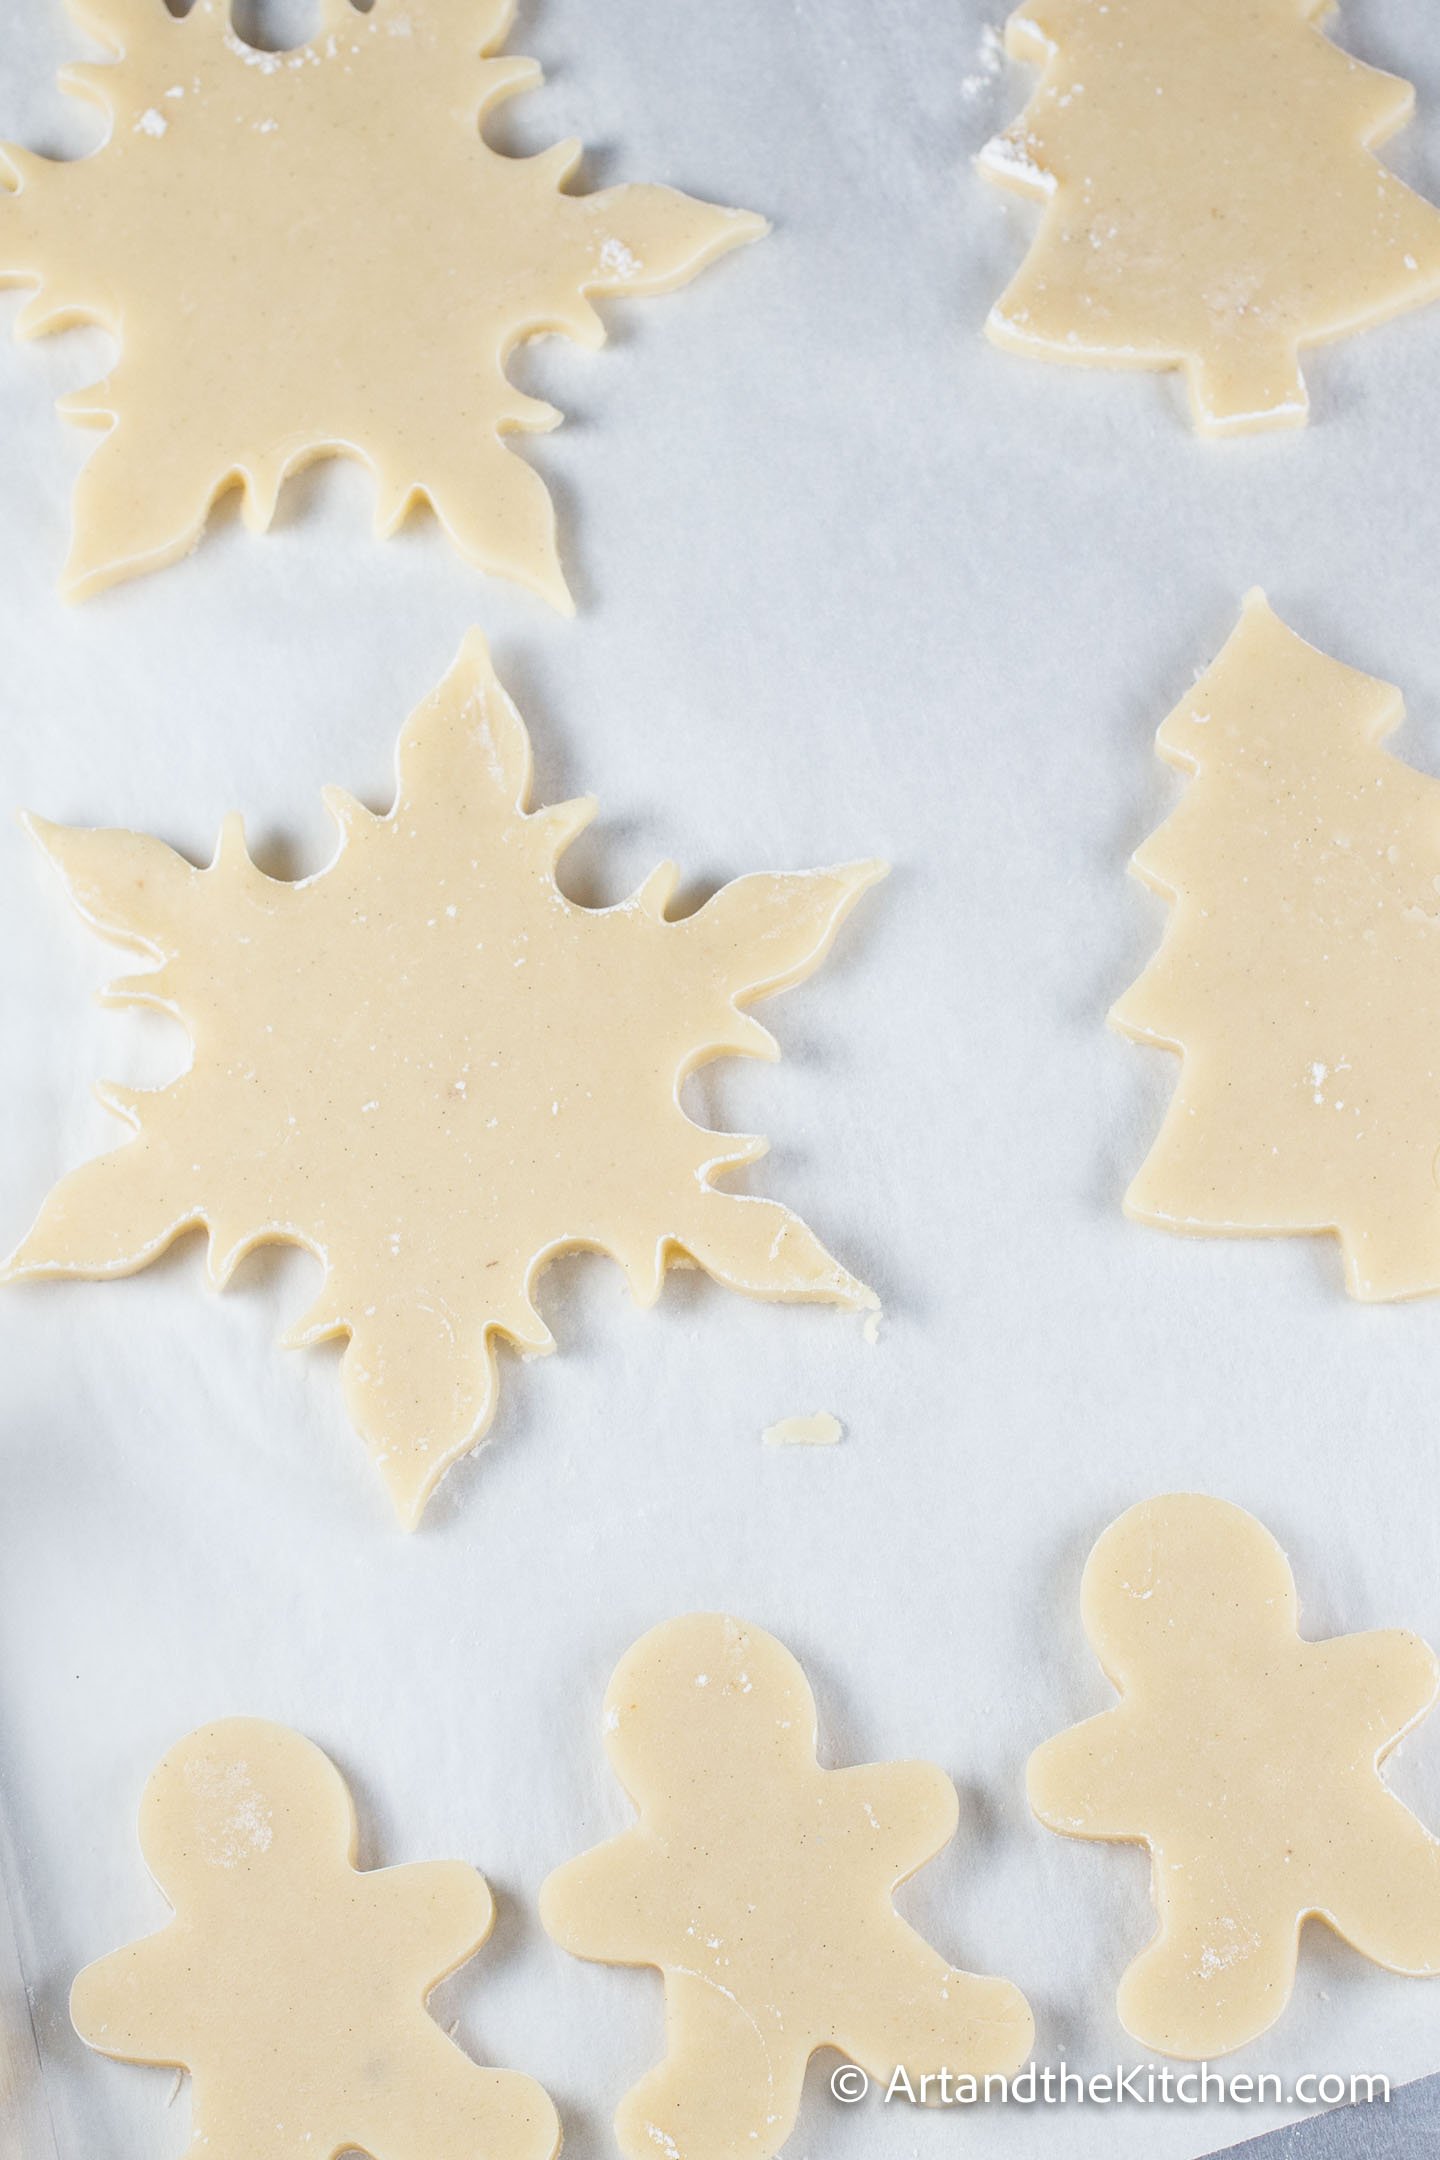
My Christmas baking starts with making sugar cookies and decorating them Royal Icing. I have tried many sugar cookie recipes and have been disappointed by their tasteless flavor. After many trials and errors, I have finally come up with the best sugar cookie recipe ever!
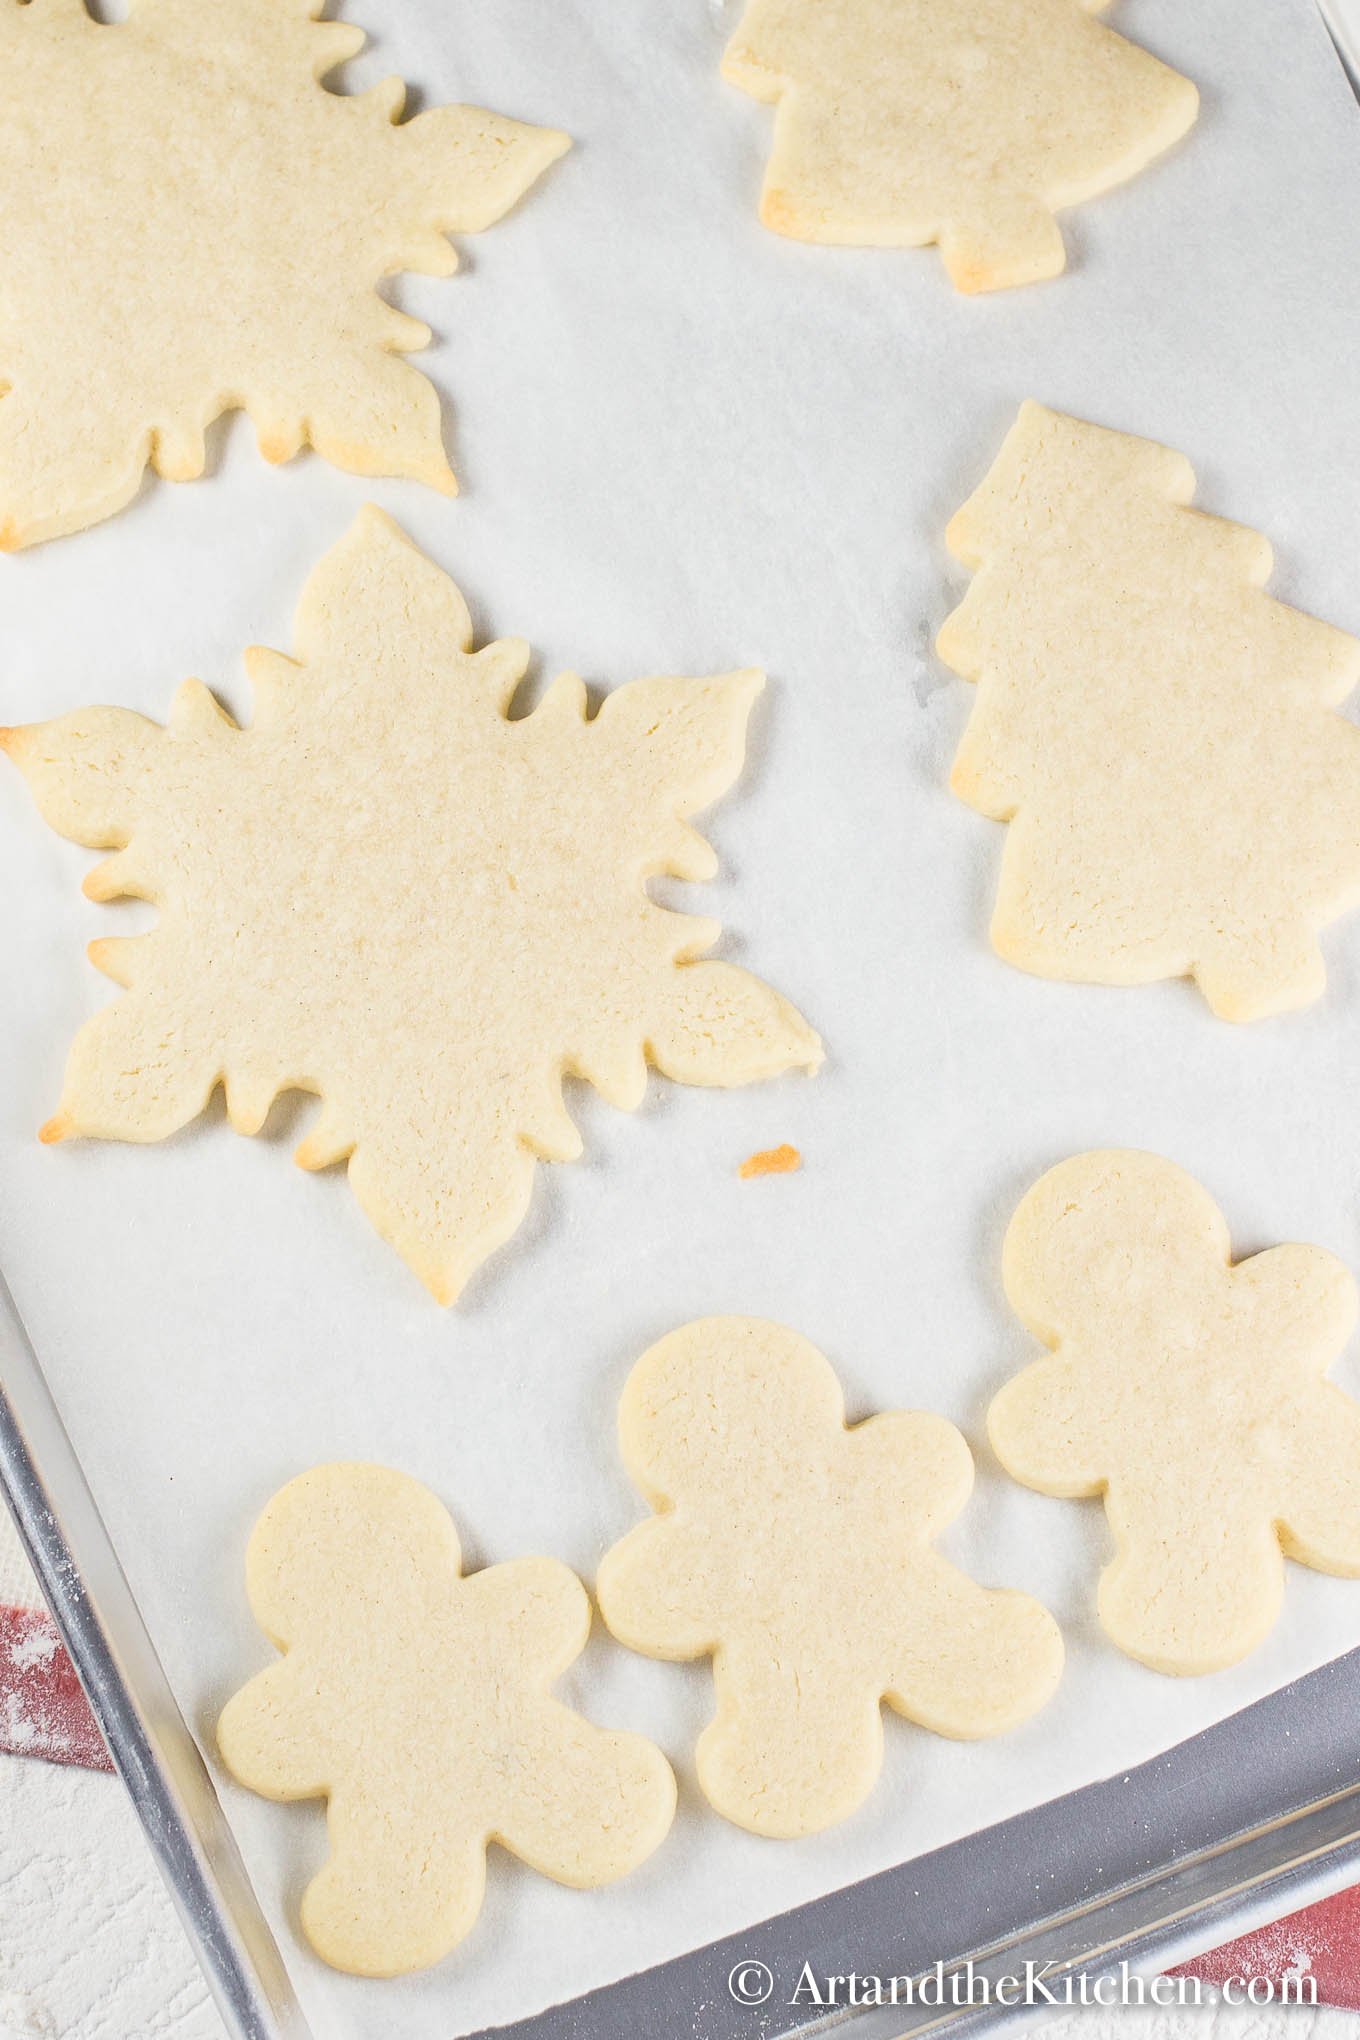
The ingredients you'll need to make perfect cut out sugar cookies.
- Butter - the butter must be soft but not overly so. When you press your finger into it with a little pressure it leaves an indentation but doesn't sink into the butter. I use unsalted butter, but if you use salted butter simply reduce the salt to ½ teaspoon.
- Sugar - just plain white granulated sugar.
- Vanilla bean- I love the superior flavor you get from vanilla beans, but they are sometimes hard to find and expensive. One teaspoon of pure vanilla extract will work as well.
- Eggs - bring to room temperature. Set eggs out on the counter 30 minutes before you bake.
- Flour- all-purpose flour. Do not sift before measuring. Simply scoop from flour container. Use exact measurement!
- Salt- I prefer using Kosher salt for baking.
- Optional Ingredients - add a different flavor to the sugar cookies by adding 2 teaspoons of pumpkin spice. For a zesty orange flavor add 1 ½ teaspoons of cardamom and 1 tablespoon of orange zest.
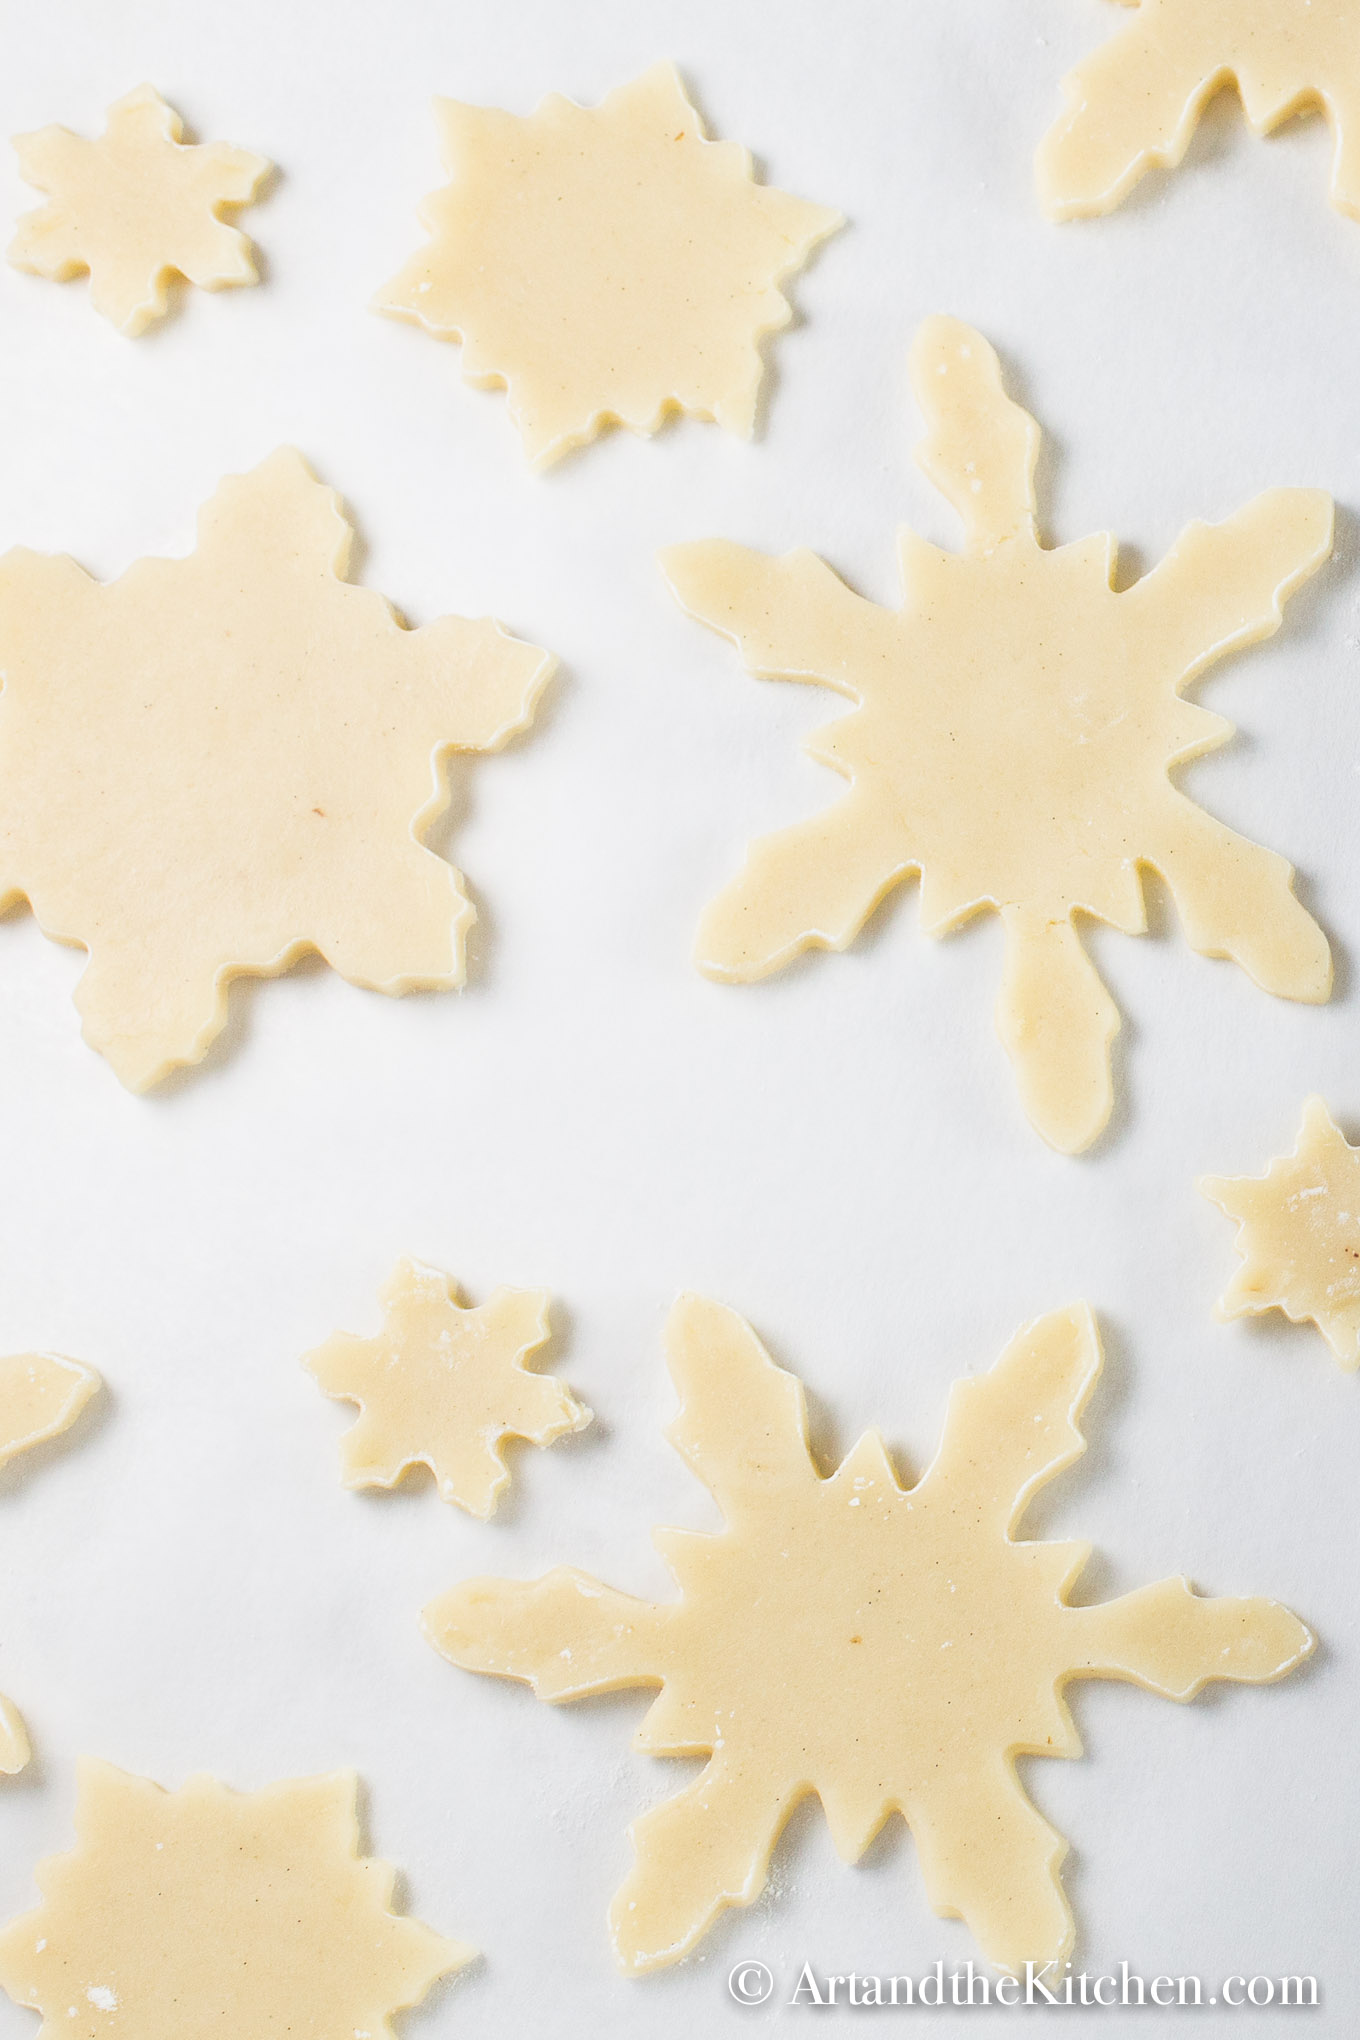
Making Christmas cookies is always a special time of year. I finally get to use my large collection of cookie cutters. I have vintage ones from my Mom and beautiful copper cookie cutters in all my favorite holiday shapes. They make perfect cut-out cookies using this sugar cookie recipe and my Candy Cane Sugar Cookie recipe.
Want to create beautifully decorated sugar cookies with royal icing? I have a great post with step by step instructions How to Decorate Sugar Cookies with Royal Icing. For something simpler when decorating cookies with kids, try a simple buttercream frosting or powdered sugar icing.

Tips and Tricks for making perfect sugar cookies.
Be sure the butter and sugar are well beaten and fluffy before adding the eggs and dry ingredients.
After adding the dry ingredients combine well but don't overmix or you will get hard cookies.

Divide the dough into two disks, wrap tightly with plastic wrap and chill for 30 minutes or longer. Can you make the dough ahead of time? Yes, 2-3 days making sure it is tightly wrapped in plastic and a freezer bag, and stored in the refrigerator. The dough may have to soften a bit at room temperature or it will be too firm to roll out.
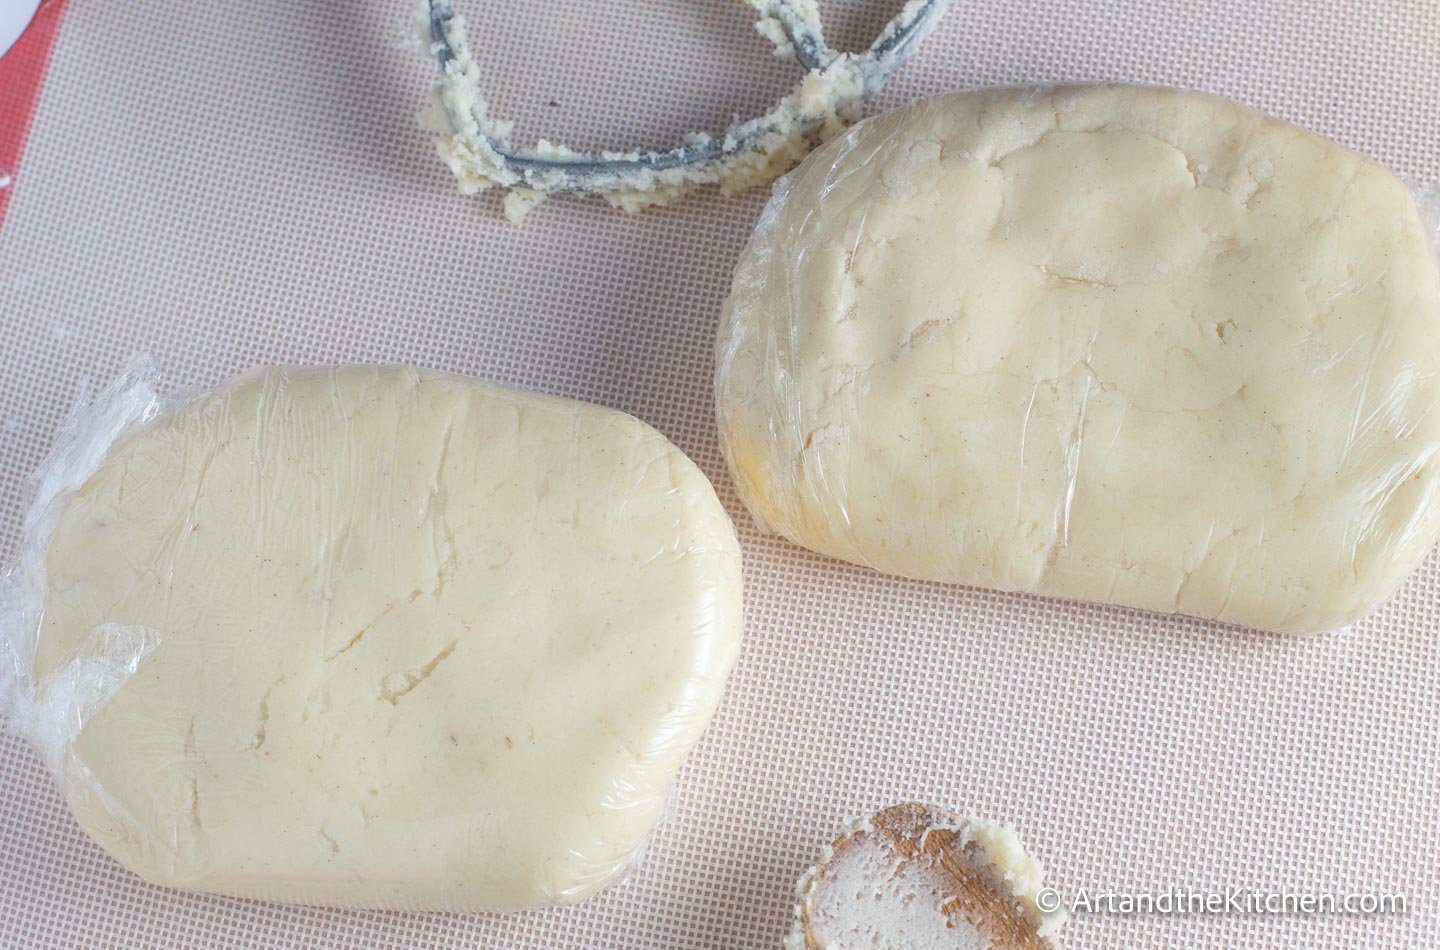
The dough should be rolled out to about ¼ inch on a well-floured surface. This will give you cookies that are soft inside but have nice crisp edges. If you roll too thin you will have crunchy cookies.
After the cookies are cut out, place them on a parchment-lined cookie sheet. Next, chill in the freezer for 5 minutes. Chilling is important for cookies to hold their shape.
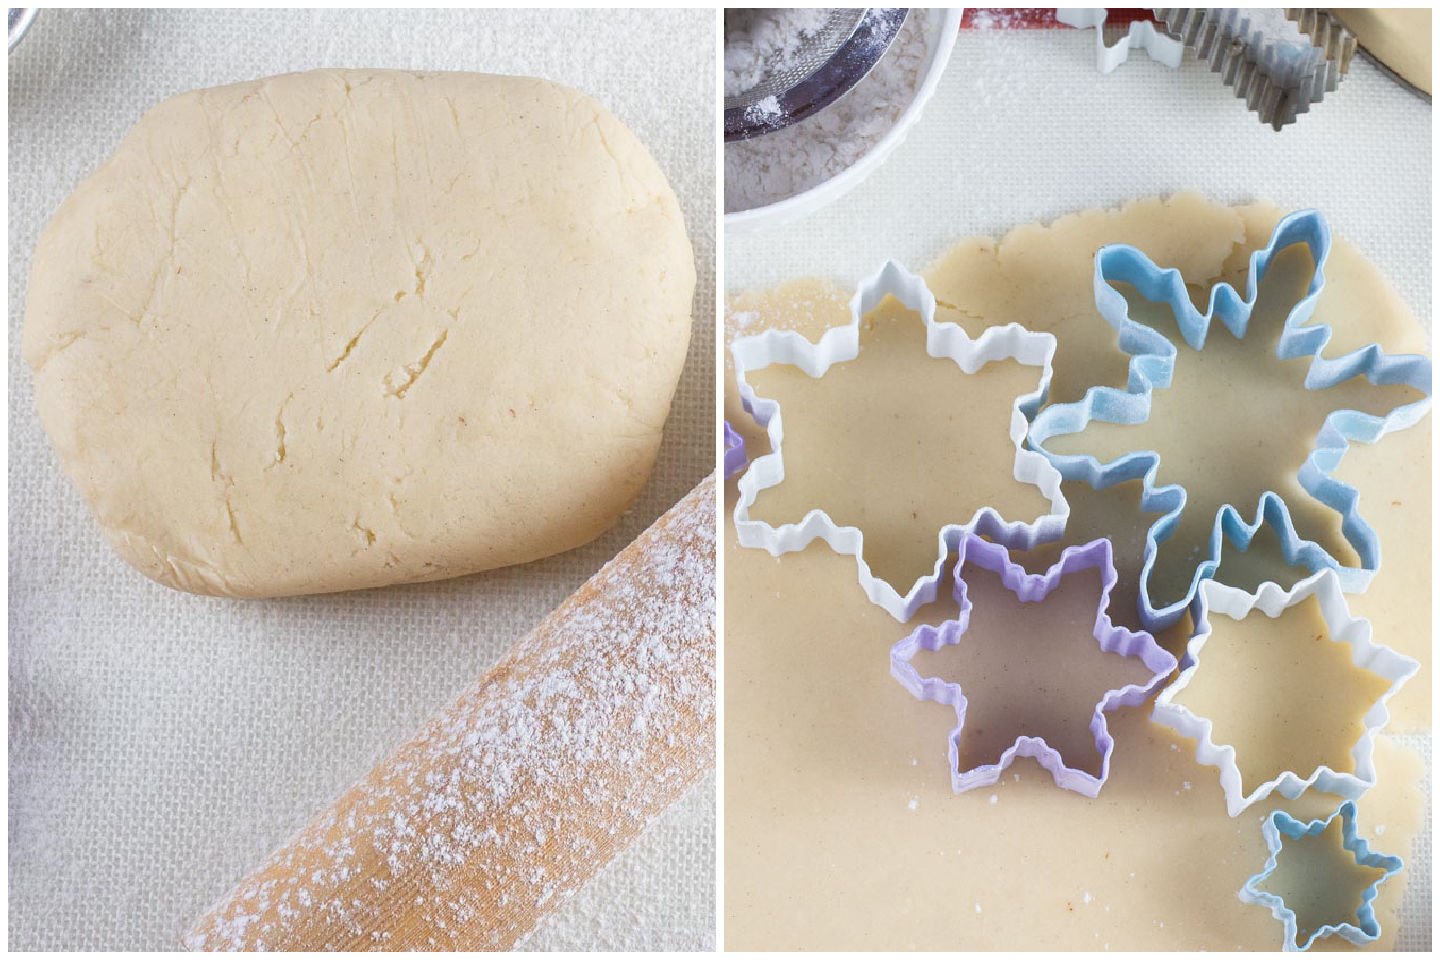
Bake only until the edges start to brown. Allow to cool a bit on the cookie sheet before moving them to a cooling rack.
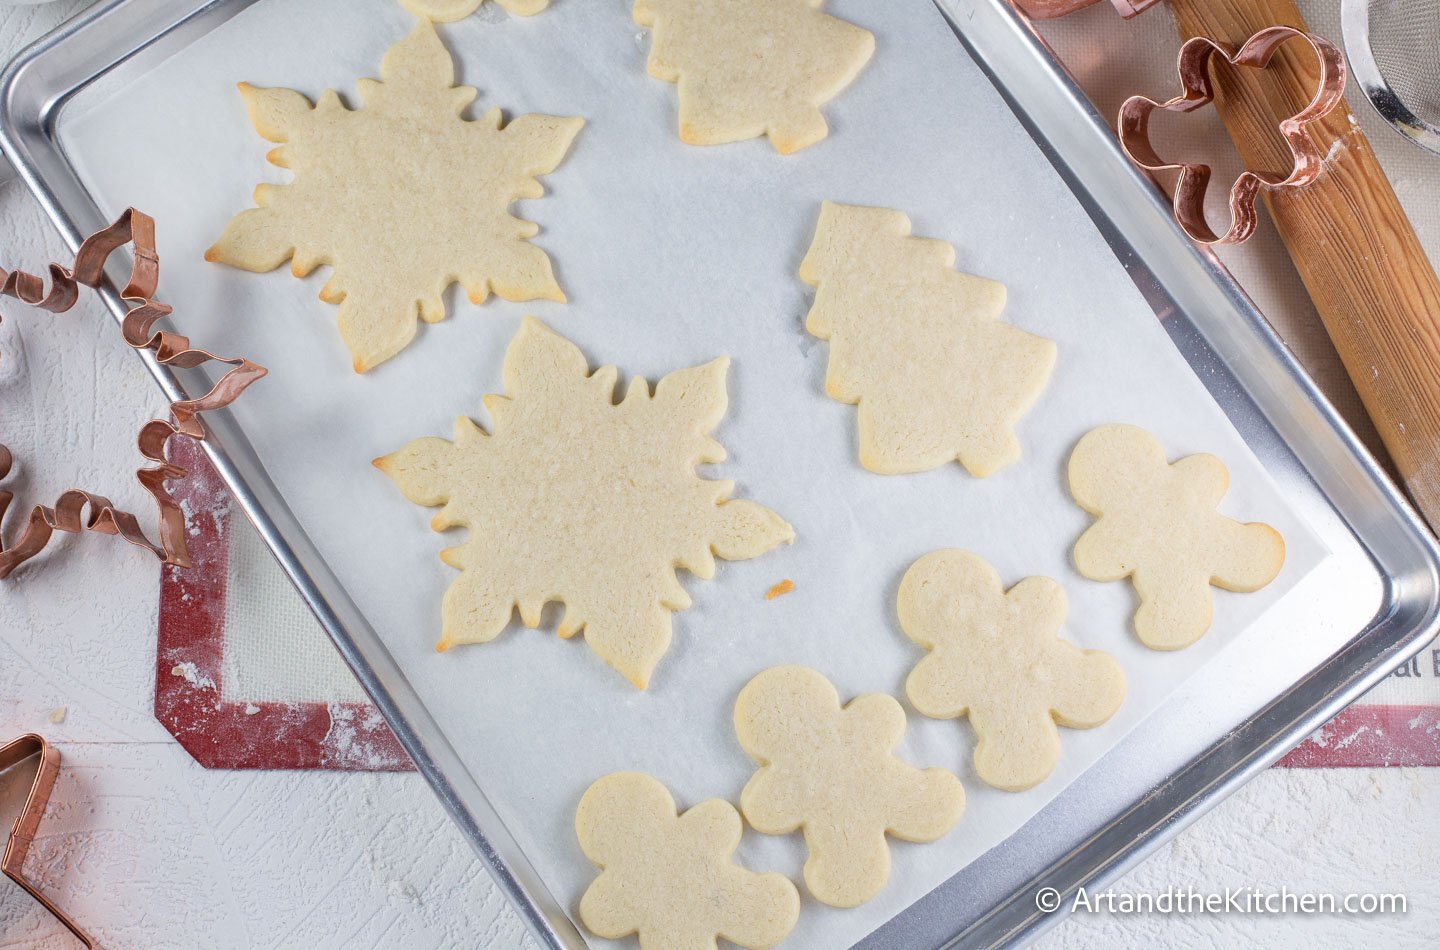
This is an easy, classic sugar cookie recipe. If you want to try a sugar cookie with a bit of a twist to it, try my Candy Cane Sugar Cookie recipe.
Be sure to these other tasty cookie recipes.
This post was originally posted December 2, 2013. Occasionally I update I update with fresh tips, content, and photos. Current update December 6, 2020.
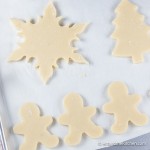
Best Ever Sugar Cookies
After years of making sugar cookies this is my Best Ever Sugar Cookies recipe. Very tasty and perfect for decorating!
Servings: 36
Calories: 151kcal
Ingredients
- 1 ½ cups butter room temperature soft
- 1 ½ cups sugar
- 1 vanilla bean opened and seeds scraped out or 1 teaspoon pure vanilla extract
- 2 eggs + extra yolk
- 3 ¾ cups all purpose flour
- 1 teaspoon salt
Instructions
- Whisk together flour and salt.
- Using electric mixer with paddle attachment beat butter and sugar together until fluffy, about 5 mins.
- Add vanilla bean and mix well.
- Add eggs and egg yolk. Combine well.
- Add the flour mix a bit at a time. Combine until mixed, but avoid over mixing.
- Divide dough into 2 separate pieces. Wrap tightly in plastic wrap and chill for at least 30 minutes.
- When ready to bake preheat oven to 350º F. Line cookie sheets with parchment paper.
- On well floured work surface roll disk out to ¼ inch thickness.
- Cut out with cookie cutter shape of your choice and transfer to baking sheet. To avoid dough sticking to cookie cutters dip them in bowl of flour, shaking off any excess.
- Place cookie sheet in freezer for about 5 minutes or refrigerator for 10 mins. This helps the cookies hold their shape and not spread.
- Bake 8-10 minutes (just until edges start to brown).
- Allow to cool a bit on cookie sheet, then transfer to cooling rack. Decorate with Royal Icing.
Notes
Optional Ingredients- add a different flavor to the sugar cookies by adding 2 teaspoons of pumpkin spice, or a zesty orange flavor by adding 1 ½ teaspoons of cardamom and 1 tablespoon of orange zest.
Recipe for Royal Icing and step by step instructions for decorating sugar cookies,
Nutrition
Calories: 151kcal | Carbohydrates: 18g | Protein: 2g | Fat: 8g | Saturated Fat: 5g | Cholesterol: 29mg | Sodium: 136mg | Potassium: 20mg | Fiber: 1g | Sugar: 8g | Vitamin A: 250IU | Calcium: 6mg | Iron: 1mg
Old Fashioned Butter Tarts
Indulge in some sweet Old Fashioned Butter Tarts. This popular Canadian classic dessert recipe consists of flaky homemade pastry shells filled with a rich, buttery caramel filling. Passed down from my Mom, this is the best butter tart recipe you will find!
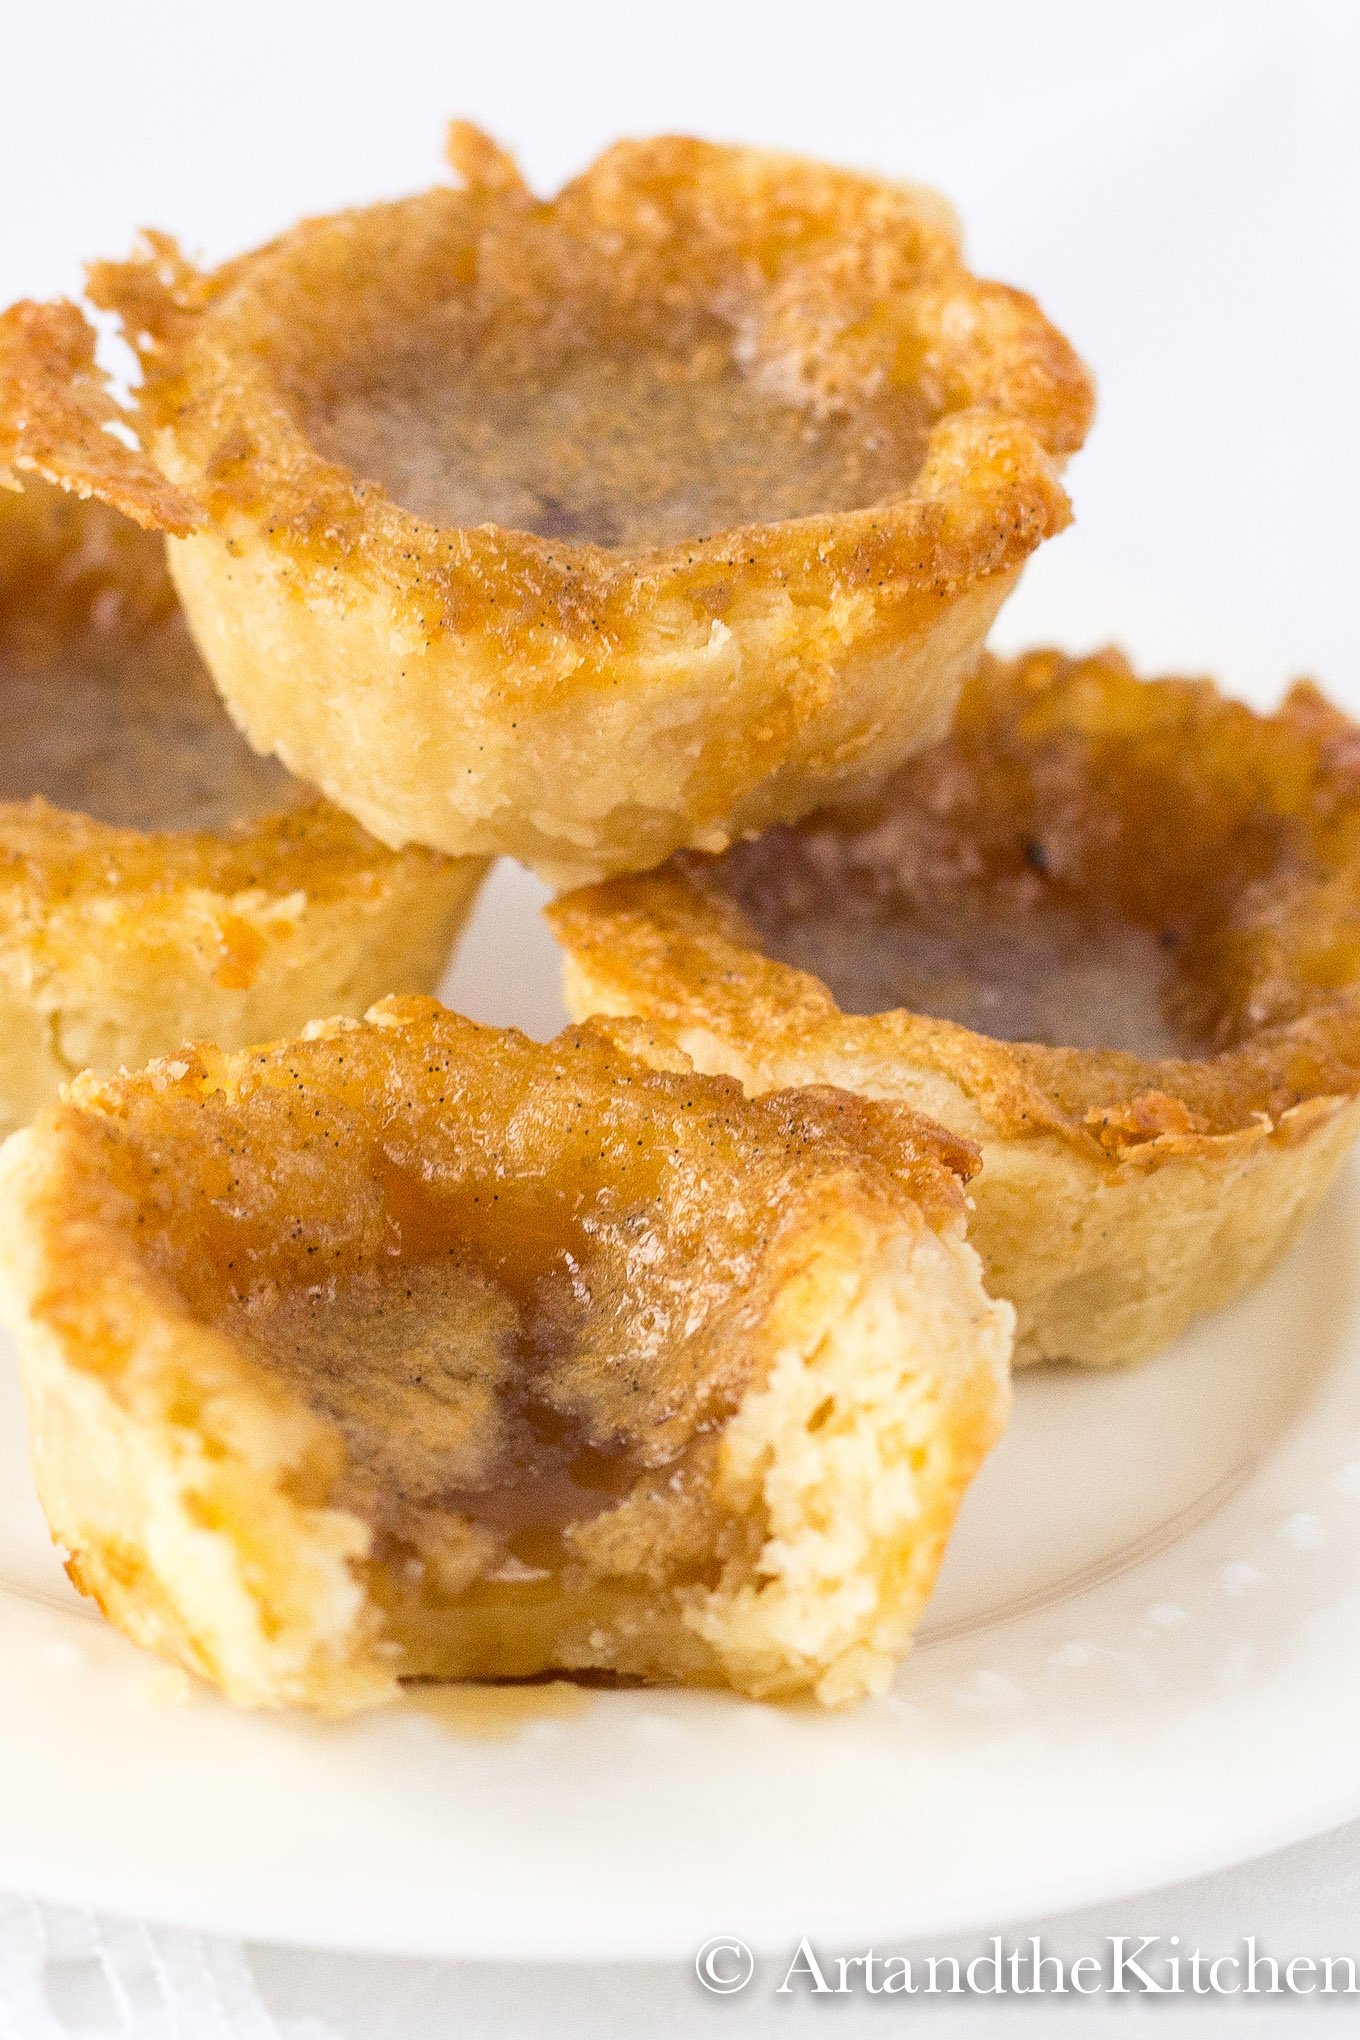
This best ever recipe for Old Fashioned Butter Tarts is always included in my Holiday baking. But these sweet tarts are so delicious you will want to bake them all year long! My Mom's recipe for butter tarts has a perfect consistency of gooey, runny, sweet filling in made-from-scratch pastry shells. The tart shells are exceptionally buttery and flaky.
Are Butter Tarts really Canadian?
Yes, Canada's favorite dessert has origins which date back to the 1600's! The Canadian Butter Tart is a small flaky pastry with a filling of butter, eggs, and brown sugar which are baked until the top is slightly crunchy and the filling is semi-solid.
Another incredible classic Canadian dessert you will love is my recipe for Nanaimo Bars.
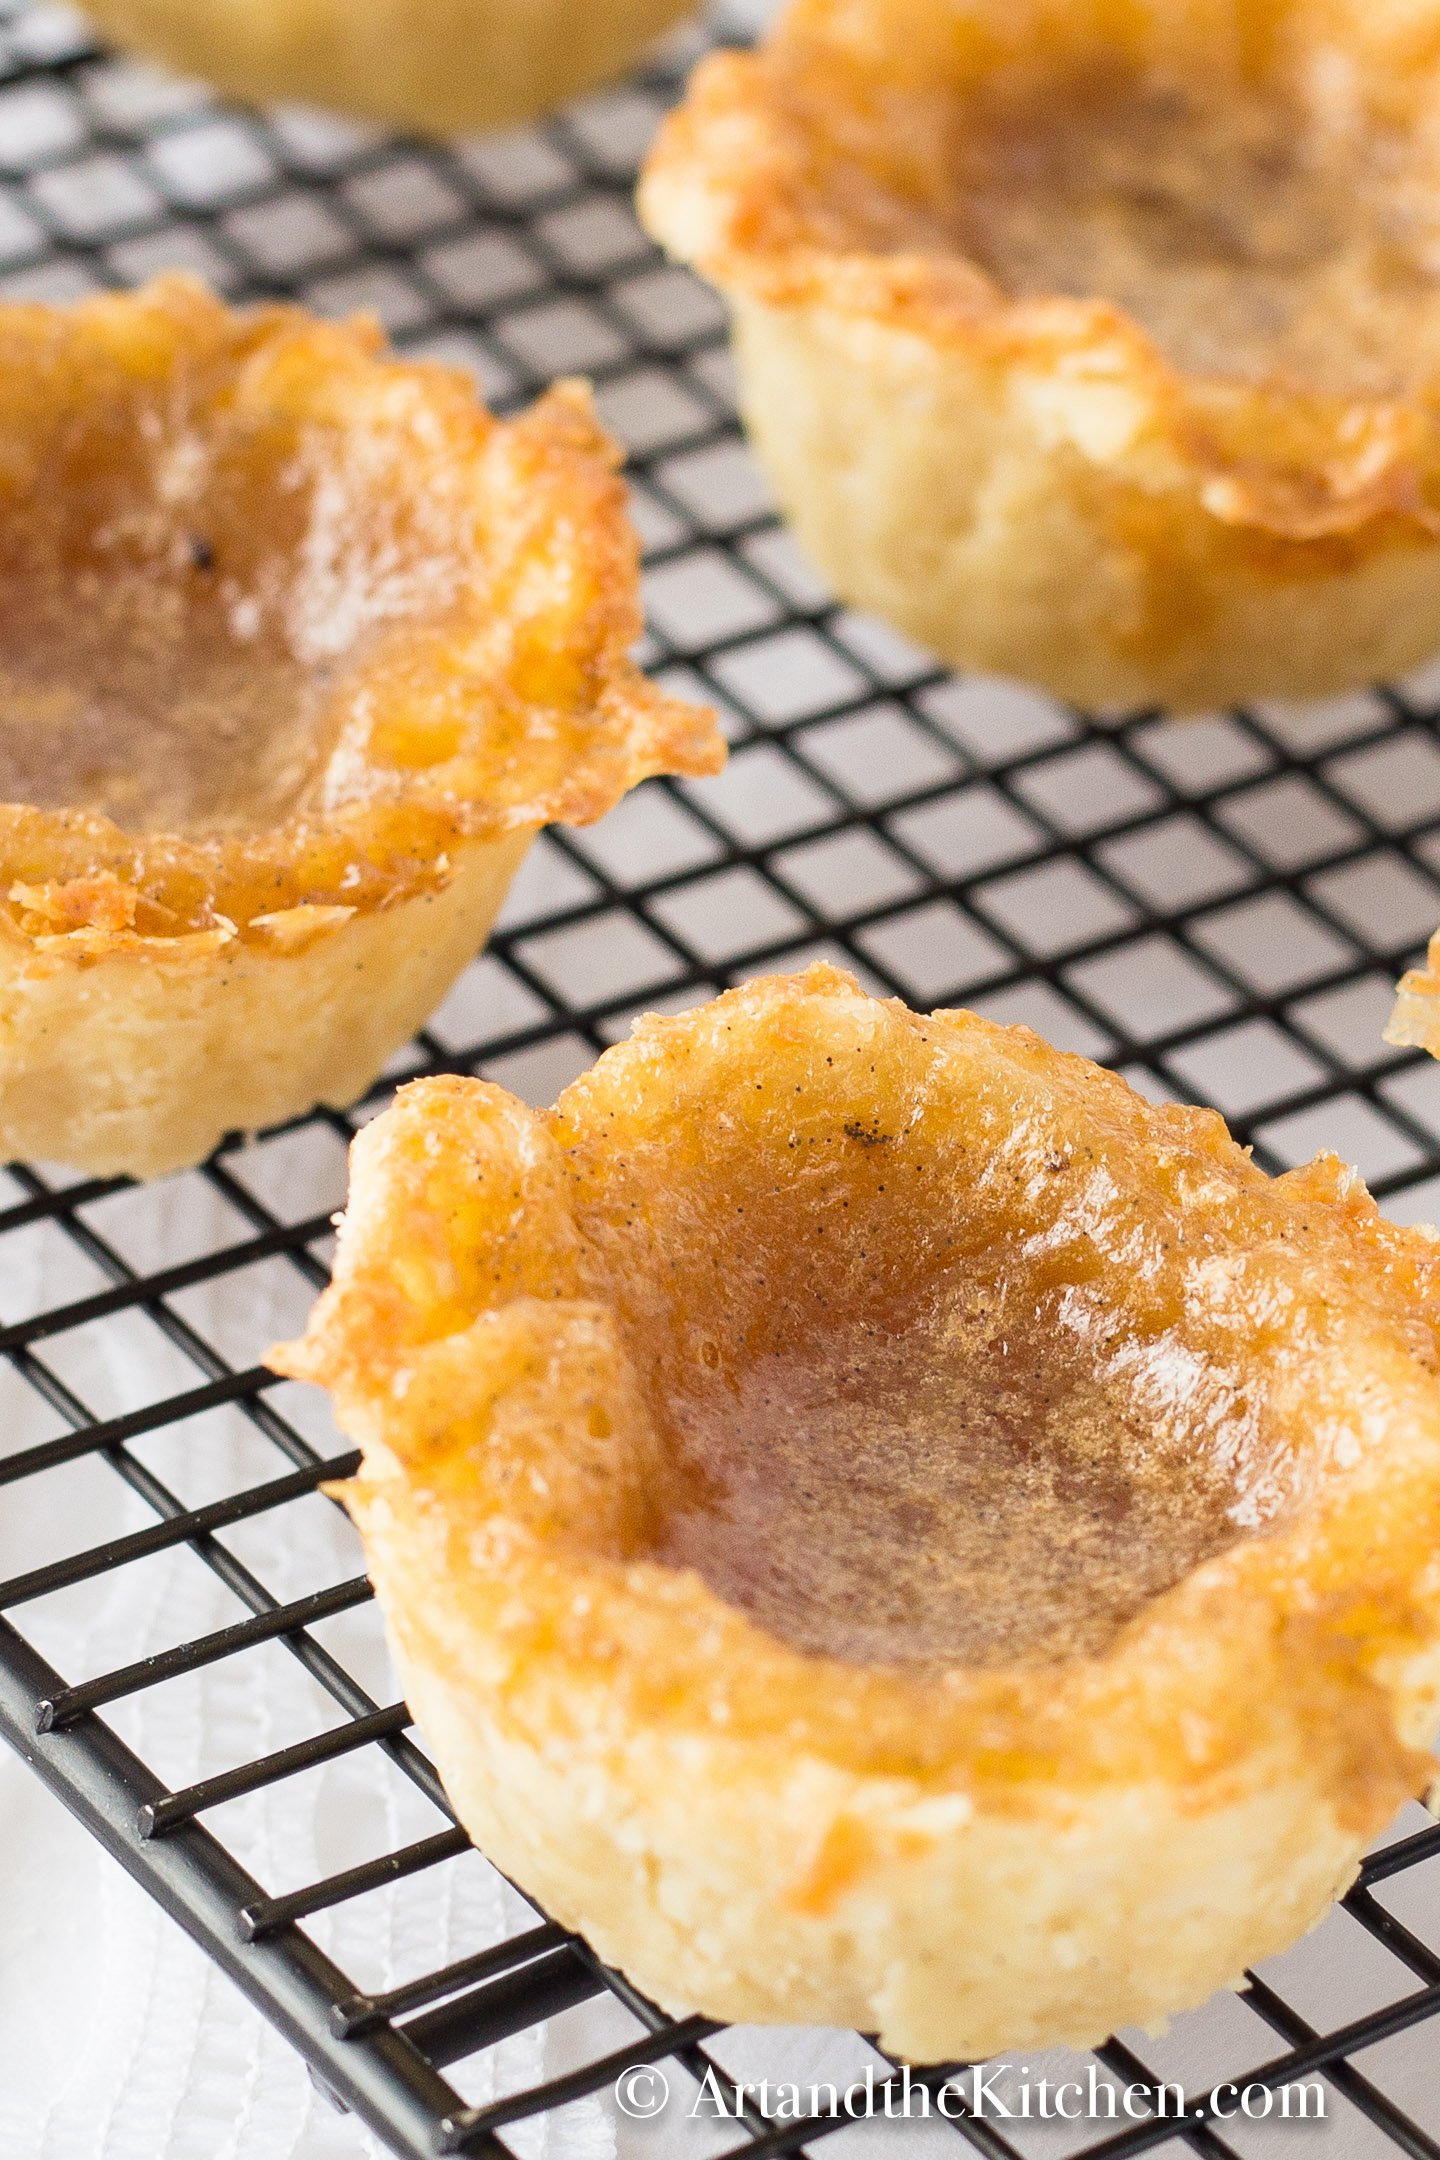
Ingredients and Substitutions
The ultra flaky tart crust is a simple combination of flour, sugar, salt, butter, and ice cold water.
Can you use store bought tart shells?
Yes, although not as tasty and flaky as homemade tart shells, they do help make this recipe quicker and easier to prepare.
I love the filling exactly as my Mom made it in this recipe. A mixture of butter, brown sugar, corn syrup, eggs, vanilla and a pinch of salt.
Some tasty additions to try would be:
- raisins
- currants
- nuts such as pecans or walnuts
Can you use maple syrup instead of corn syrup in butter tarts?
Yes, although I find them a bit more runny, and you will have the distinctive maple flavor.
How to store Butter Tarts
Store in an airtight container at room temperature for 2 days, and up to 5 days in the refrigerator.
Can Butter Tarts be frozen?
Yes, butter tarts freeze well. Cool completely, place in an airtight container for up to 3 months.
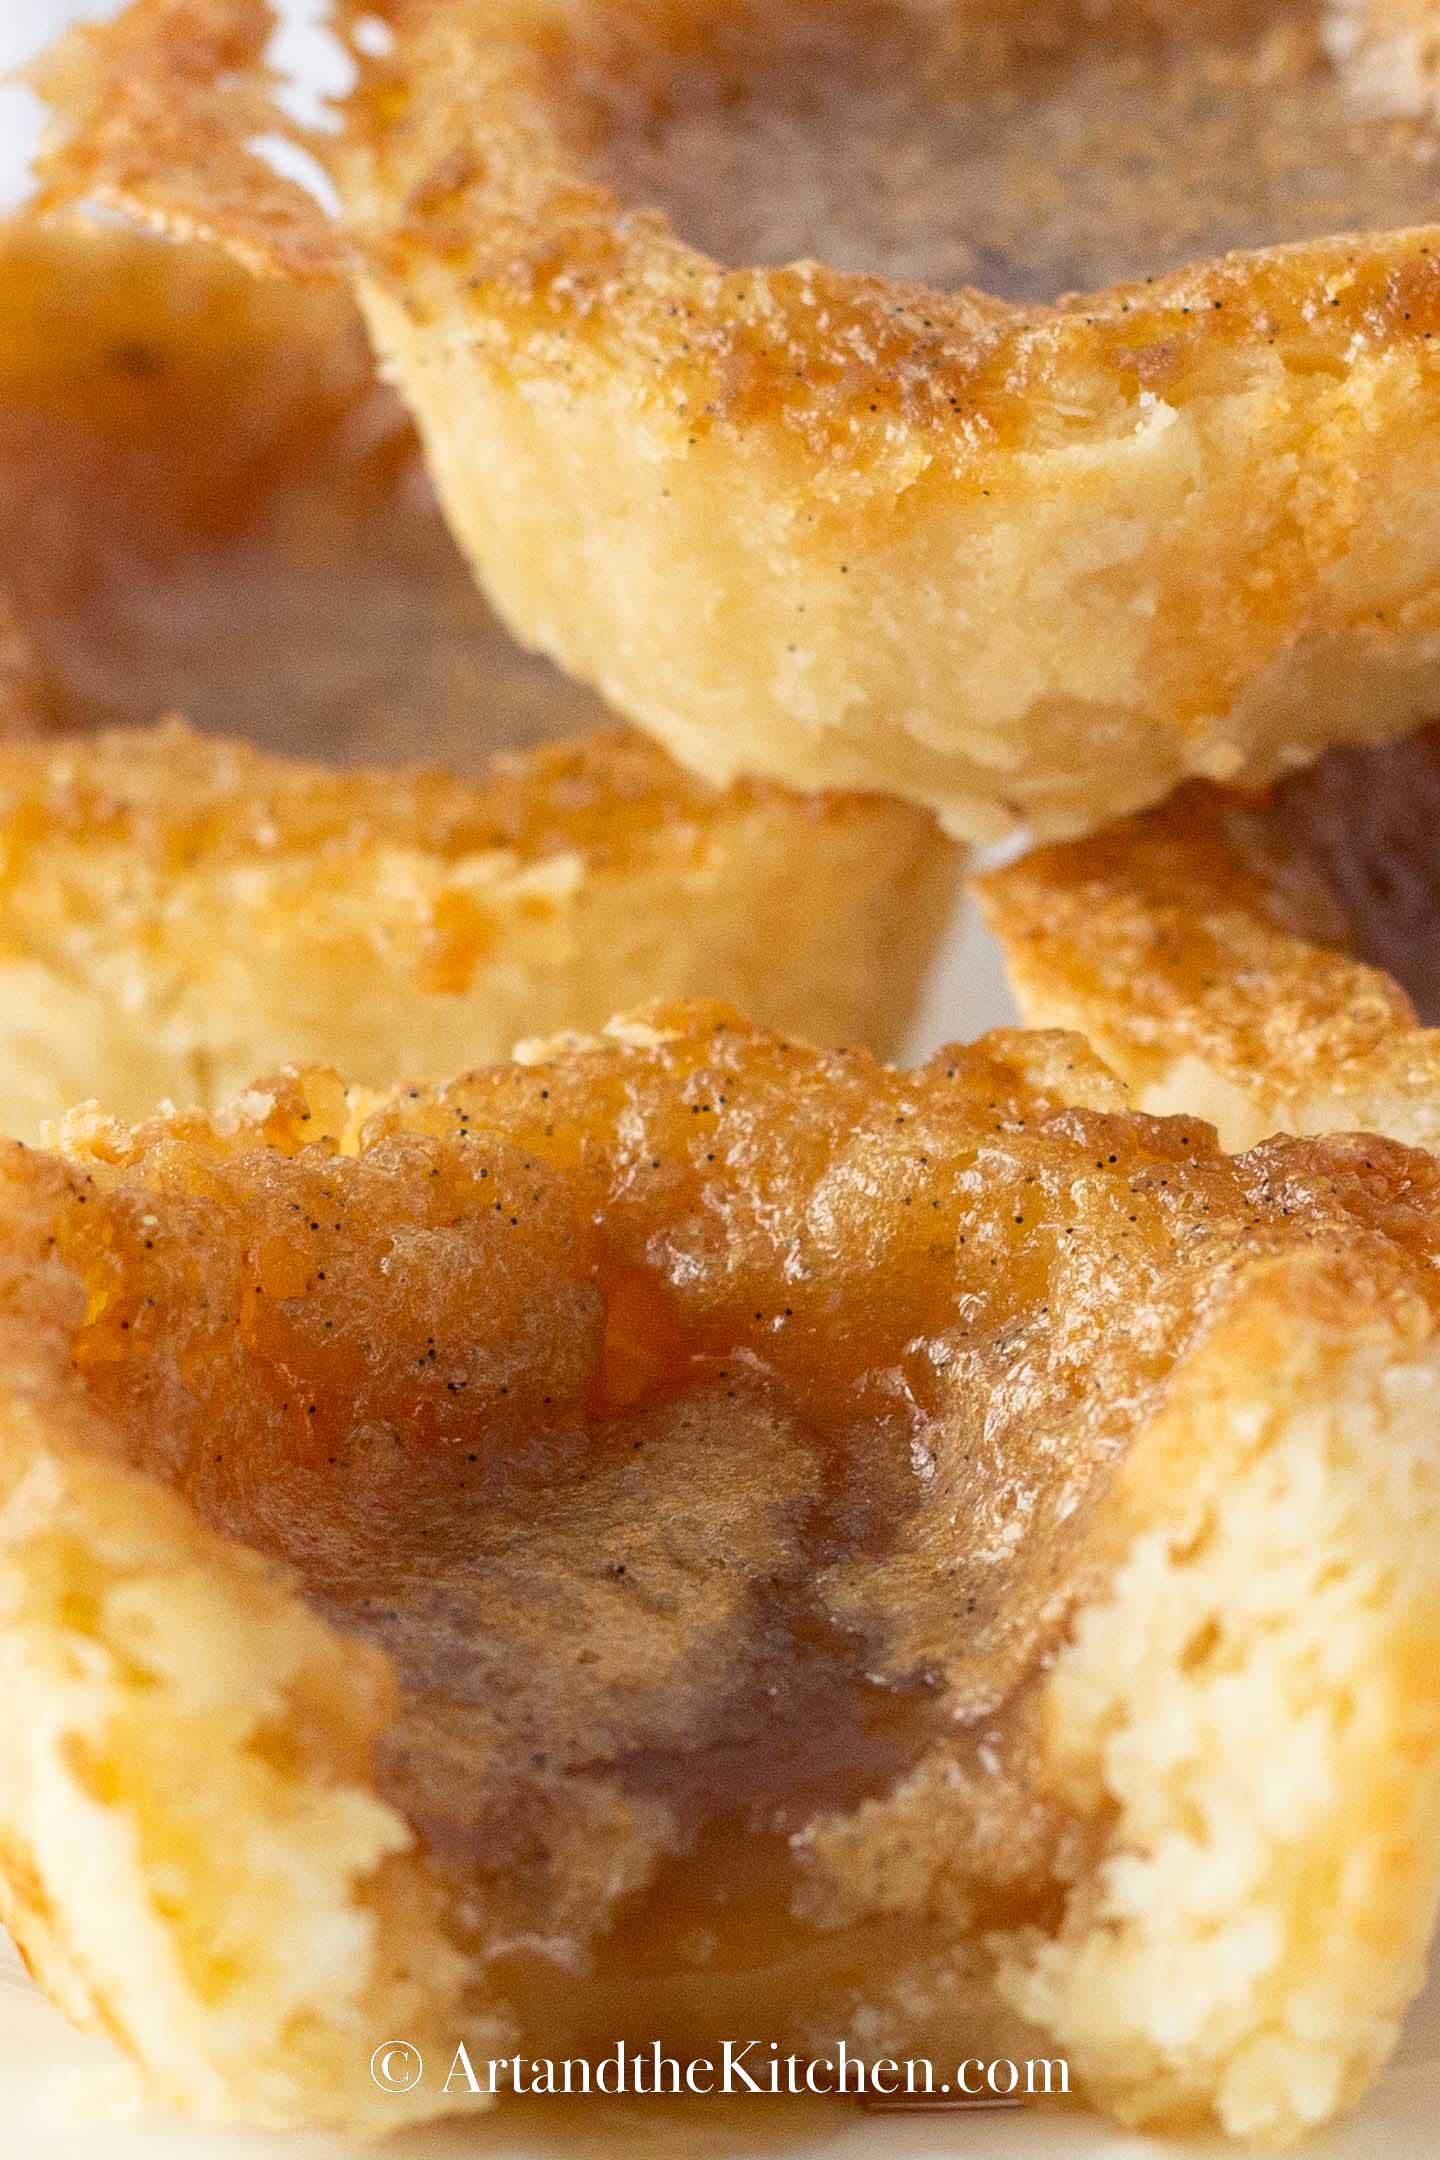
How to make these tasty treats
For the pastry:
- Sift flour, salt and sugar together. Using a pastry blender cut the chilled butter into the flour mix. Blend until it resembles course meal.
- Add ice-cold water a bit at a time, just until the dough starts to hold together. Do not over-work the pastry dough or it will become tough. The same technique you use making pie crust.
- Press dough together forming a disk, wrap in plastic wrap and refrigerate for 30 minutes.
- Next, roll out the dough on lightly floured surface, to about ¼ inch thick.
- Using a round cookie cutter, cut into 4-5 inch circles. Press dough into muffin pan, trying not to stretch the dough.
For the filling:
- Mix together butter, brown sugar and corn syrup. Whisk until the butter is creamed and sugar dissolved.
- Add egg, vanilla extract and pinch of salt. Mix well.
- Fill the tart shells about ⅔ full.
- Bake in the oven at 400º Fahrenheit for 15-20 minutes until golden brown. Cool for 10 minutes, then remove from baking pan to cooling rack.
My Mom's favorite baking treats:
Every family Christmas my Mom made her Old Fashioned Butter Tarts. They always seemed to be the first Christmas baking treat to disappear. Next to go off her Holiday baking tray were Whipped Shortbread Cookies, Butterscotch Confetti Squares and Gingerbread Cookies.
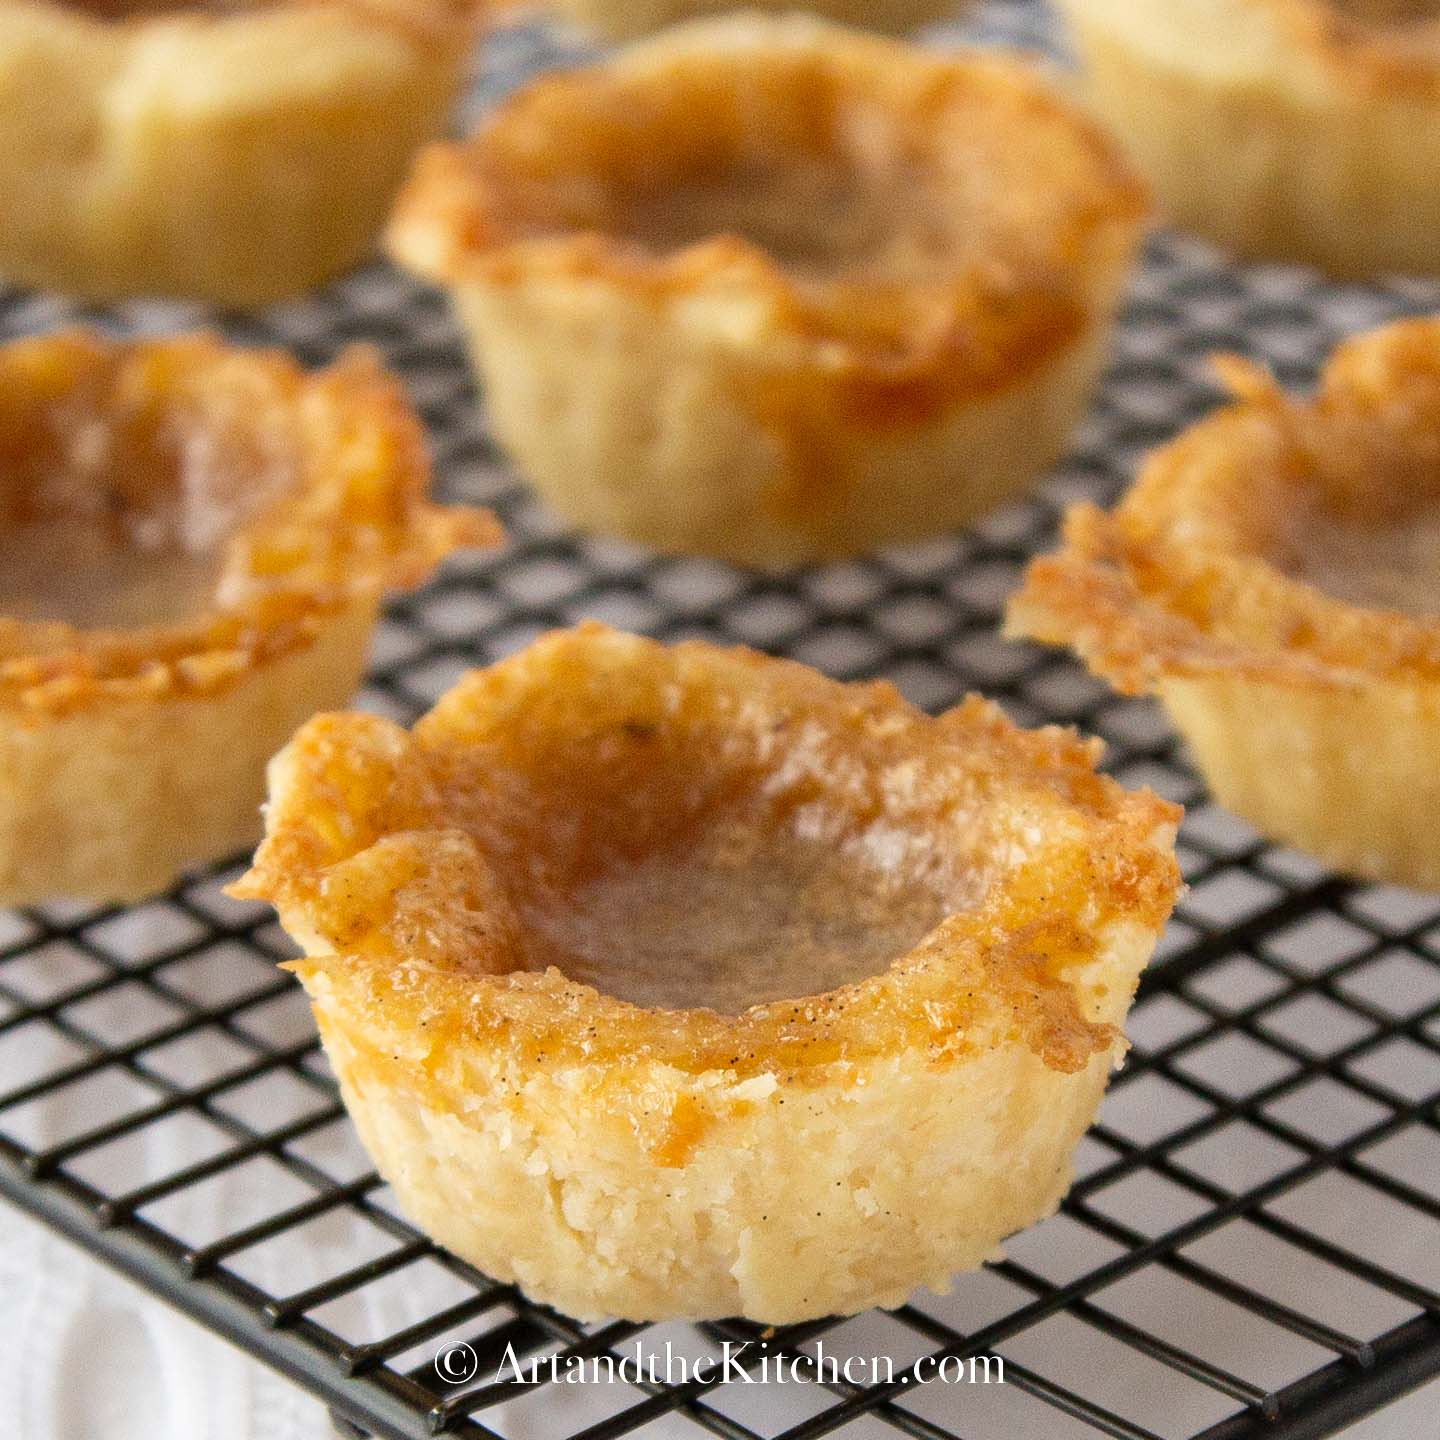
Enjoy more Sweet treat recipes
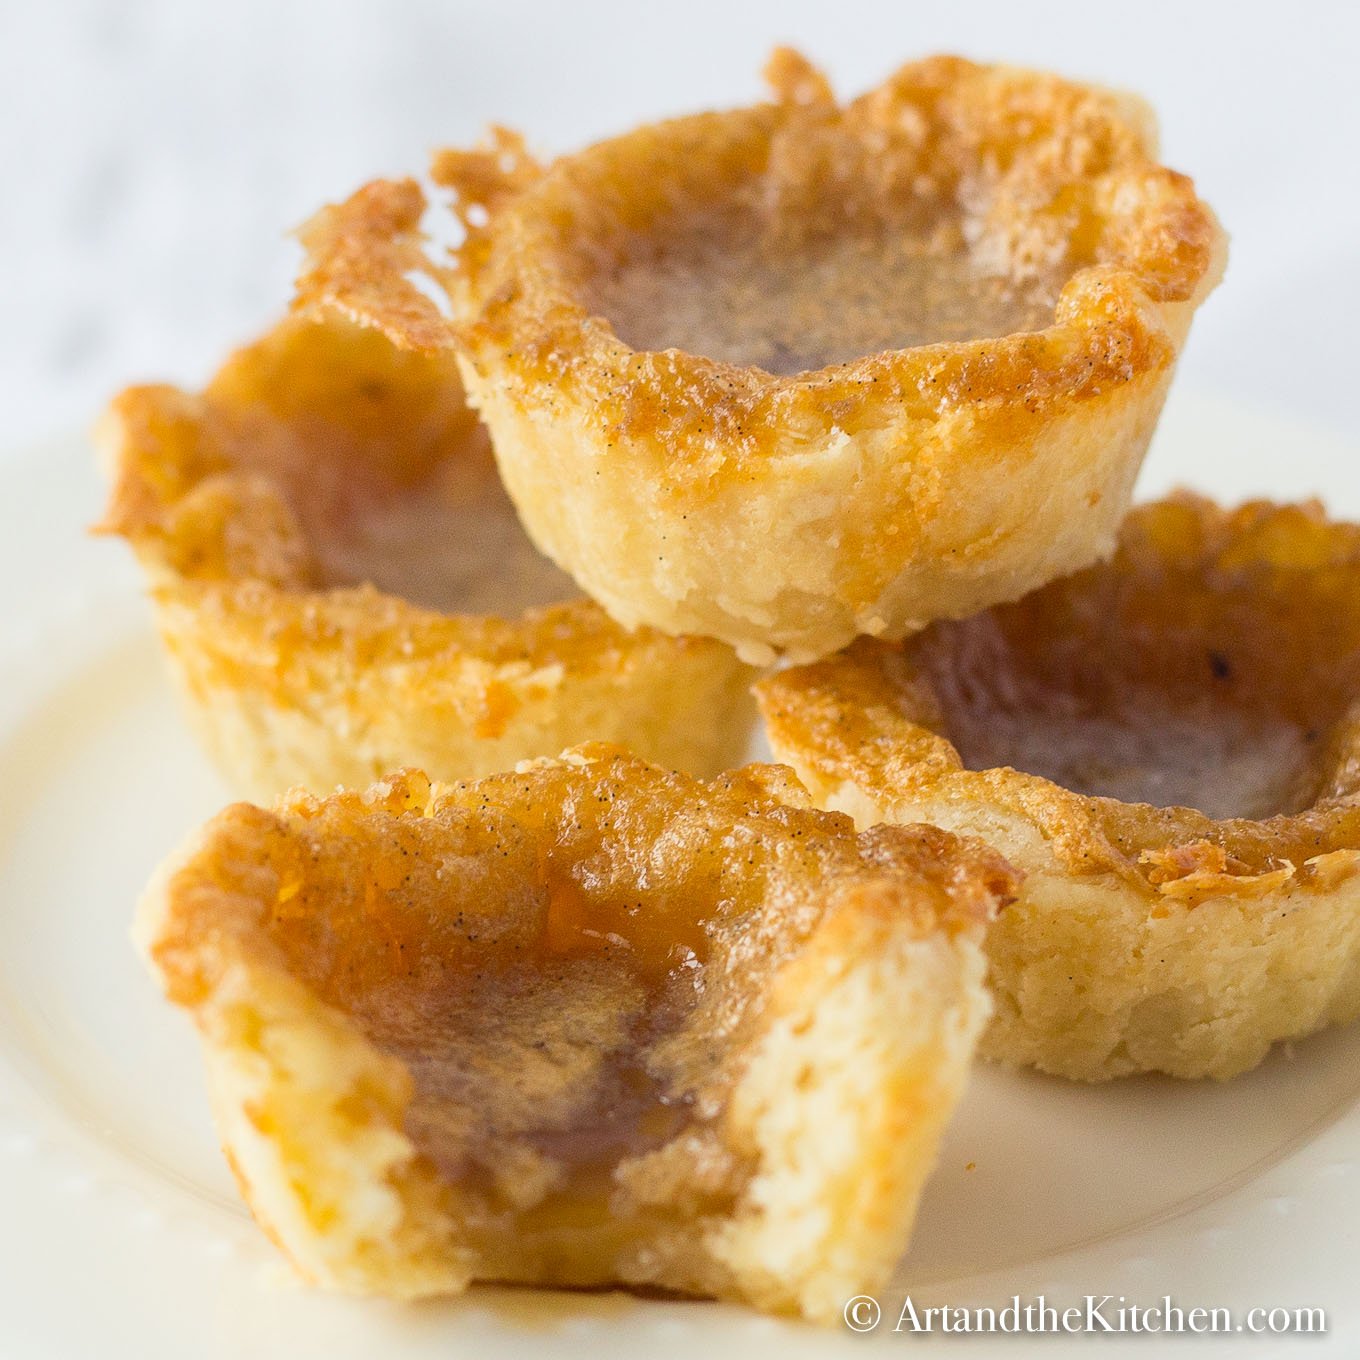

Old Fashioned Butter Tarts
The perfect butter tart recipe with sweet, slightly runny filling and flaky melt in your mouth pastry.
Servings: 16
Calories: 296kcal
Ingredients
Tart Pastry
- 2 ⅔ cups all purpose flour
- 1 tablespoon sugar
- 1 teaspoon salt
- 1 cup butter chilled and cut into pieces
- ¼-1/2 cup ice cold water
Butter Tart Filling
- ½ cup soft butter
- ½ cup brown sugar packed
- ½ cup corn syrup golden
- 2 eggs slightly beaten
- 1 teaspoon vanilla
- pinch of salt
Instructions
Butter Tart Pastry
- Sift flour, salt and sugar together.
- Using a pastry blender cut butter into flour mix until it resembles course meal.
- Add cold water a bit at a time until dough just starts to hold together. Adding too much water will make for a tough dough. Do not over-work the dough.
- Press dough together forming a disk.
- Wrap in plastic wrap and refrigerate for at least 30 minutes.
- Roll out the pastry dough to ¼ inch thickness. Cut into sixteen 4-inch circles or twelve 5-inch circles.
- Press the dough into muffin tins being careful not to stretch the dough.
- Refrigerate until the filling is prepared.
Butter Tart Filling
- In a large bowl, mix together butter, brown sugar and corn syrup. Stir until the butter is creamed and the sugar is dissolved.
- Add eggs, vanilla and pinch of salt. Mix well.
- Fill the tart shells about ⅔ full with the filling.
- Bake at 400º Fahrenheit for 15-20 minutes.
- The filling should be lightly browned and bubbling.
- Let the butter tarts cool in pan for about 10 minutes. Transfer to rack to cool completely.
Notes
Store bought pastry tart shells will work as well. Add raisins or pecans if you like.
Nutrition
Calories: 296kcal | Carbohydrates: 32g | Protein: 3g | Fat: 18g | Saturated Fat: 11g | Polyunsaturated Fat: 1g | Monounsaturated Fat: 5g | Trans Fat: 1g | Cholesterol: 66mg | Sodium: 299mg | Potassium: 45mg | Fiber: 1g | Sugar: 16g | Vitamin A: 562IU | Calcium: 19mg | Iron: 1mg